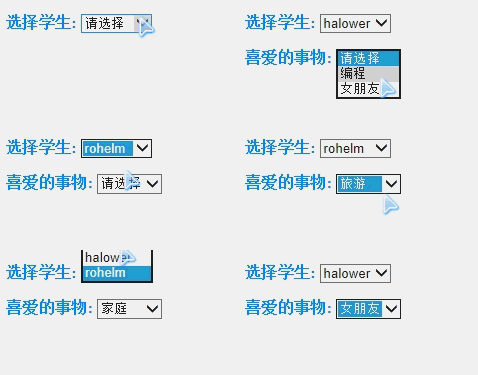
动态绑定下拉列表
在<select> data-bind的options选项如果绑定到ko.observableArray(),就可以动态新增选项效果,也就是可以利用其完成常见的级联效果的。
在这一篇文章中,我们用单页面完成无刷新的前台新增选项和使用MVC完成后台的动态添加2个例子。
范例一:
ViewModel 中声明一个selectOptions属性为一个ko.observableArray()对象,并将其设为<select>的 options下拉列表的数据源,再用两个<input>分別输入入Text及Value,输入內容点击新增按钮,此時就可看到下拉列表出現 新增的选项內容。
<html xmlns="http://www.w3.org/1999/xhtml">

    <head runat="server">
        <meta http-equiv="Content-Type" content="text/html; charset=utf-8" />
        <title>
            动态新增下拉列表选项
        </title>
        <script src="Scripts/jquery-2.0.3.js">
        </script>
        <script src="Scripts/knockout-2.3.0.js">
        </script>
        <script type="text/javascript">
            //创建一个View对象
            function ViewModel() {
                var self = this;
                //使用observableArray进行绑定可以动态变更option选项
                self.selectOptions = ko.observableArray([{
                    "text": "请选择",
                    "value": "0"
                }]);
                self.result = ko.observable("0"); //添加result监控属性,初始绑定值为0
            }

            $(function() {
                var vm = new ViewModel();
                ko.applyBindings(vm);
                $("#btnAddItem").click(function() {
                    vm.selectOptions.push({
                        "text": $("#txtOptText").val(),
                        "value": $("#txtOptValue").val()
                    });
                });
            });
        </script>
    </head>

    <body>
        <div style=" background-color:#0094ff; 180px; margin:100px auto auto auto;">
            <select style="background-color:ActiveCaption;100px" data-bind="options: selectOptions, optionsText: 'text', optionsValue: 'value', value: result">
            </select>
            Value=
            <span data-bind="    text: result">
            </span>
            <div>
                Text:
                <input id="txtOptText" value="选项1" />
            </div>
            <div>
                Value:
                <input id="txtOptValue" value="1" />
            </div>
            <input type="button" value="新增选项" id='btnAddItem' />
        </div>
    </body>

</html>

范例二:Mvc结合knockout.js完成级联下拉菜单
本例只是为了模拟,所以数据比较简陋,当然也可以从数据库中出数据来进行处理。
@ {
    Layout = null;
}

< !DOCTYPE html >

<html > <head > <meta name = "viewport"
content = "width=device-width" / ><title > Index < /title>
    <script src="~/Scripts / jquery - 2.0.3.js "></script>
    <script src="~ / Scripts / knockout - 2.3.0.debug.js "></script>

    </head>
    <body>
      <p>
        <b style="
color: #0094ff ">选择学生:</b> @Html.DropDownList("
Student ", ViewBag.Students  as SelectList, "请选择", new { onchange = "
searchLover();
" })
     </p>
      <p data-bind="
visible: selectOptions().length > 0 ">
      <b style="
color: #0094ff ">喜爱的事物:</b>
      <select data-bind="
options: selectOptions,
optionsText: 'Name',
optionsValue: 'Value',
optionsCaption: '请选择'">
      </select>
</p>
    </body>
    <script type="
text / javascript ">
        function ViewModel() {
            this.selectOptions = ko.observableArray([]);
        }
        var vm = new ViewModel();
        ko.applyBindings(vm);
        function searchLover() {
            var id= $("#Student ").val();
            $.getJSON(
                   "@Url.Action("GetLovers")",
                    { studentId: id},
                    function (data) {
                        vm.selectOptions(data);
            });
        }
</script>
</html>"
-------------------------------------Controller中的数据模拟代码
using System.Collections.Generic;
using System.Web.Mvc;

namespace KnockFunctionDemo.Controllers
{
    public class HomeController : Controller
    {
        public ViewResult Index()
        {
            ViewBag.Students = new SelectList(GetStudentList(),"Id","Name");
            return View();
        }
        private static List<Student> GetStudentList()
        {
            return new List<Student>
            {
                new Student{ Id=001, Name="halower"},
                 new Student{ Id=002, Name="rohelm"}
            };
        }
        public JsonResult GetLovers(int studentId)
        {
            var list = new List<Lover>();
            if (studentId == null)
                list= null;
            else if (studentId == 001)
            {
                list.Add(new Lover { Name = "编程", Value = "program" });
                list.Add(new Lover { Name = "女朋友", Value = "GF" });
            }
            else
            {
                list.Add(new Lover { Name = "旅游", Value = "travel" });
                list.Add(new Lover { Name = "家庭", Value = "family" });
            }
            return  Json(list, JsonRequestBehavior.AllowGet);
        }

    }


    public class Student
    {
        public int Id { get; set; }
        public string Name { get; set; }
    }

    public class Lover
    {
        public string Value { get; set; }
        public string Name { get; set; }
    }
}
