QT中使用线程可以提高工作效率。
要使用线程要经过一下四个步骤:
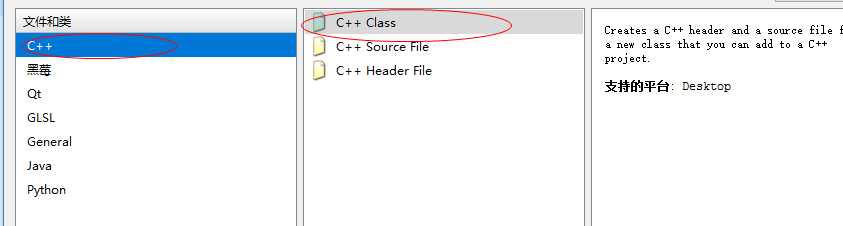
(1)先创建一个c++ class文件,记得继承Thread,创建步骤如下:
a、第一步
b、第二步


(2)自定义一个run函数,以后启动线程的时候,程序就会跳转到run函数中
void run();
(3)初始化线程
HDThread mythread = new HDThread();
(4)启动线程
mythread->start();
下面来看看线程使用的具体列子:
线程头文件hdthread.h:
 1 #ifndef HDTHREAD_H
 2 #define HDTHREAD_H
 3 #include <QThread>
 4 #include <QLabel>
 5 #include <QMutex>
 6
 7 class HDTHread : public QThread
 8 {
 9 public:
10     HDTHread(QMutex* mtex,QObject *parent = 0);
11     void run();//自定义的run函数
12     void setLabel(QLabel *lb);
13 private:
14     QLabel *label;
15     QMutex *mutex; //互斥锁
16 };
17
18 #endif // HDTHREAD_H
主函数的头文件threadqt.h
 1 #ifndef THREADQT_H
 2 #define THREADQT_H
 3
 4 #include <QMainWindow>
 5 #include <hdthread.h>
 6 #include <writefile.h>
 7 #include <QMutex>
 8 #include <QSemaphore>
 9
10 namespace Ui {
11 class ThreadQt;
12 }
13
14 class ThreadQt : public QMainWindow
15 {
16     Q_OBJECT
17
18 public:
19     explicit ThreadQt(QWidget *parent = 0);
20     ~ThreadQt();
21
22      //定义静态的信号类
23     static QSemaphore *sp_A;
24     static QSemaphore *sp_B;
25 private slots:
26     void on_pushButton_clicked();
27
28 private:
29     Ui::ThreadQt *ui;
30
31     HDTHread *thread; //hdtread类,里面继承了线程
32     WriteFile *writethread;
33     QMutex mutex;//定义互斥锁类
34
35 };
36
37 #endif // THREADQT_H
源文件hdthread.cpp:
#include "hdthread.h"
#include <QDebug>
#include <threadqt.h>
HDTHread::HDTHread(QMutex *mtex, QObject *parent):QThread(parent)//构造函数,用来初始化
{
    this->mutex = mtex;
}
void HDTHread::setLabel(QLabel *lb)
{
    this->label = lb;
}

void HDTHread::run() //启动线程时执行的函数
{
    while(true)
    {

        qint64 data = qrand()%1000; //取随机数
        //this->mutex->lock();//上锁
        ThreadQt::sp_A->acquire();//请求信号
        this->label->setText(QString::number(data));
         sleep(1);
        ThreadQt::sp_B->release();//释放信号
        //this->mutex->unlock();//解锁

        qDebug()<<"hello Qt"<<data;
    }
}
源文件threadqt.cpp
#include "threadqt.h"
#include "ui_threadqt.h"

//初始化静态变量
 QSemaphore *ThreadQt::sp_A = NULL;
 QSemaphore *ThreadQt::sp_B = NULL;

ThreadQt::ThreadQt(QWidget *parent) :
    QMainWindow(parent),
    ui(new Ui::ThreadQt)
{
    ui->setupUi(this);
    //创建信号对象
    sp_A = new QSemaphore(1);
    sp_B = new QSemaphore(0);

}

ThreadQt::~ThreadQt()
{
    delete ui;
}

void ThreadQt::on_pushButton_clicked()
{
    thread = new HDTHread(&mutex); //初始化线程
    thread->setLabel(ui->label);
    thread->start();//开启线程

    writethread = new WriteFile(&mutex);
    writethread->setLabel(ui->label);
    writethread->start();
}
大家也看到了,此处的线程也用到了互斥锁(信号量)保证线程读写数据时不出现错误,这里大家可以看一下具体实现的代码
this->mutex->lock();//上锁
ThreadQt::sp_A->acquire();//请求信号
this->label->setText(QString::number(data));
sleep(1);
ThreadQt::sp_B->release();//释放信号
this->mutex->unlock();//解锁