一. etcd服务的安装和使用
1.安装etcd应用:
wget https://github.com/coreos/etcd/releases/download/v2.2.5/etcd-v2.2.5-linux-amd64.tar.gz -O etcd-v2.2.5-linux-amd64.tar.gz
tar -zxvf etcd-v2.2.5-linux-amd64.tar.g
cp etcd etcdctl /usr/local/bin/
2.启动etcd服务:
mkdir -p /data/etcd    #创建数据存储目录
nohup etcd -name auto_scale --data-dir /data/etcd/
     --listen-peer-urls 'http://172.16.1.211:2380,http://172.16.1.211:7001'
     --listen-client-urls 'http://172.16.1.211:2379,http://172.16.1.211:4001'
     --advertise-client-urls 'http://172.16.1.211:2379,http://172.16.1.211:4001' &
3.提交key到etcd中:
curl -s http://172.16.1.211:2379/v2/keys/message -XPUT -d value="hello world" | python -m json.tool #结果通过python的json模块转义输出,增加可读性。
4.获取刚才提交的key值:
curl -s http://172.16.1.211:2379/v2/keys/message | python -m json.tool
5.删除刚才提交的key:
curl -s http://172.16.1.211:2379/v2/keys/message -XDELETE | python -m json.tool
6.提交带10秒过期时间的key:
curl -s http://172.16.1.211:2379/v2/keys/ttl_use -XPUT -d value="hello world 1" -d ttl=10 | python -m json.tool
二. 实现Salt自动化让Haproxy扩容
1.配置salt的pillar连接etcd:
yum install python-pip
pip install python-etcd #安装python的etcd包
vim /etc/salt/master
#底部添加
etcd_pillar_config:
  etcd.host: 172.16.1.211
  etcd.port: 4001

ext_pillar:
  - etcd: etcd_pillar_config root=/salt/haproxy/   #root参数是指定etcd里面的目录
2.测试通过salt获取pillar:
curl -s http://172.16.1.211:2379/v2/keys/salt/haproxy/backend_www_wmj_com/web-node1 -XPUT -d value="172.16.1.213:8080" | python -m json.tool

salt '*' pillar.item
3.让salt模板自动添加haproxy的backend:
vim /srv/salt/prod/cluster/files/haproxy-outside.cfg

#server web-node1  172.16.1.213:8080 check inter 2000 rise 30 fall 15
#使用for循环获取etcd的key值
{% for web,web_ip in pillar.backend_www_wmj_com.iteritems() %} server {{ web }} {{ web_ip }} check inter 2000 rise 30 fall 15 {% endfor %}
4.添加一台haproxy的节点:
curl -s http://172.16.1.211:2379/v2/keys/salt/haproxy/backend_www_wmj_com/web-node3 -XPUT -d value="172.16.1.215:8080" | python -m json.tool
salt '*' state.sls cluster.haproxy-outside env=prod
5.简单的自动化扩容脚本:
#!/bin/bash
create_host(){
        echo "create host"
}
deploy_service(){
        salt '*' state.sls nginx.install env=prod
}
deploy_code(){
        echo "deploy code ok"
}
service_check(){
        STATUS=$(curl -s --head http://172.16.1.213:8080/ | grep '200 OK')
        if [ -n "$STATUS" ];then
                echo "HTTP ok"
        else
                echo "HTTP not ok"
                exit 1
        fi
}
etcd_key(){
        curl -s http://172.16.1.211:2379/v2/keys/salt/haproxy/backend_www_wmj_com/web-node4 -XPUT -d value="172.16.1.213:8080"
}
sync_state(){
        salt '*' state.sls cluster.haproxy-outside env=prod
}
main(){
        create_host
       deploy_service
        deploy_code
        service_check
        etcd_key
        sync_state
}
main
############################################################################################
|
1
2
3
|
[root@node1 src]# tar xf etcd-v3.2.9-linux-amd64.tar.gzcd etcd-v3.2.9-linux-amd64cp etcd etcdctl /usr/local/bin/ |
然后开启etcd集群:
1、首先创建数据目录:mkdir /data/etcd -p
2、开启服务:
|
1
|
nohup etcd --name auto_scale --data-dir /data/etcd/ --listen-peer-urls http://192.168.44.134:2380,http://192.168.44.134:7001 --listen-client-urls http://192.168.44.134:2379,http://192.168.44.134:4001 --advertise-client-urls http://192.168.44.134:2379,http://192.168.44.134:4001 & |
|
1
2
3
4
5
|
[root@node1 ~]# netstat -tunlp|grep etcdtcp 0 0 192.168.44.134:2379 0.0.0.0:* LISTEN 52094/etcd tcp 0 0 192.168.44.134:2380 0.0.0.0:* LISTEN 52094/etcd tcp 0 0 192.168.44.134:7001 0.0.0.0:* LISTEN 52094/etcd tcp 0 0 192.168.44.134:4001 0.0.0.0:* LISTEN 52094/etcd |
1、创建一个key/value
|
1
|
[root@node1 ~]# curl -s http://192.168.44.134:2379/v2/keys/key1 -XPUT -d value="Hello world" |
2、获取创建的key/value
|
1
|
[root@node1 ~]# curl -s http://192.168.44.134:2379/v2/keys/salt/haproxy/backend_www/www1 |
3、删除创建的key/value
|
1
|
[root@node1 ~]# curl -s http://192.168.44.134:2379/v2/keys/key1 -XDELETE |
或者将上面的输出结果以json格式输出:
|
1
2
3
4
5
6
7
8
9
10
|
[root@node1 ~]# curl -s http://192.168.44.134:2379/v2/keys/salt/haproxy/backend_www/www1|python -m json.tool{ "action": "get", "node": { "createdIndex": 9, "key": "/salt/haproxy/backend_www/www1", "modifiedIndex": 9, "value": "192.168.44.134:8080" }} |
将etcd配置在saltstack中,结合使用:
1、首先需要安装依赖包:
|
1
2
3
4
5
6
7
|
####config etcd my_etcd_config: etcd.host: 192.168.44.134 etcd.port: 4001ext_pillar: - etcd: my_etcd_config root=/salt/haproxy |
3、重启master
|
1
|
[root@node1 ~]# /etc/init.d/salt-master restart |
|
1
2
3
4
5
6
7
8
9
10
11
12
13
|
[root@node1 ~]# salt '*' pillar.itemsnode2: ---------- backend_www: ---------- zabbix-agent: ---------- Zabbix_Server: 192.168.44.134 zabbix-agent-host: ---------- zabbix_host: node2 |
现在通过添加etcd的key来增加haproxy后端的节点服务器:
|
1
|
curl -s http://192.168.44.134:2379/v2/keys/salt/haproxy/backend_www/www1 -XPUT -d value="192.168.44.134:8081"|python -m json.tool |
2、查看pillar
|
1
2
3
4
5
6
7
|
[root@node1 ~]# salt '*' pillar.itemsnode1: ---------- backend_www: ---------- www1: 192.168.44.134:8081 |
3、修改haproxy配置文件:vim /srv/salt/prod/cluster/files/haproxy-outside.cfg
|
1
2
3
|
{% for www,www_ip in pillar.backend_www.iteritems() %}server {{ www }} {{ www_ip }} check inter 1000{% endfor %} |
4、修改haproxy状态配置文件:vim /srv/salt/prod/cluster/haproxy-outside.sls
|
1
2
3
4
5
6
7
8
|
haproxy-service: file.managed: - name: /etc/haproxy/haproxy.cfg - source: salt://cluster/files/haproxy-outside.cfg - user: root - group: root - mode: 644 - template: jinja 新增一行,使用jinja模板,使用变量 |
测试并验证:

|
1
2
3
4
5
6
7
8
9
10
11
12
13
14
15
16
17
18
19
20
|
[root@node1 ~]# curl -s http://192.168.44.134:2379/v2/keys/salt/haproxy/backend_www/www2 -XPUT -d value="192.168.44.134:8080"|python -m json.tool { "action": "set", "node": { "createdIndex": 14, "key": "/salt/haproxy/backend_www/www2", "modifiedIndex": 14, "value": "192.168.44.134:8080" }}[root@node1 ~]# curl -s http://192.168.44.134:2379/v2/keys/salt/haproxy/backend_www/www3 -XPUT -d value="192.168.44.135:8080"|python -m json.tool { "action": "set", "node": { "createdIndex": 15, "key": "/salt/haproxy/backend_www/www3", "modifiedIndex": 15, "value": "192.168.44.135:8080" }} |
查看设置的pillar:
|
1
2
3
4
5
6
7
8
9
10
11
|
[root@node1 ~]# salt '*' pillar.itemsnode2: ---------- backend_www: ---------- www1: 192.168.44.134:8081 www2: 192.168.44.134:8080 www3: 192.168.44.135:8080 |
执行salt状态配置文件:

自动化运维-基于etcd加saltstack的自动化扩容
# tar -xf etcd-v2.2.1-linux-amd64.tar.gz
# cd etcd-v2.2.1-linux-amd64
# cp etcd etcdctl /usr/local/bin/
查看版本
# etcd --version
创建数据目录
# mkdir -p /data/etcd
后台运行进程
# nohup etcd --name auto_scale --data-dir /data/etcd/ --listen-peer-urls 'http://192.168.3.12:2380,http://192.168.3.12:7001' --listen-client-urls 'http://192.168.3.12:2379,http://192.168.3.12:4001' --advertise-client-urls 'http://192.168.3.12:2379,http://192.168.3.12:4001' &
创建key和value
# curl -s http://192.168.3.12:2379/v2/keys/message -XPUT -d value="hello world" | python -m json.tool
结果
{
"action": "set",
"node": {
"createdIndex": 5,
"key": "/message",
"modifiedIndex": 5,
"value": "hello world"
}
}
查看key和value
# curl -s http://192.168.3.12:2379/v2/keys/message | python -m json.tool
结果
{
"action": "get",
"node": {
"createdIndex": 5,
"key": "/message",
"modifiedIndex": 5,
"value": "hello world"
}
}
删除key,可以看到查不到了
# curl -s http://192.168.3.12:2379/v2/keys/message -XDELETE | python -m json.tool
结果
{
"action": "delete",
"node": {
"createdIndex": 5,
"key": "/message",
"modifiedIndex": 6
},
"prevNode": {
"createdIndex": 5,
"key": "/message",
"modifiedIndex": 5,
"value": "hello world"
}
}
查看删除
# curl -s http://192.168.3.12:2379/v2/keys/message | python -m json.tool
结果
{
"cause": "/message",
"errorCode": 100,
"index": 6,
"message": "Key not found"
}
建一个只存在25秒的键值,25秒后发现该键值查不到了
# curl -s http://192.168.3.12:2379/v2/keys/ttl_use -XPUT -d value='hello world 1' -d ttl=25 | python -m json.tool
结果
{
"action": "set",
"node": {
"createdIndex": 9,
"expiration": "2017-04-18T03:04:54.538607442Z",
"key": "/ttl_use",
"modifiedIndex": 9,
"ttl": 25,
"value": "hello world 1"
}
}
查看
# curl -s http://192.168.3.12:2379/v2/keys/ttl_use | python -m json.tool
结果
{
"action": "get",
"node": {
"createdIndex": 9,
"expiration": "2017-04-18T03:04:54.538607442Z",
"key": "/ttl_use",
"modifiedIndex": 9,
"ttl": 24,
"value": "hello world 1"
}
编辑salt,修改etcd相关配置
# vim /etc/salt/master
etcd_pillar_config:
etcd.host: 192.168.3.12
etcd.port: 4001

ext_pillar:
- etcd: etcd_pillar_config root=/salt/haproxy/
重启服务
# /etc/init.d/salt-master restart
测试
curl -s http://192.168.3.12:2379/v2/keys/salt/haproxy/backend_www_chinasoft_com/web-node1 -XPUT -d value="192.168.3.12:8080" | python -m json.tool
结果
{
"action": "set",
"node": {
"createdIndex": 11,
"key": "/salt/haproxy/backend_www_chinasoft_com/web-node1",
"modifiedIndex": 11,
"value": "192.168.3.12:8080"
}
安装etcd
# yum install -y python-pip
# pip search python-etcd
# pip install python-etcd
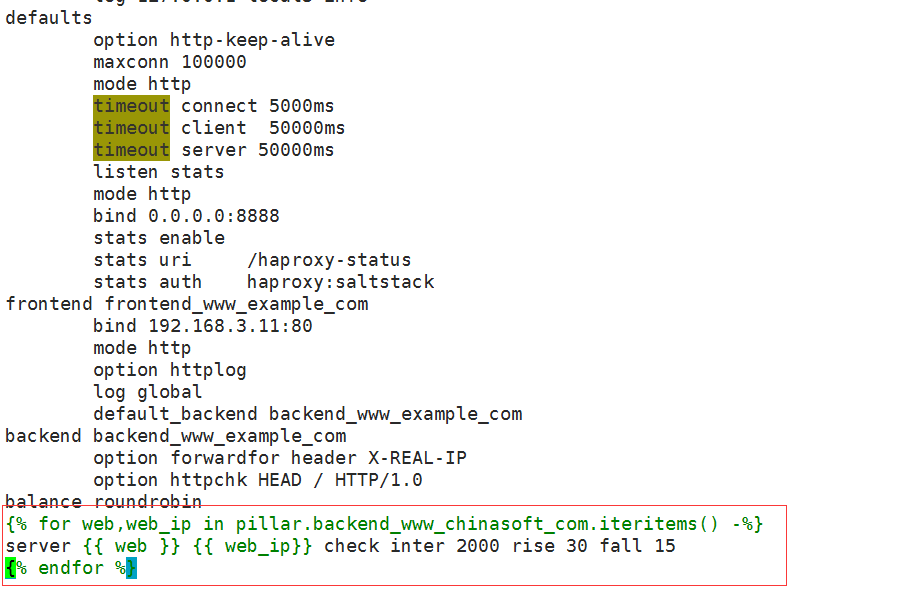
1)编写haproxy的配置文件
vim /srv/salt/prod/cluster/files/haproxy-outside.cfg

 balance roundrobin
 {% for web,web_ip in pillar.backend_www_chinasoft_com.iteritems() -%}
 server {{ web }} {{ web_ip}} check inter 2000 rise 30 fall 15
 {% endfor %}
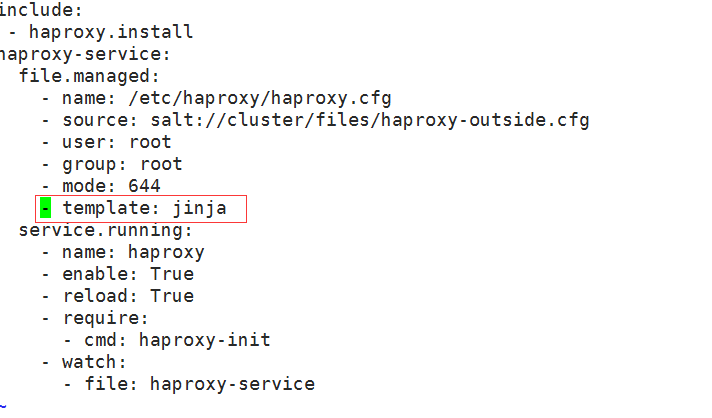
2)编写sls文件
vim /srv/salt/prod/cluster/haproxy-outside.sls

include:
- haproxy.install
haproxy-service:
file.managed:
- name: /etc/haproxy/haproxy.cfg
- source: salt://cluster/files/haproxy-outside.cfg
- user: root
- group: root
- mode: 644
- template: jinja # 添加了jinja这一行
service.running:
- name: haproxy
- enable: True
- reload: True
- require:
- cmd: haproxy-init
- watch:
- file: haproxy-service
执行以下高级状态,如果报错jinja has no attibute backend_www_chinasoft_com重启一下master即可
# salt '*' state.highstate
此时向haproxy添加backend主机
curl -s http://192.168.3.12:2379/v2/keys/salt/haproxy/backend_www_chinasoft_com/web-node2 -XPUT -d value="192.168.3.12:8080" | python -m json.tool
curl -s http://192.168.3.12:2379/v2/keys/salt/haproxy/backend_www_chinasoft_com/web-node3 -XPUT -d value="192.168.3.12:8080" | python -m json.tool
curl -s http://192.168.3.12:2379/v2/keys/salt/haproxy/backend_www_chinasoft_com/web-node4 -XPUT -d value="192.168.3.12:8080" | python -m json.tool
执行变更
# salt '*' state.highstate
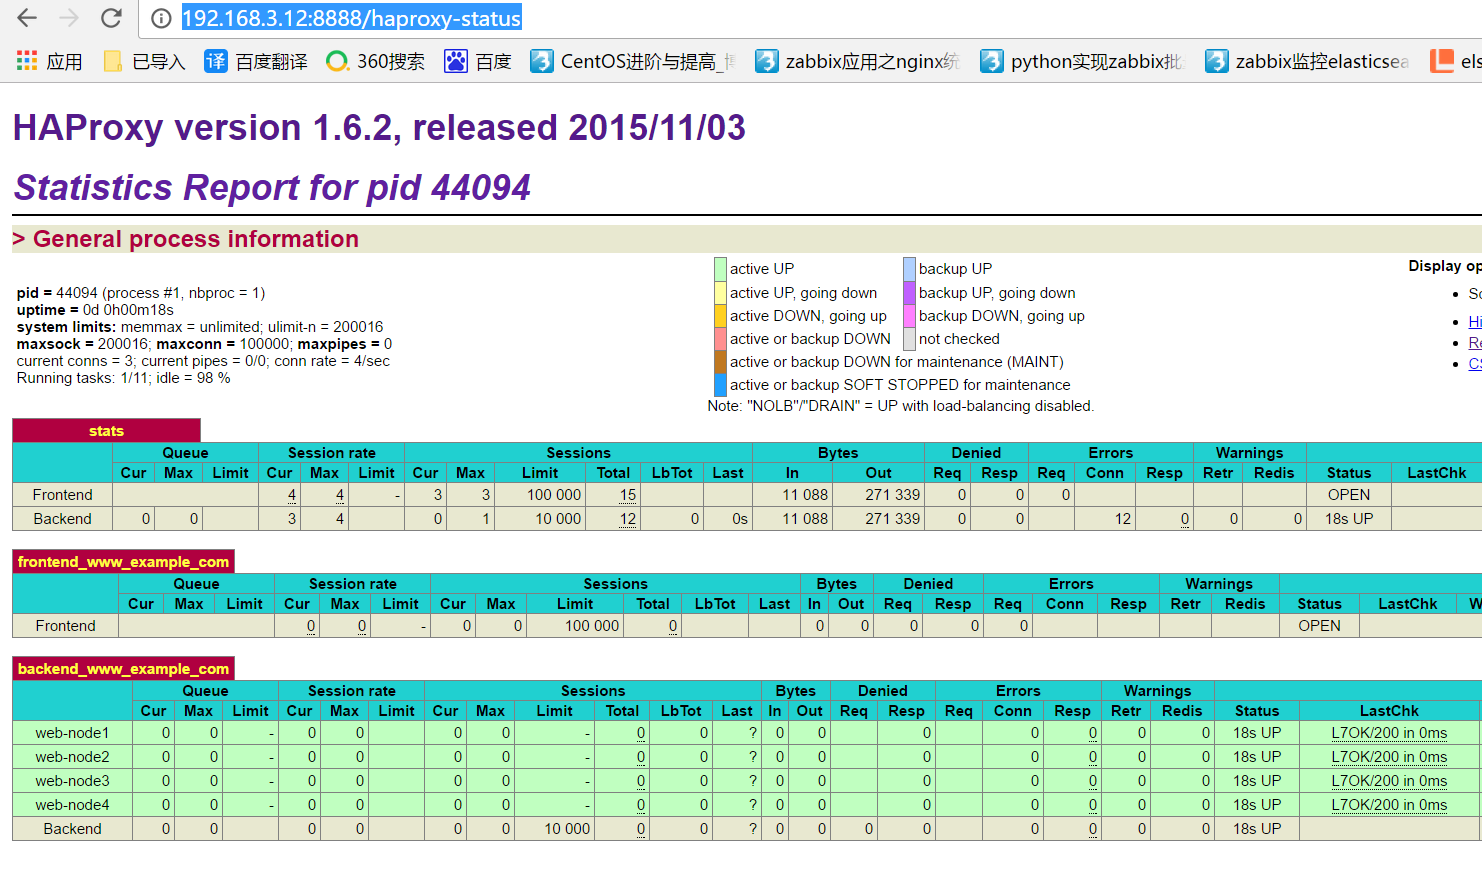
通过访问haproxy的管理界面可以看到成功添加 http://192.168.3.12:8888/haproxy-status
可以看到pillar的选项,如果不能看到需要修改/etc/salt/master (pillar_opts: False)
# salt '*' pillar.items
结果
node2.chinasoft.com:
----------
backend_www_chinasoft_com:
----------
web-node1:
192.168.3.12:8080
web-node2:
192.168.3.12:8080
web-node3:
192.168.3.12:8080
web-node4:
192.168.3.12:8080
zabbix-agent:
----------
Zabbix_Server:
192.168.3.13
mini1:
----------
backend_www_chinasoft_com:
----------
web-node1:
192.168.3.12:8080
web-node2:
192.168.3.12:8080
web-node3:
192.168.3.12:8080
web-node4:
192.168.3.12:8080
zabbix-agent:
----------
Zabbix_Server:
192.168.3.13
编写脚本实现自动添加haproxy后端服务器
# vim auto_add_haproxynode.sh

#!/bin/bash

MAIN_ADD_HOST=$1
create_host(){
echo 'create host ok'
}

deploy_service(){
ADD_HOST_PORT='8080'
}

deploy_code(){
echo 'deploy code ok'
}

service_check(){
STATUS=$(curl -s --head http://"$ADD_HOST":"$ADD_HOST_PORT"/ |grep "200 OK")
if [ -n "$STATUS" ];then
echo 'status check ok'
else
echo 'status check not ok'
exit
fi
}

etcd_key(){
ADD_HOST=$1
curl http://192.168.3.12:2379/v2/keys/salt/haproxy/backend_www_chinasoft_com/$ADD_HOST -XPUT -d value="192.168.3.19:${ADD_HOST_PORT}"
}

sync_state(){
salt '*' state.sls cluster.haproxy-outside env=prod
}

main(){
create_host;
deploy_service;
deploy_code;
etcd_key $MAIN_ADD_HOST;
sync_state;
}

main $1
执行脚本,可以看到成功添加
# ./auto_add_haproxynode.sh web-node18