今天主要看了Show Planet Axis、Show Position 、Show Cross Hairs功能,主要是它们在菜单调用方式上都是很类似。代码如下:
private void menuItemShowPosition_Click(object sender, System.EventArgs e)
{
World.Settings.ShowPosition = !World.Settings.ShowPosition;
this.toolBarButtonPosition.Pushed = World.Settings.ShowPosition;
this.menuItemShowPosition.Checked = World.Settings.ShowPosition;
this.worldWindow.Invalidate();
}
private void menuItemShowCrosshairs_Click(object sender, System.EventArgs e)
{
//控制中心十字标显示与否
World.Settings.ShowCrosshairs = !World.Settings.ShowCrosshairs;
this.menuItemShowCrosshairs.Checked = World.Settings.ShowCrosshairs;
this.worldWindow.Invalidate();
}
从上面的代码看,我们只能惊叹代码封装的很好,同样都调用this.worldWindow.Invalidate();难道Invalidate()函数万能?!请参考我的Invalidate()方法学习(资料收集),原来该方法是界面区域失效,发送了重绘事件,将会调用WorldWindow.cs中重载了的OnPaint()。OnPaint方法里主要是调用了 Render()方法。所以我们的关键是看Render()中如何实现上面三个功能。(其实Render()中实现的功能很多,主要是控制界面绘制方面的,以后还会提到它的)
Render()实现上面三个功能也大量使用了DirectX和Direct 3D方面的知识,请网上搜索学习相关知识或参看我的Direct3D学习(资料收集)。
显示中心十字线功能
Render()中实现代码为
787行 if (World.Settings.ShowCrosshairs)
this.DrawCrossHairs();
 实现显示十字标代码

protected void DrawCrossHairs()
{
int crossHairSize = 10;
if(this.crossHairs == null)
{
crossHairs = new Line(m_Device3d);//构造线对象
}
Vector2[] vertical = new Vector2[2];
Vector2[] horizontal = new Vector2[2];
// Vector2[] test = new Vector2[2];//这是我试验添加的,效果请看下面的截图
horizontal[0].X = this.Width / 2 - crossHairSize;
horizontal[0].Y = this.Height / 2;
horizontal[1].X = this.Width / 2 + crossHairSize;
horizontal[1].Y = this.Height / 2;
vertical[0].X = this.Width / 2;
vertical[0].Y = this.Height / 2 - crossHairSize;
vertical[1].X = this.Width / 2;
vertical[1].Y = this.Height / 2 + crossHairSize;
// test[0].X = this.Width / 2;
// test[0].Y = this.Height / 2 + crossHairSize;
//test[1].X = this.Width / 2 + crossHairSize;
//test[1].Y = this.Height / 2;
crossHairs.Begin();
crossHairs.Draw(horizontal, crossHairColor);
crossHairs.Draw(vertical, crossHairColor);
// crossHairs.Draw(test,Color.Red.ToArgb());
crossHairs.End();
}
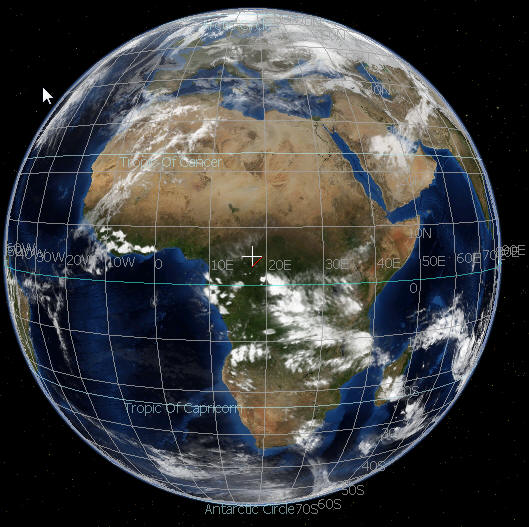
上面注销部分(我加了红线)是我试验添加的,效果请看上面的截图。其实就是划几条两点之间的线。
显示位置信息
是在Render()中调用RenderPositionInfo()方法的,请看该段实现代码。
实现显示位置坐标信息
private const int positionAlphaStep = 20;
private int positionAlpha = 255;
private int positionAlphaMin = 40;
private int positionAlphaMax = 205;
protected void RenderPositionInfo()
{
// Render some Development information to screen
string captionText = _caption;
captionText += "\n" + this.drawArgs.UpperLeftCornerText;
if(World.Settings.ShowPosition)
{
string alt = null;
double agl = this.drawArgs.WorldCamera.AltitudeAboveTerrain;
/*if(agl>100000)
alt = string.Format("{0:f2}km", agl/1000);
else
alt = string.Format("{0:f0}m", agl);*/
alt = ConvertUnits.GetDisplayString(agl);
string dist = null;
double dgl = this.drawArgs.WorldCamera.Distance;
/*if(dgl>100000)
dist = string.Format("{0:f2}km", dgl/1000);
else
dist = string.Format("{0:f0}m", dgl);*/
dist = ConvertUnits.GetDisplayString(dgl);
// Heading from 0 - 360
double heading = this.drawArgs.WorldCamera.Heading.Degrees;
if(heading<0)
heading+=360;
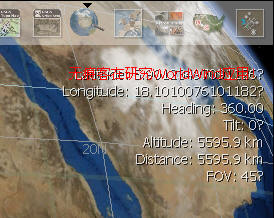
//构造显示位置坐标信息字符串
captionText += String.Format("Latitude: {0}\nLongitude: {1}\nHeading: {2:f2}\nTilt: {3}\nAltitude: {4}\nDistance: {5}\nFOV: {6}",
this.drawArgs.WorldCamera.Latitude,
this.drawArgs.WorldCamera.Longitude,
heading,
this.drawArgs.WorldCamera.Tilt,
alt,
dist,
this.drawArgs.WorldCamera.Fov );
if(agl < 300000)
{
captionText += String.Format("\nTerrain Elevation: {0:n} meters\n", this.drawArgs.WorldCamera.TerrainElevation);
}
}
if(this.showDiagnosticInfo)
captionText +=
"\nAvailable Texture Memory: " + (m_Device3d.AvailableTextureMemory/1024).ToString("N0") + " kB"+
"\nBoundary Points: " + this.drawArgs.numBoundaryPointsRendered.ToString() + " / " + this.drawArgs.numBoundaryPointsTotal.ToString() + " : " + this.drawArgs.numBoundariesDrawn.ToString() +
"\nTiles Drawn: " + (this.drawArgs.numberTilesDrawn * 0.25f).ToString() +
"\n" + this.drawArgs.WorldCamera +
"\nFPS: " + this.fps.ToString("f1") +
"\nRO: " + m_World.RenderableObjects.Count.ToString("f0") +
"\nmLat: " + this.cLat.Degrees.ToString() +
"\nmLon: " + this.cLon.Degrees.ToString() +
"\n" + TimeKeeper.CurrentTimeUtc.ToLocalTime().ToLongTimeString();
captionText = captionText.Trim();
//定义要画出文本的样式
DrawTextFormat dtf = DrawTextFormat.NoClip | DrawTextFormat.WordBreak | DrawTextFormat.Right;
int x = 7;
int y = _menuBar!=null && World.Settings.ShowToolbar ? 65 : 7;
//定义盛放位置文本的矩形框
Rectangle textRect = Rectangle.FromLTRB(x,y, this.Width-8, this.Height-8 );
//我添加的测试用代码
Rectangle testRect = Rectangle.FromLTRB(x, y, this.Width, this.Height);
// Hide position info when toolbar is open
if (_menuBar.IsActive) //如果上面的_menuBar处于活动状态,则更改位置文本的Alpha值
{
positionAlpha -= positionAlphaStep;
if (positionAlpha<positionAlphaMin)
{
positionAlpha=positionAlphaMin;
}
}
else
{
positionAlpha += positionAlphaStep;
if(positionAlpha>positionAlphaMax)
positionAlpha = positionAlphaMax;
}
int positionBackColor = positionAlpha << 24;
int positionForeColor = (int)((uint)(positionAlpha << 24) + 0xffffffu);
使用Font对象defaultDrawingFont的DrawText()实现绘制位置信息
this.drawArgs.defaultDrawingFont.DrawText( null, captionText, textRect, dtf, positionBackColor);
textRect.Offset(-1,-1);
this.drawArgs.defaultDrawingFont.DrawText( null, captionText, textRect, dtf, positionForeColor);
//下面这行是我添加的,测试用
this.drawArgs.defaultDrawingFont.DrawText(null, "无痕客在研究WorldWind应用!", textRect, dtf,Color.Red.ToArgb());
}

上面需要注意的知识点就是:使用Font对象(实例:defaultDrawingFont)的DrawText()实现绘制文本信息。
地球轴线绘制
this.DrawAxis(drawArgs);
画地球轴线
private void DrawAxis(DrawArgs drawArgs)
{
CustomVertex.PositionColored[] axis = new CustomVertex.PositionColored[2];
Vector3 topV = MathEngine.SphericalToCartesian(90, 0, this.EquatorialRadius + 0.15f *
this.EquatorialRadius);
axis[0].X = topV.X;
axis[0].Y = topV.Y;
axis[0].Z = topV.Z;
axis[0].Color = System.Drawing.Color.Pink.ToArgb();
Vector3 botV = MathEngine.SphericalToCartesian(-90, 0, this.EquatorialRadius + 0.15f *
this.EquatorialRadius);
axis[1].X = botV.X;
axis[1].Y = botV.Y;
axis[1].Z = botV.Z;
axis[1].Color = System.Drawing.Color.Pink.ToArgb();
drawArgs.device.VertexFormat = CustomVertex.PositionColored.Format;
drawArgs.device.TextureState[0].ColorOperation = TextureOperation.Disable;
drawArgs.device.Transform.World = Matrix.Translation(
(float)-drawArgs.WorldCamera.ReferenceCenter.X,
(float)-drawArgs.WorldCamera.ReferenceCenter.Y,
(float)-drawArgs.WorldCamera.ReferenceCenter.Z
);
drawArgs.device.DrawUserPrimitives(PrimitiveType.LineStrip, 1, axis);
drawArgs.device.Transform.World = drawArgs.WorldCamera.WorldMatrix;
}
其他部分:
WorldWind学习系列三:简单功能分析——主窗体的键盘监听处理及拷贝和粘贴位置坐标功能
WorldWind学习系列三:功能分析——截屏功能和“关于”窗体分析