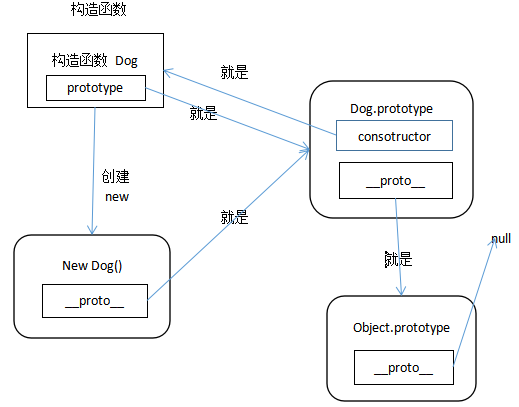
1. 对象属性及方法
- 创建对象的方式
<script>
    //创建对象的方式一
    var obj = {};
    //创建对象的方式一
    var obj = new Object();
</script>
- 挂载在对象上的变量叫对象的属性;挂载在对象上的函数叫对象的方法
    obj.name = "David";
    obj.say = function () {
        alert(this.name)
    }
    obj.say();
2. 创建对象的发展
- 普通创建模式
    var obj1 = new Object();
    obj1.name = "David";
    obj1.say = function () {
        alert(this.name)
    }
    obj1.say();
    var obj2 = new Object();
    obj2.name = "Mike";
    obj2.say = function () {
        alert(this.name)
    }
    obj2.say();
- 工厂模式
    function create(name,age){
        var obj = new Object();
        obj.name = name;
        obj.age = age;
        obj.say = function () {
            alert("姓名:"+ this.name + "年龄:" + this.age);
        }
        return obj;
    }
    var obj1 = create("David",22);
    obj1.say();
    var obj2 = create("Mike",18);
    obj2.say();
- 构造函数模式
- obj1.say != obj2.say,同样的方法占用了两块内存
    function create(name,age){
        obj.name = name;
        obj.age = age;
        obj.say = function () {
            alert("姓名:"+ this.name + "年龄:" + this.age);
        }
    }
    var obj1 = new create("David",22);
    obj1.say();
    var obj2 = new create("Mike",18);
    obj2.say();
- 原型模式
- obj1.say = obj2.say,同样的方法占用了一块内存,即两个对象共用了一个方法
- 不同的属性放在构造函数里,相同的方法放在原型对象上
- 原型对象也是对象
    function create(name,age) {
        obj.name = name;
        obj.age = age;
    }
    create.prototype.say = function () {
        alert("姓名:"+ this.name + "年龄:" + this.age);
    }
    var obj1 = new create("David",22);
    obj1.say();
    var obj2 = new create("Mike",18);
    obj2.say();
3. 实现tab选项卡
- 面向过程实现tab选项卡
css代码
        #big div{
            border: 1px solid #000;
            width: 200px;
            height: 200px;
            display: none;
        }
        #big .block{
            display: block;
        }
        input.active{
            background-color: red;
        }
html代码
<div id = "big">
    <input type = "button" value ="选项一" class = "active"/>
    <input type = "button" value = "选项二"/>
    <input type = "button" value = "选项三"/>
    <div class = "block">我是内容一</div>
    <div>我是内容二</div>
    <div>我是内容三</div>
</div>
js代码
    window.onload = function(){
        var big = document.getElementById("big");
        var inputs = big.getElementsByTagName("input");
        var divs = big.getElementsByTagName("div");
        for(var i = 0;i < inputs.length;i++){
            inputs[i].index = i;
            inputs[i].onclick = function(){
                for(var j = 0;j < inputs.length;j++){
                    inputs[j].className = "";
                    divs[j].className = "";
                }
                this.className = "active";
                divs[this.index].className = "block";
            }
        }
    }
- 面向对象实现tab选项卡
css代码
        #big1 div,#big2 div{
            width: 200px;
            height: 200px;
            display: none;
            border: 1px solid #000;
        }
        #big1 .block,#big2 .block{
            display: block;
        }
        input.active{
            background-color: red;
        }
html代码
<div id = "big1">
    <input type = "button" value = "选项一" class = "active"/>
    <input type = "button" value = "选项二"/>
    <input type = "button" value = "选项三"/>
    <div class = "block">我是内容一</div>
    <div>我是内容二</div>
    <div>我是内容三</div>
</div>
<div id="big2">
    <input type = "button" value = "选项一" class = "active"/>
    <input type = "button" value = "选项二"/>
    <input type = "button" value = "选项三"/>
    <div class = "block">我是内容一</div>
    <div>我是内容二</div>
    <div>我是内容三</div>
</div>
js代码
    window.onload = function(){
        var tab1 = new Tab("big1");
        var tab2 = new Tab("big2");
    }
    function Tab(id){
        var big = document.getElementById(id);
        this.inputs = big.getElementsByTagName("input");
        this.divs = big.getElementsByTagName("div");
        var that = this;
        for(var i = 0;i < this.inputs.length;i++){
            this.inputs[i].index = i;
            this.inputs[i].onclick = function(){
                that.show(this);
            }
        }
    }
    Tab.prototype.show = function(obtn){
        for(var j = 0;j < this.inputs.length;j++){
            this.inputs[j].className = "";
            this.divs[j].className = "";
        }
        obtn.className = "active";
        this.divs[obtn.index].className = "block";
    }
4. 引用
- 引用赋值
    // 引用赋值,共用一块内存空间
    var arr1 = [1,2,3,4];
    var arr2 = [];
    for(var i = 0;i < arr1.length;i++){
        arr2[i] = arr1[i];
    }
    arr2.push(5);
- 继承基本语法
- 继承属性
- function A(){ this.color = "black"; } A.prototype.show = function(){ alert("Hello!"); } function B(){ A.call(this); } var b = new B(); console.log(b.color);//通过callnew出来的b有color属性
-
- 继承方法
    function A(){
        this.color = "black";
    }
    A.prototype.show = function(){
        alert("Hello!");
    }
    function B(){
        A.call(this);
    }
    for(var i in A.prototype){
        B.prototype[i] = A.prototype[i];
    }
    var b = new B();
    b.show();
- 拖拽案例
html代码
<div id = "box" style=" 200px;height: 200px;background-color: red;position: absolute;">
</div>
-
- 原生js实现拖拽
  window.onload = function(){
        var box = document.getElementById("box");
        box.onmousedown = function(event){//鼠标按下事件
            var ev = event||window.event;
            var divX = ev.clientX - box.offsetLeft;
            var divY = ev.clientY - box.offsetTop;
            document.onmousemove = function(event){//鼠标移动事件
                var ev = event || window.event;
                box.style.left = ev.clientX - divX + "px";
                box.style.top = ev.clientY - divY + "px";
            }
            document.onmouseup = function(){//鼠标抬起事件
                document.onmouseup = null;
                document.onmousemove = null;
            }
        }
    }
-
- 面向对象实现拖拽
   window.onload = function(){
        new Drag("box");
    }
    function Drag(id){
        this.divX = null;
        this.divY = null;
        this.box = document.getElementById(id);
        var that = this;
        this.box.onmousedown = function(event){
           that.down(event);
        }
    }
    Drag.prototype.down = function(){
        var ev = event||window.event;
        this.divX = ev.clientX - this.box.offsetLeft;
        this.divY = ev.clientY - this.box.offsetTop;
        var that = this;
        document.onmousemove = function(event){
            that.move(event);
        }
        document.onmouseup = function(){
            that.up();
        }
    }
    Drag.prototype.move = function(){
        var ev = event||window.event;
        this.box.style.left = ev.clientX - this.divX + "px";
        this.box.style.top = ev.clientY - this.divY + "px";
    }
    Drag.prototype.up = function(){
        document.onmouseup = null;
        document.onmousemove = null;
    }
-
- 继承实现拖拽
html代码
<div id = "box1" style = "  200px;height: 200px;background-color: red; position: absolute;">
</div>
<div id = "box2" style = " 200px;height: 200px;background-color: red;position: absolute;">
</div>
js代码
window.onload = function(){
    new Drag("box1");
    new LimitDrag("box2");
}
function Drag(id){
    this.divX = null;
    this.divY = null;
    this.box = document.getElementById(id);
    var that = this;
    this.box.onmousedown = function(event){
        that.down(event);
    }
}
Drag.prototype.down = function(){
    var ev = event||window.event;
    this.divX = ev.clientX - this.box.offsetLeft;
    this.divY = ev.clientY - this.box.offsetTop;
    var that = this;
    document.onmousemove = function(event){
        that.move(event);
    }
    document.onmouseup = function(){
        that.up();
    }
}
Drag.prototype.move = function(){
    var ev = event||window.event;
    this.box.style.left = ev.clientX - this.divX + "px";
    this.box.style.top = ev.clientY - this.divY + "px";
}
Drag.prototype.up = function(){
    document.onmouseup = null;
    document.onmousemove = null;
}
function LimitDrag(id){
    Drag.call(this,id);
}
for(var i in Drag.prototype){
    LimitDrag.prototype[i] = Drag.prototype[i];
}
LimitDrag.prototype.move = function(event){
    var ev = event||window.event;
    var posX = event.clientX - this.divX;
    var posY = event.clientY - this.divY;
    if(posX < 0){
        posX = 0;
    }
    if(posX > document.documentElement.clientWidth - this.box.offsetWidth){
        posX = document.documentElement.clientWidth - this.box.offsetWidth;
    }
    if(posY < 0){
        posY = 0;
    }
    if(posY > document.documentElement.clientHeight - this.box.offsetHeight){
        posY = document.documentElement.clientHeight - this.box.offsetHeight;
    }
    this.box.style.left = posX + "px";
    this.box.style.top = posY + "px";
}
5. 原型链
