Local线程隔离对象
Local对象:
在Flask中,类似于request的对象,当绑定到了一个werkzeug.local.local对象时,即使是同一个对象,那么在多个线程中都是隔离的。
Thread Local对象:
只要满足:绑定到这在一个线程对象上的属性,在每个线程中都是隔离的,那么他就叫做Thread-local对象属性


from threading import Thread
from werkzeug.local import Local

local = Local()

local.request = '123'
gobal_request='aaa'
class MyThread(Thread):
    def run(self):
        #注意1
        # print('子线程:', local.request) 报错

        local.request = 'abc'
        print('子线程:',local.request)

        global gobal_request
        gobal_request='bbb'


mythread = MyThread()
mythread.start()
mythread.join()

print('主线程:',local.request)
print('主线程:',gobal_request)

app上下文和request上下文
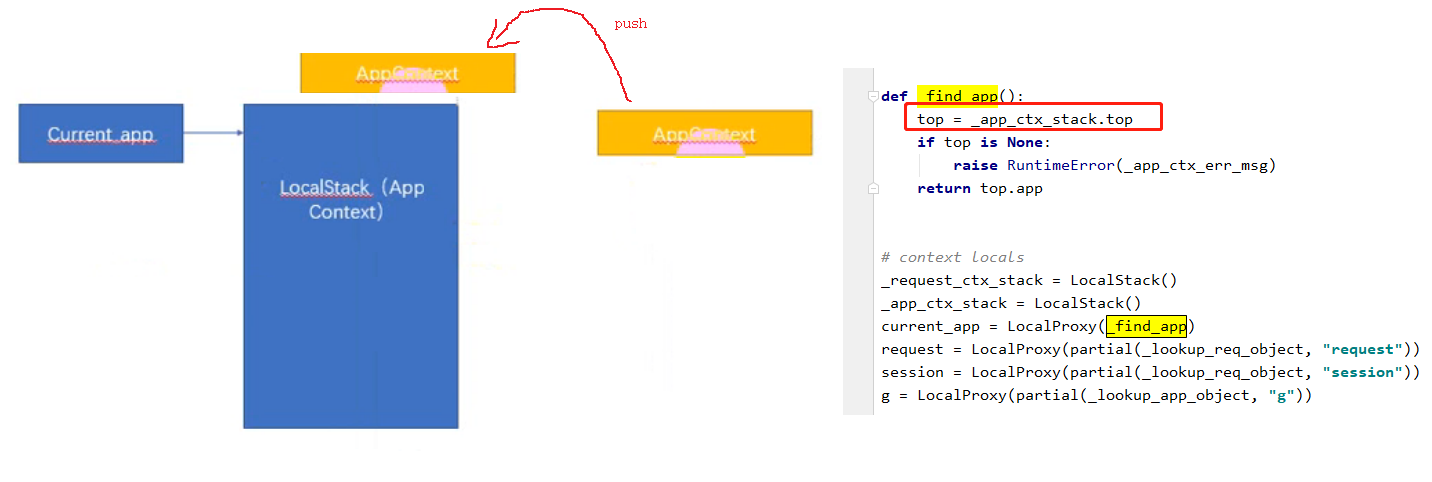
应用上下文和请求上下文都是存放到一个LocalStack的栈中。
和应用app相关的操作就必须要用到应用上下文,比如通过current_app获取当前的这个app。和请求相关的操作就必须用到请求上下文,比如使用“url_for反转视图函数。
1.在视图函数中,不用担心上下文的问题。因为视图函数要执行,那么肯定是通过访问ur的方式执行的,那么这种情况下,Flask底层就已经自动的帮我们把请求上下文和应用上下文都推入到了相应的栈中。
2.如果想要在视图函数外面执行相关的操作,比如获取当前的app(current_app),或者是反转url,那么就必须要手动推入相关的上下文(两个方法1.push 2 with)
app上下文


方法一:
app = Flask(__name__)
app.config['SECRET_KEY'] = os.urandom(24)

app_context=app.app_context()
app_context.push()

print(current_app.name)
上面黄色代码完整装栈过程。

方法二:
app = Flask(__name__)
app.config['SECRET_KEY'] = os.urandom(24)

with app.app_context():
    print(current_app.name)
请求上下文
@app.route('/')
def index():
    print(url_for("list_func")) #没问题
    return "ok"
@app.route('/list/')
def list_func():

    return "ok-list"
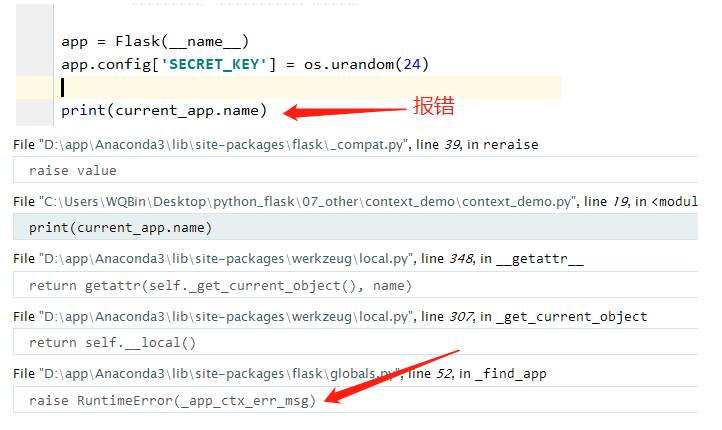
print(url_for("list_func")) #报错

当我们加上:
app_context=app.app_context()
app_context.push()
继续报错:

源码追踪:

解决方案
with app.test_request_context():
    print(url_for("list_func"))
为什么上下文需要放在栈中:
1. 应用上下文:Flask底层是基于werkzeug,werkzeug是可以包含多个app的,所以这时候用一个栈【这个栈是单例的】来保存。如果你在使用app1,那么app1应该是要在栈的顶部,如果用完了app1,那么app1应该从栈中删除。方便其他代码使用下面的app。
2. 如果在写测试代码,或者离线脚本的时候,我们有时候可能需要创建多个请求上下文,这时候就需要存放到一个栈中了。使用哪个请求上下文的时候,就把对应的请求上下文放到栈的顶部,用完了就要把这个请求上下文从栈中移除掉。
线程隔离的g对象使用详解
保存全局对象的g对象:
g对象是在整个Flask应用运行期间都是可以使用的。是全局的。这个对象是专门用来存储开发者自己定义的一些数据,方便在整个Flask程序中都可以使用。
一般使用就是,将一些经常会用到的数据绑定到上面,以后就直接从g上面取就可以了,而不需要通过传参的形式,这样更加方便。
utils.py
from flask import g

def log_a():
    print('log a %s' % g.username)

def log_b():
    print('log b %s' % g.username)

def log_c():
    print('log c %s' % g.username)
app.py
from flask import g
@app.route('/')
def index():
    g.username = "ABC"
    log_a()
    log_b()
    log_c()

    return render_template('index.html')

常用的钩子函数
Flask中钩子函数是使用特定的装饰器装饰的函数。在正常执行的代码中,插入一段自己想要的代码。
常见的钩子函数
- before_first_request:处理项目的第一次请求之前执行(只是第一次)
- before_request:每次请求之前执行
通常可以用这个装饰器来给视图函数增加一些变量。请求已经到达了Flask,但是还没有进入到具体的视图函数之前调用。一般这个就是在视图函数之前,我们可以把一些后面需要用到的数据先处理好,方便视图函数使用。 - teardown_appcontext:异常处理
不管是否有异常,注册的函数 都会在每次请求之后执行。 - template_filter:自定义过滤器时使用
- context_processor:上下文处理器
使用这个钩子函数,必须返回一个字典,即使是一个空字典。这个字典中的值在所有模版中都可以使用。
@app.context_processor
def context_processor():
    if hasattr(g,'user'):
        return {"current_user":g.user}
    else:
        return {}
- errorhandler :接收状态码
可以自定义返回这种状态码的响应的处理方法,以及返回相应的状态码,不写返回状态码默认返回200。在发生一些异常的时候,比如404错误,比如500错误,那么如果想要优雅的处理这些错误,就可以使用errorhandler来出来。
@app.errorhandler(404)
def args_error(error):
    return '您的页面已经飞出银河系--404',400
   #return '您的页面已经飞出银河系--404'404
    #return '您的页面已经飞出银河系--404'
    #return render_template(1.html)
flask信号
flask中的信号使用的是一个第三方插件,叫做blinker。
自定义信号
自定义信号分为3步,第一是定义一个信号,第二是监听一个信号,第三是发送一个信号。以下将对这三步进行讲解:
from blinker import Namespace
# Namespace:命名空间
# 1. 定义信号
myspace = Namespace()
fire_signal = myspace.signal('fire')

# 2. 监听信号
def fire_bullet(sender):
    print(sender)
    print('start fire bullet')
fire_signal.connect(fire_bullet)

# 3. 发送一个信号
fire_signal.send()

案例:
signal.py 文件
from blinker import Namespace
from datetime import datetime
from flask import request,g

namespace = Namespace() #防止多人开发信号冲突

login_signal = namespace.signal('login')

def login_log(xxxx):
    # 用户名,登录的时间,ip地址
    now = datetime.now()
    ip = request.remote_addr
    log_line = "{username}*{now}*{ip}".format(username=g.username,now=now,ip=ip)
    with open('login_log.txt','a') as fp:
        fp.write(log_line+"
")

login_signal.connect(login_log)
必须要有参数否则报错:

app,py
from signals import login_signal

@app.route('/login/')
def login():
    # 通过查询字符串的形式来传递username这个参数
    username = request.args.get('username')
    if username:
        g.username = username
        login_signal.send()
        return '登录成功!'
    else:
        return '请输入用户名!'

if __name__ == '__main__':
    app.run(debug=True)
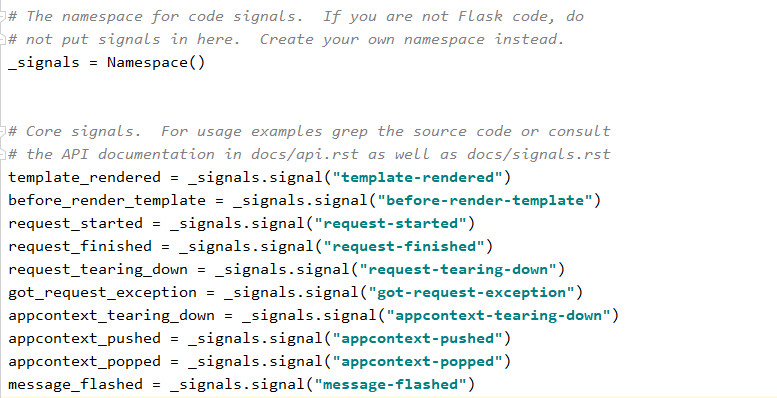
flask内置9中信号:

案例1:
from flask import template_rendered,before_render_template

def before_template_rendered_func(sender,template,context):
    print("this is before_template_rendered_func")
    print('sender:',sender)
    print('template:',template)
    print('context:',context)

def template_rendered_func(sender,template,context):
    print("this is template_rendered_func")
    print('sender:',sender)
    print('template:',template)
    print('context:',context)

template_rendered.connect(template_rendered_func)
before_render_template.connect(before_template_rendered_func)

@app.route('/')
def hello_world():
    return render_template('index.html')

源码:

案例2:
def request_exception_log(sendser,exception):
    print(exception)
got_request_exception.connect(request_exception_log)

@app.route('/')
def hello_world():
    a=1/0
    return render_template('index.html')
