注:《Spring5源码分析》汇总可参考:Spring5源码分析(002)——博客汇总
前面《Spring5源码分析(007)——IoC篇之加载BeanDefinition总览》 中提到,加载 bean 的核心方法 doLoadBeanDefinitions(InputSource inputSource, Resource resource) 中,分为3个步骤来进行:
- 1、通过调用 getValidationModeForResource(Resource resource) 来获取指定 XML 资源的验证模式,也即是 xml 开头常见到的各种 DTD 和 XSD 了。(参考博客:Spring5源码分析(008)——IoC篇之加载BeanDefinition:获取XML的验证模式)
- 2、通过调用 DocumentLoader.loadDocument(InputSource inputSource, EntityResolver entityResolver, ErrorHandler errorHandler, int validationMode, boolean namespaceAware) 来获取实际的 Document 实例。(参考博客:Spring5源码分析(009)——IoC篇之加载BeanDefinition:获取 Document 实例)
- 3、调用 registerBeanDefinitions(Document doc, Resource resource),根据 Document 解析和注册 BeanDefinition。
本文主要介绍第3个步骤,即根据 Document 解析和注册 BeanDefinition 。这是提取和注册 bean 的关键。目录结构如下:
- 1、createBeanDefinitionDocumentReader
- 2、createReaderContext
- 3、registerBeanDefinitions
- 4、DefaultBeanDefinitionDocumentReader
- 5、总结
- 6、参考
获取了 XML 配置文件的 Document 实例之后,便是进行实际的解析和 BeanDefinition 注册了。这部分是通过 XmlBeanDefinitionReader.registerBeanDefinitions(Document doc, Resource resource) 方法来进行实现:
// 实际上是构造函数的入参 DefaultListableBeanFactory
private final BeanDefinitionRegistry registry;
/**
 * Register the bean definitions contained in the given DOM document.
 * Called by {@code loadBeanDefinitions}.
 * <p>Creates a new instance of the parser class and invokes
 * {@code registerBeanDefinitions} on it.
 * <p>注册包含在给定 DOM 文档中的 bean 定义。
 * <p>创建解析器类 BeanDefinitionDocumentReader 的新实例,并在其上调用registerBeanDefinitions。
 */
public int registerBeanDefinitions(Document doc, Resource resource) throws BeanDefinitionStoreException {
    // 1、创建 BeanDefinitionDocumentReader 对象
    BeanDefinitionDocumentReader documentReader = createBeanDefinitionDocumentReader();
    // 2、记录本次加载前已注册的 BeanDefinition 数量
    int countBefore = getRegistry().getBeanDefinitionCount();
    // 3、创建 XmlReaderContext 对象
    // 4、加载及注册 BeanDefinition
    documentReader.registerBeanDefinitions(doc, createReaderContext(resource));
    // 5、记录本次注册的 BeanDefinition 数量
    return getRegistry().getBeanDefinitionCount() - countBefore;
}
这里同样会分为几步来实现:
- 1、通过调用 createBeanDefinitionDocumentReader() 来实例化 BeanDefinitionDocumentReader 对象。BeanDefinitionDocumentReader 接口是用于解析包含 Spring bean 定义的 XML 文档的 SPI 。由 XmlBeanDefinitionReader 用于实际解析 DOM 文档。
- SPI for parsing an XML document that contains Spring bean definitions. Used by XmlBeanDefinitionReader for actually parsing a DOM document.
- Instantiated per document to parse: implementations can hold state in instance variables during the execution of the registerBeanDefinitions method — for example, global settings that are defined for all bean definitions in the document.
- 2、通过调用 BeanDefinitionRegistry.getBeanDefinitionCount() 来获取本次加载前已经注册的 BeanDefinition 数量。这里的 BeanDefinitionRegistry 就是其实现类 DefaultListableBeanFactory ,即 XmlBeanDefinitionReader 构造函数的入参。
- 3、通过调用 createReaderContext(resource) 创建 XmlReaderContext 对象,用于第4步的 doc 解析的入参。
- 4、通过调用 BeanDefinitionDocumentReader.registerBeanDefinitions(Document doc, XmlReaderContext readerContext) 方法,进行实际的解析,读取 XML 中的 bean 配置,并注册 BeanDefinition 。
- 5、记录本次注册的 BeanDefinition 数量。
1、createBeanDefinitionDocumentReader
这方法主要是实例化 BeanDefinitionDocumentReader 对象 :
private Class<? extends BeanDefinitionDocumentReader> documentReaderClass = DefaultBeanDefinitionDocumentReader.class;
/**
 * Create the {@link BeanDefinitionDocumentReader} to use for actually
 * reading bean definitions from an XML document.
 * <p>创建 BeanDefinitionDocumentReader 对象,用于从 XML 文档实际读取 bean 定义。
 * <p>The default implementation instantiates the specified "documentReaderClass".
 * @see #setDocumentReaderClass
 */
protected BeanDefinitionDocumentReader createBeanDefinitionDocumentReader() {
    return BeanUtils.instantiateClass(this.documentReaderClass);
}
BeanDefinitionDocumentReader 的默认实现类只有一个 DefaultBeanDefinitionDocumentReader ,这里实例化的就是这个实现类。从前面的 API 说明中可以看出, BeanDefinitionDocumentReader 接口是用于实际解析读取并注册 bean 定义的(第 3 步 的处理),后面将继续进行介绍。
2、createReaderContext
createReaderContext(resource) 方法主要是创建 XmlReaderContext 对象。关于 XmlReaderContext ,API 说明如下:
- Extension of ReaderContext, specific to use with an XmlBeanDefinitionReader. Provides access to the NamespaceHandlerResolver configured in the XmlBeanDefinitionReader.
- XmlReaderContext 是 ReaderContext 的扩展,指定与 XmlBeanDefinitionReader 一起使用。提供对 XmlBeanDefinitionReader 中配置的 NamespaceHandlerResolver 的访问。
(后续文章将进一步详细分析)
private ProblemReporter problemReporter = new FailFastProblemReporter();

private ReaderEventListener eventListener = new EmptyReaderEventListener();

private SourceExtractor sourceExtractor = new NullSourceExtractor();

@Nullable
private NamespaceHandlerResolver namespaceHandlerResolver;

/**
 * Create the {@link XmlReaderContext} to pass over to the document reader.
 * <p>创建 XmlReaderContext 对象以传递给文档读取器。
 */
public XmlReaderContext createReaderContext(Resource resource) {
    return new XmlReaderContext(resource, this.problemReporter, this.eventListener,
            this.sourceExtractor, this, getNamespaceHandlerResolver());
}

/**
 * Lazily create a default NamespaceHandlerResolver, if not set before.
 * <p>延迟加载默认的 NamespaceHandlerResolver ,如果之前没有设置的话
 * @see #createDefaultNamespaceHandlerResolver()
 */
public NamespaceHandlerResolver getNamespaceHandlerResolver() {
    if (this.namespaceHandlerResolver == null) {
        this.namespaceHandlerResolver = createDefaultNamespaceHandlerResolver();
    }
    return this.namespaceHandlerResolver;
}

/**
 * Create the default implementation of {@link NamespaceHandlerResolver} used if none is specified.
 * <p>The default implementation returns an instance of {@link DefaultNamespaceHandlerResolver}.
 * <p>如果没有指定,则创建 NamespaceHandlerResolver 的默认实现 DefaultNamespaceHandlerResolver
 * @see DefaultNamespaceHandlerResolver#DefaultNamespaceHandlerResolver(ClassLoader)
 */
protected NamespaceHandlerResolver createDefaultNamespaceHandlerResolver() {
    ClassLoader cl = (getResourceLoader() != null ? getResourceLoader().getClassLoader() : getBeanClassLoader());
    return new DefaultNamespaceHandlerResolver(cl);
}
3、registerBeanDefinitions
BeanDefinitionDocumentReader.registerBeanDefinitions(Document doc, XmlReaderContext readerContext) 方法,这个就是进行实际的 XML 解析,读取 XML 中的 bean 配置,并注册 BeanDefinition 。接口定义如下:
/** * SPI for parsing an XML document that contains Spring bean definitions. * Used by {@link XmlBeanDefinitionReader} for actually parsing a DOM document. * <p>用于解析包含 Spring bean 定义的 XML 文档的 SPI。由 XmlBeanDefinitionReader 用于实际解析 DOM 文档。 * * <p>Instantiated per document to parse: implementations can hold * state in instance variables during the execution of the * {@code registerBeanDefinitions} method — for example, global * settings that are defined for all bean definitions in the document. * */ public interface BeanDefinitionDocumentReader { /** * Read bean definitions from the given DOM document and * register them with the registry in the given reader context. * <p>从给定的 DOM 文档中读取 bean 定义,并注册到给定的 readerContext 中的 registry */ void registerBeanDefinitions(Document doc, XmlReaderContext readerContext) throws BeanDefinitionStoreException; }
实际上是默认实现类 DefaultBeanDefinitionDocumentReader 在进行处理,接下来将进行分析。
4、DefaultBeanDefinitionDocumentReader
BeanDefinitionDocumentReader 的唯一默认实现类 DefaultBeanDefinitionDocumentReader 的实现如下:
@Nullable
private XmlReaderContext readerContext;

@Nullable
private BeanDefinitionParserDelegate delegate;
/**
 * This implementation parses bean definitions according to the "spring-beans" XSD
 * (or DTD, historically).
 * <p>该实现根据 "spring-beans" XSD (或历史上的 DTD )解析 bean 定义。
 * <p>Opens a DOM Document; then initializes the default settings
 * specified at the {@code <beans/>} level; then parses the contained bean definitions.
 * <p>打开一个 DOM 文档;然后初始化指定在 <beans/> 级别的默认设置;之后解析包含的 bean 定义
 */
@Override
public void registerBeanDefinitions(Document doc, XmlReaderContext readerContext) {
    this.readerContext = readerContext;
    // 获取 XML Document 的 root Element,然后执行注册 BeanDefinition
    doRegisterBeanDefinitions(doc.getDocumentElement());
}

/**
 * Register each bean definition within the given root {@code <beans/>} element.
 * <p>在给定的根 <beans/> 元素中注册每个 bean 定义
 */
@SuppressWarnings("deprecation")  // for Environment.acceptsProfiles(String...)
protected void doRegisterBeanDefinitions(Element root) {
    // Any nested <beans> elements will cause recursion in this method. In
    // order to propagate and preserve <beans> default-* attributes correctly,
    // keep track of the current (parent) delegate, which may be null. Create
    // the new (child) delegate with a reference to the parent for fallback purposes,
    // then ultimately reset this.delegate back to its original (parent) reference.
    // this behavior emulates a stack of delegates without actually necessitating one.
    // 记录先前的 BeanDefinitionParserDelegate 对象
    BeanDefinitionParserDelegate parent = this.delegate;
    // 1、创建新的 BeanDefinitionParserDelegate 对象,并记录到属性 delegate
    this.delegate = createDelegate(getReaderContext(), root, parent);

    // 2、检查 root Element (<beans /> 根标签) 的命名空间是否为空,或者是 http://www.springframework.org/schema/beans
    if (this.delegate.isDefaultNamespace(root)) {
        // 获取 <beans /> 根标签的 profile 属性(如果该 profile 属性没有激活,则不会用到这个 xml 配置)
        String profileSpec = root.getAttribute(PROFILE_ATTRIBUTE);
        if (StringUtils.hasText(profileSpec)) {
            // 对 profile 属性分割成列表,3类分隔符  , ; 和 空格,常见的例如 profile = test,dev,uat 等
            String[] specifiedProfiles = StringUtils.tokenizeToStringArray(
                    profileSpec, BeanDefinitionParserDelegate.MULTI_VALUE_ATTRIBUTE_DELIMITERS);
            // We cannot use Profiles.of(...) since profile expressions are not supported
            // in XML config. See SPR-12458 for details.
            // 是否已经激活了这些 profile
            if (!getReaderContext().getEnvironment().acceptsProfiles(specifiedProfiles)) {
                if (logger.isDebugEnabled()) {
                    logger.debug("Skipped XML bean definition file due to specified profiles [" + profileSpec +
                            "] not matching: " + getReaderContext().getResource());
                }
                return;
            }
        }
    }
    // 3、解析前处理,留给子类实现
    preProcessXml(root);
    // 4、实际解析 BeanDefinition
    parseBeanDefinitions(root, this.delegate);
    // 5、解析后处理,留给子类实现
    postProcessXml(root);

    this.delegate = parent;
}
- 1、通过调用 DefaultBeanDefinitionDocumentReader.createDelegate(XmlReaderContext readerContext, Element root, @Nullable BeanDefinitionParserDelegate parentDelegate) 来创建新的 BeanDefinitionParserDelegate 对象,并记录到属性 delegate 。方法内部实现如下:
- 注:BeanDefinitionParserDelegate 是 BeanDefinition 解析中一个比较重要的类,负责实际的 BeanDefinition 解析, XML 配置中 bean 标签用到的所有属性都是在 BeanDefinitionParserDelegate 里面定义的。
protected BeanDefinitionParserDelegate createDelegate(
        XmlReaderContext readerContext, Element root, @Nullable BeanDefinitionParserDelegate parentDelegate) {
    // 创建 BeanDefinitionParserDelegate 并进行初始化默认
    BeanDefinitionParserDelegate delegate = new BeanDefinitionParserDelegate(readerContext);
    delegate.initDefaults(root, parentDelegate);
    return delegate;
}
- 2、检查 root Element (<beans /> 根标签) 的命名空间是否为空,或者是 http://www.springframework.org/schema/beans
- 此处的判断主要是为了读取 <beans /> 根标签中的 profile 属性配置,然后只解析激活的 profile 配置,参考后文:4.2、扩展:关于 profile
- 3、解析前处理 和 5、解析后处理,空实现,使用的是模板方法设计模式,主要是留给子类实现,可用于 bean 定义解析前后的操作处理。
- 4、调用 parseBeanDefinitions(Element root, BeanDefinitionParserDelegate delegate) 进行具体的解析逻辑处理,接下来进行详细的分析。
4.1、parseBeanDefinitions
parseBeanDefinitions(Element root, BeanDefinitionParserDelegate delegate) 的实现如下:
/**
 * Parse the elements at the root level in the document:
 * "import", "alias", "bean".
 * <p>文档中的 root 级别的元素解析: "import", "alias", "bean"
 * @param root the DOM root element of the document
 */
protected void parseBeanDefinitions(Element root, BeanDefinitionParserDelegate delegate) {
    // 1、检查 root Element (<beans /> 根标签) 的命名空间是否为空,或者是 http://www.springframework.org/schema/beans
    if (delegate.isDefaultNamespace(root)) {
        NodeList nl = root.getChildNodes();
        for (int i = 0; i < nl.getLength(); i++) {
            Node node = nl.item(i);
            if (node instanceof Element) {
                Element ele = (Element) node;
                // 1、检查 child Element 的命名空间是否为空,或者是 http://www.springframework.org/schema/beans
                // 即检查是否使用的是默认的命名空间,然后执行默认的解析
                if (delegate.isDefaultNamespace(ele)) {
                    parseDefaultElement(ele, delegate);
                }
                else {
                    // 2、非默认的命名空间,进行自定义标签解析
                    delegate.parseCustomElement(ele);
                }
            }
        }
    }
    else {
        // 2、非默认的命名空间,进行自定义标签解析
        delegate.parseCustomElement(root);
    }
}
- 可以看到,这里分成了 2 种不同的实现来进行解析,默认解析和自定义解析。因为在 Spring 的 XML 配置里面有两大类 Bean 声明,一个是默认的,如: <bean id="test" class="test.TestBean" /> ,对应的是 1 ;另一类就是自定义的,如: <tx:annotation-driven/>,对应的是 2 。
- 1、如果根节点或者子节点元素使用的是默认的命名空间,则调用 parseDefaultElement(Element ele, BeanDefinitionParserDelegate delegate) 方法进行解析,内部实现如下:
private void parseDefaultElement(Element ele, BeanDefinitionParserDelegate delegate) {
    if (delegate.nodeNameEquals(ele, IMPORT_ELEMENT)) {    // import 标签
        importBeanDefinitionResource(ele);
    }
    else if (delegate.nodeNameEquals(ele, ALIAS_ELEMENT)) {    // alias 标签
        processAliasRegistration(ele);
    }
    else if (delegate.nodeNameEquals(ele, BEAN_ELEMENT)) {    // bean 标签
        processBeanDefinition(ele, delegate);
    }
    else if (delegate.nodeNameEquals(ele, NESTED_BEANS_ELEMENT)) {    // beans 标签,需要递归解析
        // recurse
        doRegisterBeanDefinitions(ele);
    }
}
-
- 到这里可算是见到了 XML 配置种常见的标签了,例如 import 、 alias 、 bean 。每个标签的具体解析,后续文章将逐一进行分析。
- 2、不是默认命名空间的话,则调用 BeanDefinitionParserDelegate.parseCustomElement(Element ele) 进行自定义解析,该部分也将在后续文章种进行详细剖析。
4.2、扩展:关于 profile
关于 profile 属性的说明,可以参考官方文档 XML Bean Definition Profiles ,下面这个是官方给的示例:
<beans xmlns="http://www.springframework.org/schema/beans"
    xmlns:xsi="http://www.w3.org/2001/XMLSchema-instance"
    xmlns:jdbc="http://www.springframework.org/schema/jdbc"
    xmlns:jee="http://www.springframework.org/schema/jee"
    xsi:schemaLocation="...">

    <!-- other bean definitions -->

    <beans profile="development">
        <jdbc:embedded-database id="dataSource">
            <jdbc:script location="classpath:com/bank/config/sql/schema.sql"/>
            <jdbc:script location="classpath:com/bank/config/sql/test-data.sql"/>
        </jdbc:embedded-database>
    </beans>

    <beans profile="production">
        <jee:jndi-lookup id="dataSource" jndi-name="java:comp/env/jdbc/datasource"/>
    </beans>
</beans>
激活指定的 profile 是通过 spring.profiles.active 属性来确定的,可以有以下几种方式来进行指定:
- system environment variables
- JVM system properties
- servlet context parameters in web.xml
- an entry in JNDI (see PropertySource Abstraction)
- In integration tests, active profiles can be declared by using the @ActiveProfiles annotation in the spring-test module (see context configuration with environment profiles)
此外还可以通过编程的方式来指定(官方例子):
AnnotationConfigApplicationContext ctx = new AnnotationConfigApplicationContext();
ctx.getEnvironment().setActiveProfiles("development");
ctx.register(SomeConfig.class, StandaloneDataConfig.class, JndiDataConfig.class);
ctx.refresh();
举个例子,集成到 web 环境中时,在 web.xml 中加入以下参数配置,就可以开启 devlopment 相关的配置,上面这个例子中的 production 配置将会被忽略掉:
<context-param>
    <param-name>spring.profiles.active</param-name>
    <param-value>development</param-value>
</context-param>
如果是通过启动数,则可以这样来指定:
-Dspring.profiles.active="profile1,profile2"
有了这个特性我们就可以同时在配置文件中部署多套配置来适用于生产环境和开发/测试环境,这样可以方便的进行切换开发、测试、与部署环境,最常用的就是更换不同的数据库、中间件等。
5、总结
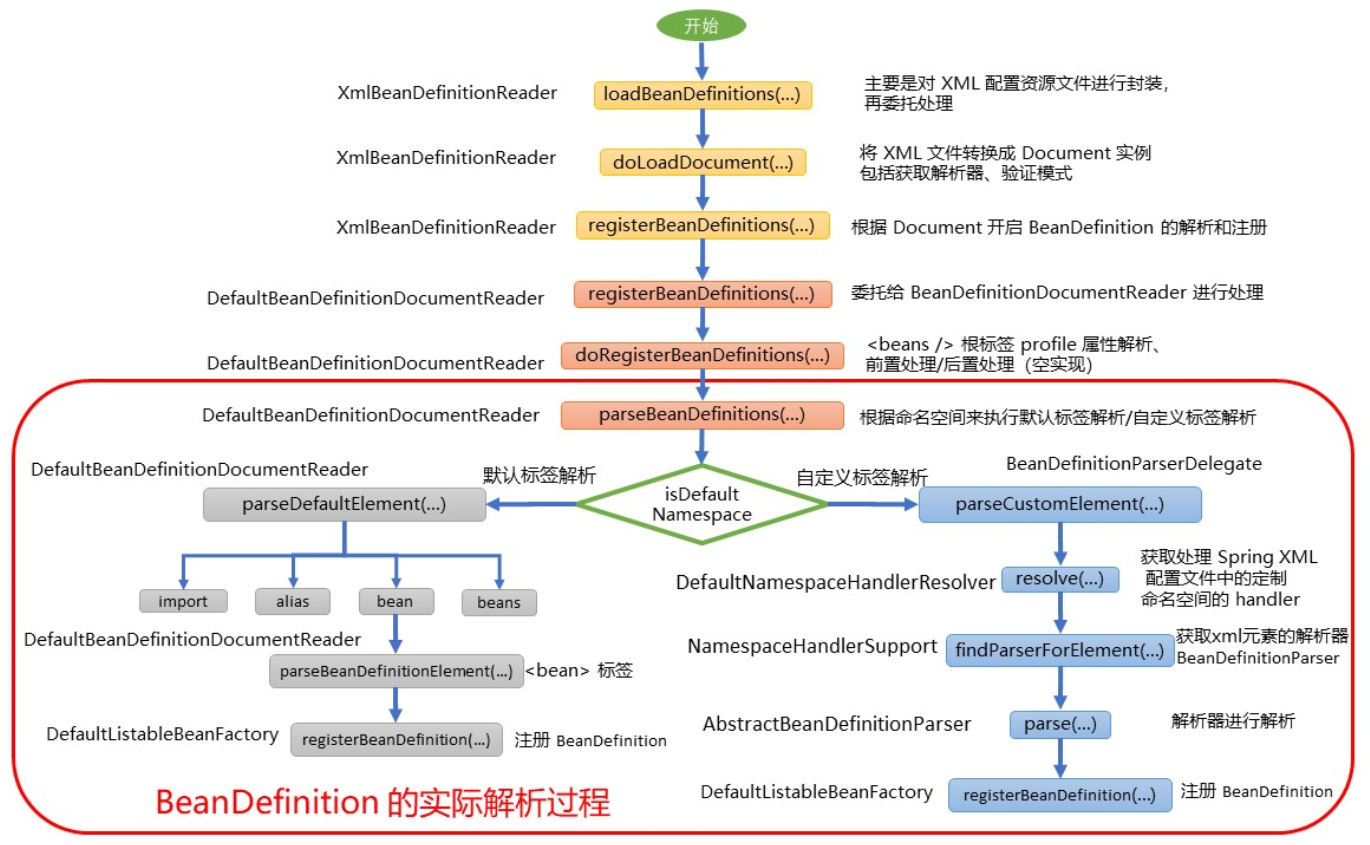
至此,本文开头提到的加载 bean 的核心方法的 3 个步骤已基本分析完毕。删减版(借鉴)的整体时序图如下:
6、参考
- spring 官方文档 5.2.3.RELEASE:https://docs.spring.io/spring-framework/docs/5.2.3.RELEASE/spring-framework-reference/core.html
- Spring源码深度解析(第2版),郝佳,P40-P43
- 死磕Spring系列:死磕 Spring or 【死磕 Spring】----- IOC 之 注册 BeanDefinition
- 芋道源码:http://svip.iocoder.cn/Spring/IoC-register-BeanDefinitions/
- 相关注释可参考笔者 github 链接:https://github.com/wpbxin/spring-framework
- 最后的时序图PPT:https://github.com/wpbxin/spring-framework/tree/master/spring-beans/diagram
- 相关的 UML 图都可以在 diagram 目录下查找