1. 使用Floodlight管理OVS桥
(1) 下载:https://codeload.github.com/floodlight/floodlight/tar.gz/v1.2
(2) tar xf floodlight-1.2.tar.gz -C /tmp
cd /tmp/floodlight-1.2
make #只需要make下即可生成 floodlight.jar
./floodlight.sh #启动floodlight.
(3)ovs-vsctl set-controller ovs-switch tcp:192.168.10.10:6653
当 OVS 交换机连接到 Floodlight 控制器后,理论上所有的流表规则应该交给控制器来建立。由于 OVS 交换机和控制器之间是通过网络通讯来传递数据的,所以网络连接失败会影响到 Flow 的建立。针对这种情况,OVS 提供了两种处理模式:
• standlone: 默认模式。如果 OVS 交换机超过三次无法正常连接到 OpenFlow 控制器,OVS 交换机自己会负责建立流表。在这种模式下,OVS 和常见的 L2 交换机相似。与此同时,OVS 也会继续尝试连接控制器,一旦网络连接恢复,OVS 会再次切换到使用控制器进行流表管理。
• secure: 在 secure 模式下,如果 OVS 无法正常连接到 OpenFlow 控制器,OVS 会不停的尝试与控制器重新建立连接,而不会自己负责建立流表。
(4) 设置 OVS 的连接模式为 secure 模式
ovs-vsctl set Bridge ovs-switch fail-mode=secure
(5) 查看 OVS 的状态,“is_connected:true”代表 OVS 已经成功连接到了 Floodlight
ovs-vsctl show
30282710-d401-4187-8e13-52388f693df7
Bridge ovs-switch
Controller "tcp:192.168.10.10:6653"
is_connected: true
(6) 连接Floodlight Web GUI
http://192.168.10.10:8080/ui/index.html
(7) Floodlight RESTServer的参考资料:
FloodLight开发者文档(译文),共五页
文档一: http://blog.csdn.net/sherkyoung/article/details/27826277
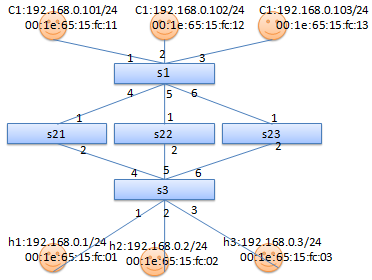
2. OVS多路径 与 STP 实验.
参考:openvswitch group(select) to multipatch:http://www.lofter.com/tag/OpenvSwitch
拓扑结构
每个OVS 交换机连线上的数字为:OVS OpenFlow Port编号.
实验步骤:
(1) 构建拓扑结构
# 创建OVS交换机
ovs-vsctl add-br s1
ovs-vsctl add-br s21
ovs-vsctl add-br s22
ovs-vsctl add-br s23
ovs-vsctl add-br s3
# 创建Network Namesapce,来充当虚拟PC
ip netns add c1 #ip netns若不支持,需升级iproute*.rpm.
ip netns add c2
ip netns add c3
ip netns add h1
ip netns add h2
ip netns add h3
# OVS交换机 S1 上的连线
ovs-vsctl add-port s1 c1
ovs-vsctl set interface c1 type=internal
ip link set c1 netns c1
ip netns exec c1 ifconfig c1 192.168.0.101/24 up
ovs-vsctl add-port s1 c2
ovs-vsctl set interface c2 type=internal
ip link set c2 netns c2
ip netns exec c2 ifconfig c2 192.168.0.102/24 up
ovs-vsctl add-port s1 c3
ovs-vsctl set interface c3 type=internal
ip link set c3 netns c3
ip netns exec c3 ifconfig c3 192.168.0.103/24 up
# OVS交换机 S3 上的连线
ovs-vsctl add-port s3 h1
ovs-vsctl set interface h1 type=internal
ip link set h1 netns h1
ip netns exec h1 ifconfig h1 192.168.0.1/24 up
ovs-vsctl add-port s3 h2
ovs-vsctl set interface h2 type=internal
ip link set h2 netns h2
ip netns exec h2 ifconfig h2 192.168.0.2/24 up
ovs-vsctl add-port s3 h3
ovs-vsctl set interface h3 type=internal
ip link set h3 netns h3
ip netns exec h3 ifconfig h3 192.168.0.3/24 up
# OVS交换机 S1 与 S21、S22、S23的连线
ovs-vsctl add-port s1 s1-s21
ovs-vsctl set interface s1-s21 type=patch options:peer=s21-s1
ovs-vsctl add-port s21 s21-s1
ovs-vsctl set interface s21-s1 type=patch options:peer=s1-s21
ovs-vsctl add-port s1 s1-s22
ovs-vsctl set interface s1-s22 type=patch options:peer=s22-s1
ovs-vsctl add-port s22 s22-s1
ovs-vsctl set interface s22-s1 type=patch options:peer=s1-s22
ovs-vsctl add-port s1 s1-s23
ovs-vsctl set interface s1-s23 type=patch options:peer=s23-s1
ovs-vsctl add-port s23 s23-s1
ovs-vsctl set interface s23-s1 type=patch options:peer=s1-s23
# OVS交换机 S3 与 S21、S22、S23的连线
ovs-vsctl add-port s3 s3-s21
ovs-vsctl set interface s3-s21 type=patch options:peer=s21-s3
ovs-vsctl add-port s21 s21-s3
ovs-vsctl set interface s21-s3 type=patch options:peer=s3-s21
ovs-vsctl add-port s3 s3-s22
ovs-vsctl set interface s3-s22 type=patch options:peer=s22-s3
ovs-vsctl add-port s22 s22-s3
ovs-vsctl set interface s22-s3 type=patch options:peer=s3-s22
ovs-vsctl add-port s3 s3-s23
ovs-vsctl set interface s3-s23 type=patch options:peer=s23-s3
ovs-vsctl add-port s23 s23-s3
ovs-vsctl set interface s23-s3 type=patch options:peer=s3-s23
#启动STP(生成树协议)
ovs-vsctl set bridge s1 stp_enable=true
ovs-vsctl set bridge s21 stp_enable=true
ovs-vsctl set bridge s22 stp_enable=true
ovs-vsctl set bridge s23 stp_enable=true
ovs-vsctl set bridge s3 stp_enable=true
# 启动STP后, 被block的接口
ovs-vsctl list port |grep -E 'name|status'
name : "s21-s1"
status : {stp_port_id="8001", stp_role=root, stp_sec_in_state="8414", stp_state=forwarding}
name : "s1-s21"
status : {stp_port_id="8003", stp_role=designated, stp_sec_in_state="8414", stp_state=forwarding}
name : "s3-s21"
status : {stp_port_id="8002", stp_role=alternate, stp_sec_in_state="8442", stp_state=blocking}
name : "s22-s1"
status : {stp_port_id="8001", stp_role=root, stp_sec_in_state="8414", stp_state=forwarding}
. ...
name : "s3-s22"
status : {stp_port_id="8001", stp_role=root, stp_sec_in_state="8414", stp_state=forwarding}
name : "s1-s23"
status : {stp_port_id="8001", stp_role=designated, stp_sec_in_state="8414", stp_state=forwarding}
name : "s3-s23"
status : {stp_port_id="8003", stp_role=alternate, stp_sec_in_state="8442", stp_state=blocking}
name : "s23-s3"
status : {stp_port_id="8001", stp_role=designated, stp_sec_in_state="8414", stp_state=forwarding}
name : "s1-s22"
status : {stp_port_id="8002", stp_role=designated, stp_sec_in_state="8414", stp_state=forwarding}
name : "s23-s1"
status : {stp_port_id="8002", stp_role=root, stp_sec_in_state="8414", stp_state=forwarding}
name : "s22-s3"
status : {stp_port_id="8002", stp_role=designated, stp_sec_in_state="8414", stp_state=forwarding}
name : "s21-s3"
status : {stp_port_id="8002", stp_role=designated, stp_sec_in_state="8414", stp_state=forwarding}
# 由于STP启动后,它会自动发现环路,并阻塞部分冗余链路防止环路.但这就妨碍了
# 我们多路径的实现需求。
# 关闭STP,添加OpenFLow规则,避免手动避免环路.
# 禁止STP
ovs-vsctl set bridge s1 stp_enable=false
ovs-vsctl set bridge s21 stp_enable=false
ovs-vsctl set bridge s22 stp_enable=false
ovs-vsctl set bridge s23 stp_enable=false
ovs-vsctl set bridge s3 stp_enable=false
#S1上添加多路径规则
# 修改OVS 交换机支持的OpenFlow版本为OpenFlow 1.3,默认支持OpenFlow 1.0
ovs-vsctl set bridge s1 protocols=OpenFlow13
ovs-vsctl set bridge s21 protocols=OpenFlow13
ovs-vsctl set bridge s22 protocols=OpenFlow13
ovs-vsctl set bridge s23 protocols=OpenFlow13
ovs-vsctl set bridge s3 protocols=OpenFlow13
# 在S1上添加实现多路径的组.
ovs-ofctl -O OpenFlow13 add-group s1
group_id=5566,type=select,bucket=output:4,bucket=output:5,bucket=output:6
# 查看添加的组规则
ovs-ofctl -O OpenFlow13 dump-groups s1
OFPST_GROUP_DESC reply (OF1.3) (xid=0x2):
group_id=5566,type=select,bucket=actions=output:4,bucket=actions=output:5,bucket=actions=output:6
# 在S1上添加C1、C2、C3进入的流规则
# (1) 把端口1~3进入的流量都定向导组ID为5566的多路径桶中,让其自动选择转发端口.
ovs-ofctl -O OpenFlow13 add-flow s1 priority=10,in_port=1,actions=group:5566
ovs-ofctl -O OpenFlow13 add-flow s1 priority=10,in_port=2,actions=group:5566
ovs-ofctl -O OpenFlow13 add-flow s1 priority=10,in_port=3,actions=group:5566
# (2) 添加进入C1~3的流规则
ovs-ofctl -O OpenFlow13 add-flow s1 priority=1,ip,ip_dst=192.168.0.101,actions=output:1
ovs-ofctl -O OpenFlow13 add-flow s1 priority=1,ip,ip_dst=192.168.0.102,actions=output:2
ovs-ofctl -O OpenFlow13 add-flow s1 priority=1,ip,ip_dst=192.168.0.103,actions=output:3
ovs-ofctl -O OpenFlow13 add-flow s1 priority=1,arp,ip_dst=192.168.0.101,actions=output:1
ovs-ofctl -O OpenFlow13 add-flow s1 priority=1,arp,ip_dst=192.168.0.102,actions=output:2
ovs-ofctl -O OpenFlow13 add-flow s1 priority=1,arp,ip_dst=192.168.0.103,actions=output:3
# 注:
# 添加priority是希望,流规则匹配时优先匹配协议地址,若是去往S1直连主机,则可直接转发.
# 避免先走多路径导致网络不通 或 多走冤枉路。优先级的值是越小越优先。
#疑问:
# OpenFlow中有0~254张流表,ovs-ofctl命令中mod-table参数可修改流表的行为,其中man手册中
#说OpenFlow1.0流表匹配是从0查到254,找到第一个匹配流表项终止,OpenFlow1.2以上,似乎不是这样,
#我测试了将ip,arp的匹配项放到table 0中, 将多路径的匹配项放到table 1中,但发现table 1中没有任何
#匹配项,而且C1 ping h1~3都不通. 接着我将所有表项都放到table 1中,结果全都不通了,而且流表项都
#没有匹配. 我尝试 ovs-ofctl -O OpenFlow13 mod-table s1 1 continue,修改流表匹配行为,但没有
#效果,因此想通过在不同流表中添加规则实现优先的方式,我没能实现. 还没需继续学习。
# 在S21、S22、S23上添加防止环路的流规则
ovs-ofctl -O OpenFlow13 add-flow s21 in_port=1,actions=output:2
ovs-ofctl -O OpenFlow13 add-flow s21 in_port=2,actions=output:1
ovs-ofctl -O OpenFlow13 add-flow s22 in_port=1,actions=output:2
ovs-ofctl -O OpenFlow13 add-flow s22 in_port=2,actions=output:1
ovs-ofctl -O OpenFlow13 add-flow s23 in_port=1,actions=output:2
ovs-ofctl -O OpenFlow13 add-flow s23 in_port=2,actions=output:1
# 在S3上添加流规则
ovs-ofctl -O OpenFlow13 add-flow s3 ip,ip_dst=192.168.0.1,actions=output:1
ovs-ofctl -O OpenFlow13 add-flow s3 ip,ip_dst=192.168.0.2,actions=output:2
ovs-ofctl -O OpenFlow13 add-flow s3 ip,ip_dst=192.168.0.3,actions=output:3
ovs-ofctl -O OpenFlow13 add-flow s3 arp,ip_dst=192.168.0.1,actions=output:1
ovs-ofctl -O OpenFlow13 add-flow s3 arp,ip_dst=192.168.0.2,actions=output:2
ovs-ofctl -O OpenFlow13 add-flow s3 arp,ip_dst=192.168.0.3,actions=output:3
ovs-ofctl -O OpenFlow13 add-flow s3 ip,ip_dst=192.168.0.101,actions=output:4
ovs-ofctl -O OpenFlow13 add-flow s3 ip,ip_dst=192.168.0.102,actions=output:5
ovs-ofctl -O OpenFlow13 add-flow s3 ip,ip_dst=192.168.0.103,actions=output:6
ovs-ofctl -O OpenFlow13 add-flow s3 arp,ip_dst=192.168.0.101,actions=output:4
ovs-ofctl -O OpenFlow13 add-flow s3 arp,ip_dst=192.168.0.102,actions=output:5
ovs-ofctl -O OpenFlow13 add-flow s3 arp,ip_dst=192.168.0.103,actions=output:6
#查看流规则
ovs-ofctl -O OpenFlow13 dump-flows s1
#测试:
# C1 ping C2
[root@node2 ~]# ip netns exec c1 ping 192.168.0.102
PING 192.168.0.102 (192.168.0.102) 56(84) bytes of data.
64 bytes from 192.168.0.102: icmp_seq=1 ttl=64 time=1.47 ms
# C1 ping h1
[root@node2 ~]# ip netns exec c1 ping 192.168.0.1
PING 192.168.0.1 (192.168.0.1) 56(84) bytes of data.
64 bytes from 192.168.0.1: icmp_seq=1 ttl=64 time=6.32 ms
# h1 ping C3
[root@node2 ~]# ip netns exec h1 ping 192.168.0.103
PING 192.168.0.103 (192.168.0.103) 56(84) bytes of data.
64 bytes from 192.168.0.103: icmp_seq=1 ttl=64 time=4.02 ms
# h1 ping h3
[root@node2 ~]# ip netns exec h1 ping 192.168.0.3
PING 192.168.0.3 (192.168.0.3) 56(84) bytes of data.
64 bytes from 192.168.0.3: icmp_seq=1 ttl=64 time=2.50 ms
# 查看流规则匹配情况,n_packets 可用来判断流规则匹配次数.
[root@node2 ~]# ovs-ofctl -O OpenFlow13 dump-flows s1
OFPST_FLOW reply (OF1.3) (xid=0x2):
cookie=0x0, duration=12107.097s, table=0, n_packets=4, n_bytes=168, priority=1,arp,arp_tpa=192.168.0.103 actions=output:3
cookie=0x0, duration=12152.967s, table=0, n_packets=4, n_bytes=392, priority=1,ip,nw_dst=192.168.0.101 actions=output:1
cookie=0x0, duration=12121.400s, table=0, n_packets=2, n_bytes=84, priority=1,arp,arp_tpa=192.168.0.102 actions=output:2
。。。。
3. OVS的SPAN功能测试
SPAN:Switched Port Analyzer(交换端口分析器),这是一种交换机端口镜像技术,目的是将某些端口进入和出去的流量都,复制一份到指定端口 做协议分析.
注:端口监控分为两种:本地SPAN 和 远程SPAN(RSPAN),RSPAN:通常采用VLAN来实现将跨交换机的复制端口流量.
拓扑:
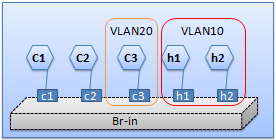
本地SPAN:
ovs-vsctl add-br s1
# OVS交换机 S1 上的连线
ovs-vsctl add-port s1 c1
ovs-vsctl set interface c1 type=internal
ip link set c1 netns c1
ip netns exec c1 ifconfig c1 10.0.0.1/24 up
ovs-vsctl add-port s1 c2
ovs-vsctl set interface c2 type=internal
ip link set c2 netns c2
ip netns exec c2 ifconfig c2 10.0.0.2/24 up
ovs-vsctl add-port s1 c3
ovs-vsctl set interface c3 type=internal -- set port c3 tag=20
ip link set c3 netns c3
ip netns exec c3 ifconfig c3 10.0.0.3/24 up
# OVS交换机 S3 上的连线
ovs-vsctl add-port s3 h1
ovs-vsctl set interface h1 type=internal -- set port h1 tag=10
ip link set h1 netns h1
ip netns exec h1 ifconfig h1 192.168.0.1/24 up
ovs-vsctl add-port s3 h2
ovs-vsctl set interface h2 type=internal -- set port h2 tag=10
ip link set h2 netns h2
ip netns exec h2 ifconfig h2 192.168.0.2/24 up
# 将C1、C2的流量镜像到C3端口.
ovs-vsctl set bridge s1 mirrors=@mymirror1
-- --id=@monPort1 get port c1
-- --id=@monPort2 get port c2
-- --id=@AnalyzerPort get port c3
-- --id=@mymirror1
create mirror name=testMirror1 select-dst-port=@monPort1,@monPort2 output-port=@AnalyzerPort
#查看Mirror配置
[root@node2 ~]# ovs-vsctl list mirror
_uuid : 2933ec23-2548-4726-9c0e-1af09be722e7
external_ids : {}
name : "testMirror1"
output_port : 881345f5-af51-4a4c-9a74-7f0f1697f78e
output_vlan : []
select_all : false
# "4eaa1eb5-3bc8-4df9-98c7-eaf254adacd4": 此为端口的uuid
select_dst_port : [4eaa1eb5-3bc8-4df9-98c7-eaf254adacd4, 6ba87998-9176-499a-bfc7-ba6b054965ea]
select_src_port : [4eaa1eb5-3bc8-4df9-98c7-eaf254adacd4, 6ba87998-9176-499a-bfc7-ba6b054965ea]
select_vlan : []
statistics : {tx_bytes=0, tx_packets=0}
#查看C3端口上收到的报文:
[root@node2 ~]# ip netns exec c3 tcpdump -enpi c3
tcpdump: verbose output suppressed, use -v or -vv for full protocol decode
listening on c3, link-type EN10MB (Ethernet), capture size 65535 bytes
03:38:47.558423 fa:9d:2c:d8:1c:f0 > Broadcast, ethertype ARP (0x0806), length 42: Request who-has 10.0.0.2 tell 10.0.0.1, length 28
03:38:47.559365 da:a3:6e:d1:83:3c > fa:9d:2c:d8:1c:f0, ethertype ARP (0x0806), length 42: Reply 10.0.0.2 is-at da:a3:6e:d1:83:3c, length 28
03:38:47.559488 fa:9d:2c:d8:1c:f0 > da:a3:6e:d1:83:3c, ethertype IPv4 (0x0800), length 98: 10.0.0.1 > 10.0.0.2: ICMP echo request, id 60252, seq 1, length 64
03:38:47.559876 da:a3:6e:d1:83:3c > fa:9d:2c:d8:1c:f0, ethertype IPv4 (0x0800), length 98: 10.0.0.2 > 10.0.0.1: ICMP echo reply, id 60252, seq 1, length 64
RSPAN的配置:
ovs-vsctl
-- --id=@myMirror2
create mirror name=testRSPAN select-all=true select-vlan=10 output-vlan=20
-- set bridge s1 mirrors=@myMirror2
GRE隧道的SPAN配置参考:
ovs-vsctl add-br br0
ovs-vsctl add-port br0 eth0
ovs-vsctl add-port br0 tap0
ovs-vsctl add-port br0 gre0
-- set interface gre0 type=gre options:remote_ip=192.168.1.10
-- --id=@p get port gre0
-- --id=@m create mirror name=m0 select-all=true output-port=@p
-- set bridge br0 mirrors=@m
删除SPAN 和 删除 GRE参考:
ovs-vsctl clear bridge br0 mirrors
ovs-vsctl del-port br0 gre0
OpenVSwitch2.0.0版本则参考配置:
# ovs-vsctl -- set Bridge br-vxlan mirrors=@my1
-- --id=@m1 get port tun0 -- --id=@a1 get port p1
-- --id=@my1 create mirror name=t1 select-dst-port=@m1 select-src-port=@m1 output-port=@a1
85df4437-c903-4110-9061-1d54d36c0427
# ovs-vsctl list mirror
_uuid : 85df4437-c903-4110-9061-1d54d36c0427
external_ids : {}
name : "t1"
output_port : 206ace18-b3e6-4423-9216-5088a60b82c1
output_vlan : []
select_all : false
select_dst_port : [8e1dd937-dd97-4446-89c8-af304ff960a5]
select_src_port : [8e1dd937-dd97-4446-89c8-af304ff960a5]
select_vlan : []
statistics : {tx_bytes=0, tx_packets=0}