本章内容:
- 线程的基本概念
- 线程的创建和启动
- 线程的调度和优先级
- 线程的状态控制
- 线程同步
1、线程基本概念:
线程:一个程序里面不同的执行路径(main()方法叫主线程)。
进程:只是一个静态的概念,例如:机器上的一个.class文件,机器上的一个.exe文件这个叫一个进程
多线程: 在同一个时间点上,一个CPU只能支持一个线程在执行
程序执行过程:
把程序的代码放到内存(代码区)里面,放进去之后并没开始执行,这个时候说明一个进程已经产生了,
但还没开始执行,这叫一个进程。进程是一个静态的概念,平时所说的进程的执行说的是进程里面主线程
(main方法)开始执行。进程是一个静态概念,实际上机器里面运行的都是线程。
CPU的执行是这样的:
CPU的速度很快,一秒钟可以算好几亿次,因此CPU把自己的时间分成一个个小时间片,我这个时间片执行你一会,下一个时间片执行他一会,再下一个时间片又执行其他人一会,虽然有几十个线程,但一样可以在很短的时间内把他们通通都执行一遍,但对我们人来说,CPU的执行速度太快了,因此看起来就像是在同时执行一样,但实际上在一个时间点上,CPU只有一个线程在运行。什么才是真正的多线程?如果你的机器是双CPU,或者是双核,这确确实实是多线程。

2、线程的创建和启动
- java的线程是通过java.lang.Thread类来实现的
- VM启动时会有一个由主方法(public static void main() {} )所定义的线程
- 可以通过创建Thread的实例来创建新的线程
- 每个线程都是通过某个特定的Thread对象所对应的方法run()来完成操作的,方法run()称为线程体
- 通过调用Thread类的start()方法来启动一个线程
创建一个新的线程:
- 实现Runnable接口
- 继承Thread类
实现Runnable接口:(Runnable接口只有一个run方法,重写run方法后,需要调用Thread中的start()方法就必须new一个Thread出来,并把线程类对象作为实参传入)
public class Test {
        public static void main(String[] args) {
                MyRunner mr = new MyRunner();//new一个线程类的对象
                //mr.run();  方法调用,方法调用的执行是等run()方法执行完之后才会继续执行main()方法
                Thread th = new Thread(mr);//要启动一个线程类就必须new一个Thread对象出来,调用Thread(Runnable target)构造方法
                th.start();//启动新开辟的线程,新线程执行的是run()方法,新线程与主线程并行执行

                for(int i = 0; i < 100; i ++) {
                        System.out.println("MainThread ------ " + i);
                }
        }
}
//定义一个类来实现Runnable接口,实现Runnable接口就表示这个类是一个线程类
class MyRunner implements Runnable {
      public void run() {
        for(int i = 0; i < 100; i ++) {
                System.out.println("MyRunner : " + i);
        }
      }
}
继承Thread类:(Thread的子类要重写run方法,然后调用Thread的start方法启动新线程)
public class Test {
        public static void main(String[] args) {
                MyRunner mr = new MyRunner();
                mr.start();//调用start()方法启动新开辟的线程
                for(int i=0; i<=100; i++) {
                        System.out.println("MainThread ----" + i);
                }
        }
}
/*
MyRunner类从Thread类继承,通过实例化MyRunner的一个对象就能开辟一个新的线程,
调用从Thread类继承来的start()方法就可以启动新开辟的线程
*/
class MyRunner extends Thread {
        public void run() {
                for(int i=0; i<=100; i++) {
                        System.out.println("MyRunner : " + i);
                }
        }
}
使用实现Runnable接口和继承Thread类这两种开辟新线程的方法的选择应该优先选择实现Runnable接口这种方式去开辟一个新的线程。因为接口的实现可以实现多个,而类的继承只能是单继承。因此在开辟新线程时能够使用Runnable接口就尽量不要使用从Thread类继承的方式来开辟新的线程
3、线程的调度和优先级

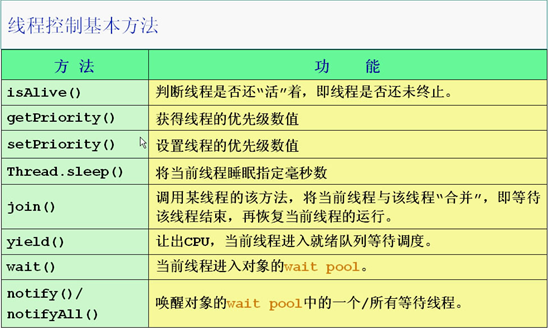
isAlive:就绪、运行、阻塞状态表示还“活”着,终止、new出来没有启动也是“死”的
4、线程的状态控制
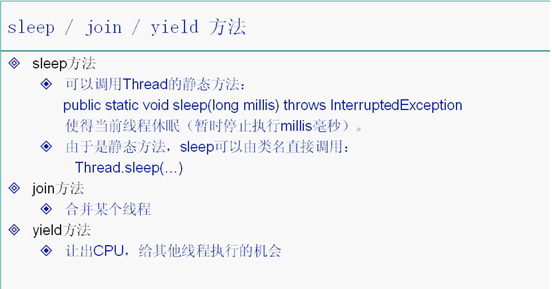
sleep方法实例:
import java.util.*;//包中存放了Date()方法

public class Test {
    public static void main(String[] args) {
        MyRunner mr = new MyRunner();
        Thread tr = new Thread(mr);
        tr.start();//start自动调用run()方法开始新的进程

        try {
            Thread.sleep(10000);//sleep为静态方法,可以通过类直接调用,main进程暂停执行10s
        } catch(InterruptedException ae) {
            // no
        }
        tr.interrupt();
    }
}

class MyRunner implements Runnable {
    public void run() {
        while(true) {
            System.out.println("====" + new Date() + "====");
            try {
                Thread.sleep(1000);//为什么用Thread.sleep,不能用MyRunner.sleep()
            } catch(InterruptedException ae) {
                return; //进程停止,不使用return,会一直输出时间,不停止
            }

        }
    }
}
john方法:
public class Test {
    public static void main(String[] args) {
        MyRunner mr = new MyRunner();
        Thread tr = new Thread(mr);
        tr.start();

        try {
            tr.join();//效果相当于方法调用
        } catch(InterruptedException ae) {
            //
        }

        for(int i=1; i<=10; i++) {
                System.out.println("i am main Thread");
            }
    }
}

class MyRunner implements Runnable {
    public void run() {
        for(int i=0; i<=10; i++) {
            System.out.println("i am" + i);
            try {
                Thread.sleep(1000);
            } catch(InterruptedException ae) {
                return;
            }
        }
    }
}
yield方法:
线程的优先级:
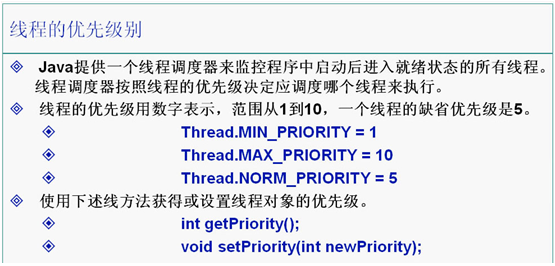
public class Test {
    public static void main(String[] args) {
        Thread t1 = new Thread(new T1());
        Thread t2 = new Thread(new T2());
        t1.setPriority(Thread.NORM_PRIORITY + 3);
        t1.start();
        t2.start();
        //因为是多线程,"t1的优先级:" + t1.getPriority() 语句不一定是在最后输出
        System.out.println("t1的优先级:" + t1.getPriority());
    }
}

class T1 implements Runnable {
    public void run() {
        for(int i=0; i<=10; i++) {
            System.out.println("-----T1  " + i);
        }
    }
}

class T2 implements Runnable {
    public void run() {
        for(int i=0; i<=10; i++) {
            System.out.println("-----T2  " + i);
        }
    }
}
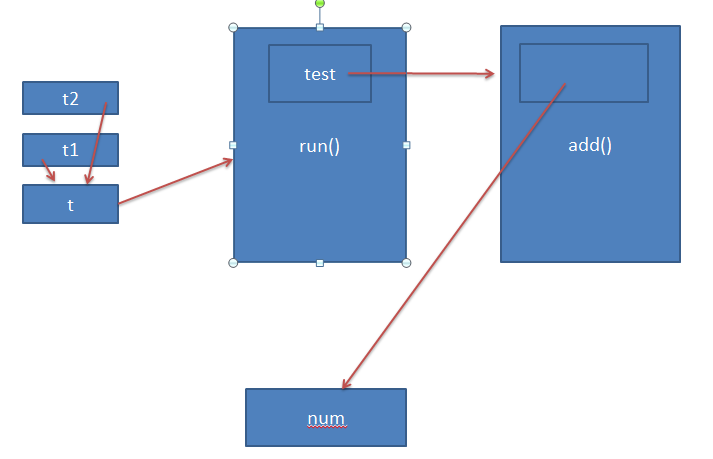
5、线程同步


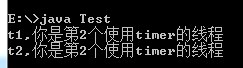
public class Test implements Runnable {
    Timer test = new Timer();
    public static void main(String[] args) {
        Test t = new Test();//new线程类对象
        Thread t1 = new Thread(t);
        Thread t2 = new Thread(t);
        t1.setName("t1");
        t2.setName("t2");
        t1.start();
        t2.start();
    }
    public void run() {
        test.add(Thread.currentThread().getName());
    }
}

class Timer {
    private static int num = 0;
    public void add(String name) {
            num ++;
            try {
                Thread.sleep(1);//即使不写sleep,第一个线程执行过程中也很可能被第二个线程打断。Thread.sleep(1)只是为了放大这个效果
            } catch(InterruptedException e) {
                // no
            }
            System.out.println(name + ",你是第" + num + "个使用timer的线程");
    }
}
防止一个线程在执行过程中被另外的线程打断:
- synchronized 声明方法
- 将代码写在synchronized(this){}方法体中
public class Test implements Runnable {
    Timer test = new Timer();
    public static void main(String[] args) {
        Test t = new Test();//new线程类对象
        Thread t1 = new Thread(t);
        Thread t2 = new Thread(t);
        t1.setName("t1");//改变线程名称,使之与参数 name 相同
        t2.setName("t2");
        t1.start();//调用run()方法
        t2.start();
    }
    public void run() {
        test.add(Thread.currentThread().getName());
    }
}

class Timer {
    private static int num = 0;
    public synchronized void add(String name) {// 在声明方法时加入synchronized时表示在执行这个方法的过程之中当前对象被锁
        //synchronized(this) {  锁定当前对象(一个线程在执行方法体语句过程中不会被另外一个线程打断)
            num ++;
            try {
                Thread.sleep(1);//即使不写sleep,第一个线程执行过程中也很可能被第二个线程打断。Thread.sleep(1)只是为了放大这个效果
            } catch(InterruptedException e) {
                // no
            }
            System.out.println(name + ",你是第" + num + "个使用timer的线程");
        //}
    }
}

线程死锁:
/*这个小程序模拟的是线程死锁的问题*/
public class TestDeadLock implements Runnable {
    public int flag = 1;
    static Object o1 = new Object(), o2 = new Object();

    public void run() {
        System.out.println(Thread.currentThread().getName() + "的flag=" + flag);
        /*
         * 运行程序后发现程序执行到这里打印出flag以后就再也不往下执行后面的if语句了
         * 程序也就死在了这里,既不往下执行也不退出
         */

        /* 这是flag=1这个线程 */
        if (flag == 1) {
            synchronized (o1) {
                /* 使用synchronized关键字把对象01锁定了 */
                try {
                    Thread.sleep(500);
                } catch (InterruptedException e) {
                    e.printStackTrace();
                }
                synchronized (o2) {
                    /*
                     * 前面已经锁住了对象o1,只要再能锁住o2,那么就能执行打印出1的操作了
                     * 可是这里无法锁定对象o2,因为在另外一个flag=0这个线程里面已经把对象o1给锁住了
                     * 尽管锁住o2这个对象的线程会每隔500毫秒睡眠一次,可是在睡眠的时候仍然是锁住o2不放的
                     */
                    System.out.println("1");
                }
            }
        }
        /*
         * 这里的两个if语句都将无法执行,因为已经造成了线程死锁的问题
         * flag=1这个线程在等待flag=0这个线程把对象o2的锁解开,
         * 而flag=0这个线程也在等待flag=1这个线程把对象o1的锁解开
         * 然而这两个线程都不愿意解开锁住的对象,所以就造成了线程死锁的问题
         */

        /* 这是flag=0这个线程 */
        if (flag == 0) {
            synchronized (o2) {
                /* 这里先使用synchronized锁住对象o2 */
                try {
                    Thread.sleep(500);
                } catch (InterruptedException e) {
                    e.printStackTrace();
                }
                synchronized (o1) {
                    /*
                     * 前面已经锁住了对象o2,只要再能锁住o1,那么就能执行打印出0的操作了 可是这里无法锁定对象o1,因为在另外一个flag=1这个线程里面已经把对象o1给锁住了 尽管锁住o1这个对象的线程会每隔500毫秒睡眠一次,可是在睡眠的时候仍然是锁住o1不放的
                     */
                    System.out.println("0");
                }
            }
        }
    }

    public static void main(String args[]) {
        TestDeadLock td1 = new TestDeadLock();
        TestDeadLock td2 = new TestDeadLock();
        td1.flag = 1;
        td2.flag = 0;
        Thread t1 = new Thread(td1);
        Thread t2 = new Thread(td2);
        t1.setName("线程td1");
        t2.setName("线程td2");
        t1.start();
        t2.start();
    }
}