说明:此处仅介绍 Keepalived 实现nginx负载均衡器的高可用,关于nginx介绍和负载均衡实现可查看我的另两篇博文 Nginx负载均衡 和 Nginx配置了解
应用背景:实现高可用,避免单点故障
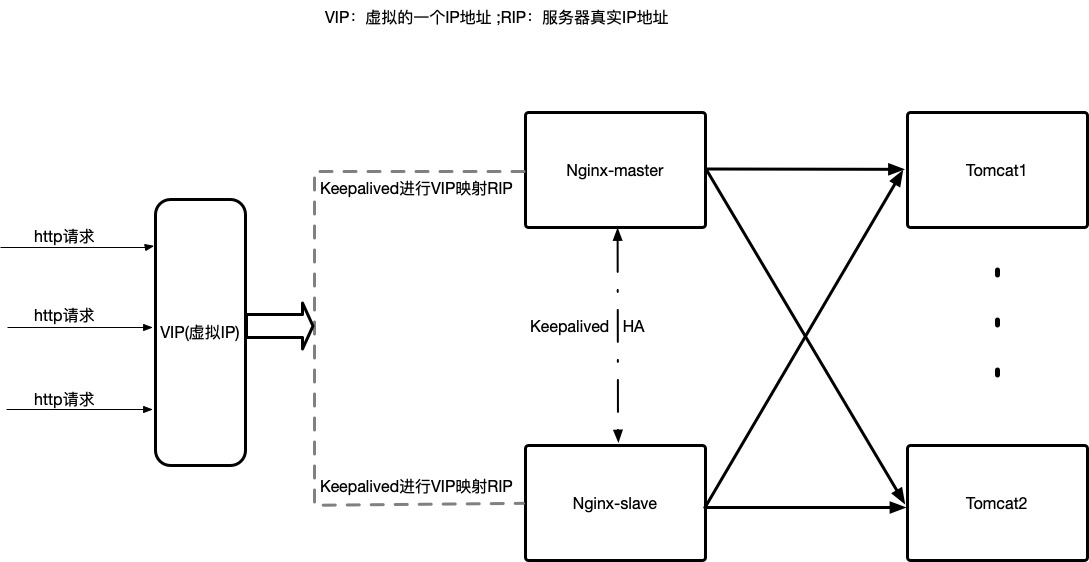
技术实现:使用2台虚拟机通过Keepalived工具来实现 nginx 的高可用(High Avaiability),达到一台nginx入口服务器宕机,另一台备机自动接管服务的效果。(nginx做反向代理,实现后端应用服务器的负载均衡)
环境准备
192.168.182.130:nginx + keepalived master
192.168.182.133:nginx + keepalived backup
192.168.182.131:tomcat
192.168.182.132:tomcat
虚拟ip(VIP):192.168.182.100,对外提供服务的ip,也可称作浮动ip
各个组件之间的关系图如下:

在Nginx负载均衡的基础上再配置一台nginx服务器用于负载均衡器,也就是此处的192.168.182.133服务器。
安装Keepalived
在两台nginx服务器分别安装keepalived,步骤如下:
keepalived源码包下载地址:http://www.keepalived.org/download.html
tar -zvxf keepalived-1.4.0.tar.gz
cd keepalived-1.4.0
4、查看安装环境是否适合,并指定安装目录;
./configure --prefix=/usr/local/keepalived
5、系统出现警告:*** WARNING - this build will not support IPVS with IPv6. Please install libnl/libnl-3 dev libraries to support IPv6 with IPVS.
yum -y install libnl libnl-devel
6、 安装完以后重新查看安装环境是否适合,并指定安装目录
./configure --prefix=/usr/local/keepalived
7、出现错误: configure: error: libnfnetlink headers missing
yum install -y libnfnetlink-devel
8、安装完以后重新查看安装环境是否适合,并指定安装目录
./configure --prefix=/usr/local/keepalived
9、显示环境符合,可进行keepalived安装
make && make install
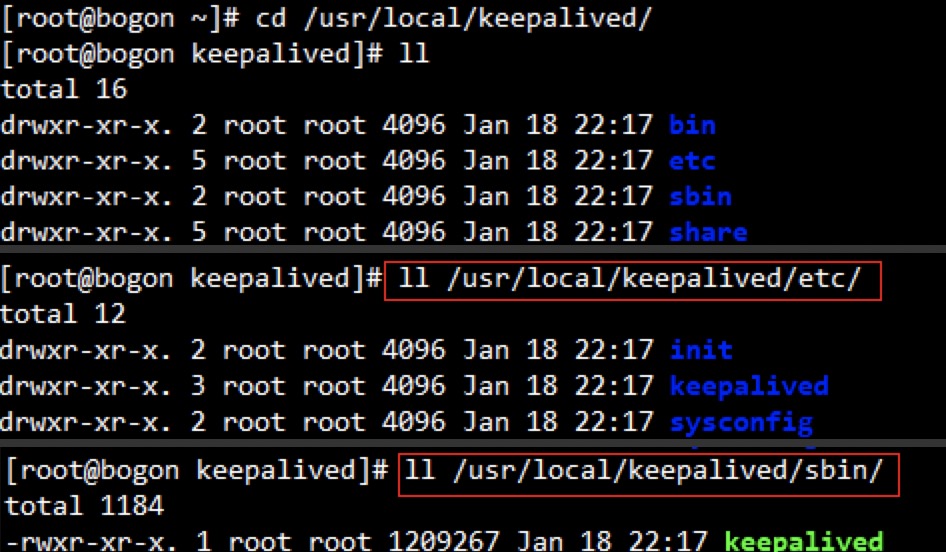
10、进入指定安装目录可看到如下目录结构:

11、把keepalived配置到系统服务
mkdir /etc/keepalived/
cp /usr/local/keepalived/etc/keepalived/keepalived.conf  /etc/keepalived/
cp /usr/local/keepalived/etc/init/keepalived.conf        /etc/init.d/keepalived
cp /usr/local/keepalived/etc/sysconfig/keepalived        /etc/sysconfig/
12、自定义编辑keepalived执行脚本
vi /etc/init.d/keepalived
keepalived脚本文件如下:
#!/bin/sh
#
# keepalived   High Availability monitor built upon LVS and VRRP
#
# chkconfig:   - 86 14
# description: Robust keepalive facility to the Linux Virtual Server project
#              with multilayer TCP/IP stack checks.

### BEGIN INIT INFO
# Provides: keepalived
# Required-Start: $local_fs $network $named $syslog
# Required-Stop: $local_fs $network $named $syslog
# Should-Start: smtpdaemon httpd
# Should-Stop: smtpdaemon httpd
# Default-Start:
# Default-Stop: 0 1 2 3 4 5 6
# Short-Description: High Availability monitor built upon LVS and VRRP
# Description:       Robust keepalive facility to the Linux Virtual Server
#                    project with multilayer TCP/IP stack checks.
### END INIT INFO

# Source function library.
. /etc/rc.d/init.d/functions

exec="/usr/local/keepalived/sbin/keepalived"
prog="keepalived"
config="/etc/keepalived/keepalived.conf"

[ -e /etc/sysconfig/$prog ] && . /etc/sysconfig/$prog

lockfile=/var/lock/subsys/keepalived

start() {
    [ -x $exec ] || exit 5
    [ -e $config ] || exit 6
    echo -n $"Starting $prog: "
    daemon $exec $KEEPALIVED_OPTIONS
    retval=$?
    echo
    [ $retval -eq 0 ] && touch $lock-file
    return $retval
}

stop() {
    echo -n $"Stopping $prog: "
    killproc $prog
    retval=$?
    echo
    [ $retval -eq 0 ] && rm -f $lockfile
    return $retval
}

restart() {
    stop
    start
}

reload() {
    echo -n $"Reloading $prog: "
    killproc $prog -1
    retval=$?
    echo
    return $retval
}

force_reload() {
    restart
}

rh_status() {
    status $prog
}

rh_status_q() {
    rh_status &>/dev/null
}


case "$1" in
    start)
        rh_status_q && exit 0
        $1
        ;;
    stop)
        rh_status_q || exit 0
        $1
        ;;
    restart)
        $1
        ;;
    reload)
        rh_status_q || exit 7
        $1
        ;;
    force-reload)
        force_reload
        ;;
    status)
        rh_status
        ;;
    condrestart|try-restart)
        rh_status_q || exit 0
        restart
        ;;
    *)
        echo $"Usage: $0 {start|stop|status|restart|condrestart|try-restart|reload|force-reload}"
        exit 2
esac
exit $?
- exec="/usr/sbin/keepalived" 修改成keepalived执行程序的路径。
- config="/etc/keepalived/keepalived.conf" 修改成keepalived核心配置文件的路径。
13、由于/etc/init.d/keepalived权限不够(白色字体),授权
chmod 755 /etc/init.d/keepalived
14、将keepalived添加到开机自启
vi /etc/rc.local
在编辑区将keepalived执行程序的路径添加到最后一行,如下:

注意:由于/etc/rc.local权限不够,需授权
chmod 755 /etc/rc.local
15、keepalived到此安装完成!
配置两台nginx服务器的keepalived,实现两台nginx负载均衡器高可用
1、先配置nginx-master,也就是192.168.182.130这台服务器
vi /etc/keepalived/keepalived.conf
keepalived.conf
global_defs {
   router_id 30   # 设置nginx-master服务器的ID,这个值在整个keepalived高可用架构中是唯一的,此处用IP末尾数标识
}

vrrp_script check_nginx {
    script "/etc/keepalived/check_nginx.sh"    # 配置keepalived监控nginx负载均衡服务器状态的脚本,看nginx是否挂掉等情况,然后做相应处理
    interval 5         # 检测脚本执行的时间间隔,单位是秒
}

vrrp_instance VI_1 {
    state MASTER                    # 指定keepalived的角色,MASTER为主,BACKUP为辅
    interface eth0          # 指定当前进行VRRP通讯的接口卡(此处是centos的网卡)
    virtual_router_id 51        # 虚拟路由编号,主从要一致,以表明主从服务器属于同一VRRP通讯协议小组
    mcast_src_ip 192.168.182.130    #  本机IP地址
    priority 100            # 优先级,数值越大,处理请求的优先级越高
    advert_int 1            # 检查间隔,默认1s(vrrp组播周期秒数)
    authentication {
        auth_type PASS
        auth_pass 1111
    }
    track_script {          #  调用检测脚本
        check_nginx
    }
    virtual_ipaddress {        # 定义虚拟IP(VIP),可设置多个,每行一个,两个节点设置的虚拟IP必须一致
        192.168.182.100
    }
}
2、将keepalived.conf配置中的监控脚本check_nginx.sh,放在配置中书写的路径下
#!/bin/bash
counter=$(ps -C nginx --no-heading|wc -l)
if [ "${counter}" = "0" ]; then
    /usr/local/nginx/sbin/nginx
    sleep 2
    counter=$(ps -C nginx --no-heading|wc -l)
    if [ "${counter}" = "0" ]; then
        /etc/init.d/keepalived stop
    fi
fi
3、端口调整
因为nginx服务器配置中显示,nginx默认监控端口80,所以为了80端口为我所用,先将nginx配置中默认的80端口修改为8888(只要不被占用即可),然后,在我们配置的server模块中,监听80端口,主机名改为localhost,这样,我们访问虚拟IP192.168.182.100(以为是80端口,所以不需要带端口号)时,才能映射到nginx服务器IP192.168.182.130,然后,nginx再去进行请求转发给两台tomcat真实服务器192.168.182.131和192.168.182.132中的一台
nginx-master配置nginx.conf修改为:
#user  nobody;
worker_processes  1;

#error_log  logs/error.log;
#error_log  logs/error.log  notice;
#error_log  logs/error.log  info;

#pid        logs/nginx.pid;


events {
    worker_connections  1024;
}


http {
    include       mime.types;
    default_type  application/octet-stream;

    #log_format  main  '$remote_addr - $remote_user [$time_local] "$request" '
    #                  '$status $body_bytes_sent "$http_referer" '
    #                  '"$http_user_agent" "$http_x_forwarded_for"';

    #access_log  logs/access.log  main;

    sendfile        on;
    #tcp_nopush     on;

    #keepalive_timeout  0;
    keepalive_timeout  65;

    #gzip  on;
    upstream serverCluster{
        server 192.168.182.131:8080 weight=1;
        server 192.168.182.132:8080 weight=1;
    }
    server {
       listen       8888;   # 此处默认80修改为8888
       server_name  localhost;

        #charset koi8-r;

        #access_log  logs/host.access.log  main;

       location / {
           root   html;
           index  index.html index.htm;
       }

        #error_page  404              /404.html;

        # redirect server error pages to the static page /50x.html
        #
        error_page   500 502 503 504  /50x.html;
        location = /50x.html {
            root   html;
        }

        # proxy the PHP scripts to Apache listening on 127.0.0.1:80
        #
        #location ~ .php$ {
        #    proxy_pass   http://127.0.0.1;
        #}

        # pass the PHP scripts to FastCGI server listening on 127.0.0.1:9000
        #
        #location ~ .php$ {
        #    root           html;
        #    fastcgi_pass   127.0.0.1:9000;
        #    fastcgi_index  index.php;
        #    fastcgi_param  SCRIPT_FILENAME  /scripts$fastcgi_script_name;
        #    include        fastcgi_params;
        #}

        # deny access to .htaccess files, if Apache's document root
        # concurs with nginx's one
        #
        #location ~ /.ht {
        #    deny  all;
        #}
    }


    # another virtual host using mix of IP-, name-, and port-based configuration
    #
    #server {
    #    listen       8000;
    #    listen       somename:8080;
    #    server_name  somename  alias  another.alias;

    #    location / {
    #        root   html;
    #        index  index.html index.htm;
    #    }
    #}

    server{
        listen 80;
        server_name localhost;

        location / {
            proxy_set_header Host $host;
            proxy_set_header X-Real-IP $remote_addr;
            proxy_set_header X-Forwarded-For $proxy_add_x_forwarded_for;
            proxy_pass http://serverCluster;
            expires 3d;
        }
    }
    # HTTPS server
    #
    #server {
    #    listen       443 ssl;
    #    server_name  localhost;

    #    ssl_certificate      cert.pem;
    #    ssl_certificate_key  cert.key;

    #    ssl_session_cache    shared:SSL:1m;
    #    ssl_session_timeout  5m;

    #    ssl_ciphers  HIGH:!aNULL:!MD5;
    #    ssl_prefer_server_ciphers  on;

    #    location / {
    #        root   html;
    #        index  index.html index.htm;
    #    }
    #}

}
4、端口调整结束后,重启keepalived,查看keepalived配置是否起作用

出现上图中eth0(我们配置的VRRP通信网卡就是eth0)红色标记中的内容,则表示虚拟IP成功映射真实服务器IP,keepalived配置成功!
5、同上1-4操作对nginx-slave,也就是IP为192.168.182.133的nginx负载均衡器从属进行配置
实验:
此处浏览器演示过程不再介绍,只把结论和演示过程中需要注意的地方进行陈述:
结论:
1、多次访问虚拟IP192.168.182.100,浏览器会轮流展示两台tomcat的页面,说明keepalived将虚拟IP映射到了nginx服务真实IP,并且nginx对请求进行了负载均衡。
2、将nginx-master手动停止nginx服务,几秒过后,再去检查nginx运行状态,会发现,nginx正在运行中,这说明,keepalived的配置中的监控nginx脚本文件成功运行。
3、将nginx-master手动停止keepalived服务,会发现,虚拟IP被转移到nginx-slave服务器,并且和nginx-slave真实IP进行映射,此时,用户继续访问虚拟IP192.168.182.100,并不会感知发生什么变化,但是真实情况是,nginx-master这台机器已经不再工作,担任系统负载均衡的变成了nginx-slave;如果你再把nginx-master的keepalived服务手动开启,则情况会初始化为原先的状态,即:nginx-master继续担任系统负载均衡角色,而nginx-slave则重新闲置,这种情况说明keepalived实现了nginx的高可用(HA)。
注意:
1、在实验测试过程中,有可能因为浏览器缓存的缘故导致结果出乎意料,所以在每次测试前,先清一下缓存
2、请求走向:访问虚拟IP(VIP),keepalived将请求映射到本地nginx,nginx将请求转发至tomcat,例如:http://192.168.182.100,被映射成http://192.168.182.130,端口是80,而130上nginx的端口正好是80;映射到nginx上后,nginx再进行请求的转发。
3、VIP总会在keepalived服务器中的某一台上,也只会在其中的某一台上;VIP绑定的服务器上的nginx就是master,当VIP所在的服务器宕机了,keepalived会将VIP转移到backup上,并将backup提升为master。
4、VIP也称浮动ip,是公网ip,与域名进行映射,对外提供服务; 其他ip一般而言都是内网ip, 外部是直接访问不了的