WebService历来都很受重视,特别是Java阵营,WebService框架和技术层出不穷。知名的XFile(新的如CXF)、Axis1、Axis2等。
而Sun公司也不甘落后,从早期的JAX-RPC到现在成熟的、支持RPC调用与消息传递的JAX-WS都经过了市场的考验,十分成熟,而且使用JAX-WS开发WebService的收益是很大的,它是轻量级的。
我们使用JAX-WS开发WebService只需要很简单的几个步骤:写接口和实现=>发布=>生成客户端(测试或使用)。
而在开发阶段我们也不需要导入外部jar包,因为这些api都是现成的。首先是接口的编写(接口中只需要把类注明为@WebService,把要暴露给客户端的方法注明为@WebMethod即可,其余如@WebResult、@WebParam等都不是必要的,而客户端和服务端的通信用RPC和Message-Oriented两种,区别和配置以后再说):
 1 package service;
 2
 3 import java.util.Date;
 4
 5 import javax.jws.WebMethod;
 6 import javax.jws.WebParam;
 7 import javax.jws.WebResult;
 8 import javax.jws.WebService;
 9 import javax.jws.soap.SOAPBinding;
10
11 /**
12  * 作为测试的WebService接口
13  *
14  * @author Johness
15  *
16  */
17 @WebService
18 @SOAPBinding(style = SOAPBinding.Style.RPC)
19 public interface SayHiService {
20
21     /**
22      * 执行测试的WebService方法
23      */
24     @WebMethod
25     void SayHiDefault();
26
27     /**
28      * 执行测试的WebService方法(有参)
29      *
30      * @param name
31      */
32     @WebMethod
33     void SayHi(@WebParam(name = "name") String name);
34
35     /**
36      * 执行测试的WebService方法(用于时间校验)
37      *
38      * @param clentTime 客户端时间
39      * @return 0表示时间校验失败 1表示校验成功
40      */
41     @WebMethod
42     @WebResult(name = "valid")
43     int CheckTime(@WebParam(name = "clientTime") Date clientTime);
44 }
然后是实现类(注解@WebService及其endpointInterface属性是必要的):
 1 package service.imp;
 2
 3 import java.text.SimpleDateFormat;
 4 import java.util.Date;
 5
 6 import javax.jws.WebService;
 7 import javax.jws.soap.SOAPBinding;
 8
 9 import service.SayHiService;
10
11 /**
12  * 作为测试的WebService实现类
13  *
14  * @author Johness
15  *
16  */
17 @WebService(endpointInterface = "service.SayHiService")
18 @SOAPBinding(style = SOAPBinding.Style.RPC)
19 public class SayHiServiceImp implements SayHiService {
20
21     @Override
22     public void SayHiDefault() {
23         System.out.println("Hi, Johness!");
24     }
25
26     @Override
27     public void SayHi(String name) {
28         System.out.println("Hi, " + name + "!");
29     }
30
31     @Override
32     public int CheckTime(Date clientTime) {
33         // 精确到秒
34         String dateServer = new java.sql.Date(System.currentTimeMillis())
35                 .toString()
36                 + " "
37                 + new java.sql.Time(System.currentTimeMillis());
38         String dateClient = new SimpleDateFormat("yyyy-MM-dd HH:mm:ss")
39                 .format(clientTime);
40         return dateServer.equals(dateClient) ? 1 : 0;
41     }
42
43 }
然后是发布(一般有两种方式):
方式一(此方式只能作为调试,有以下bug:
jdk1.6u17?以下编译器不支持以Endpoint.publish方式发布document方式的soap,必须在service接口和实现类添加“@SOAPBinding(style = SOAPBinding.Style.RPC)”注解;
访问受限,似乎只能本机访问(应该会绑定到publish的URL上,如下使用localhost的话就只能本机访问)……):
 1 package mian;
 2
 3 import javax.xml.ws.Endpoint;
 4
 5 import service.imp.SayHiServiceImp;
 6
 7 public class Main {
 8
 9     /**
10      * 发布WebService
11      * 简单
12      */
13     public static void main(String[] args) {
14         Endpoint.publish("http://localhost:8080/testjws/service/sayHi", new SayHiServiceImp());
15     }
16
17 }
方式二(基于web服务器Servlet方式):
以Tomcat为例,首先编写sun-jaxws.xml文件并放到WEB-INF下:
1 <?xml version="1.0" encoding="UTF-8"?>
2 <endpoints xmlns="http://java.sun.com/xml/ns/jax-ws/ri/runtime"
3     version="2.0">
4     <endpoint name="SayHiService"
5         implementation="service.imp.SayHiServiceImpl"
6         url-pattern="/service/sayHi" />
7 </endpoints>
然后改动web.xml,添加listener和servlet(url-pattern要相同哦):
 1 <?xml version="1.0" encoding="UTF-8"?>
 2 <web-app xmlns:xsi="http://www.w3.org/2001/XMLSchema-instance" xmlns="http://java.sun.com/xml/ns/javaee" xmlns:web="http://java.sun.com/xml/ns/javaee/web-app_2_5.xsd" xsi:schemaLocation="http://java.sun.com/xml/ns/javaee http://java.sun.com/xml/ns/javaee/web-app_2_5.xsd" version="2.5">
 3
 4     <listener>
 5         <listener-class>
 6             com.sun.xml.ws.transport.http.servlet.WSServletContextListener
 7         </listener-class>
 8     </listener>
 9     <servlet>
10         <servlet-name>SayHiService</servlet-name>
11         <servlet-class>
12             com.sun.xml.ws.transport.http.servlet.WSServlet
13         </servlet-class>
14     </servlet>
15     <servlet-mapping>
16         <servlet-name>SayHiService</servlet-name>
17         <url-pattern>/service/sayHi</url-pattern>
18     </servlet-mapping>
19
20     <welcome-file-list>
21         <welcome-file>index.html</welcome-file>
22         <welcome-file>index.htm</welcome-file>
23         <welcome-file>index.jsp</welcome-file>
24     </welcome-file-list>
25 </web-app>
最后部署到Tomcat里,值得一提的是您可能需要添加以下jar包(因为Tomcat没有):
启动Tomcat。
服务端工作就完成了,注意两个事情。
注意:项目需要使用UTF-8编码(至少sun-jaxws.xml必须是UTF-8格式的);
对于MyEclipse的内置Tomcat,可能会出现不需要手动添加上述jar包,但独立部署时应该添加,因为它们使用的class-path不一样;
多个不同路径的接口也要使用同一个WSServlet;
最好加上@SOAPBinding(style = SOAPBinding.Style.RPC)注解。
部署好了之后打开浏览器输入网址:http://localhost:8080/testjws/service/sayHi?wsdl。可以看到东西就证明发布成功了。
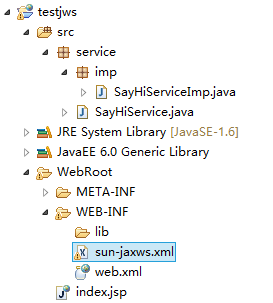
附上项目树状图:

最后是客户端使用,由于WebService是平台和语言无关的基于xml的,所以我们完全可以使用不同语言来编写或生成客户端。
一般有三种方式来使用(对于Java语言而言):
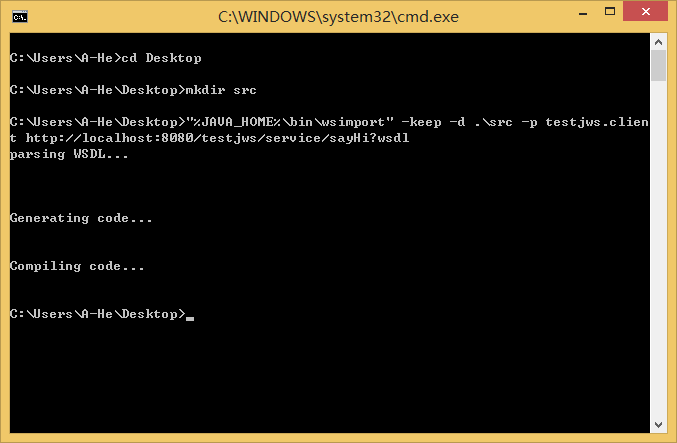
一,使用jdk自带工具wsimport生成客户端:

jdk自带的wsimport工具生成,上图我是把客户端文件生成到了桌面src文件中(-d),并保留了源文件(-keep),指定了包名(-p)。
然后我们就可以使用生成的文件来调用服务器暴露的方法了:

值得一提的是你生成使用的jdk和你客户端的jre需要配套!
从上面的目录结构我们可以发现:服务端的每个webmethod都被单独解析成为了一个类(如果使用了实体,实体也会被解析到客户端,并且是源码,所以建议使用实体时慎重)。
(上面的图是旧图,只是为了表示一下jaxws是为每个webmethod生成类的情况)
而我们的service则被生成了一个代理类来调用服务,接下来我们看看使用情况:
 1 package test;
 2
 3 import java.util.Date;
 4 import java.util.GregorianCalendar;
 5
 6 import javax.xml.datatype.DatatypeConfigurationException;
 7 import javax.xml.datatype.DatatypeFactory;
 8 import javax.xml.datatype.XMLGregorianCalendar;
 9
10 import testjws.client.SayHiService;
11 import testjws.client.SayHiServiceImpService;
12
13 public class Main {
14
15     public static void main(String[] args) throws DatatypeConfigurationException {
16         // 获取service
17         SayHiService service = new SayHiServiceImpService().getSayHiServiceImpPort();
18
19         // sayhi
20         service.sayHiDefault();
21         service.sayHi("Ahe");
22
23         // checktime
24         // 这里主要说一下时间日期的xml传递,方法还略显复杂
25         GregorianCalendar calender = new GregorianCalendar();
26         calender.setTime(new Date(System.currentTimeMillis()));
27         XMLGregorianCalendar xmldate = DatatypeFactory.newInstance().newXMLGregorianCalendar(calender);
28         System.out.println(service.checkTime(xmldate));
29
30     }
31
32 }
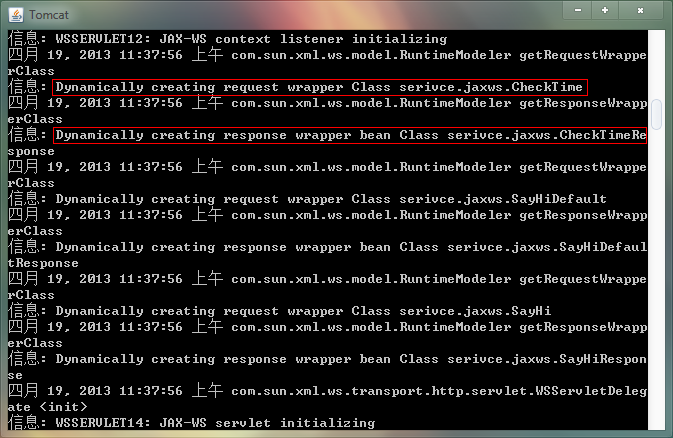
看看服务器的输出,我们是否调用成功:

成功了!
对于校验时间的方法客户端也收到反馈了:

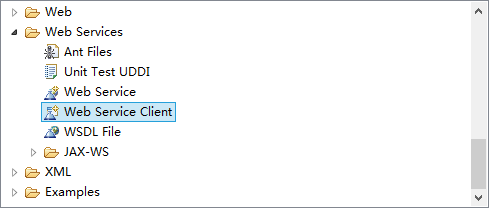
二,使用诸如MyEclipse(Eclipse for Jave EE也可以)创建一个Web Service Client的项目

然后填入wsdl地址即可,后续步骤我就不贴出了。
三,自己写代码-_-,其实这个方法不得不说是最好的。


