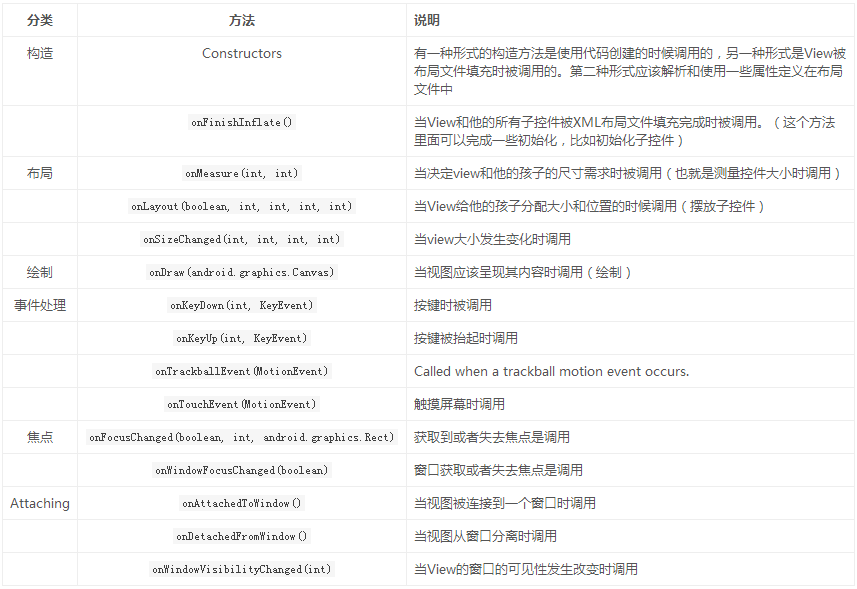
1,自定义控件一直是我们的痛点,今天就和大家一点点去了解了解,首先一般的自定义控件都是继承于View类,所以我们先来看看view的一些重要的方法,这是官方文档,大家想了解更多也可以去看看,这里我展示对我们常用到的,如下所示:
根据上面的方法,发现我们想绘制自己的view的话最简单的就是重写一下OnDraw()方法就行,今天和大家一起打造自己的Textview。
2,重写OnDraw()方法
创建一个MyTextView,继承自View类,这里我们要重写它的四个构造方法,一般重写前三个构造方法就行,它们的参数不一样分别对应不同的创建方式,比如只有一个Context参数的构造方法通常是通过代码初始化控件时使用;而两个参数的构造方法通常对应布局文件中控件被映射成对象时调用(需要解析属性);通常我们让这两个构造方法最终调用三个参数的构造方法,然后在第三个构造方法中进行一些初始化操作。
package com.qianmo.activitydetail;

import android.content.Context;
import android.graphics.Canvas;
import android.graphics.Color;
import android.graphics.Paint;
import android.graphics.Rect;
import android.support.annotation.Nullable;
import android.util.AttributeSet;
import android.util.Log;
import android.view.View;

/**
 * Created by wangjitao on 2017/3/20 0020.
 * E-Mail:543441727@qq.com
 */

public class MyTextView extends View {
    private final static String TAG = "MyTextView";

    //文字
    private String mText;

    //文字的颜色
    private int mTextColor;

    //文字的大小
    private int mTextSize;

    //绘制的范围
    private Rect mBound;
    private Paint mPaint;

    public MyTextView(Context context) {
        this(context, null);
    }

    public MyTextView(Context context, @Nullable AttributeSet attrs) {
        this(context, attrs, 0);
    }

    public MyTextView(Context context, @Nullable AttributeSet attrs, int defStyleAttr) {
        super(context, attrs, defStyleAttr);
        init();
    }

    /**
     * 初始化数据
     */
    private void init() {
        //初始化数据
        mText = " I Love You !";
        mTextColor = Color.RED;
        mTextSize = 30;

        //初始化Paint数据
        mPaint = new Paint();
        mPaint.setColor(mTextColor);
        mPaint.setTextSize(mTextSize);

        //获取绘制的宽高
        mBound = new Rect();
        mPaint.getTextBounds(mText, 0, mText.length(), mBound);
        Log.i(TAG, "Left :" + mBound.left + ",Right:" + mBound.right + ",Top:" + mBound.top + ",Bottom:" + mBound.bottom);
    }

    @Override
    protected void onDraw(Canvas canvas) {
        //绘制文字
        canvas.drawText(mText, getWidth() / 2 - mBound.width() / 2, getHeight() / 2 + mBound.height() / 2, mPaint);
        //注意一下我们这里的getWidth()和getHeight()是获取的px
        Log.i(TAG, "getWidth():" + getWidth() + ",getHeight(): " + getHeight());
    }
}
布局文件
<?xml version="1.0" encoding="utf-8"?>
<LinearLayout
    xmlns:android="http://schemas.android.com/apk/res/android"
    xmlns:app="http://schemas.android.com/apk/res-auto"
    xmlns:myview="http://schemas.android.com/apk/res-auto"
    android:layout_width="match_parent"
    android:layout_height="match_parent"
    android:orientation="vertical"
    >

    <com.qianmo.activitydetail.MyTextView
        android:layout_width="200dp"
        android:layout_height="100dp"
        />


</LinearLayout>
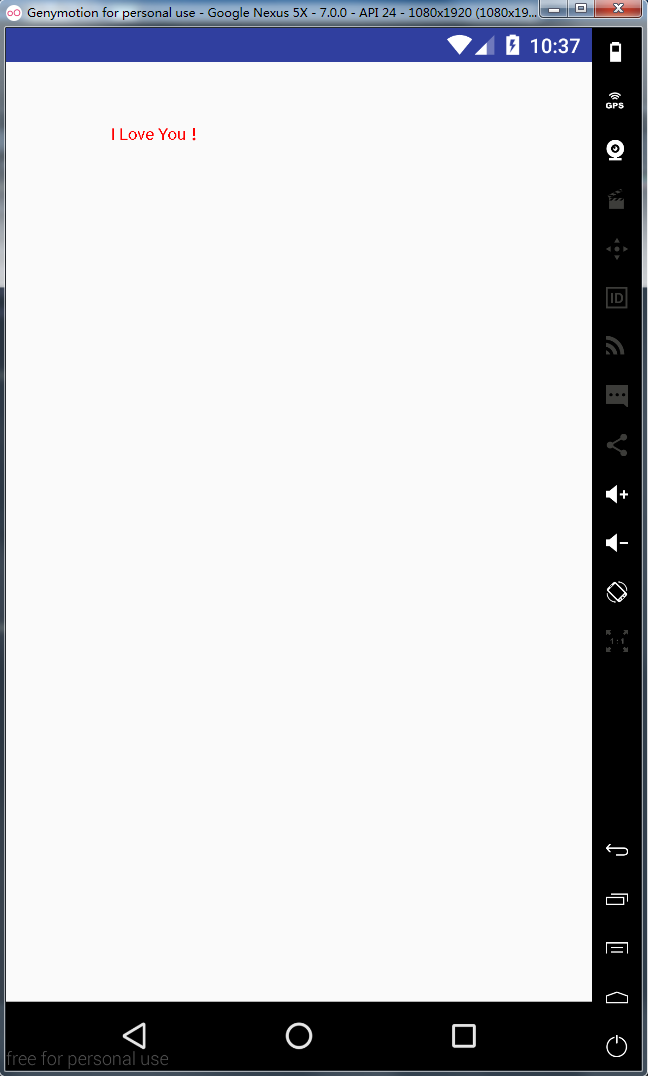
运行效果如下:
注意一下,这里我们一直有一个疑问一下我们在onDraw()方法中得到的宽度和高度的单位是什么呢?是px还是sp还dp?让我们看一看源码子解释的,这时候我们看一下源码
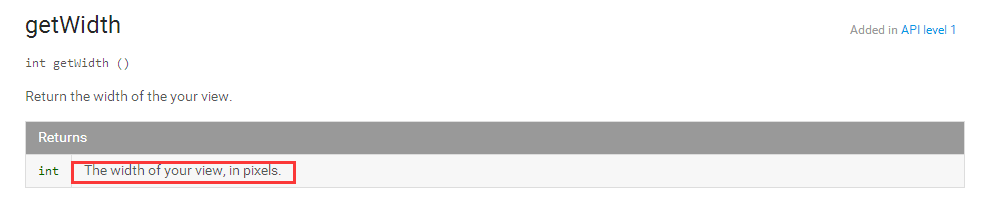
源码高速我们返回的是px像素,那么我们在xml文件中设置的宽度是200dp怎么转换成我们的px的呢?
举例:HVGA屏320*480,一般是3.5寸,计算点密度为√ (320^2 + 480^2) / 3.5 = 164,约等于160,1pd=1px,WVGA屏480*800,按3.8寸屏算,点密度 √ (480^2 + 800^2) / 3.8 = 245,约等于240,1dp=1.5px。
PPI = √(长度像素数² + 宽度像素数²) / 屏幕对角线英寸数
dp:Density-independent pixels,以160PPI屏幕为标准,则1dp=1px,
dp和px的换算公式 :
dp*ppi/160 = px。比如1dp x 320ppi/160 = 2px。
我们这个模拟器是1920*1080分辨率尺寸是5.2 按照上面的公式计算,我们机型的换算为大约得到 1dp = 2.75px
ok,题外话扯太多了
上面的代码我只是简单的写了下onDraw()方法,那我们现在有这一种需求,所写入的文字、文字颜色、文字大小等属性是可以有开发者动态控制的,那这时候我们该怎么办呢?这时候就要使用到我们的自定义属性了
3,自定义属性
在res/values文件下创建attrs文件,在文件下添加我们需要的自定义属性,format是这个属性的输入格式 ,具体代码如下:
<?xml version="1.0" encoding="utf-8"?>
<resources>
    <declare-styleable name="MyTextView2">
        <attr name="myText" format="string"/>
        <attr name="myTextColor" format="color"/>
        <attr name="myTextSize" format="dimension"/>
    </declare-styleable>
</resources>
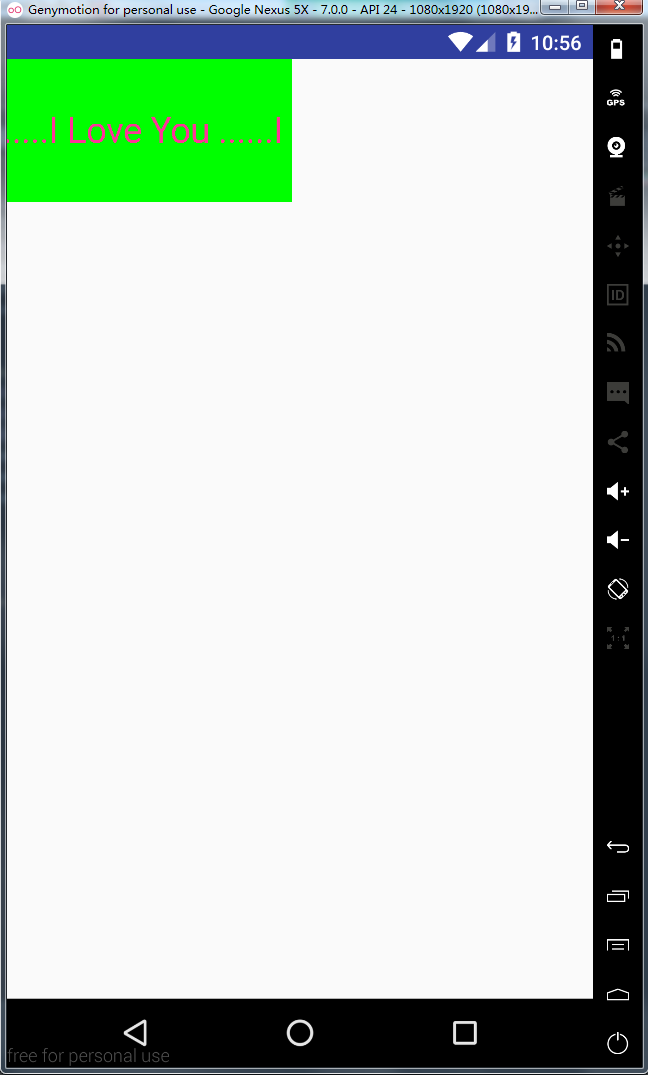
这时候我们在布局文件中想要使用我们的自定义属性需要在根父容器加上自己命名空间 如:xmlns:myview="http://schemas.android.com/apk/res-auto" ,前面的myview名字可以自己改变,再看一下我们在布局文件中怎么动态的设置我们的属性的
<com.qianmo.activitydetail.MyTextView2
        android:layout_width="200dp"
        android:layout_height="100dp"
        android:background="#00ff00"
        myview:myText=" I Love You ......"
        myview:myTextColor="#ff3399"
        myview:myTextSize="25sp"
        />
这时候在构造函数中去获取我们的自定义属性
 public MyTextView2(Context context, @Nullable AttributeSet attrs, int defStyleAttr) {
        super(context, attrs, defStyleAttr);
        init(context, attrs, defStyleAttr);
    }

    /**
     * 初始化数据
     */
    private void init(Context context, AttributeSet attrs, int defStyleAttr) {
        //获取自定义属性的值
        TypedArray a = context.getTheme().obtainStyledAttributes(attrs, R.styleable.MyTextView2, defStyleAttr, 0);
        mText = a.getString(R.styleable.MyTextView2_myText);
        mTextColor = a.getColor(R.styleable.MyTextView2_myTextColor, Color.BLACK);
        mTextSize = a.getDimension(R.styleable.MyTextView2_myTextSize, 30f);
        a.recycle();

        //初始化Paint数据
        mPaint = new Paint();
        mPaint.setColor(mTextColor);
        mPaint.setTextSize(mTextSize);

        //获取绘制的宽高
        mBound = new Rect();
        mPaint.getTextBounds(mText, 0, mText.length(), mBound);
        Log.i(TAG, "Left :" + mBound.left + ",Right:" + mBound.right + ",Top:" + mBound.top + ",Bottom:" + mBound.bottom);
    }
看一下我们的运行效果
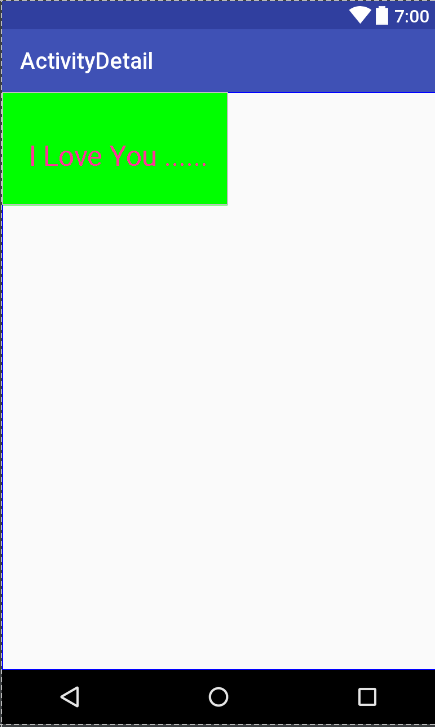
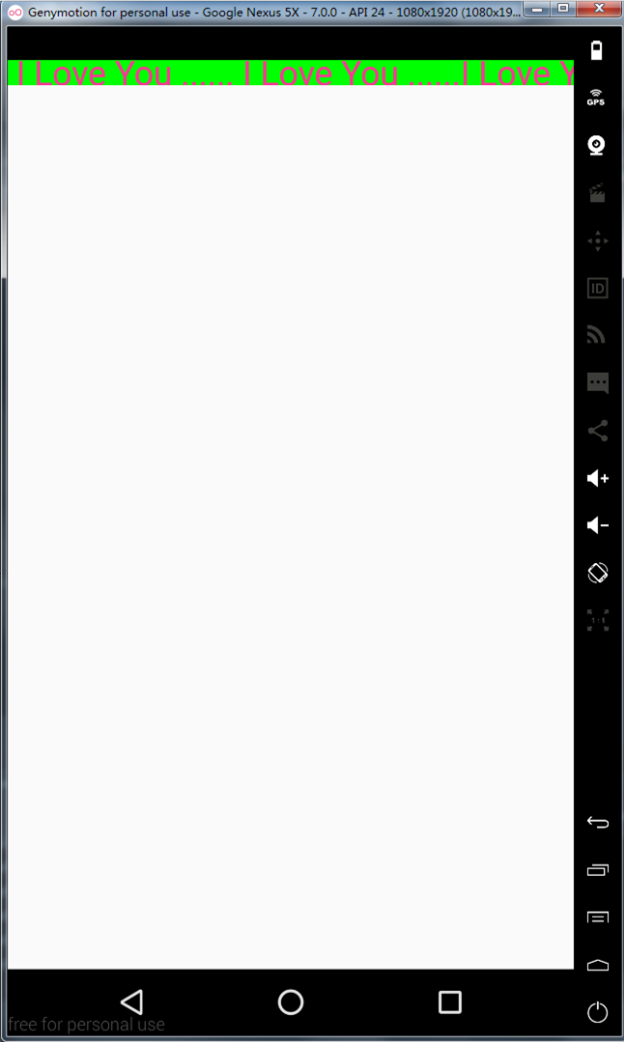
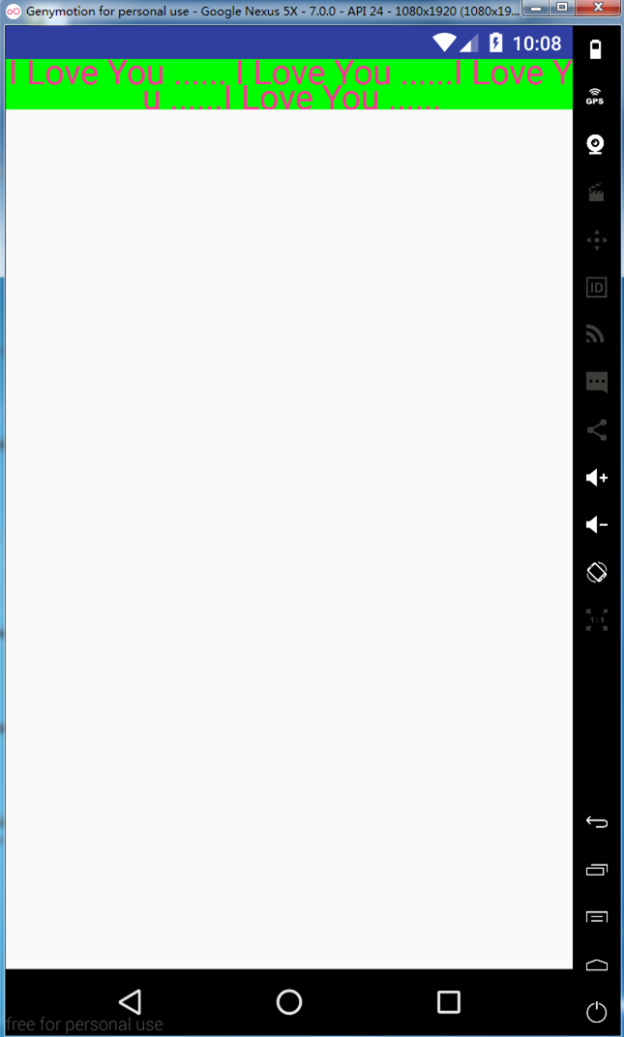
可以看到我们的效果出来了,可以由开发者自定义,现在我们将myText属性修改为“I Love You ...... I Love You ...... ”
发现不文明现象,那我们试着按照我们的正常思维,将宽度和高度设置为wrap_content,看看效果
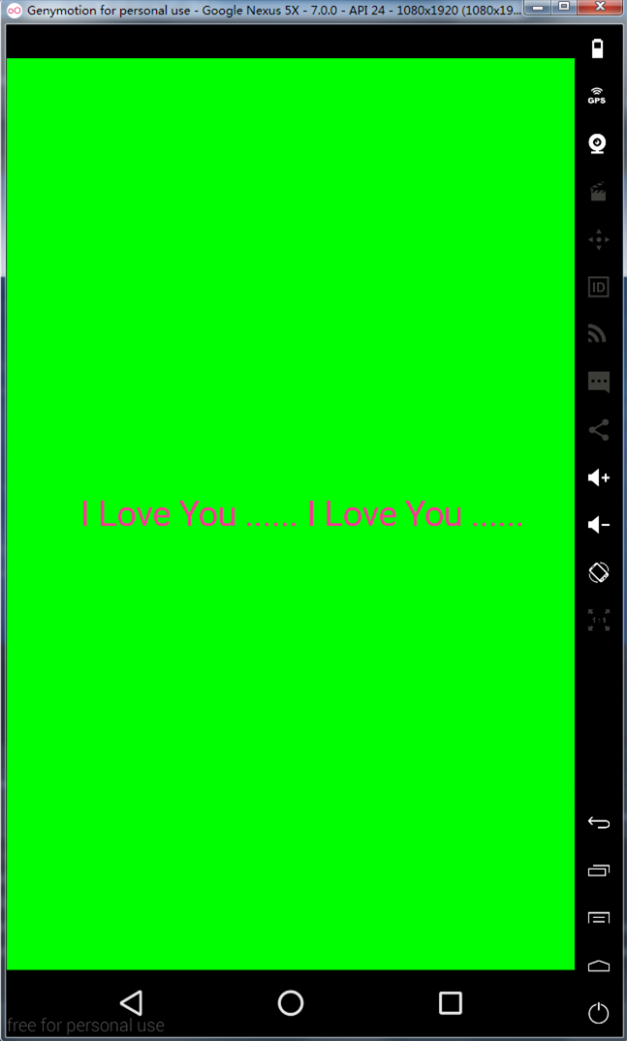
感觉一脸的懵逼,我是宽度匹配内容物宽度,为什么会占用满屏???既然出现了问题我们要找找错误的原因,我们看看上面展示的官方文档,既然是大小出问题了,那就看看我们的onMeasure()源码
4,onMeasure方法
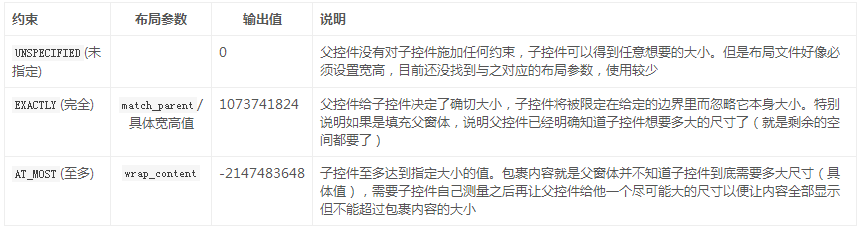
在学习onMeasure方法之前我们来了解MeasuerSpec这个类,点进入源码,发现他是个尺寸和测量模式的集合,用来描述父控件对子控件的约束,接下来我们来看看部分源码
/**MeasureSpec 封装了父控件对其孩子的布局要求
有大小和模式两种,而模式则有三种模式
public static class MeasureSpec {
        private static final int MODE_SHIFT = 30;
        private static final int MODE_MASK  = 0x3 << MODE_SHIFT;
        //父控件不强加任何约束给子控件,它可以为它逍遥的任何大小
        public static final int UNSPECIFIED = 0 << MODE_SHIFT; //0
        //父控件给子控件一个精确的值
        public static final int EXACTLY     = 1 << MODE_SHIFT; //1073741824
 	//父控件给子控件竟可能最大的值
        public static final int AT_MOST     = 2 << MODE_SHIFT; //-2147483648
        //设定尺寸和模式创建的统一约束规范
        public static int makeMeasureSpec(int size, int mode) {
            if (sUseBrokenMakeMeasureSpec) {
                return size + mode;
            } else {
                return (size & ~MODE_MASK) | (mode & MODE_MASK);
            }
        }
     // 从规范中获取模式
        public static int getMode(int measureSpec) {
            return (measureSpec & MODE_MASK);
        }
     //从规范中获取尺寸
        public static int getSize(int measureSpec) {
            return (measureSpec & ~MODE_MASK);
        }
}
这里我们重写onMeasure方法,在方法里面打印一下我们的在xml文件中的布局对应的MeasuerSpec的模式,重写的onMeasure()代码如下
  @Override
    protected void onMeasure(int widthMeasureSpec, int heightMeasureSpec) {
        super.onMeasure(widthMeasureSpec, heightMeasureSpec);
        int widthMode = MeasureSpec.getMode(widthMeasureSpec); //获取宽的模式
        int heightMode = MeasureSpec.getMode(heightMeasureSpec); // 获取高的模式
        int widthSize = MeasureSpec.getSize(widthMeasureSpec); //获取宽的尺寸
        int heightSize = MeasureSpec.getSize(heightMeasureSpec); //获取高的尺寸

        Log.i(TAG, "widthMode:" + widthMode);
        Log.i(TAG, "heightMode:" + heightMode);
        Log.i(TAG, "widthSize:" + widthSize);
        Log.i(TAG, "heightSize:" + heightSize);
}
场景一:设置MyView的宽高为wrap_content
 <com.qianmo.activitydetail.MyTextView2
        android:layout_width="wrap_content"
        android:layout_height="wrap_content"
        android:background="#00ff00"
        myview:myText=" I Love You ......I Love You ......"
        myview:myTextColor="#ff3399"
        myview:myTextSize="25sp"
        />
看一下我们的输出结果
03-20 05:09:20.020 15255-15255/? I/MyTextView: widthMode:-2147483648
03-20 05:09:20.020 15255-15255/? I/MyTextView: heightMode:-2147483648
03-20 05:09:20.020 15255-15255/? I/MyTextView: widthSize:1080
03-20 05:09:20.020 15255-15255/? I/MyTextView: heightSize:1731
场景二:设置MyView的宽高为match_parent
<com.qianmo.activitydetail.MyTextView2
        android:layout_width="match_parent"
        android:layout_height="match_parent"
        android:background="#00ff00"
        myview:myText=" I Love You ......I Love You ......"
        myview:myTextColor="#ff3399"
        myview:myTextSize="25sp"
        />
看一下输出结果
03-20 05:08:17.041 14272-14272/? I/MyTextView: widthMode:1073741824
03-20 05:08:17.041 14272-14272/? I/MyTextView: heightMode:1073741824
03-20 05:08:17.041 14272-14272/? I/MyTextView: widthSize:1079
03-20 05:08:17.041 14272-14272/? I/MyTextView: heightSize:1541
ok,这样我们可以总结出了我们以前得到的一些结果,如下表所示
那么我们现在有一个疑问了,为什么我们的wrap_content会占用的是整个屏幕的宽度和高度,这时候我们就要看一下我们OnMeasure()源码中是怎么处理的
View的源码
protected void onMeasure(int widthMeasureSpec, int heightMeasureSpec) {
        setMeasuredDimension(getDefaultSize(getSuggestedMinimumWidth(), widthMeasureSpec),
                getDefaultSize(getSuggestedMinimumHeight(), heightMeasureSpec));
    }

public static int getDefaultSize(int size, int measureSpec) {
        int result = size;
        int specMode = MeasureSpec.getMode(measureSpec);
        int specSize = MeasureSpec.getSize(measureSpec);

        switch (specMode) {
        case MeasureSpec.UNSPECIFIED:
            result = size;
            break;
        case MeasureSpec.AT_MOST:
        case MeasureSpec.EXACTLY:
            result = specSize;
            break;
        }
        return result;
    }
可以看到我们的源码中调用是自身的getDefaultSize()方法,然后在MeasureSpec.AT_MOST和MeasureSpec.EXACTLY全部返回的是specSize,而specSize表示的是父控件剩余宽度,也就是我们看到的全屏。所以默认onMeasure方法中wrap_content 和match_parent 的效果是一样的,都是填充剩余的空间。
4,重写onMeasuer()方法
@Override
    protected void onMeasure(int widthMeasureSpec, int heightMeasureSpec) {
        super.onMeasure(widthMeasureSpec, heightMeasureSpec);
        int widthMode = MeasureSpec.getMode(widthMeasureSpec); //获取宽的模式
        int heightMode = MeasureSpec.getMode(heightMeasureSpec); // 获取高的模式
        int widthSize = MeasureSpec.getSize(widthMeasureSpec); //获取宽的尺寸
        int heightSize = MeasureSpec.getSize(heightMeasureSpec); //获取高的尺寸

        Log.i(TAG, "widthMode:" + widthMode);
        Log.i(TAG, "heightMode:" + heightMode);
        Log.i(TAG, "widthSize:" + widthSize);
        Log.i(TAG, "heightSize:" + heightSize);

        //下面对wrap_content这种模式进行处理
        int width;
        int height;
        if (widthMode == MeasureSpec.EXACTLY) {
            width = widthSize;
        } else {
            //如果是wrap_content,我们要得到控件需要多大的尺寸
            //首先丈量文本的宽度
            float textWidth = mBound.width();
            //控件的宽度就是文本的宽度加上两边的内边距。内边距就是padding值,在构造方法执行完就被赋值
            width = (int) (getPaddingLeft() + textWidth + getPaddingRight());
        }
        if (heightMode == MeasureSpec.EXACTLY) {
            height = widthSize;
        } else {
            //如果是wrap_content,我们要得到控件需要多大的尺寸
            //首先丈量文本的宽度
            float textHeight = mBound.height();
            //控件的宽度就是文本的宽度加上两边的内边距。内边距就是padding值,在构造方法执行完就被赋值
            height = (int) (getPaddingTop() + textHeight + getPaddingBottom());
        }

        //保存丈量结果
        setMeasuredDimension(width, height);
    }
看一下我们实现的效果,这样我们的内容就全部展示出来了
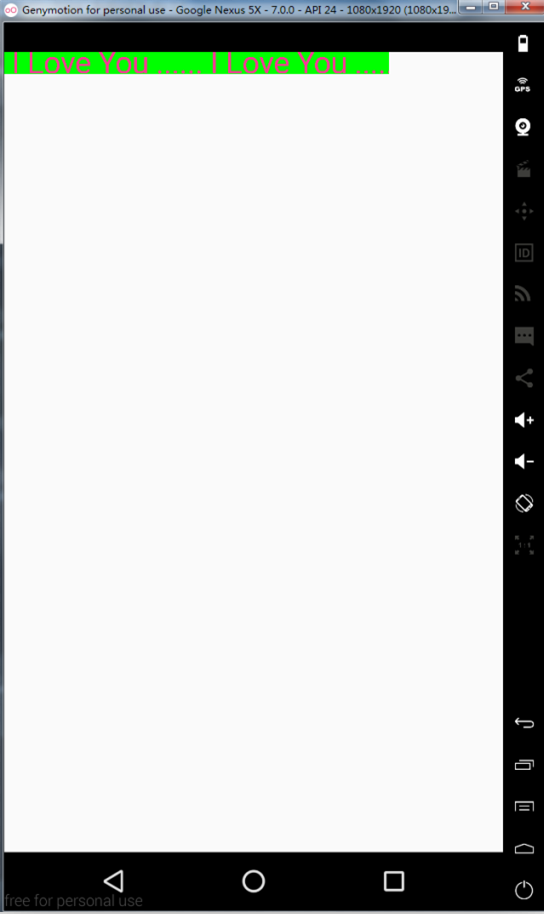
现在我们继续该我们的需求,将myText属性变成“I Love You ...... I Love You ...... I Love You ...... ” 看一下我们的效果,貌似没把后面的内容展示完全,这时候我们想实现它自动换行
5,实现TextView的自动换行
先说一下我们的思路,这里说一下我们打算先计算我们要展示的textview需要花费多少行展示,然后再将里面展示的内容切割,放到数组里面,在用过onDraw绘制文字,这种只是一种实现方式,而且感觉性能不太好,大家有时间的话可以去看一下TextView的源码,看一些官方是怎么试下的,下面看一下我们切割text内容的代码
package com.qianmo.activitydetail;

import android.content.Context;
import android.content.res.TypedArray;
import android.graphics.Canvas;
import android.graphics.Color;
import android.graphics.Paint;
import android.graphics.Rect;
import android.support.annotation.Nullable;
import android.text.TextUtils;
import android.util.AttributeSet;
import android.util.Log;
import android.view.View;
import android.widget.TextView;

import java.util.ArrayList;

/**
 * Created by wangjitao on 2017/3/20 0020.
 * E-Mail:543441727@qq.com
 */

public class MyTextView4 extends View {
    private final static String TAG = "MyTextView";

    //文字
    private String mText;
    private ArrayList<String> mTextList;

    //文字的颜色
    private int mTextColor;

    //文字的大小
    private float mTextSize;

    //绘制的范围
    private Rect mBound;
    private Paint mPaint;

    public MyTextView4(Context context) {
        this(context, null);
    }

    public MyTextView4(Context context, @Nullable AttributeSet attrs) {
        this(context, attrs, 0);
    }

    public MyTextView4(Context context, @Nullable AttributeSet attrs, int defStyleAttr) {
        super(context, attrs, defStyleAttr);
        init(context, attrs, defStyleAttr);
    }

    /**
     * 初始化数据
     */
    private void init(Context context, AttributeSet attrs, int defStyleAttr) {
        //获取自定义属性的值
        TypedArray a = context.getTheme().obtainStyledAttributes(attrs, R.styleable.MyTextView2, defStyleAttr, 0);
        mText = a.getString(R.styleable.MyTextView2_myText);
        mTextColor = a.getColor(R.styleable.MyTextView2_myTextColor, Color.BLACK);
        mTextSize = a.getDimension(R.styleable.MyTextView2_myTextSize, 30f);
        a.recycle();

        //初始化Paint数据
        mPaint = new Paint();
        mPaint.setAntiAlias(true);
        mPaint.setColor(mTextColor);
        mPaint.setTextSize(mTextSize);

        //获取绘制的宽高
        mBound = new Rect();
        mTextList = new ArrayList<>();
        mPaint.getTextBounds(mText, 0, mText.length(), mBound);

    }

    @Override
    protected void onDraw(Canvas canvas) {
        //绘制文字
        for (int i = 0; i < mTextList.size(); i++) {
            mPaint.getTextBounds(mTextList.get(i), 0, mTextList.get(i).length(), mBound);
            Log.v(TAG, "在X:" + (getWidth() / 2 - mBound.width() / 2) + "  Y:" + (getPaddingTop() + (mBound.height() * i)) + "  绘制:" + mTextList.get(i));
            canvas.drawText(mTextList.get(i), (getWidth() / 2 - mBound.width() / 2), (getPaddingTop() + (mBound.height() * (i + 1))), mPaint);
            Log.i(TAG, "getWidth() :" + getWidth() + ", mBound.width():" + mBound.width() + ",getHeight:" + getHeight() + ",mBound.height() *i:" + mBound.height() * i);
        }
    }

    boolean isOneLine = true;
    float lineNum;
    float splineNum;

    @Override
    protected void onMeasure(int widthMeasureSpec, int heightMeasureSpec) {
        super.onMeasure(widthMeasureSpec, heightMeasureSpec);
        int widthMode = MeasureSpec.getMode(widthMeasureSpec); //获取宽的模式
        int heightMode = MeasureSpec.getMode(heightMeasureSpec); // 获取高的模式
        int widthSize = MeasureSpec.getSize(widthMeasureSpec); //获取宽的尺寸
        int heightSize = MeasureSpec.getSize(heightMeasureSpec); //获取高的尺寸

        Log.i(TAG, "widthMode:" + widthMode);
        Log.i(TAG, "heightMode:" + heightMode);
        Log.i(TAG, "widthSize:" + widthSize);
        Log.i(TAG, "heightSize:" + heightSize);

        float textWidth = mBound.width();   //文本的宽度
        if (mTextList.size() == 0) {
            //将文本分段
            int padding = getPaddingLeft() + getPaddingRight();
            int specWidth = widthSize - padding; //剩余能够显示文本的最宽度
            if (textWidth <= specWidth) {
                //可以显示一行
                lineNum = 1;
                mTextList.add(mText);
            } else {
                //超过一行
                isOneLine = false;
                splineNum = textWidth / specWidth;
                //如果有小数的话则进1
                if ((splineNum + "").contains(".")) {
                    lineNum = (int) (splineNum + 0.5);
//                    lineNum = Integer.parseInt((splineNum + "").substring(0, (splineNum + "").indexOf("."))) + 1;
                } else {
                    lineNum = splineNum;
                }
                int lineLength = (int) (mText.length() / splineNum);
                for (int i = 0; i < lineNum; i++) {
                    String lineStr;
                    //判断是否可以一行展示
                    if (mText.length() < lineLength) {
                        lineStr = mText.substring(0, mText.length());
                    } else {
                        lineStr = mText.substring(0, lineLength);
                    }
                    mTextList.add(lineStr);
                    if (!TextUtils.isEmpty(mText)) {
                        if (mText.length() < lineLength) {
                            mText = mText.substring(0, mText.length());
                        } else {
                            mText = mText.substring(lineLength, mText.length());
                        }
                    } else {
                        break;
                    }
                }

            }
        }

        //下面对wrap_content这种模式进行处理
        int width;
        int height;
        if (widthMode == MeasureSpec.EXACTLY) {
            width = widthSize;
        } else {
            //如果是wrap_content,我们要得到控件需要多大的尺寸
            if (isOneLine) {
                //控件的宽度就是文本的宽度加上两边的内边距。内边距就是padding值,在构造方法执行完就被赋值
                width = (int) (getPaddingLeft() + textWidth + getPaddingRight());
            } else {
                //如果是多行,说明控件宽度应该填充父窗体
                width = widthSize;
            }

        }
        if (heightMode == MeasureSpec.EXACTLY) {
            height = heightSize;
        } else {
            //如果是wrap_content,我们要得到控件需要多大的尺寸
            //首先丈量文本的宽度
            float textHeight = mBound.height();
            if (isOneLine) {
                //控件的宽度就是文本的宽度加上两边的内边距。内边距就是padding值,在构造方法执行完就被赋值
                height = (int) (getPaddingTop() + textHeight + getPaddingBottom());
            } else {
                //如果是多行
                height = (int) (getPaddingTop() + textHeight * lineNum + getPaddingBottom());
            }
        }

        //保存丈量结果
        setMeasuredDimension(width, height);
    }
}
效果如下:
ok,自动换行实现了,下面的是Github源码地址,有需要的同学可以下下来看看。See You Next Time ····