1、新建客户端需要的脚本
# vim discovertcpport.sh
#!/bin/bash
portarray=(`sudo netstat -tnlp|egrep -i "$1"|awk {'print $4'}|awk -F':' '{if ($NF~/^[0-9]*$/) print $NF}'|sort|uniq`)
length=${#portarray[@]}
printf "{
"
printf  '	'""data":["
for ((i=0;i<$length;i++))
  do
     printf '
		{'
     printf ""{#TCP_PORT}":"${portarray[$i]}"}"
     if [ $i -lt $[$length-1] ];then
                printf ','
     fi
  done
printf  "
	]
"
printf "}
"
2、客户端增加discovery的key
UserParameter=tcpportlisten,/usr/local/zabbix_agent/sbin/discovertcpport.sh "$1"
3、重启zabbix_agentd服务
# /etc/init.d/zabbix_agentd restart
4 、服务端测试
# /usr/local/zabbix/bin/zabbix_get  -s 192.168.0.111   -k tcpportlisten
{
        "data":[
                {"{#TCP_PORT}":"10050"},
                {"{#TCP_PORT}":"22"},
                {"{#TCP_PORT}":"80"}
        ]
}
返回类似以上内容即为正常
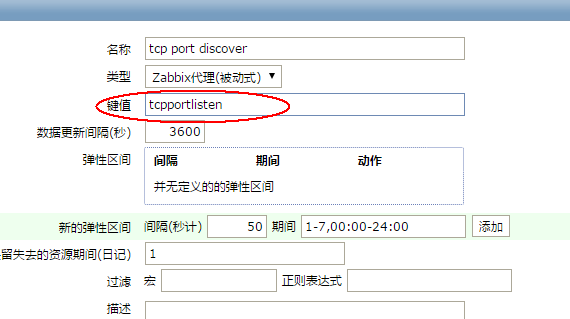
5、在Linux模板中创建端口自动发现规则
然后创建项目原型
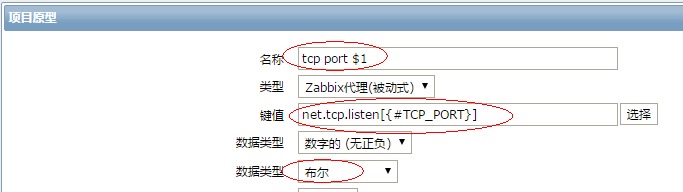
此处要确实注意端口变量{#TCP_PORT}名称要与上面脚本中的保持一致。
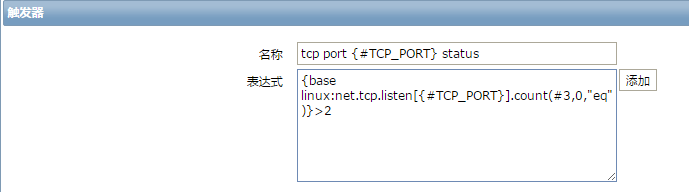
再创建触发器原型
到此,监控端口已经完成。
-------------------------------------------------------
可能遇到的问题:
1 、 执行脚本的时候发现提示 Not all processes could be identified, non-owned process info will not be shown, you would have to be root to see it all.) 应该是没权限的意思,
2 、添加完自动发现规则之后,提示 Value should be a JSON object 这个错误
解决办法是 vim /etc/sudoers
#Defaults requiretty 注释掉这个
然后在上面的脚本里面加上sudo netstat -tnlp|egrep -i "$1"|awk {'print $4'}|awk -F':' '{if ($NF~/^[0-9]*$/) print $NF}'|sort|uniq
--------------------------------------------
附:tomcat端口监控脚本
#!/bin/bash
sudo netstat -tnlp|grep "java"|awk {'print $4'}|awk -F':' '{if ($NF~/^[0-9]*$/) print $NF}'|sort|uniq >/tmp/tomcat
portarray=(`sudo grep "^$1$" /tmp/tomcat`)
length=${#portarray[@]}
printf "{
"
printf  '	'""data":["
for ((i=0;i<$length;i++))
  do
     printf '
		{'
     printf ""{#TOMCAT_PORT80}":"${portarray[$i]}"}"
     if [ $i -lt $[$length-1] ];then
                printf ','
     fi
  done
printf  "
	]
"
printf "}
"
UserParameter=tomcat_port8080[*],/etc/zabbix/monitor_scripts/discover_tomcat8080.sh $1
# zabbix_get -s 172.17.213.62 -k tomcat_port8080[8080]
{
"data":[
{"{#TOMCAT_PORT8081}":"8081"}
]
}