建一个Maven项目,
pom里加下jedis依赖,
1 <dependency>
2     <groupId>redis.clients</groupId>
3     <artifactId>jedis</artifactId>
4     <version>2.9.0</version>
5 </dependency>
package com.wishwzp.redis;

import redis.clients.jedis.Jedis;

/**
 * 测试类
 * @author user
 *
 */
public class JedisTest {

    public static void main(String[] args) {
        Jedis jedis=new Jedis("192.168.1.107",6379); // 创建客户端 设置IP和端口
        jedis.set("name", "javaxk"); // 设置值
        String value=jedis.get("name"); // 获取值
        System.out.println(value);
        jedis.close(); // 释放连接资源
    }
}
测试代码,
运行 报错了
报错原因:connect time out
连接超时
我们配置下防火墙 开一个6379端口权限
firewall-cmd --zone=public --add-port=6379/tcp --permanent
firewall-cmd --reload
继续运行 还是报错 连接超时 错误;
我们配置下 redis配置文件
[root@localhost redis]# vi /usr/local/redis/redis.conf
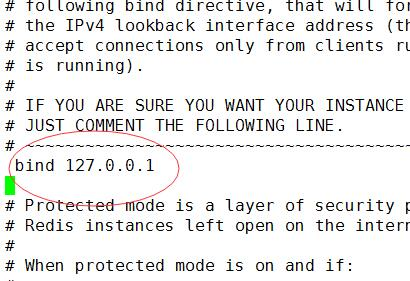
这里绑定了本机,我们把这个备注掉;
# bind 127.0.0.1
配置完后
[root@localhost redis]# ./bin/redis-cli shutdown
[root@localhost redis]# ./bin/redis-server ./redis.conf
要重启下redis服务;
继续运行 又报错了
Exception in thread "main" redis.clients.jedis.exceptions.JedisDataException: DENIED Redis is running in protected mode because protected mode is enabled, no bind address was specified, no authentication password is requested to clients. In this mode connections are only accepted from the loopback interface. If you want to connect from external computers to Redis you may adopt one of the following solutions: 1) Just disable protected mode sending the command 'CONFIG SET protected-mode no' from the loopback interface by connecting to Redis from the same host the server is running, however MAKE SURE Redis is not publicly accessible from internet if you do so. Use CONFIG REWRITE to make this change permanent. 2) Alternatively you can just disable the protected mode by editing the Redis configuration file, and setting the protected mode option to 'no', and then restarting the server. 3) If you started the server manually just for testing, restart it with the '--protected-mode no' option. 4) Setup a bind address or an authentication password. NOTE: You only need to do one of the above things in order for the server to start accepting connections from the outside.
at redis.clients.jedis.Protocol.processError(Protocol.java:127)
at redis.clients.jedis.Protocol.process(Protocol.java:161)
at redis.clients.jedis.Protocol.read(Protocol.java:215)
at redis.clients.jedis.Connection.readProtocolWithCheckingBroken(Connection.java:340)
at redis.clients.jedis.Connection.getStatusCodeReply(Connection.java:239)
at redis.clients.jedis.Jedis.set(Jedis.java:121)
at com.wishwzp.redis.JedisTest.main(JedisTest.java:14)
这个是因为远程连接redis redis自我保护 拒绝访问;
有两种方法 解决
第一种 直接去掉自我保护功能(不推荐)
[root@localhost redis]# vi /usr/local/redis/redis.conf
进入配置
找到 protected-mode yes
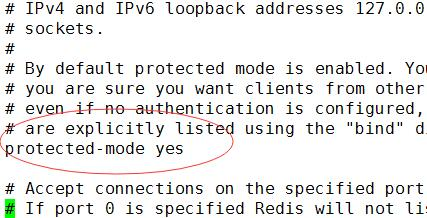
改成 no即可
编辑后 重启redis服务,然后运行 ,结果出来了
运行结果显示:javaxk
第二种 设置redis连接密码
进入客户端
[root@localhost redis]# ./bin/redis-cli
127.0.0.1:6379> config set requirepass 123456
设置密码 123456
127.0.0.1:6379> quit
[root@localhost redis]# ./bin/redis-cli
127.0.0.1:6379> auth 123456
OK
说明设置成功
 1 package com.wishwzp.redis;
 2
 3 import redis.clients.jedis.Jedis;
 4
 5 /**
 6  * 测试类
 7  * @author user
 8  *
 9  */
10 public class JedisTest {
11
12     public static void main(String[] args) {
13         Jedis jedis=new Jedis("192.168.1.107",6379); // 创建客户端 设置IP和端口
14         jedis.auth("123456"); // 设置密码
15         jedis.set("name", "javaxk"); // 设置值
16         String value=jedis.get("name"); // 获取值
17         System.out.println(value);
18         jedis.close(); // 释放连接资源
19     }
20 }
这样运行就ok了。
运行结果显示:javaxk