实验2 系统调用
2.1 实验目的
- 建立对系统调用接口的深入认识
- 掌握系统调用的基本过程
- 能完成系统调用的全面控制
- 为后续实验做准备
2.2 实验内容
在Linux0.11上添加系统调用,并编写两个简单的应用程序测试
2.2.1 iam()
int iam(const char * name)
函数的功能为,将字符串参数name的内容拷贝到内核中保存下来,要求name的长度不能超过23个字符。返回值是拷贝的字符数。如果name的长度超过了23,则返回-1,并置errno 为EINVAL。
2.2.2 whoami()
int whoami(char* name, unsigned int size)
函数的功能为,从内核中将iam()存储的名字拷贝到name指向的用户地址空间中,同时确保不会对name越界访存(size说明了name的大小)。返回值是拷贝的字符数,如果size小于需要的空间,则返回-1,并置errno 为EINVAL。
2.2.3 测试程序
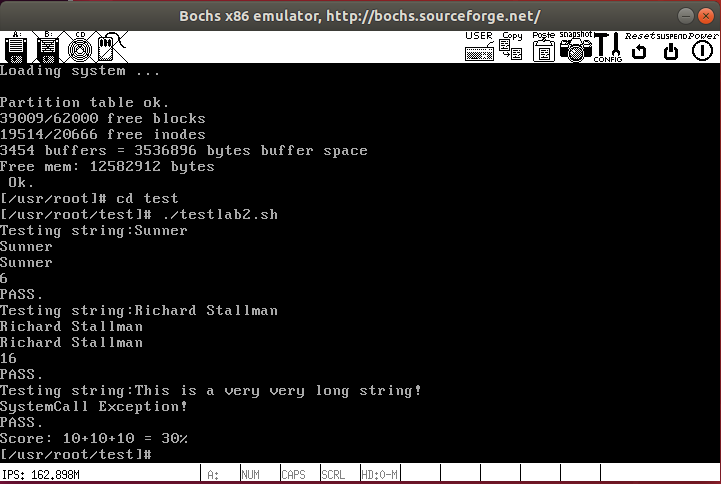
运行添加过新系统调用的Linux0.11,在其环境下编写两个测试程序iam.c和whoami.c。执行结果如下:
2.3 实验问题
2.3.1 从Linux0.11现在的机制来看,它的系统调用最多能传递几个参数?
根据《Linux内核完全注释修正版V5.0》第5.5节的内容,最多能够传递3个参数,且最多能够直接传递3个参数。原因在于存储参数的寄存器为ebx,ecx,edx三个,因此最多可以传递的参数为3个,另一方面,根据include/unistd.h文件中的宏函数,最多只支持3个参数,因此最多能够直接传递3个参数。
2.3.2 如何扩大这个限制?
根据《Linux内核完全注释修正版V5.0》第5.5节的内容,内核通常采用的方法是直接把这些参数作为一个参数缓冲块,并把这个缓冲块的指针作为一个参数传递给内核。因此对于多于三个参数的系统调用,可以使用_syscall1(),来把第一个参数的指针传递给内核就可以。
2.3.3 用文字简要描述向Linux0.11中添加一个系统调用foo()的步骤
- 在
Linux-0.11/kernel中添加源文件foo.c。 - 在
linux-0.11/include/Linux/sys.h中添加extern int sys_foo();和在fn_ptr sys_call_table[]中添加sys_foo;以声明新的系统调用处理函数以及索引值。 - 在
linux-0.11/kernel/system_call.s中,将nr_system_calls加1,修改系统调用总数。 - 在
linux-0.11/kernel/Makefile中改动OBJS添加foo.o和在Dependencies处加foo.s foo.o: foo.c ../include/Linux/kernel.h ../include/unistd.h以及其他在foo.c中涉及到的头文件所在的位置,添加新系统调用所在文件的编译、链接规则。 - 在
linux-0.11/include/unistd.h中添加#define __NR_foo N,其中N根据系统调用的编号在最后添加。 - 在应用程序中提供接口。
2.4 实验过程
2.4.1 编写who.c
/*
* linux/kernel/who.c
*
* 2020 Kenichi Sanada
*/
//若*.h头文件在默认目录`include/`中,则在代码中就不用明确指明其位置。如果不是`UNIX`类的标准头文件,则需要指明所在的目录,并用双引号括住
//unistd.h头文件是标准符号常数与类型文件。其中定义了各种符号常数和类型,并声明了各种函数。如果定义了符号__LIBRARY__,则还会包含系统调用
//号和内嵌汇编代码syscall0()等。
#define __LIBRARY__
#include<unistd.h>
#include<string.h> //使用了strlen函数来计算name的长度
#include<asm/segment.h> //使用了put_fs_byte和get_fs_byte函数
#include<errno.h> //要求设置错误为EINVAL
_syscall1(int, iam, const char*, name); //对应于iam函数
_syscall2(int, whoami, char*, name, unsigned int, size); //对应于whoami函数
char memory[30] = {0}; //作为储藏来自iam的name参数的内存,并初始化
int sys_iam(const char* name) //iam函数,由于使用系统调用作为内核函数需要前缀为sys_
{
int i = 0; //第一次计算name的长度
while(get_fs_byte(name + i) != '�')
{
i++;
}
if(i > 23) //如果那么的长度超过了23,那么就返回-1,并置errno为EINVAL
{
return -EINVAL;
}
int j = 0; //当长度不超过23时,重新计数
while((memory[j] = get_fs_byte(name + j)) != '�')//按照字节为单位从用户空间中向内核空间拷贝数据
{
j++;
}
printk("%s
", memory); //内核状态下只能使用printk而不能使用printf,进行调试用
return j; //返回name字段的长度
}
int sys_whoami(char* name, unsigned int size) //whoami函数
{
int i = 0; //第一次计数
while(memory[i] != '�') //将内核态中存储的数据进行计数
{
i ++;
}
if(i > size)//如果超过了限制的大小,那么就返回-1,且置errno为EINVAL
{
return -EINVAL;
}
int j = 0;//第二次计数
while(memory[j] != '�')//进行从内核空间向用户空间按照字节传输数据
{
put_fs_byte(memory[j], name + j);
j ++;
}
return j;//返回传输数据的长度
}
2.4.2 修改Linux0.11内核代码
2.4.2.1 Makefile
要想让我们添加的kernel/who.c可以和其它Linux代码编译链接到一起,必须要修改Makefile文件。Makefile里记录的是所有源程序文件的编译、链接规则,在书中的3.6 节有简略介绍。 我们之所以简单地运行make all就可以编译整个代码树,是因为make完全按照Makefile里的指示工作。Makefile在代码树中有很多,分别负责不同模块的编译工作。我们要修改的是kernel/Makefile。 需要修改两处。一处是:
OBJS  = sched.o system_call.o traps.o asm.o fork.o
        panic.o printk.o vsprintf.o sys.o exit.o
        signal.o mktime.o
改为:
OBJS  = sched.o system_call.o traps.o asm.o fork.o
        panic.o printk.o vsprintf.o sys.o exit.o
        signal.o mktime.o who.o
另一处:
### Dependencies:
exit.s exit.o: exit.c ../include/errno.h ../include/signal.h
  ../include/sys/types.h ../include/sys/wait.h ../include/linux/sched.h
  ../include/linux/head.h ../include/linux/fs.h ../include/linux/mm.h
  ../include/linux/kernel.h ../include/linux/tty.h ../include/termios.h
  ../include/asm/segment.h
改为:
### Dependencies:
who.s who.o: who.c ../include/linux/kernel.h ../include/unistd.h
  ../include/string.h ../include/asm/segment.h
exit.s exit.o: exit.c ../include/errno.h ../include/signal.h
  ../include/sys/types.h ../include/sys/wait.h ../include/linux/sched.h
  ../include/linux/head.h ../include/linux/fs.h ../include/linux/mm.h
  ../include/linux/kernel.h ../include/linux/tty.h ../include/termios.h
  ../include/asm/segment.h
Makefile修改后,和往常一样make all就能自动把who.c加入到内核中了。如果编译时提示who.c有错误,就说明修改生效了。
2.4.2.2 linux-0.11/include/linux/sys.h
这个头文件修改的意义是把 iam与whoami两个函数加到全局变量,和中断函数表中就可以了,中断被调用的时候,先查找中断向量表,
找到相应的函数名,调用其函数。
修改的位置如下:
由
......
extern int sys_ssetmask();
extern int sys_setreuid();
extern int sys_setregid();
修改为
......
extern int sys_ssetmask();
extern int sys_setreuid();
extern int sys_setregid();
extern int sys_iam();
extern int sys_whoami();
另一部分修改:
由
fn_ptr sys_call_table[] = { ...., sys_ssetmask,
sys_setreuid, sys_setregid};
修改为
fn_ptr sys_call_table[] = { ...., sys_ssetmask,
sys_setreuid, sys_setregid, sys_iam, sys_whoami};
需要注意的是,由于会在unistd.h中修改#define __NR__XXX N来对应增加的两个系统调用,因此在数据上要保持位置的一致性。
2.4.2.3 system_call.s
修改其中的nr_system_calls,本来是72,也就是有72个系统调用函数,我们加了两个所以改成74。
修改如下:
nr_system_calls = 74
2.4.2.4 include/unistd.h
注意,在修改unistd.h时需要直接在Image文件中进行修改,可以使用在实验仓库中有的mount-hdc程序进行挂载,从而可以在主机上直接对系统中的文件进行修改和存储。
使用mount-hdc程序挂载后,进入hdcusrinclude目录,在其中修改unistd.h。修改的内容如下:
#define _NR_iam 72
#define _NR_whoami 73
2.4.3 iam.c文件
#define __LIBRARY__
#include <unistd.h>
#include <string.h>
#include <errno.h>
#include <stdio.h>
_syscall1(int,iam,const char*,name)//在程序中使用iam函数时需要加上这个

int main(int argc,char* argv[])
{

    if(argc > 1){ //判断是否输入了参数的字符串
	if(iam(argv[1]) < 0){ //如果返回为-1,说明字符串可能长度超过了23个字符
            printf("SystemCall Exception!
"); //输出提示信息
	}
        else
        {
            printf("%d
", iam(argv[1]));//输出字符长度
        }
    }
    else{
	printf("Input Exception!
"); //输出提示信息
    }
    return 0;
}
2.4.4 whoami.c文件
#define __LIBRARY__
#include <unistd.h>
#include <string.h>
#include <errno.h>
#include <stdio.h>
_syscall2(int, whoami, char*, name, unsigned int, size);

int main()
{
    int num;
    char temp[30]= {0}; //用于存储来自iam的字符串

    num = whoami(temp, 30);
    if(num >= 0) //如果大于0说明正常接受了
    {
         printf("%s
",temp);
    }
    else //如果为-1说明系统调用出现异常
    {
       printf("System Call Exception!");
    }
    return 0;
}