一、CountDownLatch是什么
CountDownLatch是在jdk1.5被引入的,位于java.util.concurrent包下。CountDownLatch这个类是一个同步工具类,它允许一个或多个线程一直等待,直到其他线程的操作执行完后再执行(A synchronization aid that allows one or more threads to wait until a set of operations being performed in other threads completes.)。
例如,应用程序的主线程希望在负责启动框架服务的线程已经启动所有的框架服务之后再执行。
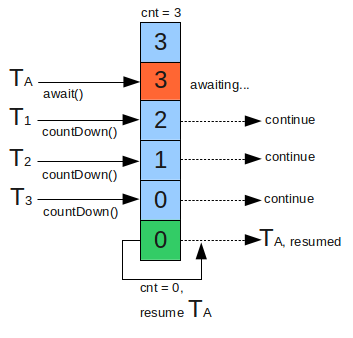
CountDownLatch是通过一个计数器来实现的,计数器的初始值为线程的数量。每当一个线程完成了自己的任务后,计数器的值就会减1。当计数器值到达0时,它表示所有的线程已经完成了任务,然后在闭锁上等待的线程就可以恢复执行任务(A CountDownLatch is initialized with a given count. The await methods block until the current count reaches zero due to invocations of the countDown() method, after which all waiting threads are released and any subsequent invocations of await return immediately)。
CountDownLatch的伪代码如下所示:
//Main thread start
//Create CountDownLatch for N threads
//Create and start N threads
//Main thread wait on latch
//N threads completes there tasks are returns
//Main thread resume execution
二、CountDownLatch如何工作
CountDownLatch.java类中定义的构造函数:
/**
 * Constructs a {@code CountDownLatch} initialized with the given count.
 *
 * @param count the number of times {@link #countDown} must be invoked
 *        before threads can pass through {@link #await}
 * @throws IllegalArgumentException if {@code count} is negative
 */
public CountDownLatch(int count) {
    if (count < 0) throw new IllegalArgumentException("count < 0");
    this.sync = new Sync(count);
}
构造器中的计数值(count)实际上就是需要等待的线程数量。这个值只能被设置一次,而且CountDownLatch没有提供任何机制去重新设置这个计数值(This is a one-shot phenomenon -- the count cannot be reset. If you need a version that resets the count, consider using a CyclicBarrier)。
与CountDownLatch的第一次交互是主线程等待其他线程。主线程必须在启动其他线程后立即调用CountDownLatch.await(long timeout, TimeUnit unit)方法(建议使用这个带有超时时间的方法)。这样主线程的操作就会在这个方法上阻塞,直到其他线程完成各自的任务。
其他N个线程必须引用闭锁对象,因为他们需要通知CountDownLatch对象,他们已经完成了各自的任务。这种通知机制是通过CountDownLatch.countDown()方法来完成的;每调用一次这个方法,在构造函数中初始化的count值就减1。所以当N个线程都调用了这个方法,count的值等于0,然后主线程就能通过await()方法,恢复执行自己的任务。
JavaDoc中提供的两个使用CountDownLatch的很好的例子。
Sample1:
Here is a pair of classes in which a group of worker threads use two countdown latches,The first is a start signal that prevents any worker from proceeding until the driver is ready for them to proceed;The second is a completion signal that allows the driver to wait until all workers have completed.
public class Driver {
    public static void main(String[] args) throws InterruptedException {
        CountDownLatch startSignal = new CountDownLatch(1);
        CountDownLatch doneSignal = new CountDownLatch(N);

        for (int i = 0; i < N; ++i) { // create and start threads
            new Thread(new Worker(startSignal, doneSignal)).start();
        }
        doSomethingElse();            // don't let run yet
        startSignal.countDown();      // let all threads proceed
        doSomethingElse();
        doneSignal.await();           // wait for all to finish
    }
}
public class Worker implements Runnable {
    private final CountDownLatch startSignal;
    private final CountDownLatch doneSignal;

    Worker(CountDownLatch startSignal, CountDownLatch doneSignal) {
        this.startSignal = startSignal;
        this.doneSignal = doneSignal;
    }

    @Override
    public void run() {
        try {
            startSignal.await();
            doWork();
            doneSignal.countDown();
        } catch (InterruptedException ex) {
        } // return;
    }

    void doWork() {
    }
}
Sample1:
Another typical usage would be to divide a problem into N parts, describe each part with a Runnable that executes that portion and counts down on the latch, and queue all the Runnables to an Executor. When all sub-parts are complete, the coordinating thread will be able to pass through await. (When threads must repeatedly count down in this way, instead use a CyclicBarrier.)
class Driver2 { // ...
    void main() throws InterruptedException {
        CountDownLatch doneSignal = new CountDownLatch(N);
        Executor e = ...

        for (int i = 0; i < N; ++i){ // create and start threads
            e.execute(new WorkerRunnable(doneSignal, i));
        }
        doneSignal.await();           // wait for all to finish
   }
}
class WorkerRunnable implements Runnable {
    private final CountDownLatch doneSignal;
    private final int i;
    WorkerRunnable(CountDownLatch doneSignal, int i) {
        this.doneSignal = doneSignal;
        this.i = i;
    }
    public void run() {
        try {
            doWork(i);
            doneSignal.countDown();
        } catch (InterruptedException ex) {} // return;
    }

    void doWork() { ... }
}
三、在实时系统中的使用场景
1.实现最大的并行性:有时我们想同时启动多个线程,实现最大程度的并行性。例如,我们想测试一个单例类。如果我们创建一个初始计数为1的CountDownLatch,并让所有线程都在这个锁上等待,那么我们可以很轻松地完成测试。我们只需调用一次countDown()方法就可以让所有的等待线程同时恢复执行。
2.开始执行前等待n个线程完成各自任务,例如应用程序启动类要确保在处理用户请求前,所有N个外部系统已经启动和运行了。
3.死锁检测:一个非常方便的使用场景是,你可以使用n个线程访问共享资源,在每次测试阶段的线程数目是不同的,并尝试产生死锁。
四、CountDownLatch使用例子
在这个例子中,我模拟了一个应用程序启动类,它开始时启动了n个线程类,这些线程将检查外部系统并通知闭锁,并且启动类一直在闭锁上等待着。一旦验证和检查了所有外部服务,那么启动类恢复执行。
BaseHealthChecker.java:这个类是一个Runnable,负责所有特定的外部服务健康的检测。它删除了重复的代码和闭锁的中心控制代码。
import java.util.concurrent.CountDownLatch;

public abstract class BaseHealthChecker implements Runnable {
    private CountDownLatch _latch;
    private String _serviceName;
    private boolean _serviceUp;

    /**
     * Get latch object in constructor so that after completing the task, thread can countDown() the latch
     *
     * @param serviceName
     * @param latch
     */
    public BaseHealthChecker(String serviceName, CountDownLatch latch) {
        super();
        this._latch = latch;
        this._serviceName = serviceName;
        this._serviceUp = false;
    }

    @Override
    public void run() {
        try {
            verifyService();
            _serviceUp = true;
        } catch (Throwable t) {
            t.printStackTrace(System.err);
            _serviceUp = false;
        } finally {
            if (_latch != null) {
                _latch.countDown();
            }
        }
    }

    public String getServiceName() {
        return _serviceName;
    }

    public boolean isServiceUp() {
        return _serviceUp;
    }

    /**
     * This methos needs to be implemented by all specific service checker
     */
    public abstract void verifyService();
}
NetworkHealthChecker.java:这个类继承了BaseHealthChecker,实现了verifyService()方法。
DatabaseHealthChecker.java和CacheHealthChecker.java除了服务名和休眠时间外,与NetworkHealthChecker.java是一样的。
import java.util.concurrent.CountDownLatch;

public class NetworkHealthChecker extends BaseHealthChecker {
    public NetworkHealthChecker(CountDownLatch latch) {
        super("Network Service", latch);
    }

    @Override
    public void verifyService() {
        System.out.println("Checking " + this.getServiceName());
        try {
            Thread.sleep(7000);
        } catch (InterruptedException e) {
            e.printStackTrace();
        }
        System.out.println(this.getServiceName() + " is UP");
    }
}
ApplicationStartupUtil.java:这个类是一个主启动类,它负责初始化闭锁,然后等待,直到所有服务都被检测完。
import java.util.ArrayList;
import java.util.List;
import java.util.concurrent.CountDownLatch;
import java.util.concurrent.Executor;
import java.util.concurrent.Executors;

public class ApplicationStartupUtil {
    //List of service checkers
    private static List<BaseHealthChecker> _services;

    //This latch will be used to wait on
    private static CountDownLatch _latch;

    private ApplicationStartupUtil() {
    }

    private final static ApplicationStartupUtil INSTANCE = new ApplicationStartupUtil();

    public static ApplicationStartupUtil getInstance() {
        return INSTANCE;
    }

    public static boolean checkExternalServices() throws Exception {
        //Initialize the latch with number of service checkers
        _latch = new CountDownLatch(3);

        //All add checker in lists
        _services = new ArrayList<BaseHealthChecker>();
        _services.add(new NetworkHealthChecker(_latch));
        _services.add(new CacheHealthChecker(_latch));
        _services.add(new DatabaseHealthChecker(_latch));

        //Start service checkers using executor framework
        Executor executor = Executors.newFixedThreadPool(_services.size());

        for (final BaseHealthChecker v : _services) {
            executor.execute(v);
        }

        //Now wait till all services are checked
        _latch.await();

        //Services are file and now proceed startup
        for (final BaseHealthChecker v : _services) {
            if (!v.isServiceUp()) {
                return false;
            }
        }
        return true;
    }
}
现在你可以写测试代码去检测一下闭锁的功能了。
public class Main {
    public static void main(String[] args) {
        boolean result = false;
        try {
            result = ApplicationStartupUtil.checkExternalServices();
        } catch (Exception e) {
            e.printStackTrace();
        }
        System.out.println("External services validation completed !! Result was :: " + result);
    }
}
控制台输出
Checking Network Service
Checking Database Service
Checking Cache Service
Network Service is UP
Database Service is UP
Cache Service is UP
External services validation completed !! Result was :: true