版权声明:本文为HaiyuKing原创文章,转载请注明出处!
前言
本Demo采用的是其中一个方案,其他方案请阅读参考资料《Android Studio中统一管理版本号引用配置》
使用步骤
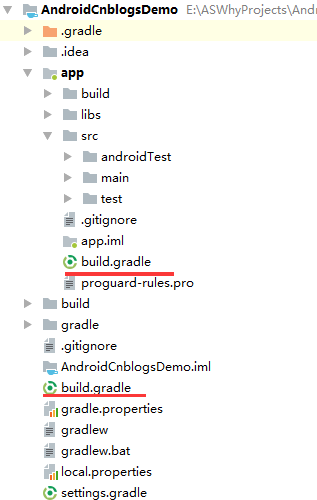
一、项目组织结构图

注意事项:
1、 导入类文件后需要change包名以及重新import R文件路径
2、 Values目录下的文件(strings.xml、dimens.xml、colors.xml等),如果项目中存在,则复制里面的内容,不要整个覆盖
二、导入步骤
(1)新建项目后查看app/build.gradle文件,获取版本号(compileSdkVersion、buildToolsVersion、minSdkVersion、targetSdkVersion、support:appcompat、constraint-layout等)
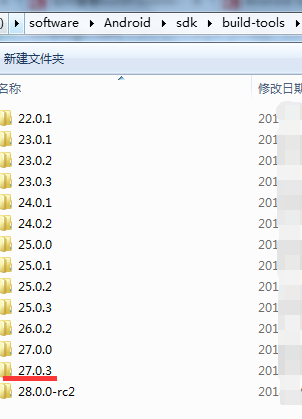
其中,buildToolsVersion的可选值在sdk安装目录下的build-tools中查看(对了,如果使用AS3.0.1新建项目,可能在app/build.gradle文件中看不到buildToolsVersion,那么最后可加可不加,本Demo就不添加了):

新建项目后的app/build.gradle文件:
apply plugin: 'com.android.application'

android {
    compileSdkVersion 27
    defaultConfig {
        applicationId "com.why.project.androidcnblogsdemo"
        minSdkVersion 16
        targetSdkVersion 27
        versionCode 1
        versionName "1.0"
        testInstrumentationRunner "android.support.test.runner.AndroidJUnitRunner"
    }
    buildTypes {
        release {
            minifyEnabled false
            proguardFiles getDefaultProguardFile('proguard-android.txt'), 'proguard-rules.pro'
        }
    }
}

dependencies {
    implementation fileTree(dir: 'libs', include: ['*.jar'])
    implementation 'com.android.support:appcompat-v7:27.1.1'
    implementation 'com.android.support.constraint:constraint-layout:1.1.2'
    testImplementation 'junit:junit:4.12'
    androidTestImplementation 'com.android.support.test:runner:1.0.2'
    androidTestImplementation 'com.android.support.test.espresso:espresso-core:3.0.2'

}
(2)在项目的build.gradle文件中添加以下代码【根据实际情况扩充,写法类似】
// Top-level build file where you can add configuration options common to all sub-projects/modules.

buildscript {
    repositories {
        jcenter()
        maven {
            url 'https://maven.google.com/'
            name 'Google'
        }
    }
    dependencies {
        classpath 'com.android.tools.build:gradle:3.1.2'

        // NOTE: Do not place your application dependencies here; they belong
        // in the individual module build.gradle files
    }
}

allprojects {
    repositories {
        jcenter()
        google()
    }
}

task clean(type: Delete) {
    delete rootProject.buildDir
}

//Android Studio统一管理依赖版本号引用配置
ext {
    //修改compileSdkVersion并不会影响我们的我们生成的app在手机先的行为。最理想的情况就是把compileSdkVersion设置到最高。
    globalCompileSdkVersion = 27
    //构建工具的版本号是多少,规则是可以用高的构建工具来构建低版本Sdk的工程。使用build-tools目录中的最大版本号即可
    globalBuildToolsVersion = "27.0.3"
    //targetSdkVersion的设置主要是当系统版本高于设置的target的时候。然后targetSdkVersion最好和compileSdkVersion一样。
    globalTargetSdkVersion = 27
    //这个就是程序运行的最低的要求的Sdk版本号,在低于这个版本号的手机设备上无法安装。
    globalMinSdkVersion = 16

    supportLibraryVersion = "27.1.1"

    /*=================================常用的引用============================================*/
    //supportLibVersion 的头数字是和targetSdkVersion 版本一样的。
    androidDependencies = [
            appcompat_v7 : "com.android.support:appcompat-v7:${supportLibraryVersion}",
            design        : "com.android.support:design:${supportLibraryVersion}",
            support_v4    : "com.android.support:support-v4:${supportLibraryVersion}",
            recyclerView : "com.android.support:recyclerview-v7:${supportLibraryVersion}",
    ]

    /*=================================module中公共用到的引用============================================*/
    globalDependencies = [
            //constraintLayout引用
            constraintLayout : "com.android.support.constraint:constraint-layout:1.1.2",
            //glide的引用
            glide : "com.github.bumptech.glide:glide:4.7.1",
    ]
}
(3)修改app/build.gradle
apply plugin: 'com.android.application'

android {
    compileSdkVersion rootProject.ext.globalCompileSdkVersion
    defaultConfig {
        applicationId "com.why.project.androidcnblogsdemo"
        minSdkVersion rootProject.ext.globalMinSdkVersion
        targetSdkVersion rootProject.ext.globalTargetSdkVersion
        versionCode 1
        versionName "1.0"
        testInstrumentationRunner "android.support.test.runner.AndroidJUnitRunner"
    }
    buildTypes {
        release {
            minifyEnabled false
            proguardFiles getDefaultProguardFile('proguard-android.txt'), 'proguard-rules.pro'
        }
    }
}

dependencies {
    implementation fileTree(dir: 'libs', include: ['*.jar'])
    implementation androidDependencies.appcompat_v7
    implementation globalDependencies.constraintLayout
    testImplementation 'junit:junit:4.12'
    androidTestImplementation 'com.android.support.test:runner:1.0.2'
    androidTestImplementation 'com.android.support.test.espresso:espresso-core:3.0.2'

}
(4)参考app/build.gradle的修改方法修改其他module中的build.gradle文件
混淆配置
无