版权声明:本文为HaiyuKing原创文章,转载请注明出处!
前言
封装webview的常用配置和选择文件、打开相机、录音、打开本地相册的用法。【如果想要使用简单的预览功能,可以参考《MyBridgeWebViewDemo【集成JsBridge开源库的的封装的webview】》】
注意:如果使用选择文件、打开相机、录音、打开本地相册的功能,那么就需要搭配《Android6.0运行时权限(基于RxPermission开源库)》的申请运行时权限(相机、录音、存储权限)、《AppUtils【获取手机的信息和应用版本号、安装apk】》的适配7.0FileProvider功能。
效果图


代码分析
一、申请运行时权限主要涉及到以下文件:
app中的build.gradle

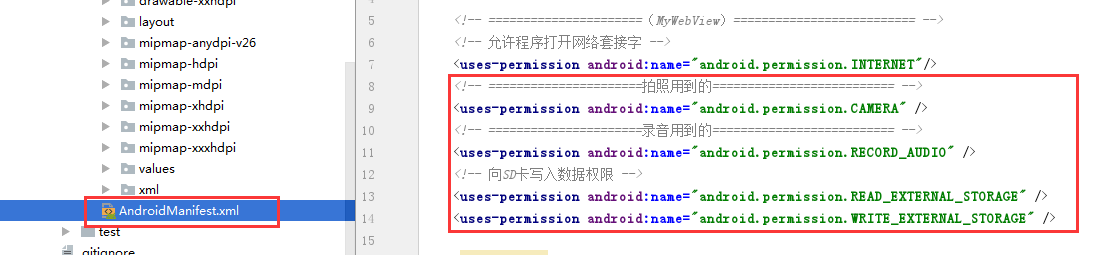
AndroidManifest.xml
MainActivity.java

二、适配7.0File Provider主要涉及到以下文件:
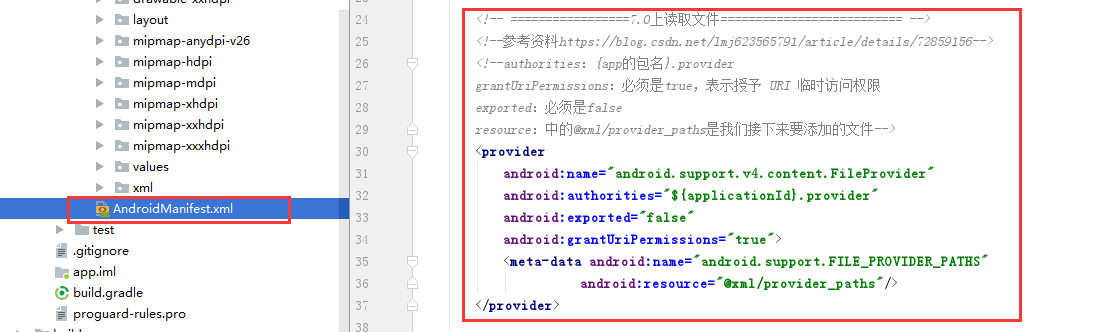
AndroidManifest.xml
xml/provider_paths.xml

使用步骤
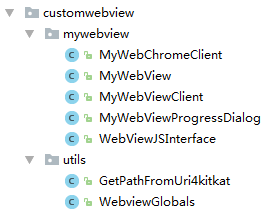
一、项目组织结构图


注意事项:
1、 导入类文件后需要change包名以及重新import R文件路径
2、 Values目录下的文件(strings.xml、dimens.xml、colors.xml等),如果项目中存在,则复制里面的内容,不要整个覆盖
二、导入步骤
0-1、申请运行时权限,参考《Android6.0运行时权限(基于RxPermission开源库)》
0-2、适配Android7.0FileProvider功能,参考《AppUtils【获取手机的信息和应用版本号、安装apk】》
1、将assets文件夹复制到项目中
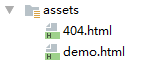
404.html【自定义404页面,会调用WebViewJSInterface中的refresh方法】
<!DOCTYPE html>
<html>
<head>
  <meta charset=utf-8 />
  <meta http-equiv="keywords" content="404">
  <meta name="viewport" content="width=device-width, initial-scale=1.0, minimum-scale=1.0, maximum-scale=1.0, user-scalable=no" />
  <meta http-equiv="X-UA-Compatible" content="IE=edge,chrome=1" />
  <meta name="renderer" content="webkit">

  <title>404哟</title>
</head>
<body>
  <div class="demo">
    <p><span>4</span><span>0</span><span>4</span></p>
    <p>网络正在开小差(´・ω・`)</p><br/>
    <p><a onclick="window.androidMethod.refresh();">重新加载</a></p>
  </div>
</body>
</html>


<style type="text/css">
body {
  background-color: #ECECEC;
  font-family: 'Open Sans', sans-serif;
  font-size: 14px;
  color: #3c3c3c;
}

.demo p:first-child {
  text-align: center;
  font-family: cursive;
  font-size: 150px;
  font-weight: bold;
  line-height: 100px;
  letter-spacing: 5px;
  color: #fff;
}

.demo p:first-child span {
  cursor: pointer;
  text-shadow: 0px 0px 2px #686868,
    0px 1px 1px #ddd,
    0px 2px 1px #d6d6d6,
    0px 3px 1px #ccc,
    0px 4px 1px #c5c5c5,
    0px 5px 1px #c1c1c1,
    0px 6px 1px #bbb,
    0px 7px 1px #777,
    0px 8px 3px rgba(100, 100, 100, 0.4),
    0px 9px 5px rgba(100, 100, 100, 0.1),
    0px 10px 7px rgba(100, 100, 100, 0.15),
    0px 11px 9px rgba(100, 100, 100, 0.2),
    0px 12px 11px rgba(100, 100, 100, 0.25),
    0px 13px 15px rgba(100, 100, 100, 0.3);
  -webkit-transition: all .1s linear;
  transition: all .1s linear;
}

.demo p:first-child span:hover {
  text-shadow: 0px 0px 2px #686868,
    0px 1px 1px #fff,
    0px 2px 1px #fff,
    0px 3px 1px #fff,
    0px 4px 1px #fff,
    0px 5px 1px #fff,
    0px 6px 1px #fff,
    0px 7px 1px #777,
    0px 8px 3px #fff,
    0px 9px 5px #fff,
    0px 10px 7px #fff,
    0px 11px 9px #fff,
    0px 12px 11px #fff,
    0px 13px 15px #fff;
  -webkit-transition: all .1s linear;
  transition: all .1s linear;
}

.demo p:not(:first-child) {
  text-align: center;
  color: #666;
  font-family: cursive;
  font-size: 20px;
  text-shadow: 0 1px 0 #fff;
  letter-spacing: 1px;
  line-height: 2em;
  margin-top: -50px;
}
</style>
demo.html【用于演示选择文件、打开相机、录音、打开本地相册功能】


<html>
    <head>
        <meta content="text/html; charset=utf-8" http-equiv="content-type">
        <meta http-equiv="keywords" content="测试">
        <meta name="viewport" content="width=device-width, initial-scale=1.0, minimum-scale=1.0, maximum-scale=1.0, user-scalable=no" />
        <title>
            webview
        </title>
    </head>

    <body>
        <p>
            <input type="file" value="打开文件" />
        </p>

        <p>
            点击下面的按钮,获取的文件路径:
        </p>
        <p>
            <input type="text" id="filePath" value="文件路径" style="100%"/>
        </p>
        <p>
            <input type="button" id="openRecord" value="打开录音" onclick="window.androidMethod.openRecord();"/>
        </p>
        <p>
            <input type="button" id="takePicture" value="打开相机" onclick="window.androidMethod.takePicture();"/>
        </p>
        <p>
            <input type="button" id="choosePic" value="打开本地相册" onclick="window.androidMethod.choosePic();"/>
        </p>
        <p>
            <a href='tel:10010'>拨打电话:10010</a>
        </p>
    </body>
    <script>
        //打开录音、打开相机、打开本地相册,选择文件后返回的路径
        function setInputText(urlPath){
            document.getElementById("filePath").value = urlPath;
        }
    </script>

</html>
2、将customwebview包复制到项目中
3、将mywebview_progress_dialog_img_drawable.xml复制到项目中
<?xml version="1.0" encoding="utf-8"?>
<!-- WebView使用的进度加载对话框进度圆圈 -->
<animated-rotate xmlns:android="http://schemas.android.com/apk/res/android"
    android:drawable="@drawable/mywebview_progress_dialog_img"
    android:pivotX="50%"
    android:pivotY="50%"
    android:fromDegrees="0.0"
    android:toDegrees="360.0"
    android:repeatMode="restart"
     />
4、将mywebview_progress_dialog_img.png图片复制到项目中


5、将mywebview_dialog_webviewprogress.xml复制到项目中
<?xml version="1.0" encoding="utf-8"?>
<!-- WebView使用的进度加载对话框布局文件 -->
<RelativeLayout xmlns:android="http://schemas.android.com/apk/res/android"
    android:id="@+id/dialog_view"
    android:layout_width="match_parent"
    android:layout_height="match_parent">

    <!-- 自定义圆形进度条 -->
    <!-- android:indeterminateDrawable自定义动画图标 -->
    <ProgressBar
        android:id="@+id/loadProgressBar"
        android:layout_width="wrap_content"
        android:layout_height="wrap_content"
        android:layout_centerInParent="true"
        android:layout_marginLeft="5dp"
        android:layout_marginRight="5dp"
        android:indeterminateDrawable="@drawable/mywebview_progress_dialog_img_drawable"
        />

</RelativeLayout>
6、在styles.xml文件中添加以下代码
<resources>

    <!-- Base application theme. -->
    <style name="AppTheme" parent="Theme.AppCompat.Light.DarkActionBar">
        <!-- Customize your theme here. -->
        <item name="colorPrimary">@color/colorPrimary</item>
        <item name="colorPrimaryDark">@color/colorPrimaryDark</item>
        <item name="colorAccent">@color/colorAccent</item>
    </style>

    <!-- ==================MyWebview========网页加载时的进度对话框========================== -->
    <style name="mywebview_loading_style" parent="android:style/Theme.Dialog">
        <!-- Dialog的windowFrame框为无 -->
        <item name="android:windowFrame">@null</item>
        <!-- 是否显示title -->
        <item name="android:windowNoTitle">true</item>
        <!-- 是否浮现在activity之上 -->
        <item name="android:windowIsFloating">true</item>
        <!-- 设置dialog的背景:#00000000透明色 -->
        <item name="android:windowBackground">@android:color/transparent</item>
        <!-- 半透明 -->
        <item name="android:windowIsTranslucent">true</item>
        <!-- 背景变灰:整个屏幕变灰,配合setCanceledOnTouchOutside(false) -->
        <item name="android:backgroundDimEnabled">false</item>
        <!-- 对话框是否有遮盖 -->
        <item name="android:windowContentOverlay">@null</item>
    </style>

</resources>
7、在AndroidManifest.xml中添加以下代码
<?xml version="1.0" encoding="utf-8"?>
<manifest xmlns:android="http://schemas.android.com/apk/res/android"
          package="com.why.project.mywebviewdemo">

    <!-- ======================(MyWebView)========================== -->
    <!-- 允许程序打开网络套接字 -->
    <uses-permission android:name="android.permission.INTERNET"/>
    <!-- ======================拍照用到的========================== -->
    <uses-permission android:name="android.permission.CAMERA" />
    <!-- ======================录音用到的========================== -->
    <uses-permission android:name="android.permission.RECORD_AUDIO" />
    <!-- 向SD卡写入数据权限 -->
    <uses-permission android:name="android.permission.READ_EXTERNAL_STORAGE" />
    <uses-permission android:name="android.permission.WRITE_EXTERNAL_STORAGE" />

    <application
        android:allowBackup="true"
        android:icon="@mipmap/ic_launcher"
        android:label="@string/app_name"
        android:roundIcon="@mipmap/ic_launcher_round"
        android:supportsRtl="true"
        android:theme="@style/AppTheme">

        <!-- =================7.0上读取文件========================== -->
        <!--参考资料https://blog.csdn.net/lmj623565791/article/details/72859156-->
        <!--authorities:{app的包名}.provider
        grantUriPermissions:必须是true,表示授予 URI 临时访问权限
        exported:必须是false
        resource:中的@xml/provider_paths是我们接下来要添加的文件-->
        <provider
            android:name="android.support.v4.content.FileProvider"
            android:authorities="${applicationId}.provider"
            android:exported="false"
            android:grantUriPermissions="true">
            <meta-data android:name="android.support.FILE_PROVIDER_PATHS"
                       android:resource="@xml/provider_paths"/>
        </provider>

        <activity android:name=".MainActivity">
            <intent-filter>
                <action android:name="android.intent.action.MAIN"/>

                <category android:name="android.intent.category.LAUNCHER"/>
            </intent-filter>
        </activity>
        <!-- 网页页面 -->
        <activity android:name=".MyWebviewActivity">
        </activity>
    </application>

</manifest>
三、使用方法
在布局文件activity_mywebview.xml中声明【实际项目中实际新的完整路径】
<?xml version="1.0" encoding="utf-8"?>
<android.support.constraint.ConstraintLayout
    xmlns:android="http://schemas.android.com/apk/res/android"
    android:layout_width="match_parent"
    android:layout_height="match_parent">

    <com.why.project.mywebviewdemo.customwebview.mywebview.MyWebView
        android:id="@+id/web_view"
        android:layout_width="match_parent"
        android:layout_height="match_parent"
        android:layout_weight="1">

    </com.why.project.mywebviewdemo.customwebview.mywebview.MyWebView>

</android.support.constraint.ConstraintLayout>
在Activity中使用如下
package com.why.project.mywebviewdemo;

import android.annotation.TargetApi;
import android.app.Activity;
import android.content.Intent;
import android.net.Uri;
import android.os.Build;
import android.os.Bundle;
import android.support.v7.app.AppCompatActivity;
import android.text.TextUtils;
import android.util.Log;
import android.webkit.ValueCallback;
import android.webkit.WebView;
import android.widget.Toast;

import com.why.project.mywebviewdemo.customwebview.mywebview.MyWebView;
import com.why.project.mywebviewdemo.customwebview.mywebview.WebViewJSInterface;
import com.why.project.mywebviewdemo.customwebview.utils.GetPathFromUri4kitkat;
import com.why.project.mywebviewdemo.customwebview.utils.WebviewGlobals;

import java.io.File;

/**
 * Created by HaiyuKing
 * Used webview
 */

public class MyWebviewActivity extends AppCompatActivity {
    private static final String TAG = MyWebviewActivity.class.getSimpleName();

    private MyWebView myWebView;

    @Override
    protected void onCreate(Bundle savedInstanceState) {
        super.onCreate(savedInstanceState);
        setContentView(R.layout.activity_mywebview);

        initViews();
        initDatas();
        initEvents();
    }

    @Override
    public void onDestroy()
    {
        //销毁webview控件
        myWebView.removeAllViews();
        myWebView.destroy();
        super.onDestroy();
    }

    private void initViews() {
        myWebView = findViewById(R.id.web_view);
        myWebView.setCanBackPreviousPage(true,MyWebviewActivity.this);//可以返回上一页
    }

    private void initDatas() {
        String openUrl = getIntent().getExtras().getString("urlKey");
        if(TextUtils.isEmpty(openUrl)){
            myWebView.loadLocalUrl("demo.html");
        }else {
            myWebView.loadWebUrl(openUrl);
        }
    }

    private void initEvents() {

    }

    /*=========================================实现webview调用相机、打开文件管理器功能==============================================*/
    @Override
    public void onActivityResult(int requestCode, int resultCode, Intent data) {
        super.onActivityResult(requestCode, resultCode, data);
        Log.w(TAG, "{onActivityResult}resultCode="+resultCode);
        Log.w(TAG, "{onActivityResult}requestCode="+requestCode);
        Log.w(TAG, "{onActivityResult}data="+data);
        if (resultCode == Activity.RESULT_OK) {
            //webview界面调用打开本地文件管理器选择文件的回调
            if (requestCode == WebviewGlobals.CHOOSE_FILE_REQUEST_CODE ) {
                Uri result = data == null ? null : data.getData();
                Log.w(TAG,"{onActivityResult}文件路径地址:" + result.toString());

                //如果mUploadMessage或者mUploadCallbackAboveL不为空,代表是触发input[type]类型的标签
                if (null != myWebView.getMyWebChromeClient().getmUploadMessage() || null != myWebView.getMyWebChromeClient().getmUploadCallbackAboveL()) {
                    if (myWebView.getMyWebChromeClient().getmUploadCallbackAboveL() != null) {
                        onActivityResultAboveL(requestCode, data);//5.0++
                    } else if (myWebView.getMyWebChromeClient().getmUploadMessage() != null) {
                        myWebView.getMyWebChromeClient().getmUploadMessage().onReceiveValue(result);//将文件路径返回去,填充到input中
                        myWebView.getMyWebChromeClient().setmUploadMessage(null);
                    }
                }else{
                    //此处代码是处理通过js方法触发的情况
                    Log.w(TAG,"{onActivityResult}文件路径地址(js):" + result.toString());
                    String filePath = GetPathFromUri4kitkat.getPath(MyWebviewActivity.this, Uri.parse(result.toString()));

                    setUrlPathInput(myWebView,"打开本地相册:" + filePath);//修改网页输入框文本
                }
            }
            //因为拍照指定了路径,所以data值为null
            if(requestCode == WebviewGlobals.CAMERA_REQUEST_CODE){
                File pictureFile = new File(WebViewJSInterface.mCurrentPhotoPath);

                Uri uri = Uri.fromFile(pictureFile);
                Intent intent = new Intent(Intent.ACTION_MEDIA_SCANNER_SCAN_FILE);
                intent.setData(uri);
                MyWebviewActivity.this.sendBroadcast(intent);  // 这里我们发送广播让MediaScanner 扫描我们制定的文件
                // 这样在系统的相册中我们就可以找到我们拍摄的照片了【但是这样一来,就会执行MediaScanner服务中onLoadFinished方法,所以需要注意】

                //拍照
//                String fileName = FileUtils.getFileName(WebViewJSInterface.mCurrentPhotoPath);
                Log.e(TAG,"WebViewJSInterface.mCurrentPhotoPath="+ WebViewJSInterface.mCurrentPhotoPath);
                setUrlPathInput(myWebView,"打开相机:" + WebViewJSInterface.mCurrentPhotoPath);//修改网页输入框文本
            }

            //录音
            if(requestCode == WebviewGlobals.RECORD_REQUEST_CODE){
                Uri result = data == null ? null : data.getData();
                Log.w(TAG,"录音文件路径地址:" + result.toString());//录音文件路径地址:content://media/external/audio/media/111

                String filePath = GetPathFromUri4kitkat.getPath(MyWebviewActivity.this, Uri.parse(result.toString()));
                Log.w(TAG,"录音文件路径地址:" + filePath);

                setUrlPathInput(myWebView,"打开录音:" + filePath);//修改网页输入框文本
            }
        }else if(resultCode == RESULT_CANCELED){//resultCode == RESULT_CANCELED 解决不选择文件,直接返回后无法再次点击的问题
            if (myWebView.getMyWebChromeClient().getmUploadMessage() != null) {
                myWebView.getMyWebChromeClient().getmUploadMessage().onReceiveValue(null);
                myWebView.getMyWebChromeClient().setmUploadMessage(null);
            }
            if (myWebView.getMyWebChromeClient().getmUploadCallbackAboveL() != null) {
                myWebView.getMyWebChromeClient().getmUploadCallbackAboveL().onReceiveValue(null);
                myWebView.getMyWebChromeClient().setmUploadCallbackAboveL(null);
            }
        }
    }

    //5.0以上版本,由于api不一样,要单独处理
    @TargetApi(Build.VERSION_CODES.LOLLIPOP)
    private void onActivityResultAboveL(int requestCode, Intent data) {

        if (myWebView.getMyWebChromeClient().getmUploadCallbackAboveL() == null) {
            return;
        }
        Uri result = null;
        if (requestCode == WebviewGlobals.CHOOSE_FILE_REQUEST_CODE) {//打开本地文件管理器选择图片
            result = data == null ? null : data.getData();
        } else if (requestCode == WebviewGlobals.CAMERA_REQUEST_CODE) {//调用相机拍照
            File pictureFile = new File(WebViewJSInterface.mCurrentPhotoPath);

            Uri uri = Uri.fromFile(pictureFile);
            Intent intent = new Intent(Intent.ACTION_MEDIA_SCANNER_SCAN_FILE);
            intent.setData(uri);
            MyWebviewActivity.this.sendBroadcast(intent);  // 这里我们发送广播让MediaScanner 扫描我们制定的文件
            // 这样在系统的相册中我们就可以找到我们拍摄的照片了【但是这样一来,就会执行MediaScanner服务中onLoadFinished方法,所以需要注意】

            result = Uri.fromFile(pictureFile);
        }
        Log.w(TAG,"{onActivityResultAboveL}文件路径地址:"+result.toString());
        myWebView.getMyWebChromeClient().getmUploadCallbackAboveL().onReceiveValue(new Uri[]{result});//将文件路径返回去,填充到input中
        myWebView.getMyWebChromeClient().setmUploadCallbackAboveL(null);
        return;
    }


    //设置网页上的文件路径输入框文本
    private void setUrlPathInput(WebView webView, String urlPath) {
        if (Build.VERSION.SDK_INT >= Build.VERSION_CODES.KITKAT) {
            webView.evaluateJavascript("setInputText('"+ urlPath +"')", new ValueCallback<String>() {
                @Override
                public void onReceiveValue(String value) {
                    Log.i(TAG, "onReceiveValue value=" + value);
                }});
        }else{
            Toast.makeText(MyWebviewActivity.this,"当前版本号小于19,无法支持evaluateJavascript,需要使用第三方库JSBridge", Toast.LENGTH_SHORT).show();
        }
    }
}
混淆配置
注意:根据实际项目的路径修改下面表红色的文字
# Add project specific ProGuard rules here.
# You can control the set of applied configuration files using the
# proguardFiles setting in build.gradle.
#
# For more details, see
#   http://developer.android.com/guide/developing/tools/proguard.html

# If your project uses WebView with JS, uncomment the following
# and specify the fully qualified class name to the JavaScript interface
# class:
#-keepclassmembers class fqcn.of.javascript.interface.for.webview {
#   public *;
#}

# Uncomment this to preserve the line number information for
# debugging stack traces.
#-keepattributes SourceFile,LineNumberTable

# If you keep the line number information, uncomment this to
# hide the original source file name.
#-renamesourcefileattribute SourceFile

#====WebView + js====
-keepclassmembers class com.why.project.mywebviewdemo.customwebview.mywebview.MyWebView {
   public *;
}
-keepclassmembers class com.why.project.mywebviewdemo.customwebview.mywebview.MyWebChromeClient {
   public *;
}
-keepclassmembers class com.why.project.mywebviewdemo.customwebview.mywebview.MyWebViewClient {
   public *;
}
# keep 使用 webview 的类
-keepclassmembers class com.why.project.mywebviewdemo.MyWebviewActivity {
  public *;
}
-keepattributes *Annotation*
#解决:android sdk api >= 17 时需要加@JavascriptInterface”所出现的问题。
-keepattributes *JavascriptInterface*
参考资料
Android-WebView-解决对选择文件 input type="file"无响应