参考网站:
http://blog.csdn.net/faye0412/article/details/6280761
http://blog.csdn.net/kk185800961/article/details/49235975
1 MySql主从配置
主库所在服务器IP地址为192.168.178.2,从库所在服务器IP地址为192.168.178.3
1.1 MySql主从复制原理
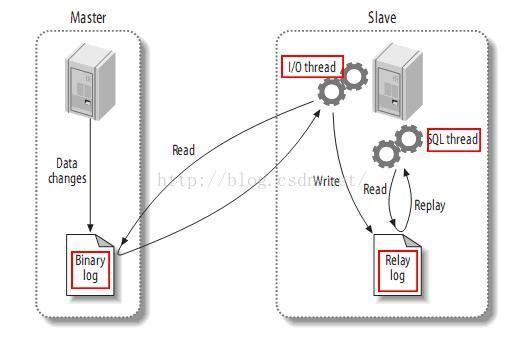
mysql 主从同步原理:
1. master 将操作记录到二进制日志(binary log)中;
2. slave IO 线程 将master的binary log events读写到它的中继日志(relay log);
3. slave SQL进程读取中继日志,将重做记录数据到数据库中。
MySQL的主从同步是一个很成熟的架构,优点为:
①在从服务器可以执行查询工作(即我们常说的读功能),降低主服务器压力;
②在从主服务器进行备份,避免备份期间影响主服务器服务;
③当主服务器出现问题时,可以切换到从服务器。
1.2 Mysql的安装
本文采用yum安装,命令如下:
[root@xldwhj ~]# yum install mysql mysql-devel mysql-server
1.3 主库设置
修改主库my.cnf,主要是设置个不一样的id和logbin(#这可依具体环境而定,压力大的化可采用huge.cnf),红色部分为新增部分。
[root@xldwhj ~]# vim /etc/my.conf
[mysqld]
datadir=/var/lib/mysql
socket=/var/lib/mysql/mysql.sock
user=mysql
# Disabling symbolic-links is recommended to prevent assorted security risks
symbolic-links=0
log-bin=mysql-bin
server-id=1
binlog-ignore-db=information_schema
binlog-ignore-db=cluster
binlog-ignore-db=mysql
[mysqld_safe]
log-error=/var/log/mysqld.log
pid-file=/var/run/mysqld/mysqld.pid
主库设置(2):
port = 3306
server_id = 1
log-bin= mysql-bin
binlog_format = mixed
read-only=0
#binlog-do-db=test
binlog-ignore-db=mysql
binlog-ignore-db=information_schema
binlog-ignore-db=performance_schema
auto-increment-offset=1
auto-increment-increment=2
启动主库生效:
[root@xldwhj ~]# service mysqld restart
登陆主库:
[root@xldwhj ~]# mysql –u root –p
Enter password:
Welcome to the MySQL monitor. Commands end with ; or \g.
Your MySQL connection id is 242
Server version: 5.1.73-log Source distribution
Copyright (c) 2000, 2013, Oracle and/or its affiliates. All rights reserved.
Oracle is a registered trademark of Oracle Corporation and/or its
affiliates. Other names may be trademarks of their respective
owners.
Type 'help;' or '\h' for help. Type '\c' to clear the current input statement.
mysql> grant all privileges on *.* to '用户名'@'%' identified by '密码'; //赋予从库权限帐号,
本文建立的账户名称为xldwhj,密码为123123
//(主从库设置用第二种方式时的设置方法)
mysql>grant replication slave on *.* to '用户名'@'192.168.1.153' identified by '密码';
允许用户在主库上读取日志,输入为从库设置的用户名和密码,本文创建的用户名为xldroot。
mysql> select user,host from mysql.user; //查看是否创建用户成功
+-----------+-----------+
| user | host |
+-----------+-----------+
| xldroot | % | //此处为从库新创建的用户。
| 用户名 | % |
| root | 127.0.0.1 |
| | localhost |
| root | localhost |
| | xldwhj |
| root | xldwhj |
+-----------+-----------+
7 rows in set (0.00 sec)
锁主库表:
mysql> flush tables with read lock;
#现在禁止操作主数据库!防止日志有变化,保证主从数据初始状态一致!
7、显示主库信息
记录File和Position,从库设置将会用到
mysql> show master status;
+------------------+----------+--------------+---------------------------------------------------------+
| File | Position | Binlog_Do_DB | Binlog_Ignore_DB |
+------------------+----------+--------------+---------------------------------------------------------+
| mysql-bin.000003 | 790 | | information_schema,cluster,mysql ------|
+------------------+----------+--------------+---------------------------------------------------------+
1 row in set (0.00 sec)
至此主库设置完成
1.4 从库设置
在主库服务器上解锁主库表
mysql> unlock tables;
修改从库配置文件/etc/my.cof
[mysqld]
datadir=/var/lib/mysql
socket=/var/lib/mysql/mysql.sock
user=mysql
# Disabling symbolic-links is recommended to prevent assorted security risks
symbolic-links=0
log-bin=mysql-bin
server-id=2
binlog-ignore-db=information_schema
binlog-ignore-db=cluster
binlog-ignore-db=mysql
replicate-do-db=test
replicate-ignore-db=mysql
log-slave-updates
slave-skip-errors=all
slave-net-timeout=60
master-host=192.168.178.2
master-user=root
master-password=pfingo
[mysqld_safe]
log-error=/var/log/mysqld.log
pid-file=/var/run/mysqld/mysqld.pid
从库设置(2)
port = 3306
server_id = 2
log-bin= mysql-bin
binlog_format = mixed
read-only=0
#replicate-do-db=test
replicate-ignore-db=mysql
replicate-ignore-db=information_schema
replicate-ignore-db=performance_schema
relay_log=mysql-relay-bin
log-slave-updates=on
#auto-increment-offset=2
#auto-increment-increment=2
在从库服务器上验证连接主库:
[root@xldmysql ~]# mysql -u root -p
Enter password:
Welcome to the MySQL monitor. Commands end with ; or \g.
Your MySQL connection id is 269
Server version: 5.1.73-log Source distribution
Copyright (c) 2000, 2013, Oracle and/or its affiliates. All rights reserved.
Oracle is a registered trademark of Oracle Corporation and/or its
affiliates. Other names may be trademarks of their respective
owners.
Type 'help;' or '\h' for help. Type '\c' to clear the current input statement.
mysql> slave stop;
mysql> change master to master_host='192.168.178.2',master_user='xldroot',master_password='123123',master_log_file='mysql-bin.000003', master_log_pos=790;
//连接MASTER MASTER_LOG_FILE为主库的File,MASTER_LOG_POS为主库的Position
//上述第二条命令语句中的master_log_file='mysql-bin.000003', master_log_pos=790;对应为前面在主库中执行的show master status;结果。
启动从库服务
mysql> slave start;
主库从库配置文件部分说明:
log-bin :需要启用二进制日志
server_id : 用于标识不同的数据库服务器
binlog-do-db : 需要记录到二进制日志的数据库
binlog-ignore-db : 忽略记录二进制日志的数据库
auto-increment-offset :该服务器自增列的初始值。
auto-increment-increment :该服务器自增列增量。
replicate-do-db :指定复制的数据库
replicate-ignore-db :不复制的数据库
relay_log :从库的中继日志,主库日志写到中继日志,中继日志再重做到从库。
log-slave-updates :该从库是否写入二进制日志,如果需要成为多主则可启用。只读可以不需要。
如果为多主的话注意设置
auto-increment-offset 和 auto-increment-increment
1.5 测试
在主库服务器上新建一张数据库表:
mysql> use test;
Database changed
mysql> CREATE TABLE `myTest` (
-> `id` INT( 5 ) UNSIGNED NOT NULL AUTO_INCREMENT ,
-> `username` VARCHAR( 20 ) NOT NULL ,
-> `password` CHAR( 32 ) NOT NULL ,
-> `last_update` DATETIME NOT NULL ,
-> `number` FLOAT( 10 ) NOT NULL ,
-> `content` TEXT NOT NULL ,
-> PRIMARY KEY ( `id` )
-> ) ENGINE = MYISAM ;
Query OK, 0 rows affected (0.02 sec)
mysql> show tables;
+----------------+
| Tables_in_test |
+----------------+
| myTest |
+----------------+
1 row in set (0.00 sec)
在从库查看主库新建的表是否存在:
mysql> use test;
Reading table information for completion of table and column names
You can turn off this feature to get a quicker startup with -A
Database changed
mysql> show tables;
+----------------+
| Tables_in_test |
+----------------+
| myTest |
+----------------+
1 row in set (0.01 sec)
可以看出从库与主库中信息一致,主从配置成功。
为了更进一步验证在从库上输入show slave status\G
mysql> show slave status\G
*************************** 1. row ***************************
Slave_IO_State: Waiting for master to send event
Master_Host: 192.168.178.2
Master_User: xldroot
Master_Port: 3306
Connect_Retry: 60
Master_Log_File: mysql-bin.000007
Read_Master_Log_Pos: 106
Relay_Log_File: mysqld-relay-bin.000002
Relay_Log_Pos: 251
Relay_Master_Log_File: mysql-bin.000007
Slave_IO_Running: Yes
Slave_SQL_Running: Yes
Replicate_Do_DB: test
Replicate_Ignore_DB: mysql
Replicate_Do_Table:
Replicate_Ignore_Table:
Replicate_Wild_Do_Table:
Replicate_Wild_Ignore_Table:
Last_Errno: 0
Last_Error:
Skip_Counter: 0
Exec_Master_Log_Pos: 106
Relay_Log_Space: 407
Until_Condition: None
Until_Log_File:
Until_Log_Pos: 0
Master_SSL_Allowed: No
Master_SSL_CA_File:
Master_SSL_CA_Path:
Master_SSL_Cert:
Master_SSL_Cipher:
Master_SSL_Key:
Seconds_Behind_Master: 0
Master_SSL_Verify_Server_Cert: No
Last_IO_Errno: 0
Last_IO_Error:
Last_SQL_Errno: 0
Last_SQL_Error:
1 row in set (0.00 sec)
Slave_IO_Running: Yes(网络正常);
Slave_SQL_Running: Yes(表结构正常)
进一步验证了以上过程的正确性。
2 MySql主主配置
采用第二种主从复制的my.cnf配置
192.168.178.2虚拟机的my.cnf配置如下:
[mysqld]
port = 3306
server_id = 1
log-bin= mysql-bin
binlog_format = mixed
read-only=0
#binlog-do-db=test
binlog-ignore-db=mysql
binlog-ignore-db=information_schema
binlog-ignore-db=performance_schema
auto-increment-offset=1
auto-increment-increment=2
#主主复制的192.168.178.2作为从库的设置(新增)
#replicate-do-db=test
replicate-ignore-db=mysql
replicate-ignore-db=information_schema
replicate-ignore-db=performance_schema
relay_log=mysql-relay-bin
log-slave-updates=on
192.168.178.3虚拟机的my.cnf的设置如下:
[mysqld]
basedir =/usr/local/mysql
datadir =/usr/local/mysql/data
port = 3306
server_id = 2
log-bin= mysql-bin
binlog_format = mixed
read-only=0
#replicate-do-db=test
replicate-ignore-db=mysql
replicate-ignore-db=information_schema
replicate-ignore-db=performance_schema
relay_log=mysql-relay-bin
log-slave-updates=on
#主主复制的192.168.178.3作为主库设置(新增)
#binlog-do-db=test
binlog-ignore-db=mysql
binlog-ignore-db=information_schema
binlog-ignore-db=performance_schema
auto-increment-offset=2
auto-increment-increment=2
添加完成后,重启数据库
[root@xldwhj ~]# service mysqld restart
Stopping mysqld: [ OK ]
Starting mysqld: [ OK ]
在192.168.178.3原从库中创建192.168.178.2原主库用于连接的用户:
mysql>grant replication slave on *.* to 'xldroot'@'192.168.1.153' identified by '123123';
查看192.168.178.3原从库的日志记录位置:
mysql> show master status\G
*************************** 1. row ***************************
File: mysql-bin.000009
Position: 521
Binlog_Do_DB:
Binlog_Ignore_DB: mysql,information_schema,performance_schema
1 row in set (0.00 sec)
从192.168.178.2原主库连接到192.168.178.3原从库的命令如下:
mysql>
change master to master_host='192.168.178.3',master_user='xldroot',
master_password='123123',master_log_file='mysql-bin.000009', master_log_pos=521;
查看192.168.178.2原主库的同步信息:
mysql> show slave status\G
*************************** 1. row ***************************
Slave_IO_State: Waiting for master to send event
Master_Host: 192.168.178.3
Master_User: repl_user
Master_Port: 3306
Connect_Retry: 60
Master_Log_File: mysql-bin.000009
Read_Master_Log_Pos: 521
Relay_Log_File: mysql-relay-bin.000004
Relay_Log_Pos: 499
Relay_Master_Log_File: mysql-bin.000009
Slave_IO_Running: Yes
Slave_SQL_Running: Yes
Replicate_Do_DB:
Replicate_Ignore_DB: mysql,information_schema,performance_schema
Replicate_Do_Table:
Replicate_Ignore_Table:
Replicate_Wild_Do_Table:
Replicate_Wild_Ignore_Table:
Last_Errno: 0
Last_Error:
Skip_Counter: 0
Exec_Master_Log_Pos: 521
Relay_Log_Space: 654
Until_Condition: None
Until_Log_File:
Until_Log_Pos: 0
Master_SSL_Allowed: No
Master_SSL_CA_File:
Master_SSL_CA_Path:
Master_SSL_Cert:
Master_SSL_Cipher:
Master_SSL_Key:
Seconds_Behind_Master: 0
Master_SSL_Verify_Server_Cert: No
Last_IO_Errno: 0
Last_IO_Error:
Last_SQL_Errno: 0
Last_SQL_Error:
1 row in set (0.00 sec)
双主配置已经配好,下面进行进一步的测试:
在192.168.178.3原从库上创建一张表并进行相关操作:
mysql>use test
mysql>create table tabdemo(id int primary key auto_increment, value int default 0) auto_increment= 1 engine=innodb default charset=utf8;
mysql>insert into tabdemo(value) values(1),(1),(1),(1),(1);
mysql>select * from tabdemo;
+----+-------+
| id | value |
+----+-------+
| 1 | 1 |
| 3 | 1 |
| 5 | 1 |
| 7 | 1 |
| 9 | 1 |
+----+-------+
在192.168.178.2原主机上执行:
mysql>select * from tabdemo; //出现下述信息
+----+-------+
| id | value |
+----+-------+
| 1 | 1 |
| 3 | 1 |
| 5 | 1 |
| 7 | 1 |
| 9 | 1 |
+----+-------+
执行
mysql> insert into tabdemo(value) values(2),(2),(2),(2),(2);
mysql> select * from tabdemo;
+----+-------+
| id | value |
+----+-------+
| 1 | 1 |
| 2 | 1 |
| 3 | 1 |
| 4 | 1 |
| 5 | 1 |
| 6 | 2 |
| 8 | 2 |
| 10 | 2 |
| 12 | 2 |
| 14 | 2 |
+----+-------+
在192.168.178.3上执行
mysql> select * from tabdemo;
+----+-------+
| id | value |
+----+-------+
| 1 | 1 |
| 2 | 1 |
| 3 | 1 |
| 4 | 1 |
| 5 | 1 |
| 6 | 2 |
| 8 | 2 |
| 10 | 2 |
| 12 | 2 |
| 14 | 2 |
+----+-------+
至此为止,测试完毕,双主配置成功。