dhttp://www.cnblogs.com/yuanchenqi/articles/6083427.html
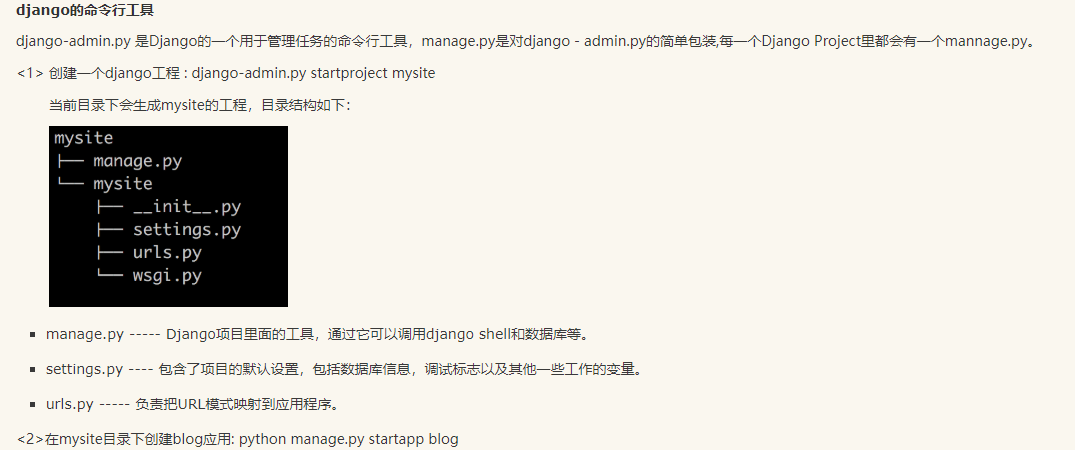
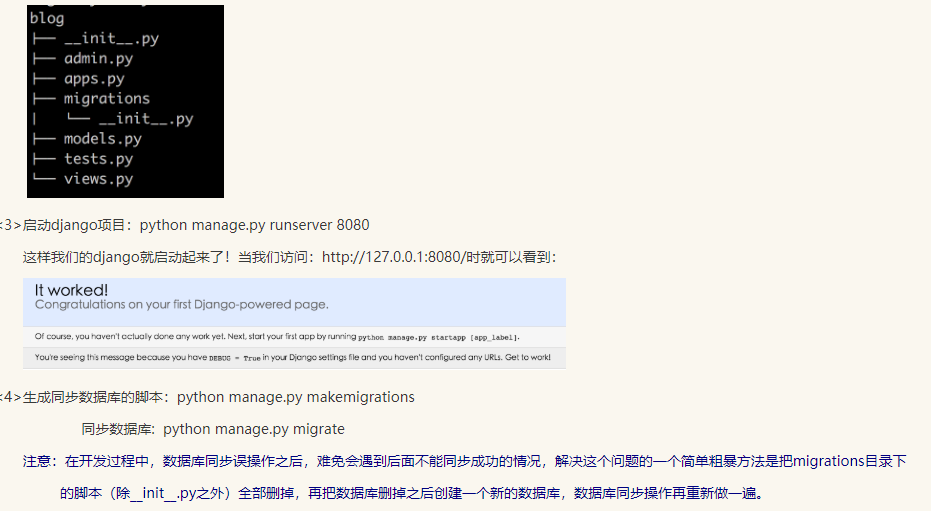
django
    #安装: pip3 install django

          添加环境变量

    #1  创建project
       django-admin startproject mysite

       ---mysite

          ---settings.py
          ---url.py
          ---wsgi.py

       ---- manage.py(启动文件)

    #2  创建APP
       python mannage.py startapp  app01

    #3  settings配置

       TEMPLATES

       STATICFILES_DIRS=(
            os.path.join(BASE_DIR,"statics"),
        )

       STATIC_URL = '/static/'
       #  我们只能用 STATIC_URL,但STATIC_URL会按着你的STATICFILES_DIRS去找#4  根据需求设计代码
           url.py
           view.py

    #5  使用模版
       render(req,"index.html")

    #6  启动项目
       python manage.py runserver  127.0.0.1:8090

    #7  连接数据库,操作数据
       model.py

提交数据展示
<!DOCTYPE html>
<html lang="en">
<head>
    <meta charset="UTF-8">
    <title>Title</title>
</head>
<body>
<h1>创建个人信息</h1>

<form action="/userInfor/" method="post">

    <p>姓名<input type="text" name="username"></p>
    <p>性别<input type="text" name="sex"></p>
    <p>邮箱<input type="text" name="email"></p>
    <p><input type="submit" value="submit"></p>

</form>

<hr>

<h1>信息展示</h1>

<table border="1">

    <tr>
        <td>姓名</td>
        <td>性别</td>
        <td>邮箱</td>
    </tr>
    {% for i in info_list %}

        <tr>
            <td>{{ i.username }}</td>
            <td>{{ i.sex }}</td>
            <td>{{ i.email }}</td>
        </tr>

    {% endfor %}

</table>

</body>
</html>


-----------------------url.py---------------------------------------
url(r'^userInfor/', views.userInfor)

-----------------------views.py--------------------------------------

info_list=[]

def userInfor(req):

    if req.method=="POST":
        username=req.POST.get("username",None)
        sex=req.POST.get("sex",None)
        email=req.POST.get("email",None)

        info={"username":username,"sex":sex,"email":email}
        info_list.append(info)

    return render(req,"userInfor.html",{"info_list":info_list})
提交数据展示----数据库
<!DOCTYPE html>
<html lang="en">
<head>
    <meta charset="UTF-8">
    <title>Title</title>
</head>
<body>
<h1>创建个人信息</h1>

<form action="/userInfor/" method="post">

    <p>姓名<input type="text" name="username"></p>
    <p>性别<input type="text" name="sex"></p>
    <p>邮箱<input type="text" name="email"></p>
    <p><input type="submit" value="submit"></p>

</form>

<hr>

<h1>信息展示</h1>

<table border="1">

    <tr>
        <td>姓名</td>
        <td>性别</td>
        <td>邮箱</td>
    </tr>
    {% for i in info_list %}

        <tr>
            <td>{{ i.username }}</td>
            <td>{{ i.sex }}</td>
            <td>{{ i.email }}</td>
        </tr>

    {% endfor %}

</table>

</body>
</html>


----------------------------------------------models.py
from django.db import models

# Create your models here.


class UserInfor(models.Model):

    username=models.CharField(max_length=64)
    sex=models.CharField(max_length=64)
    email=models.CharField(max_length=64)

----------------------------------------------views.py

from django.shortcuts import render

from app01 import models
# Create your views here.


def userInfor(req):

    if req.method=="POST":
        u=req.POST.get("username",None)
        s=req.POST.get("sex",None)
        e=req.POST.get("email",None)


       #---------表中插入数据方式一
            # info={"username":u,"sex":e,"email":e}
            # models.UserInfor.objects.create(**info)

       #---------表中插入数据方式二
        models.UserInfor.objects.create(
            username=u,
            sex=s,
            email=e
        )

        info_list=models.UserInfor.objects.all()

        return render(req,"userInfor.html",{"info_list":info_list})

    return render(req,"userInfor.html")
一、概述:(django静态文件配置)

     #静态文件交由Web服务器处理,Django本身不处理静态文件。简单的处理逻辑如下(以nginx为例):

     #          URI请求-----> 按照Web服务器里面的配置规则先处理,以nginx为例,主要求配置在nginx.
                             #conf里的location

                         |---------->如果是静态文件,则由nginx直接处理

                         |---------->如果不是则交由Django处理,Django根据urls.py里面的规则进行匹配

    # 以上是部署到Web服务器后的处理方式,为了便于开发,Django提供了在开发环境的对静态文件的处理机制,方法是这样:

    #1、在INSTALLED_APPS里面加入'django.contrib.staticfiles',

    #2、在urls.py里面加入
       if settings.DEBUG:
           urlpatterns += patterns('', url(r'^media/(?P<path>.*)$',
           'django.views.static.serve', {'document_root': settings.MEDIA_ROOT }),
            url(r'^static/(?P<path>.*)$',
          'django.views.static.serve',{'document_root':settings.STATIC_ROOT}), )

    # 3、这样就可以在开发阶段直接使用静态文件了。

二、MEDIA_ROOT和MEDIA_URL

        #而静态文件的处理又包括STATIC和MEDIA两类,这往往容易混淆,在Django里面是这样定义的:

        #MEDIA:指用户上传的文件,比如在Model里面的FileFIeld,ImageField上传的文件。如果你定义

        #MEDIA_ROOT=c:	empmedia,那么File=models.FileField(upload_to="abc/")#,上传的文件就会被保存到c:	empmediaabc
        #eg:
            class blog(models.Model):
                   Title=models.charField(max_length=64)
                   Photo=models.ImageField(upload_to="photo")
        #     上传的图片就上传到c:	empmediaphoto,而在模板中要显示该文件,则在这样写
        #在settings里面设置的MEDIA_ROOT必须是本地路径的绝对路径,一般是这样写:
                 BASE_DIR= os.path.abspath(os.path.dirname(__file__))
                 MEDIA_ROOT=os.path.join(BASE_DIR,'media/').replace('\','/')

        #MEDIA_URL是指从浏览器访问时的地址前缀,举个例子:
            MEDIA_ROOT=c:	empmediaphoto
            MEDIA_URL="/data/"
        #在开发阶段,media的处理由django处理:

        #    访问http://localhost/data/abc/a.png就是访问c:	empmediaphotoabca.png

        #    在模板里面这样写<img src="{{MEDIA_URL}}abc/a.png">

        #    在部署阶段最大的不同在于你必须让web服务器来处理media文件,因此你必须在web服务器中配置,
        #  以便能让web服务器能访问media文件
        #    以nginx为例,可以在nginx.conf里面这样:

                 location ~/media/{
                       root/temp/
                       break;
                    }

        #    具体可以参考如何在nginx部署django的资料。

三、STATIC_ROOT和STATIC_URL、
    STATIC主要指的是如css,js,images这样文件,在settings里面可以配置STATIC_ROOT和STATIC_URL,
    配置方式与MEDIA_ROOT是一样的,但是要注意

    #STATIC文件一般保存在以下位置:

    #1、STATIC_ROOT:在settings里面设置,一般用来放一些公共的js,css,images等。

    #2、app的static文件夹,在每个app所在文夹均可以建立一个static文件夹,然后当运行collectstatic时,
    #    Django会遍历INSTALL_APPS里面所有app的static文件夹,将里面所有的文件复制到STATIC_ROOT。因此,
    #   如果你要建立可复用的app,那么你要将该app所需要的静态文件放在static文件夹中。

    # 也就是说一个项目引用了很多app,那么这个项目所需要的css,images等静态文件是分散在各个app的static文件的,比
    #  较典型的是admin应用。当你要发布时,需要将这些分散的static文件收集到一个地方就是STATIC_ROOT。

    #3、STATIC文件还可以配置STATICFILES_DIRS,指定额外的静态文件存储位置。
    #  STATIC_URL的含义与MEDIA_URL类似。

    # ----------------------------------------------------------------------------
    #注意1:
        #为了后端的更改不会影响前端的引入,避免造成前端大量修改

        STATIC_URL = '/static/'               #引用名
        STATICFILES_DIRS = (
            os.path.join(BASE_DIR,"statics")  #实际名 ,即实际文件夹的名字
        )

        #django对引用名和实际名进行映射,引用时,只能按照引用名来,不能按实际名去找
        #<script src="/statics/jquery-3.1.1.js"></script>
        #------error-----不能直接用,必须用STATIC_URL = '/static/':
        #<script src="/static/jquery-3.1.1.js"></script>

    #注意2(statics文件夹写在不同的app下,静态文件的调用):

        STATIC_URL = '/static/'

        STATICFILES_DIRS=(
            ('hello',os.path.join(BASE_DIR,"app01","statics")) ,
        )

        #<script src="/static/hello/jquery-1.8.2.min.js"></script>

    #注意3:
        STATIC_URL = '/static/'
        {% load staticfiles %}
       # <script src={% static "jquery-1.8.2.min.js" %}></script>
其他文件配置
APPEND_SLASH
       Default: True
       When set to True, if the request URL does not match any of the patterns in the URLconf and it
       doesn’t end in a slash, an HTTP redirect is issued to the same URL with a slash appended. Note
       that the redirect may cause any data submitted in a POST request to be lost.