Spring自带了多种应用上下文
AnnotationConfigApplicationContext:从一个或多个java配置类中加载应用上下文
AnnotationConfigWebApplicationContext:从一个或多个java配置类加载web的应用上下文
ClassPathXmlApplicationContext: 从类路径下的xml文件中加上上下文定义
FileSystemXmlApplicationContext:从文件系统下的xml文件加载上下文定义
XmlWebApplicationContext:从web应用下的xml文件加载上下文
FileSystemXmlApplicationCont 和 ClassPathXmlApplicationContext的区别是
FileSystemXmlApplicationCont是指定的文件系统下去寻找对应的xml文件
ClassPathXmlApplicationContext是在所有的类路径下去寻找xml文件的
1 ApplicationContext context = new FileSystemXmlApplicationContext("d:/test.xml");
2
3 or
4
5 ApplicationContext context = new ClassPathXmlApplicationContext("test.xml");
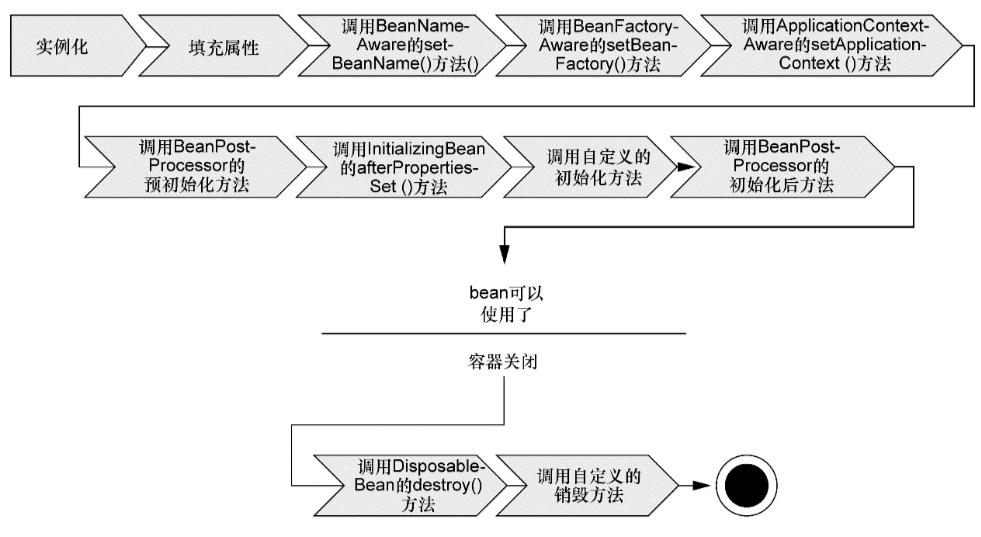
bean的生命周期

本地实验bean去实现其中的几个接口,例如 BeanNameAware, BeanPostProcessor, DisposableBean
代码大致如下,其中LogUtil自行替换即可
Applicationcontext的工具类,这里仅仅用class来获取,其他方法类似
public class SpringContextHolder {

    private static ApplicationContext innerContext;

    @Autowired
    public void setInnerContext(ApplicationContext context){
        innerContext = context;
    }


    public static <T> T getBean(Class<T> clazz){
        return innerContext.getBean(clazz);
    }

}
 1 @Component
 2 public class TestBean implements BeanNameAware, BeanPostProcessor, DisposableBean {
 3
 4     private String name;
 5
 6     public void setBeanName(String name) {
 7         LogUtil.info("name = " + name);
 8         this.name = name;
 9     }
10
11     public Object postProcessBeforeInitialization(Object bean, String beanName) throws BeansException {
12         LogUtil.info("post Before invoked, name " + beanName);
13         return bean;
14     }
15
16     public Object postProcessAfterInitialization(Object bean, String beanName) throws BeansException {
17         LogUtil.info("post After invoked, name " + beanName);
18         return bean;
19     }
20
21     public void destroy() throws Exception {
22         LogUtil.info("be destroy");
23     }
24 }
xml配置开启注解即可,这里不贴了
还有另一个与其一样的类,不同点是 打印到控制台的内容有 22 作为前缀
测试类大致如下
 1 @RunWith(SpringJUnit4ClassRunner.class)
 2 @ContextConfiguration(locations = "/spring.xml")
 3 public class SpringTest {
 4
 5
 6     @Test
 7     public void test(){
 8         try {
 9             TestBean testBean = SpringContextHolder.getBean(TestBean.class);
10             TestBean2 testBean2 = SpringContextHolder.getBean(TestBean2.class);
11         } catch (QuestFailedException e) {
12             e.printStackTrace();
13         }
14     }
15
16 }
运行结果如下
 1 post Before invoked, name testB
 2 22 post Before invoked, name testB
 3 post After invoked, name testB
 4 22 post After invoked, name testB
 5 post Before invoked, name testA
 6 22 post Before invoked, name testA
 7 post After invoked, name testA
 8 22 post After invoked, name testA
 9 post Before invoked, name springContextHolder
10 22 post Before invoked, name springContextHolder
11 post After invoked, name springContextHolder
12 22 post After invoked, name springContextHolder
13 post Before invoked, name org.springframework.context.event.internalEventListenerProcessor
14 22 post Before invoked, name org.springframework.context.event.internalEventListenerProcessor
15 post After invoked, name org.springframework.context.event.internalEventListenerProcessor
16 22 post After invoked, name org.springframework.context.event.internalEventListenerProcessor
17 post Before invoked, name org.springframework.context.event.internalEventListenerFactory
18 22 post Before invoked, name org.springframework.context.event.internalEventListenerFactory
19 post After invoked, name org.springframework.context.event.internalEventListenerFactory
20 22 post After invoked, name org.springframework.context.event.internalEventListenerFactory
21 post Before invoked, name quest
22 22 post Before invoked, name quest
23 post After invoked, name quest
24 22 post After invoked, name quest
25 post Before invoked, name knight
26 22 post Before invoked, name knight
27 post After invoked, name knight
28 22 post After invoked, name knight
29 post Before invoked, name minstrel
30 22 post Before invoked, name minstrel
31 post After invoked, name minstrel
32 22 post After invoked, name minstrel
可见第二个接口是针对spring环境下的所有bean的,当有多个接口的实现者时,均会被调用
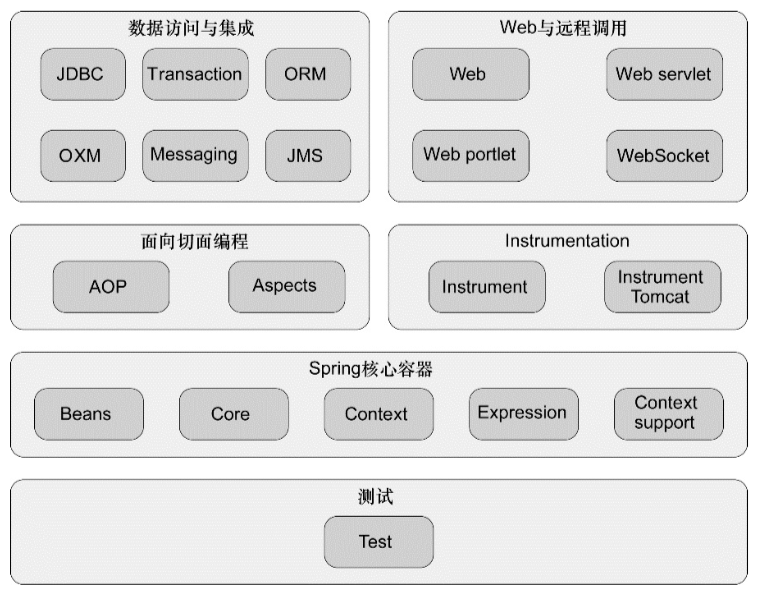
spring的包情况

Spring容器配置的三种方式
xml配置
java类配置
隐式的bean发现机制和自动配置
重点讲解第三点,spring从2个角度来实现自动化装配
组件扫描:spring自动发现应用上下文所创建的bean
自动装配:spring自动满足bean之间的依赖
基于java类配置的自动扫描
1 @Configuration
2 @ComponentScan
3 public class CDPlayerConfig {
4     // nothing
5 }
ComponentScan会默认扫描该类所在的包的类,及其子包所有的类,这个与传统的在xml中配置 <context:component-scan base-package="xx" /> 的用法是一样的
@ComponentScan(value="xxx") 表明xxx是基础包 与 @ComponentScan(basePackages={"x1","x2"}) 是等价的
还可以是 @ComponentScan(basePackageClasses={a.class, b.class}) 这类类锁在的包,也会作为扫描的基础包
bean类
 1 // 接口
 2 public interface CompactDisc {
 3     void play();
 4 }
 5
 6
 7
 8 // 一个实现类
 9 @Component
10 public class SgtPeppers implements CompactDisc{
11
12     private String title = "sgt title";
13
14     private String artist = " paul ";
15
16
17     public void play() {
18         LogUtil.info(title + " -> " + artist);
19     }
20 }
测试类
 1 @RunWith(SpringJUnit4ClassRunner.class)
 2 @ContextConfiguration(classes = CDPlayerConfig.class)
 3 public class CDPlayerTest {
 4
 5     @Autowired
 6     private CompactDisc compactDisc;
 7
 8     @Test
 9     public void test(){
10         Assert.assertNotNull(compactDisc);
11     }
12
13 }
运行的结果是通过,表明通过这种方式,成功的将bean装配了
这里顺带说下 Autowired 和 Resource的区别
Autowired自动装备,默认先按照类型去查找,如果找到了唯一的实例,那么顺利装配,如果不唯一,则需要使用 @Qualifier来指定
Resource则默认按照属性名去寻找,如果没有找到,则按照类型寻找,按类型寻找发现不唯一,也会报错,这个时候,就需要同 @Qualifier 一起使用
按上面的代码 修改2个bean类,以及测试类如下
 1 @Component(value = "cdc")
 2 public class CdCommon implements CompactDisc {
 3
 4     public void play() {
 5         LogUtil.info("i'm cdc");
 6     }
 7 }
 8
 9
10
11 @Component(value = "sp")
12 public class SgtPeppers implements CompactDisc{
13
14     private String title = "sgt title";
15
16     private String artist = " paul ";
17
18
19     public void play() {
20         LogUtil.info(title + " -> " + artist);
21     }
22 }
23
24
25
26 // 测试类
27 @RunWith(SpringJUnit4ClassRunner.class)
28 @ContextConfiguration(classes = CDPlayerConfig.class)
29 public class CDPlayerTest {
30
31     @Autowired
32     @Qualifier(value = "sp")
33     private CompactDisc compactDisc;
34
35     @Resource
36     @Qualifier(value = "cdc")
37     private CompactDisc cdc1;
38     //    private CompactDisc cdc;
39
40     @Test
41     public void test(){
42         Assert.assertNotNull(compactDisc);
43 //        Assert.assertNotNull(cdc);
44         Assert.assertNotNull(cdc1);
45     }
46
47 }
这个运行的结果也是可以的
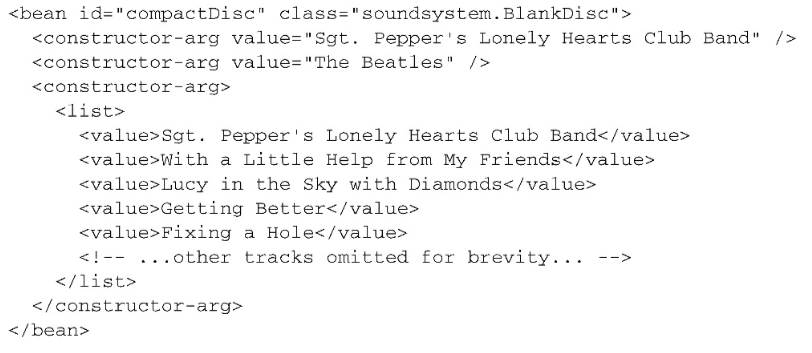
spring xml 方式声明bean ,参数有list时,可以这么使用
