1、准备工作
我们最终想实现的效果如下:
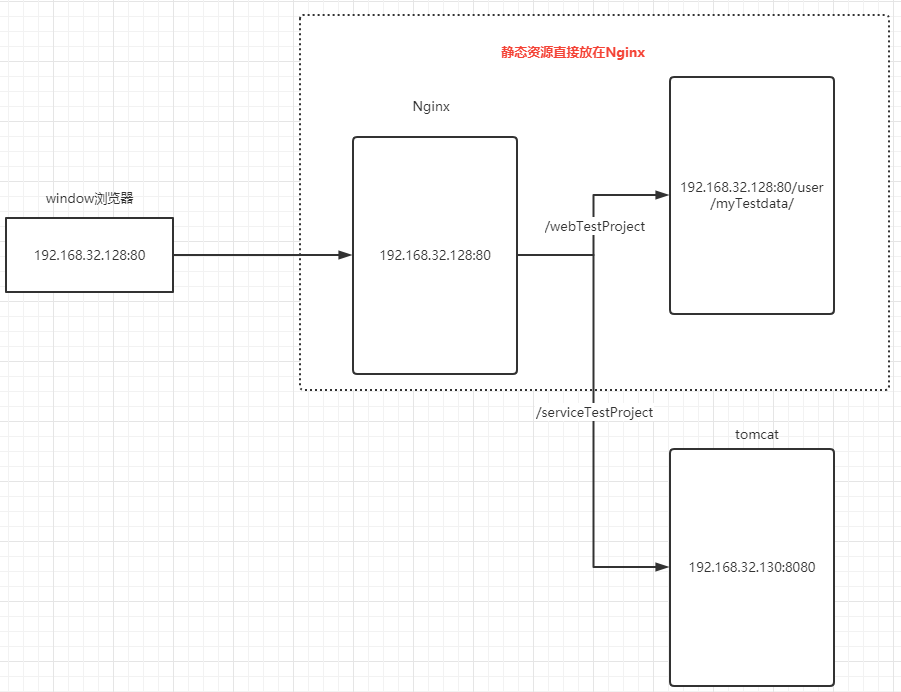
即访问以 /webTestProject 为前缀的资源时,我们认为是静态资源。我们把静态资源直接放在 Nginx 服务器上,通过 Nginx 来直接返回静态资源。
当访问的资源以 /serviceTestProject 为前缀时,我们认为是动态资源。此时通过 Nginx 把请求代理转发至 192.168.32.130 服务器上,通过该服务器来处理动态请求。
上面也是常见的前后端分离项目的架构,实际上我们接下来的配置也是示例前后端分离在实际生产上的架构。
1.1、准备静态资源
首先先准备静态资源项目即前端项目 webTestProject,然后将该项目放到 192.168.32.128 服务器的 /usr/myTestData/webTestProject 目录下:

index.html 文件内容如下,只是显示一些简单内容发出求一个请求:
<!DOCTYPE html>
<html lang="en">

<head>
    <meta charset="UTF-8">
    <meta http-equiv="X-UA-Compatible" content="IE=edge">
    <meta name="viewport" content="width=device-width, initial-scale=1.0">
    <title>Document</title>
</head>

<body>
    <h1>Nginx练习页面</h1>

    <script>
        var xmlhttp;
        if (window.XMLHttpRequest) {
            //  IE7+, Firefox, Chrome, Opera, Safari 浏览器执行代码
            xmlhttp = new XMLHttpRequest();
        } else {
            // IE6, IE5 浏览器执行代码
            xmlhttp = new ActiveXObject("Microsoft.XMLHTTP");
        }
        xmlhttp.onreadystatechange = function () {
            if (xmlhttp.readyState == 4 && xmlhttp.status == 200) {
                console.log(xmlhttp.responseText);
            }
        }

        //请求根路径下的/serviceTestProject/ajaxResponse.do,实际上会由Nginx转发至动态资源服务器
        xmlhttp.open("GET", "/serviceTestProject/ajaxResponse.do", true);
        xmlhttp.send();
    </script>
</body>

</html>
1.2、准备动态资源
我们新建一个简单的 maven javaweb 项目,并且建立一个 ajaxResponse.do 请求以供前端访问。
ajaxResponse.do 的代码如下:
@Controller
public class ControllerTest01 {

    //直接给 ajax 请求返回字符串
    @RequestMapping("/ajaxResponse.do")
    public void ajaxResponse(HttpServletRequest request, HttpServletResponse response) throws Exception{
        PrintWriter out = response.getWriter();
        out.write("hello");
    }
}
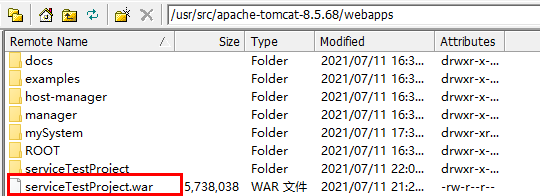
将该 web 项目打包,并且将打成的 war 包放在 192.168.32.130 服务器上的 tomcat 目录下的 webapps 目录下:
2、配置动静分离
将前端静态资源和后台动态资源分别部署到不同服务器上后,我们就可以开始进行配置了。
打开 192.168.32.128 服务器上的 Nginx 配置文件 /usr/local/nginx/conf/nginx.conf ,进行如下修改:
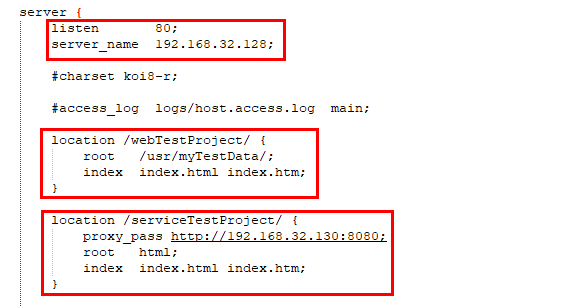
即监听本服务器上的 80 端口,当请求的资源以 /webTestProject 为前缀时,将请求直接转发至访问本服务器上 /usr/myTestData/ 目录下的资源,即直接将该目录下的静态资源返回。
当请求的资源以 /serviceTestProject 为前缀时,将请求转发至 192.168.32.130 服务器上,由该服务器来处理动态请求,我们将后台项目部署在了该服务器上。
配置完成后,我们可以在浏览器访问 http://192.168.32.128/webTestProject/index.html 可以看到如下效果:

ajaxResponse.do 请求:
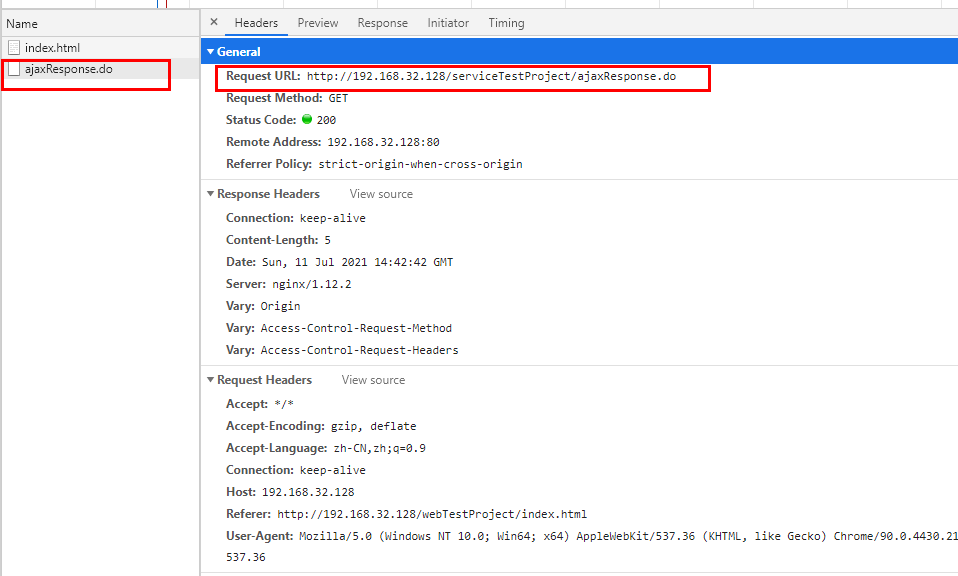
可以看到 ajaxResponse.do 请求能正常访问,并不会有跨域问题。这是因为这些动态资源已经由 Nginx 进行了反向代理,虽然实际上是由 192.168.32.130 服务器进行处理并返回的,但浏览器并不能感知到。因为发出的动态资源请求是请求 192.168.32.128 服务器上的资源的,然后再由该服务器上的 Nginx 转发至 192.168.32.130 服务器上的。
实际上,动态资源是由 192.168.32.130 服务器处理并返回的,静态资源是由 192.168.32.128 上的 Nginx 服务器直接返回的。
2.1、完整的Nginx配置文件
完整的Nginx配置文件如下:
#user  nobody;
worker_processes  1;

#error_log  logs/error.log;
#error_log  logs/error.log  notice;
#error_log  logs/error.log  info;

#pid        logs/nginx.pid;


events {
    worker_connections  1024;
}


http {
    include       mime.types;
    default_type  application/octet-stream;

    #log_format  main  '$remote_addr - $remote_user [$time_local] "$request" '
    #                  '$status $body_bytes_sent "$http_referer" '
    #                  '"$http_user_agent" "$http_x_forwarded_for"';

    #access_log  logs/access.log  main;

    sendfile        on;
    #tcp_nopush     on;

    #keepalive_timeout  0;
    keepalive_timeout  65;

    #gzip  on;

    server {
        listen       80;
        server_name  192.168.32.128;

        #charset koi8-r;

        #access_log  logs/host.access.log  main;

        location /webTestProject/ {
            root   /usr/myTestData/;
            index  index.html index.htm;
        }

        location /serviceTestProject/ {
            proxy_pass http://192.168.32.130:8080;
            root   html;
            index  index.html index.htm;
        }

        #error_page  404              /404.html;

        # redirect server error pages to the static page /50x.html
        #
        error_page   500 502 503 504  /50x.html;
        location = /50x.html {
            root   html;
        }

        # proxy the PHP scripts to Apache listening on 127.0.0.1:80
        #
        #location ~ .php$ {
        #    proxy_pass   http://127.0.0.1;
        #}

        # pass the PHP scripts to FastCGI server listening on 127.0.0.1:9000
        #
        #location ~ .php$ {
        #    root           html;
        #    fastcgi_pass   127.0.0.1:9000;
        #    fastcgi_index  index.php;
        #    fastcgi_param  SCRIPT_FILENAME  /scripts$fastcgi_script_name;
        #    include        fastcgi_params;
        #}

        # deny access to .htaccess files, if Apache's document root
        # concurs with nginx's one
        #
        #location ~ /.ht {
        #    deny  all;
        #}
    }


    # HTTPS server
    #
    #server {
    #    listen       443 ssl;
    #    server_name  localhost;

    #    ssl_certificate      cert.pem;
    #    ssl_certificate_key  cert.key;

    #    ssl_session_cache    shared:SSL:1m;
    #    ssl_session_timeout  5m;

    #    ssl_ciphers  HIGH:!aNULL:!MD5;
    #    ssl_prefer_server_ciphers  on;

    #    location / {
    #        root   html;
    #        index  index.html index.htm;
    #    }
    #}

}