第一步:创建父工程,pom.xml如下:
    <parent>
        <groupId>org.springframework.boot</groupId>
        <artifactId>spring-boot-starter-parent</artifactId>
        <version>2.1.0.RELEASE</version>
    </parent>

    <dependencies>
        <dependency>
            <groupId>org.springframework.boot</groupId>
            <artifactId>spring-boot-starter-web</artifactId>
        </dependency>
        <!--解决jdk 9 以上没有  JAXB API 的问题-->
<!--        <dependency>
            <groupId>javax.xml.bind</groupId>
            <artifactId>jaxb-api</artifactId>
            <version>2.3.0</version>
        </dependency>
        <dependency>
            <groupId>com.sun.xml.bind</groupId>
            <artifactId>jaxb-core</artifactId>
            <version>2.3.0</version>
        </dependency>
        <dependency>
            <groupId>javax.xml.bind</groupId>
            <artifactId>jaxb-impl</artifactId>
            <version>2.3.0</version>
        </dependency>
        <dependency>
            <groupId>javax.activation</groupId>
            <artifactId>activation</artifactId>
            <version>1.1.1</version>
        </dependency>-->
    </dependencies>

    <!--dependencyManagement是分布式项目里面统一管理版本号-->
    <dependencyManagement>
        <dependencies>
            <dependency>
                <groupId>org.springframework.cloud</groupId>
                <artifactId>spring-cloud-dependencies</artifactId>
                <version>Finchley.RELEASE</version>
                <type>pom</type>
                <scope>import</scope>
            </dependency>
        </dependencies>
    </dependencyManagement>
在父工程下创建Moudule,pom.xml如下:(Eureka Server实现)
    <dependencies>
        <dependency>
            <groupId>org.springframework.cloud</groupId>
            <artifactId>spring-cloud-starter-netflix-eureka-server</artifactId>
            <version>2.1.0.RELEASE</version>
        </dependency>
    </dependencies>
创建配置文件application.yml,添加Eureka Server相关配置
server:
  port: 8761   #当前Eureka Server服务端口(一般注册中心的端口定为8761)
eureka:
  instance:
    hostname: localhost    #设置当前实例的主机名称
  client:
    register-with-eureka: false   #eureka本身是个微服务,false表示不将自身注册到注册中心
    fetch-registry: false    #是否要同步其它注册中心的数据
    #注册中心的访问地址
    service-url:
      defaultZone: http://localhost:8761/eureka/
创建启动类
@SpringBootApplication  //声明该类是Spring Boot服务的入口
@EnableEurekaServer    //声明该类是一个Eureka Server微服务,提供服务注册和服务发现功能,即注册中心
public class EurekaServerApplication {
    public static void main(String[] args){   //main方法提示  psvm
        SpringApplication.run(EurekaServerApplication.class,args);
    }
}
在父工程下创建Moudule,pom.xml如下:(Eureka Client实现)
        <dependency>
            <groupId>org.springframework.cloud</groupId>
            <artifactId>spring-cloud-starter-netflix-eureka-client</artifactId>
            <version>2.1.0.RELEASE</version>
        </dependency>
创建配置文件application.yml,添加Eureka client相关配置
server:
  port: 8010
spring:
  application:
    name: provider1   #当前服务在注册中心的名字
eureka:
  instance:
    prefer-ip-address: true   #是否将当前服务的IP注册到Eureka Server
  client:
    service-url:
      defaultZone: http://localhost:8761/eureka/   #注册中心访问地址
创建提供者启动类
@SpringBootApplication   //声明该类是Spring Boot服务的入口
public class EurekaClientApplication {
    public static void main(String[] args) {
        SpringApplication.run(EurekaClientApplication.class,args);
    }
}
RestTemplate的使用
1.什么是RestTemplate
RestTemplate是spring框架提供的基于REST的服务组件,底层对http请求及响应进行了封装,提供了很多访问REST服务的方法,可以简化代码开发。
2.如何使用RestTemplate
在父工程下创建Moudule,创建需要用到的实体类,通过@Bean将RestTemplate注入到ioc容器,创建Handler调用服务提供的方法
在父工程下创建Moudule,pom.xml如下 (Consumer消费者的实现)


    <dependencies>
        <dependency>
            <groupId>org.springframework.cloud</groupId>
            <artifactId>spring-cloud-starter-netflix-eureka-client</artifactId>
            <version>2.1.0.RELEASE</version>
        </dependency>
    </dependencies>
创建配置文件application.yml,添加Consumer相关配置
server:
  port:8020
spring:
  application:
    name: consumer
eureka:
  client:
    service-url:
      defaultZone: http://localhost:8761/eureka/   #注册中心地址
   instance:
     prefer-ip-adress: true                 #是否把ip进行注册
创建启动类
@SpringBootApplication
public class ConsumerApplication {
    public static void main(String[] args) {
        SpringApplication.run(ConsumerApplication.class,args);
    }
    @Bean    //将RestTemplate注入IOC容器
    public RestTemplate restTemplate(){
        return new RestTemplate();
    }
}
创建实体类
@Data
@AllArgsConstructor
@NoArgsConstructor
public class Student {
    private long id;
    private String name;
    private int age;
}
创建Handler
@RestController
@RequestMapping("/consumer")
public class ConsumerHandler {
    @Autowired
    RestTemplate restTemplate;

    @GetMapping("/findAll")
    public Collection<Student> findAll(){
        return restTemplate.getForEntity("http://127.0.0.1:8010/student/findAll",Collection.class).getBody();
    }

    @GetMapping("/findAll2")
    public Collection<Student> findAll2(){
        return restTemplate.getForObject("http://127.0.0.1:8010/student/findAll", Collection.class);
    }

    @GetMapping("/findById/{id}")
    public Student findById(@PathVariable("id") long id){
        return restTemplate.getForObject("http://127.0.0.1:8010/student/findById/{id}",Student.class,id);
    }

    @PostMapping("/save")
    public void save(@RequestBody Student student){
        restTemplate.getForObject("http://127.0.0.1:8010/student/save",null,student);
    }
}
服务网关:
Spring Cloud集成了zuul组件,实现了服务网关。
什么是zuul组件?
Zuul是Netflix提供的一个开源的API网关服务器,是客户端和网站后端所有请求的中间层,对外开放一个API,将所有请求导入统一的入口,屏蔽了服务端的具体实现逻辑,zuul可以实现反向代理的功能,在网关内部实现动态路由、身份认证、IP过滤、数据监控等。
zuul自带负载均衡功能。
在父工程下创建Moudule,pom.xml如下 (Zuul实现)
 <dependencies>
        <dependency>
            <groupId>org.springframework.cloud</groupId>
            <artifactId>spring-cloud-starter-netflix-eureka-client</artifactId>
            <version>2.1.0.RELEASE</version>
        </dependency>
        <dependency>
            <groupId>org.springframework.cloud</groupId>
            <artifactId>spring-cloud-starter-netflix-zuul</artifactId>
            <version>2.1.0.RELEASE</version>
        </dependency>
    </dependencies>
创建配置文件application.yml,添加Zuul相关配置
server:
  port: 8030
spring:
  application:
    name: getWay
eureka:
  client:
    service-url:
      defaultZone: http://localhost:8761/eureka/   #注册中心地址
zuul:
  routes:
    provider: /p/**     #给服务提供者提供provider设置映射,通过此处配置,我们可以通过http://127.0.0.1:8030/p/student/findAll访问注册中心提供者提供的方法
创建启动类
@EnableZuulProxy  //包含了@EnableZuulServer,设置该类是网管的启动类
@EnableAutoConfiguration  //可以帮助spring boot应用将所有符合条件的@Configration配置加载到当前spring boot创建并使用的ioc容器
public class ZuulApplication {
    public static void main(String[] args) {
        SpringApplication.run(ZuulApplication.class,args);
    }
}
此处运行项目发现bug,bug示例:
Error starting ApplicationContext. To display the conditions report re-run your application with 'debug' enabled.
2019-05-03 16:45:02.347 ERROR 326972 --- [           main] o.s.b.d.LoggingFailureAnalysisReporter   :

***************************
APPLICATION FAILED TO START
***************************

Description:

An attempt was made to call the method org.springframework.boot.autoconfigure.web.ServerProperties$Servlet.getServletPrefix()Ljava/lang/String; but it does not exist. Its class, org.springframework.boot.autoconfigure.web.ServerProperties$Servlet, is available from the following locations:

    jar:file:/D:/root/.m2/repository/org/springframework/boot/spring-boot-autoconfigure/2.1.3.RELEASE/spring-boot-autoconfigure-2.1.3.RELEASE.jar!/org/springframework/boot/autoconfigure/web/ServerProperties$Servlet.class

It was loaded from the following location:

    file:/D:/root/.m2/repository/org/springframework/boot/spring-boot-autoconfigure/2.1.3.RELEASE/spring-boot-autoconfigure-2.1.3.RELEASE.jar


Action:

Correct the classpath of your application so that it contains a single, compatible version of org.springframework.boot.autoconfigure.web.ServerProperties$Servlet
以上bug经度娘指点发现问题所在:版本不匹配
解决方案:将spring cloud和spring boot换成匹配的版本,可以参考一下图表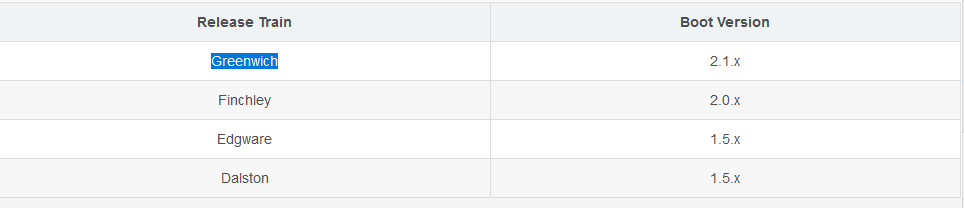
新的父类pom.xml
    <!--dependencyManagement是分布式项目里面统一管理版本号-->
    <dependencyManagement>
        <dependencies>
            <dependency>
                <groupId>org.springframework.cloud</groupId>
                <artifactId>spring-cloud-dependencies</artifactId>
                <version>Greenwich.SR1</version>
                <type>pom</type>
                <scope>import</scope>
            </dependency>
        </dependencies>
    </dependencyManagement>
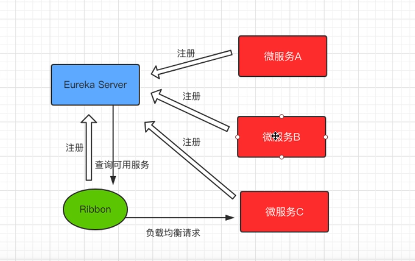
Ribbon负载均衡
什么是Ribbon?
Spring Cloud Ribbon是一个负载均衡解决方案,Ribbon是Netflix发布的负载均衡器,Spring Cloud Ribbon是基于Netflix Ribbon实现的,是一个用于对Http请求进行控制的负载均衡客户端。
在注册中心对Ribbon进行注册之后,Ribbon就可以基于某种负载均衡算法,如轮询、随机、加权轮询、加权随机等自动帮助服务消费者调用接口,开发者也可以根据具体需求自定义负载均衡算法。实际开发中,Spring Cloud Ribbon需要结合Spring Cloud Eureka来使用。Eureka Server提供所有可以调用的服务提供者列表,Ribbon基于特定的负载均衡算法从这些服务提供者中选择要调用的具体实例。
在父工程下创建Moudule,pom.xml如下 (Ribbon实现)
    <dependencies>
        <dependency>
            <groupId>org.springframework.cloud</groupId>
            <artifactId>spring-cloud-starter-netflix-eureka-client</artifactId>
            <version>2.1.0.RELEASE</version>
        </dependency>
        <dependency>
            <groupId>org.projectlombok</groupId>
            <artifactId>lombok</artifactId>
        </dependency>
    </dependencies>
创建配置文件application.yml,添加Ribbon相关配置
server:
  port: 8040
spring:
  application:
    name: ribbon
eureka:
  client:
    service-url:
      defualtZone: http://localhost:8761/eureka/
  instance:
    prefer-ip-address: true
创建启动类
@SpringBootApplication
public class RibbonApplication {
    public static void main(String[] args) {
        SpringApplication.run(RibbonApplication.class,args);
    }
    @Bean
    @LoadBalanced   //声明一个基于Ribbon的负载均衡
    public RestTemplate restTemplate(){
        return new RestTemplate();
    }
}
将实体类复制进来,创建控制层
@RestController
@RequestMapping("/ribbon")
public class RibbonHandler {
    @Autowired
    private RestTemplate restTemplate;

    @GetMapping("/findAll")
    public Collection<Student> findAll(){
        return restTemplate.getForObject("http://provider/student/findAll",Collection.class);
    }

    @GetMapping("/getPort")
    public String getPort(){
        return restTemplate.getForObject("http://provider/student/getPort",String.class);
    }
}
Feign
创建启动类
什么是Feign?
和Ribbon一样,Feign也是由NetFlix提供的,Feign是一个声明式,模板化的Web Service客户端,它简化了开发者编写web服务客户端的操作,开发者可以通过简单的接口和注解来调用HTTP API,Spring Cloud Feign,它整合了Ribbon和Hystrix,具有可插拔、基于注解、负载均衡、服务熔断等一系列便捷功能。
相比较于Ribbon+RestTemplate的方式,Feign大大简化了代码的开发。Feign支持多种注解,包括Feign注解、JAX-RS注解、spring MVC注解等,同事Spring Cloud还对feign进行了优化,整合了Ribbon和Eureka,从而让Feign的使用更加方便。
在父工程下创建Moudule,pom.xml如下 (Feign实现)
    <dependencies>
        <dependency>
            <groupId>org.springframework.cloud</groupId>
            <artifactId>spring-cloud-starter-netflix-eureka-client</artifactId>
            <version>2.1.0.RELEASE</version>
        </dependency>
        <dependency>
            <groupId>org.springframework.cloud</groupId>
            <artifactId>spring-cloud-starter-openfeign</artifactId>
            <version>2.1.0.RELEASE</version>
        </dependency>
        <dependency>
            <groupId>org.projectlombok</groupId>
            <artifactId>lombok</artifactId>
        </dependency>
    </dependencies>
创建配置文件application.yml,添加Ribbon相关配置
server:
  port: 8050
spring:
  application:
    name: feign
eureka:
  client:
    service-url:
      defualtZone: http://localhost:8761/eureka/
  instance:
    prefer-ip-address: true
创建启动类
@EnableFeignClients
@SpringBootApplication
public class FeignApplication {
    public static void main(String[] args) {
        SpringApplication.run(FeignApplication.class,args);
    }
}
创建声明式接口 ,映射注册中心的路由
@FeignClient(value ="provider")
public interface FeignProvideClient {
    @GetMapping("/student/findAll")
    public Collection<Student> findAll();
    @GetMapping("/student/getPort")
    public String getPort();
}
将实体类复制进来,创建控制层
@RestController
@RequestMapping("/feign")
public class FeignHandler {
    @Autowired
    private FeignProvideClient feignProvideClient;

    @GetMapping("/findAll")
    public Collection<Student> findAll(){
        return feignProvideClient.findAll();
    }

    @GetMapping("/getPort")
    public String getPort(){
        return feignProvideClient.getPort();
    }
}
Feign实现熔断器
--1-修改feign的application.yml,实现服务熔断器开关
server:
  port: 8050
spring:
  application:
    name: feign
eureka:
  client:
    service-url:
      defualtZone: http://localhost:8761/eureka/
  instance:
    prefer-ip-address: true
feign:
  hystrix:
    enabled: true   #控制feign服务熔断器的开关
--2-创建FeignProviderClient接口的实现类FeignError,定义容错处理逻辑,通过@Component注解将FeignError实例注入IOC容器中。
@Component
public class FeignError implements FeignProvideClient {
    @Override
    public Collection<Student> findAll() {
        return null;
    }
    @Override
    public String getPort() {
        return "服务器维护中!!!";
    }
}
--3-在FeignProviderClient定义处通过@FeignClient的fallback属性设置映射(降级处理,如果出现问题,访问FeignError逻辑处理)。
@FeignClient(value ="provider",fallback = FeignError.class)
public interface FeignProvideClient {
    @GetMapping("/student/findAll")
    public Collection<Student> findAll();
    @GetMapping("/student/getPort")
    public String getPort();
}
Hystrix容错机制
在不改变各个微服务调用关系的前提下,针对错误情况进行预先处理。
-设计原则-
--1-服务隔离机制
--2-服务降级机制
--3-熔断机制
--4-提供实时监控和报警功能
--5-提供实时的配置和修改功能
Hystrix数据监控需要结合Spring Boot Actuator来使用,Actuator提供了对服务的健康监控、数据统计,可以通过hystrix.stream节点获取监控的请求数据,提供了可视化的监控界面。
在父工程下创建Moudule,pom.xml如下 (Hystrix数据监控)
    <dependencies>
        <!--hystrix需要注册到Eureka注册中心-->
        <dependency>
            <groupId>org.springframework.cloud</groupId>
            <artifactId>spring-cloud-starter-netflix-eureka-client</artifactId>
            <version>2.1.0.RELEASE</version>
        </dependency>
        <!--hytrix需要结合feigns使用-->
        <dependency>
            <groupId>org.springframework.cloud</groupId>
            <artifactId>spring-cloud-starter-openfeign</artifactId>
            <version>2.1.0.RELEASE</version>
        </dependency>
        <!--Hystrix数据监控需要结合Spring Boot Actuator来使用-->
        <dependency>
            <groupId>org.springframework.boot</groupId>
            <artifactId>spring-boot-starter-actuator</artifactId>
            <version>2.1.0.RELEASE</version>
        </dependency>
        <dependency>
            <groupId>org.springframework.cloud</groupId>
            <artifactId>spring-cloud-starter-netflix-hystrix</artifactId>
            <version>2.1.0.RELEASE</version>
        </dependency>
        <!--数据可视化监控页面-->
        <dependency>
            <groupId>org.springframework.cloud</groupId>
            <artifactId>spring-cloud-starter-netflix-hystrix-dashboard</artifactId>
            <version>2.1.0.RELEASE</version>
        </dependency>
    </dependencies>
创建配置文件application.yml
server:
  port: 8060   #服务端口8060
spring:
  application:
    name: hystrix    #服务名称hystrix
eureka:
  instance:
    prefer-ip-address: true  #将IP注册到注册中心
  client:
    service-url:
      defaultZone: http://localhost:8761/eureka/  #注册中心的地址
feign:
  hystrix:
    enabled: true #开启熔断器
management:
  endpoints:
    web:
      exposure:
        include: 'hystrix.stream'  #通过hystrix.stream节点获取监控的请求数据
创建启动类:
@SpringBootApplication
@EnableFeignClients  //声明启动feign客户端
@EnableCircuitBreaker  //声明启动数据监控
@EnableHystrixDashboard  //声明启动可视化的数据监控
public class HystrixApplication {
    public static void main(String[] args) {
        SpringApplication.run(HystrixApplication.class,args);
    }
}
启动成功之后,访问http://127.0.0.1:8060/actuator/hystrix.stream可以监控到请求数据。
访问http://127.0.0.1:8060/hystrix可以看到可视化的监控页面,输入要监控的节点地址即可看到该节点的可视化数据监控。
Spring Cloud配置中心
Spring Cloud Config,通过服务端可以为多个客户端提供配置服务,Spring Cloud Config可以将配置文件存储在本地,也可以将配置文件存储在远程Git仓库。 创建Config Server,通过它管理所有的配置文件。
本地文件系统
在父工程下创建Moudule,pom.xml如下 (Config Server实现)
    <dependencies>
        <dependency>
            <groupId>org.springframework.cloud</groupId>
            <artifactId>spring-cloud-config-server</artifactId>
            <version>2.1.0.RELEASE</version>
        </dependency>
    </dependencies>
创建配置文件application.yml
server:
  port: 8762
spring:
  application:
    name: nativeconfigserver
  profiles:
    active: native   #配置文件的获取方式
  cloud:
    config:
      server:
        native:
          search-locations: classpath:/shared  #本地配置文件存放路径
在resources路径下创建shared文件夹,并在此目录下创建configclient-dev.yml
server:
  port: 8070
foo: foo version 1     #版本
创建启动类:
@SpringBootApplication
@EnableConfigServer    //声明配置中心
public class NativeConfigServerApplication {
    public static void main(String[] args) {
        SpringApplication.run(NativeConfigServerApplication.class,args);
    }
}
-创建客户端读取本地配置中心的配置文件-
--1--创建Moudule,pom.xml如下
    <dependencies>
        <dependency>
            <groupId>org.springframework.cloud</groupId>
            <artifactId>spring-cloud-starter-config</artifactId>
            <version>2.1.0.RELEASE</version>
        </dependency>
    </dependencies>
--2--创建配置文件 bootstrap.yml,配置读取本地配置中心的相关信息(bootstrap.yml文件名一定不能错,错了就读取不到配置文件的信息)
spring:
  application:
    name: configclient
  profiles:
    active: dev
  cloud:
    config:
      uri: http://localhost:8762  #本地config Server的访问路径
      fail-fast: true   #设置客户端优先判断Config Server获取是否正常
通过spring.application.name结合spring.profiles.active拼接目标配置文件名:configclient-dev.yml,去Config Server中查找该文件
创建客户端控制层:
@RestController
@RequestMapping("/native")
public class NativeConfigHandler {

    @Value("${server.port}")
    private String port;

    @Value("${foo}")
    private String foo;

    @GetMapping("/index")
    public String index(){
        return this.port+"-"+this.foo;
    }
}
创建客户端启动类:
@SpringBootApplication
public class NativeConfigClientHandler {
    public static void main(String[] args) {
        SpringApplication.run(NativeConfigClientHandler.class,args);
    }
}
启动Eureka服务--》启动config服务--》启动config客户端 访问http://127.0.0.1:8070/native/index 此时客户端读取的是服务端的配置文件。
Spring Cloud Config 远程配置
创建config包,在config包中配置文件configclient,上传到git
server:
  port: 8070
eureka:
  client:
    serviceUrl:
      defaultZone: http://localhost:8761/eureka/
spring:
  application:
    name: configclient
--创建configserver--
pom.xml
<dependencies>
    <dependency>
        <groupId>org.springframework.cloud</groupId>
        <artifactId>spring-cloud-config-server</artifactId>
        <version>2.1.0.RELEASE</version>
    </dependency>
    <dependency>
        <groupId>org.springframework.cloud</groupId>
        <artifactId>spring-cloud-starter-netflix-eureka-client</artifactId>
        <version>2.1.0.RELEASE</version>
    </dependency>
</dependencies>
-配置文件-
server:
  port: 8888
spring:
  application:
    name: configserver
  cloud:
    config:
      server:
        git:
          uri: https://gitee.com/*********/cs.git  # git上的项目地址
          username: ******
          search-paths: config                     #存放配置文件的目录
          password: *******
      label: master                             #分支名
eureka:
  client:
    service-url:
      defualtZone: http://127.0.0.1:8761/eureka/
-创建启动类-
@SpringBootApplication
@EnableConfigServer
@EnableDiscoveryClient
public class ConfigServerApplication {
    public static void main(String[] args) {
        SpringApplication.run(ConfigServerApplication.class,args);
    }
}
--创建configclient--
pom.xml
  <dependencies>
        <dependency>
            <groupId>org.springframework.cloud</groupId>
            <artifactId>spring-cloud-starter-config</artifactId>
            <version>2.1.0.RELEASE</version>
        </dependency>
    </dependencies>
-配置文件-
spring:
  cloud:
    config:
      label: master  #Git Repository的一个分支
      name: configclient  #当前服务注册在Eureka Server上的名称,与远程仓库配置文件的配置文件名对应
      discovery:
        enabled: true   #是否开启config服务发现支持
        service-id: configserver  #配置中心在Eureka Server上注册的名称
eureka:
  client:
    service-url:
      defaultZone: http://localhost:8761/eureka/
-启动类-
@SpringBootApplication
public class ConfigClientApplication {
    public static void main(String[] args) {
        SpringApplication.run(ConfigClientApplication.class,args);
    }
}
-控制层Handler-
@RequestMapping("/hello")
@RestController
public class ConfigHandler {

    @Value("${server.port}")
    private String port;

    @GetMapping("/getPort")
    public String getPort(){
        return this.port;
    }
}
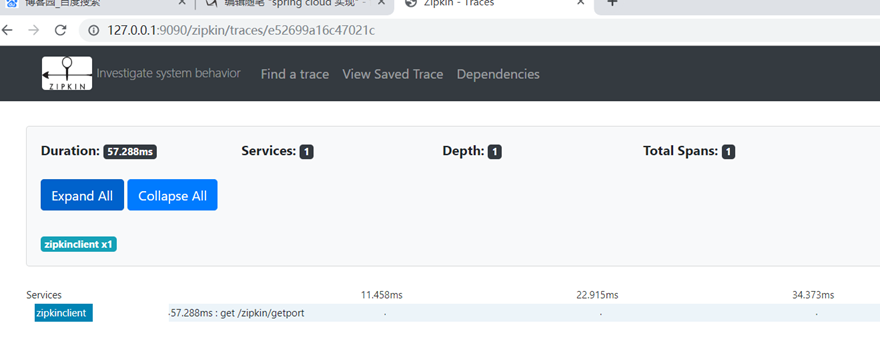
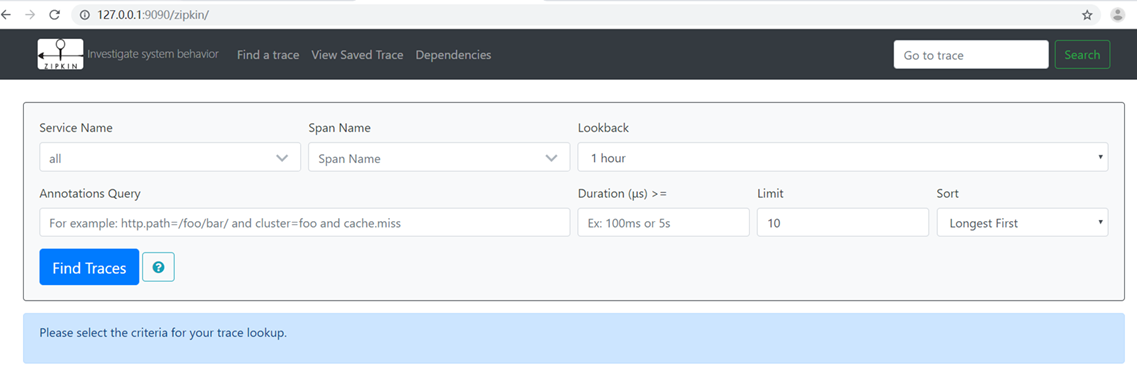
服务跟踪
Spring Cloud Zipkin
Zipkin是一个可以采集并且跟踪分布式系统中请求数据的组件,让开发者可以更加直观的监控到请求在各个微服务中所耗费的时间,Zipkin: Zipkin Server / Zipkin Clinet
--创建Zipkin Server --
-pom.xml
        <dependency>
            <groupId>org.springframework.boot</groupId>
            <artifactId>spring-boot-starter-web</artifactId>
        </dependency>
        <dependency>
            <groupId>io.zipkin.java</groupId>
            <artifactId>zipkin-server</artifactId>
            <version>2.11.9</version>
        </dependency>
        <dependency>
            <groupId>io.zipkin.java</groupId>
            <artifactId>zipkin-autoconfigure-ui</artifactId>
            <version>2.11.9</version>
        </dependency>
-创建配置文件-
server:
  port: 9090
-创建启动类-
@SpringBootApplication
@EnableZipkinServer    //声明启动ZipkinServer
public class ZipkinApplication {
    public static void main(String[] args) {
        SpringApplication.run(ZipkinApplication.class,args);
    }
}
--创建Zipkin Clinet--
-pom.xml-
        <dependency>
            <groupId>org.springframework.cloud</groupId>
            <artifactId>spring-cloud-starter-zipkin</artifactId>
            <version>2.1.0.RELEASE</version>
        </dependency>
-创建配置文件-
server:
  port: 8090
spring:
  application:
    name: zipkinclient
  sleuth:
    web:
      client:
        enable: true   #设置开启请求跟踪
    sampler:
      probability: 1.0   #设置查样比例
  zipkin:
    base-url: http://127.0.0.1:9090  #Zipkin Server地址
eureka:
  client:
    service-url:
      defaultZone: http://127.0.0.1:8761/eureka/
-创建启动类-
@RestController
@RequestMapping("/zipkin")
public class ZipkinHandler {

    @Value("${server.port}")
    private String port;

    @GetMapping("/getPort")
    public String index(){
        return this.port;
    }

}
-创建Handler-
server:
  port: 8090
spring:
  application:
    name: zipkinclient
  sleuth:
    web:
      client:
        enable: true   #设置开启请求跟踪
    sampler:
      probability: 1.0   #设置查样比例
  zipkin:
    base-url: http://127.0.0.1:9090  #Zipkin Server地址
eureka:
  client:
    service-url:
      defaultZone: http://127.0.0.1:8761/eureka/
步骤一:
步骤二:
步骤三: