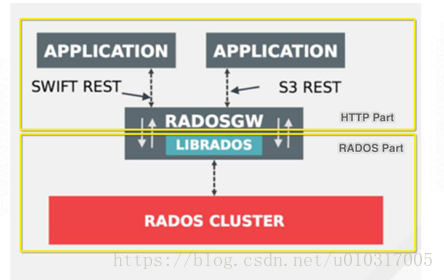
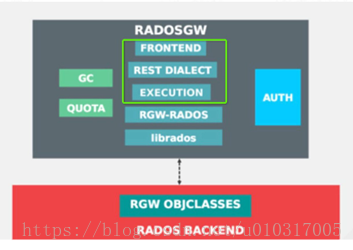
1. ceph对象存储简介
- 用户认证信息:S3(access key, secret key), Swift(secret key)
- 访问控制权限信息:包含操作访问权限(read、write、delete等)和访问控制列表ACL
- 用户配额信息:防止某些用户占用过多存储空间,根据用户付费情况配置存储空间。
- 基础信息:(保存在对应RADOS对象的数据部分)RGW关注的信息,包含bucket配额信息(最大对象数目或最大对象大小总和),bucket placement rule,bucket中的索引对象数目等等。
- 扩展信息:(保存在对应RADOS对象的扩展属性)对RGW透明的一些信息,如用户自定义的元数据信息
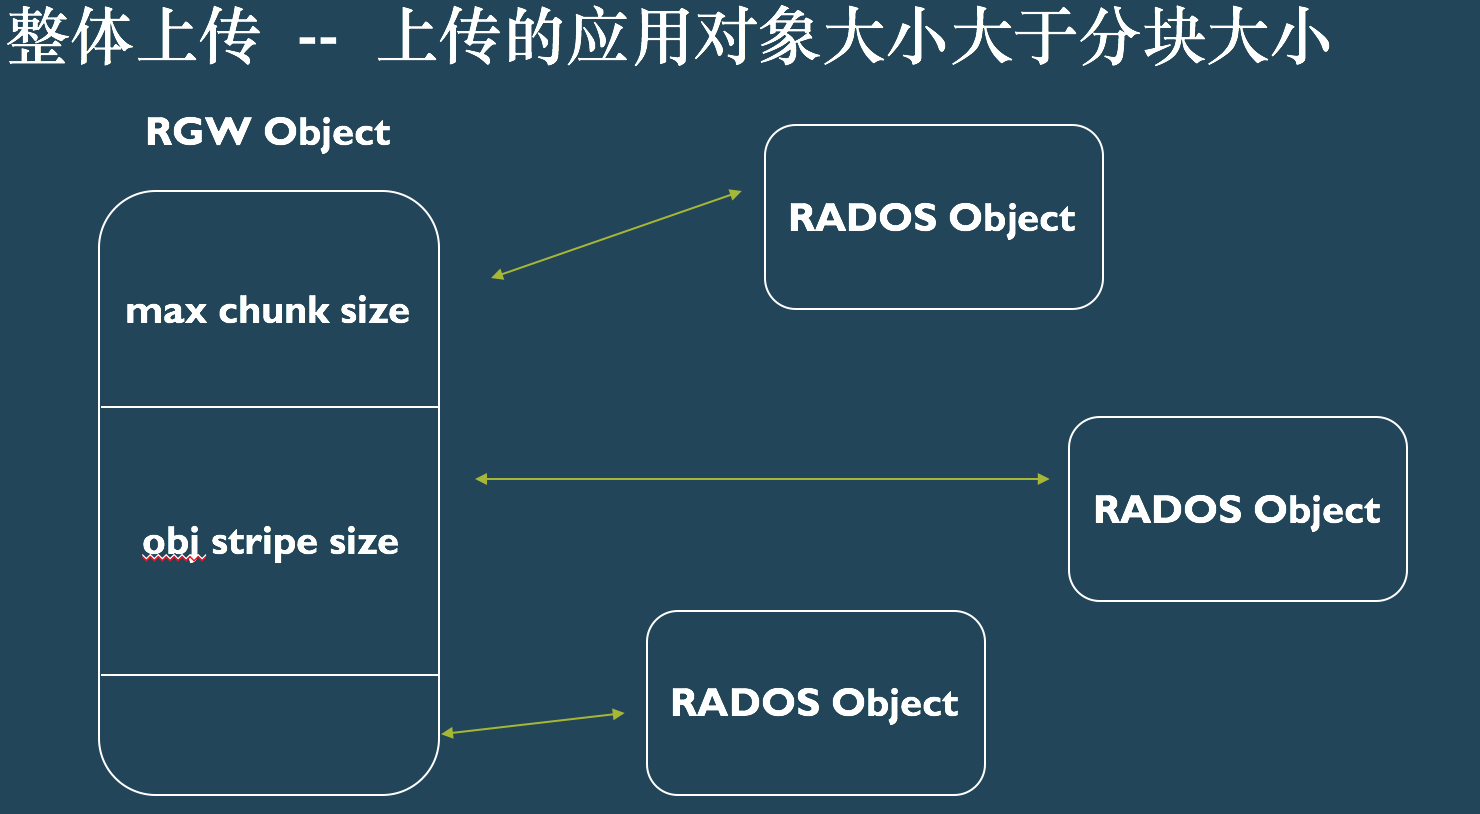
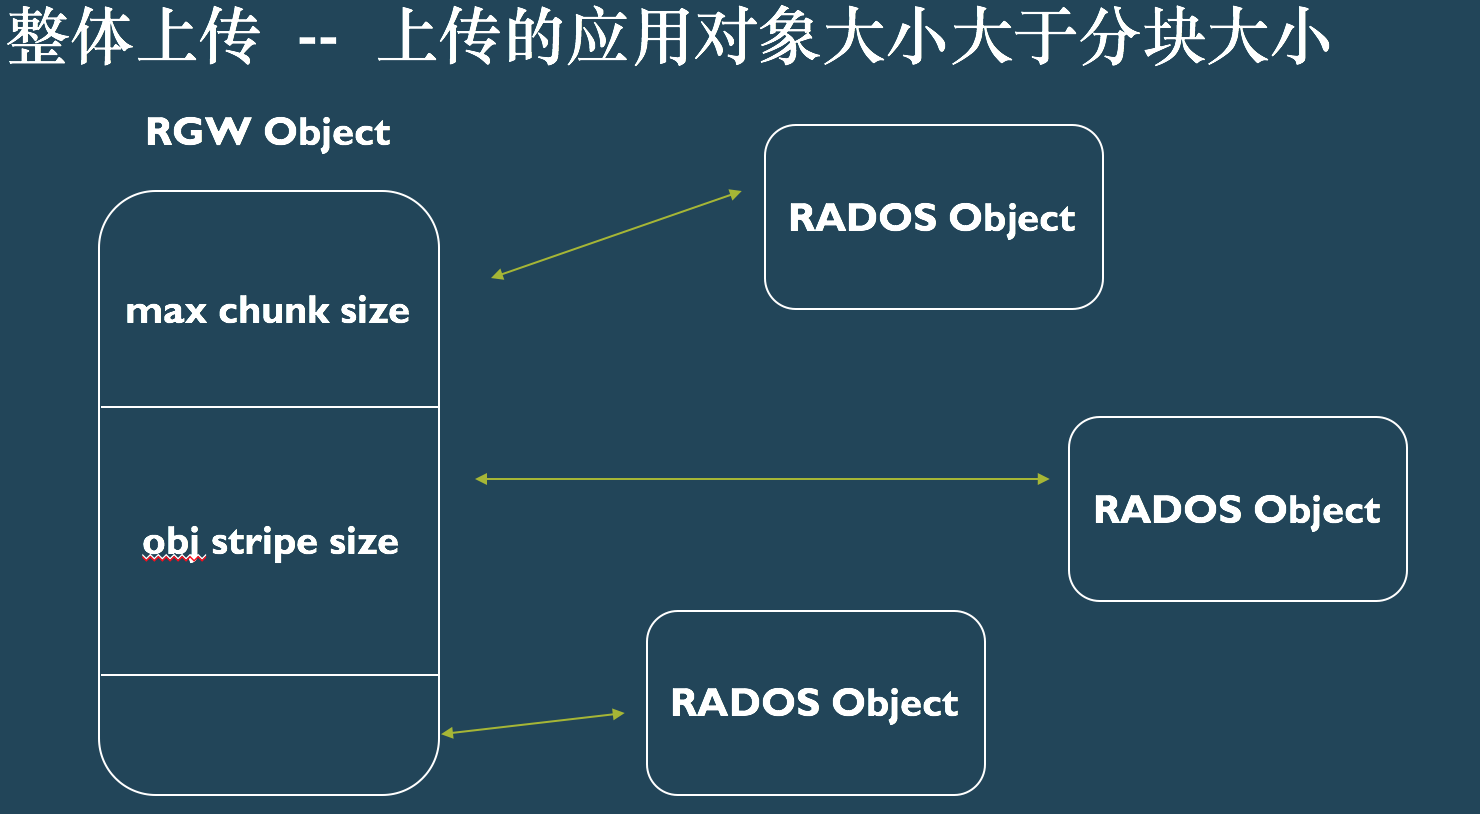
- rgw_max_chunk_size:分块大小,RGW下发至RADOS集群的单个IO的大小。
- rgw_obj_stripe_size:条带大小,multipart除首对象外的分段其他大小
- class RGWObjManifest:管理应用对象和RADOS对象的对应关系。
- 应用对象大小小于等于分块大小:用户上传的一个对象只对应一个 RADOS 对象,该 RADOS 对象以应用对象名称命名,应用对象元数据也保存在该 RADOS 对象的扩展属性中。
- 应用对象大小大于分块大小:应用对象被分解成一个大小等于分块大小的首对象,多个大小等于条带大小的中间对象,和一个大小小于等于条带大小的尾对象。首对象以应用对象名称命名,在 RGW 中将该对象称为head_obj,该对象的数据部分保存了应用对象前 rgw_max_chunk_size 字节的数据,扩展属性部分保存了应用对象的元数据信息和manifest信息。中间对象和尾对象保存应用对象剩余的数据,对象名称为“shadow_” + “.” + “32bit 随机字符串” + “_” + “条带编号”,其中条带编号从1开始。
- “_multipart_” + “用户上传对象名称” + “分段上传ID” + “分段编号”
- “_shadow_” + “用户上传对象名称” + “分段上传ID” + “分段编号” + “_” + “条带编号”
2. ceph对象存储配置对象网关
2.1 配置RADOS网关
2.1.1 创建RGW用户和keyring,生成keyring
[root@ceph-jewel-node1 ~]# ceph-authtool --create-keyring /etc/ceph/ceph.client.radosgw.keyring

[root@ceph-jewel-node1 ~]# chmod +x /etc/ceph/ceph.client.radosgw.keyring
2.1.2 为RGW实例生成网关用户和秘钥,网关的实例名称是gateway
[root@ceph-jewel-node1 ~]# ceph-authtool /etc/ceph/ceph.client.radosgw.keyring -n client.radosgw.gateway --gen-key
2.1.3 给秘钥添加权限
[root@ceph-jewel-node1 ~]# ceph-authtool -n client.radosgw.gateway --cap osd 'allow rwx' --cap mon 'allow rwx' /etc/ceph/ceph.client.radosgw.keyring
2.1.4 将秘钥添加到ceph集群
[root@ceph-jewel-node1 ~]# ceph -k /etc/ceph/ceph.client.admin.keyring auth add client.radosgw.gateway -i /etc/ceph/ceph.client.radosgw.keyring
2.1.5 将秘钥分配给ceph RGW 节点
[root@ceph-jewel-node1 ~]# scp /etc/ceph/ceph.client.radosgw.keyring ceph-jewel-node2:/etc/ceph/
[root@ceph-jewel-node1 ~]# scp /etc/ceph/ceph.client.radosgw.keyring ceph-jewel-node3:/etc/ceph/
2.1.6 创建对应的资源池
[root@ceph-jewel-node1 ~]# ceph osd pool create .rgw 128 128
[root@ceph-jewel-node1 ~]# ceph osd pool create .rgw.root 128 128
[root@ceph-jewel-node1 ~]# ceph osd pool create .rgw.control 128 128
[root@ceph-jewel-node1 ~]# ceph osd pool create .rgw.gc 128 128
[root@ceph-jewel-node1 ~]# ceph osd pool create .rgw.buckets 128 128
[root@ceph-jewel-node1 ~]# ceph osd pool create .rgw.buckets.index 128 128
[root@ceph-jewel-node1 ~]# ceph osd pool create .rgw.buckets.extra 128 128
[root@ceph-jewel-node1 ~]# ceph osd pool create .log 128 128
[root@ceph-jewel-node1 ~]# ceph osd pool create .intent-log 128 128
[root@ceph-jewel-node1 ~]# ceph osd pool create .usage 128 128
[root@ceph-jewel-node1 ~]# ceph osd pool create .users 128 128
[root@ceph-jewel-node1 ~]# ceph osd pool create .users.email 128 128
[root@ceph-jewel-node1 ~]# ceph osd pool create .users.swift 128 128
[root@ceph-jewel-node1 ~]# ceph osd pool create .users.uid 128 128
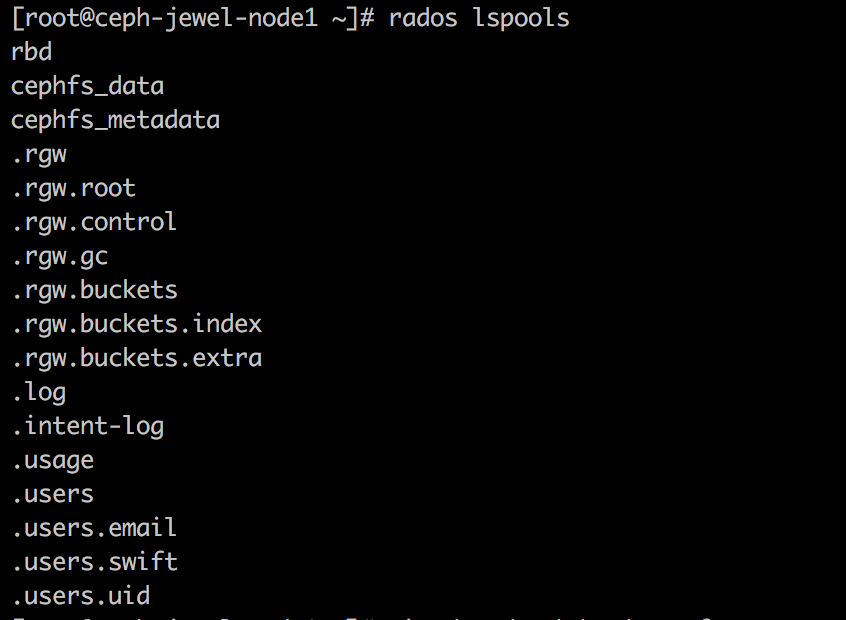
2.1.7 查看对应的资源池
[root@ceph-jewel-node1 ~]# rados lspools
2.1.8 检查集群状态
[root@ceph-jewel-node1 ~]# ceph -s

注意:使用ceph -s命令查看检查集群健康情况,一般新建很多pool的时候集群容易出现异常,这样即使我们后面启动了网关,也无法使用。会报错libcurl doesn’t support curl_multi_wait()。
2.1.9 修改配置文件
[root@ceph-jewel-node1 ~]# vim /etc/ceph/ceph.conf
[client.radosgw.gateway]
rgw frontends=fastcgi socket_port=9000 socket_host=0.0.0.0
host=ceph-jewel-node1
keyring=/etc/ceph/ceph.client.radosgw.keyring
log file=/var/log/radosgw/client.radosgw.gateway.log
rgw socket path=/var/run/ceph/ceph.radosgw.gateway.fastcgi.sock
rgw print continue=false
rgw content length compat = true
[root@ceph-jewel-node1 ~]# mkdir -p /var/log/radosgw
[root@ceph-jewel-node1 ~]# chown 777 /var/log/radosgw
[root@ceph-jewel-node1 ~]# chown 777 /var/run/ceph
2.1.10 分配配置文件
[root@ceph-jewel-node1 ~]# cd /opt/ceph-cluster/
[root@ceph-jewel-node1
ceph-cluster]# ceph-deploy --overwrite-conf config push
ceph-jewel-node1 ceph-jewel-node2 ceph-jewel-node3
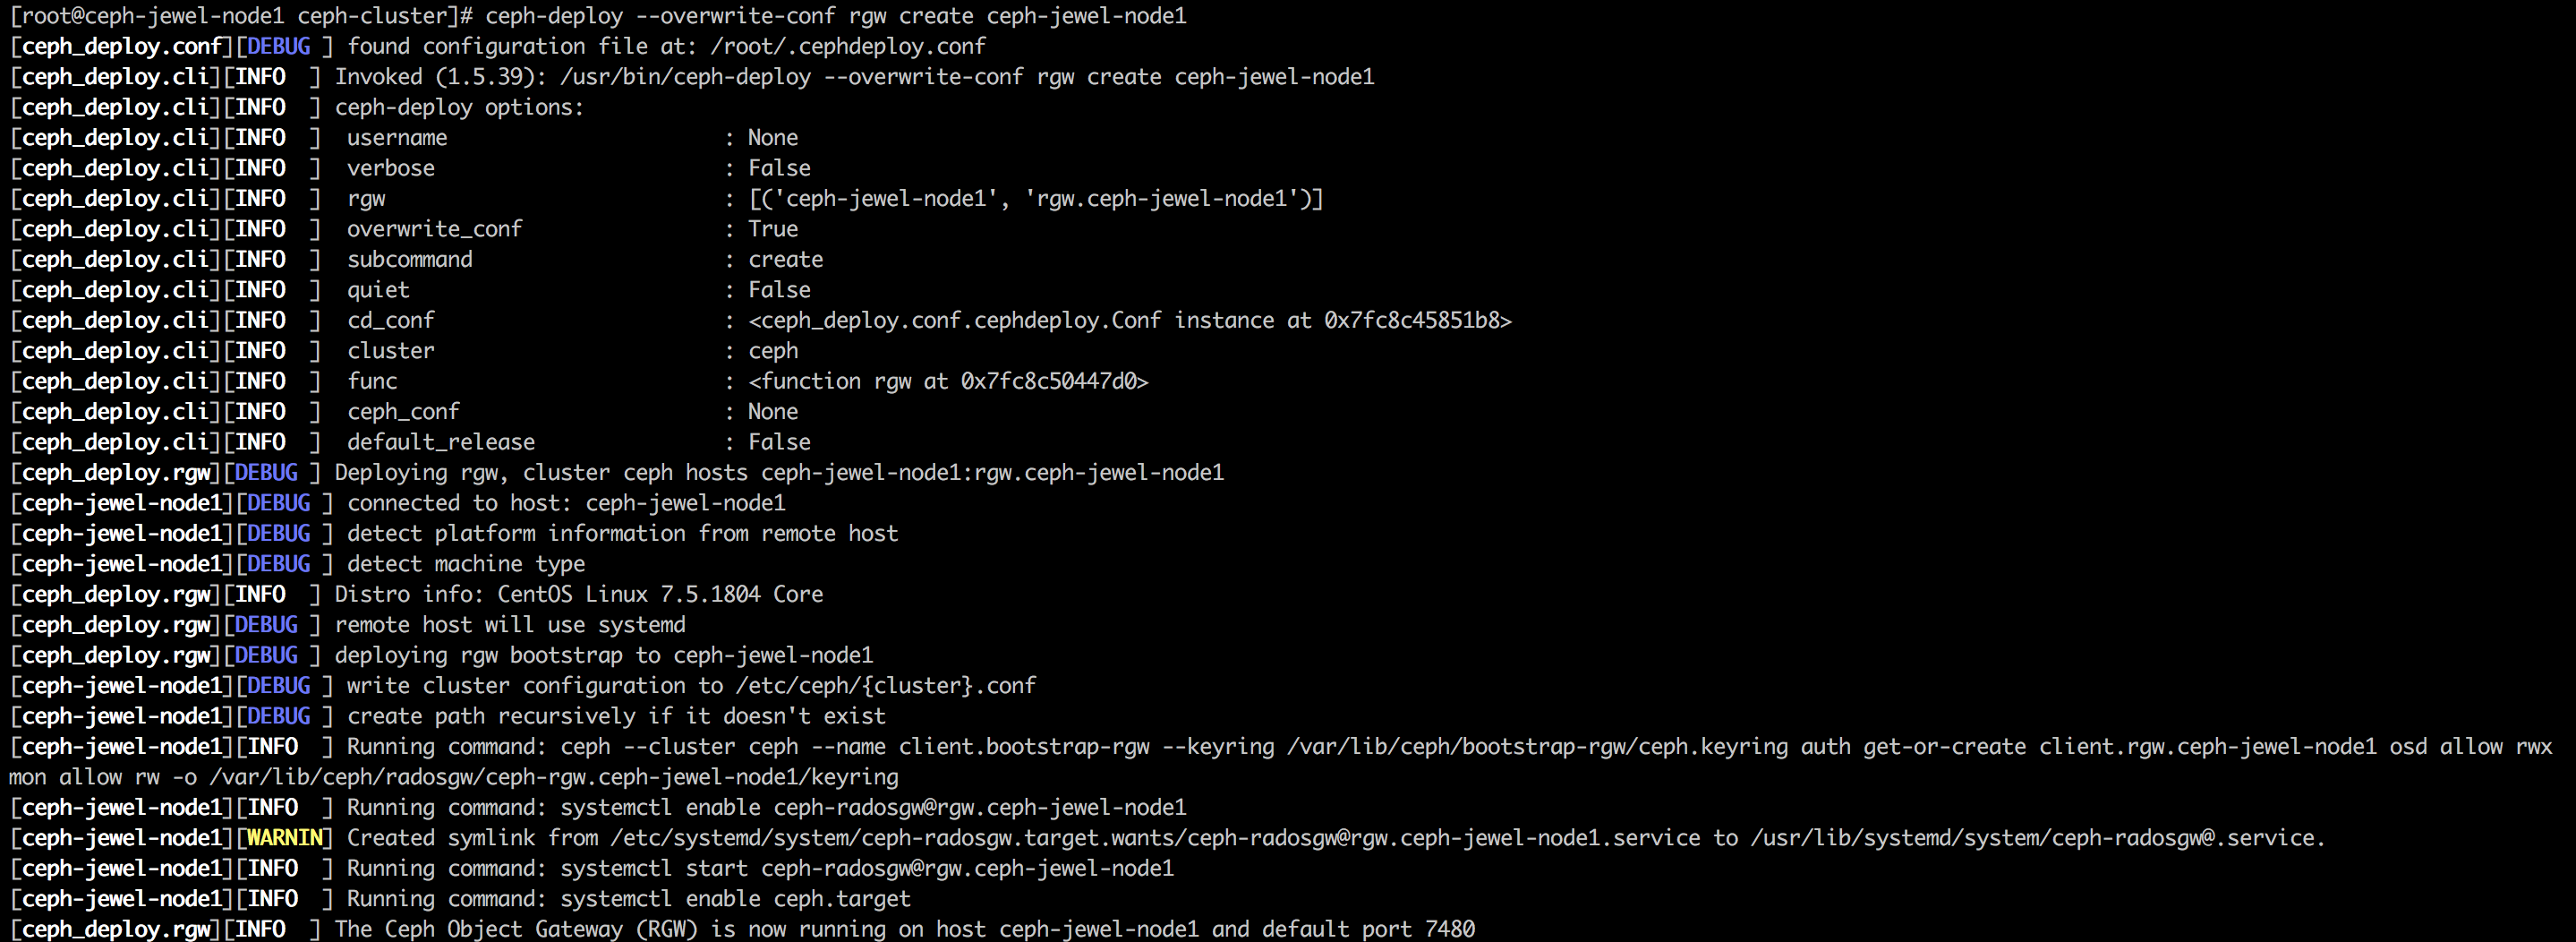
2.1.11 创建对象
[root@ceph-jewel-node1 ceph-cluster]# ceph-deploy --overwrite-conf rgw create ceph-jewel-node1
2.1.12 重启服务
查看radosgw服务状态:
ps -ef | grep radosgw
sudo systemctl status ceph-radosgw.service #centos7
重启RGW使用命令
sudo systemctl restart ceph-radosgw.service #centos7
如果报错ibcurl doesn’t support curl_multi_wait()说明没有权限认证或者需要的资源池没有创建好。
[zzq@localhost myceph]$ sudo service ceph-radosgw restart
Starting client.rgw.admin... [FAILED]
/usr/bin/dirname: extra operand `-n'
Try `/usr/bin/dirname --help' for more information.
2018-05-27 18:07:21.747065 7ff716144820 -1 WARNING: libcurl doesn't support curl_multi_wait()
2018-05-27 18:07:21.747066 7ff716144820 -1 WARNING: cross zone / region transfer performance may be affected
2.1.13 测试
[root@ceph-jewel-node1 ceph-cluster]# curl http://ceph-jewel-node1:7480
<?xml
version="1.0" encoding="UTF-8"?><ListAllMyBucketsResult
xmlns="http://s3.amazonaws.com/doc/2006-03-01/"><Owner><ID>anonymous</ID><DisplayName></DisplayName></Owner><Buckets></Buckets></ListAllMyBucketsResult>
2.2 创建对象网关用户
2.2.1 测试访问集群
[root@ceph-jewel-node1 ceph-cluster]# ceph -s -k /etc/ceph/ceph.client.radosgw.keyring --name client.radosgw.gateway

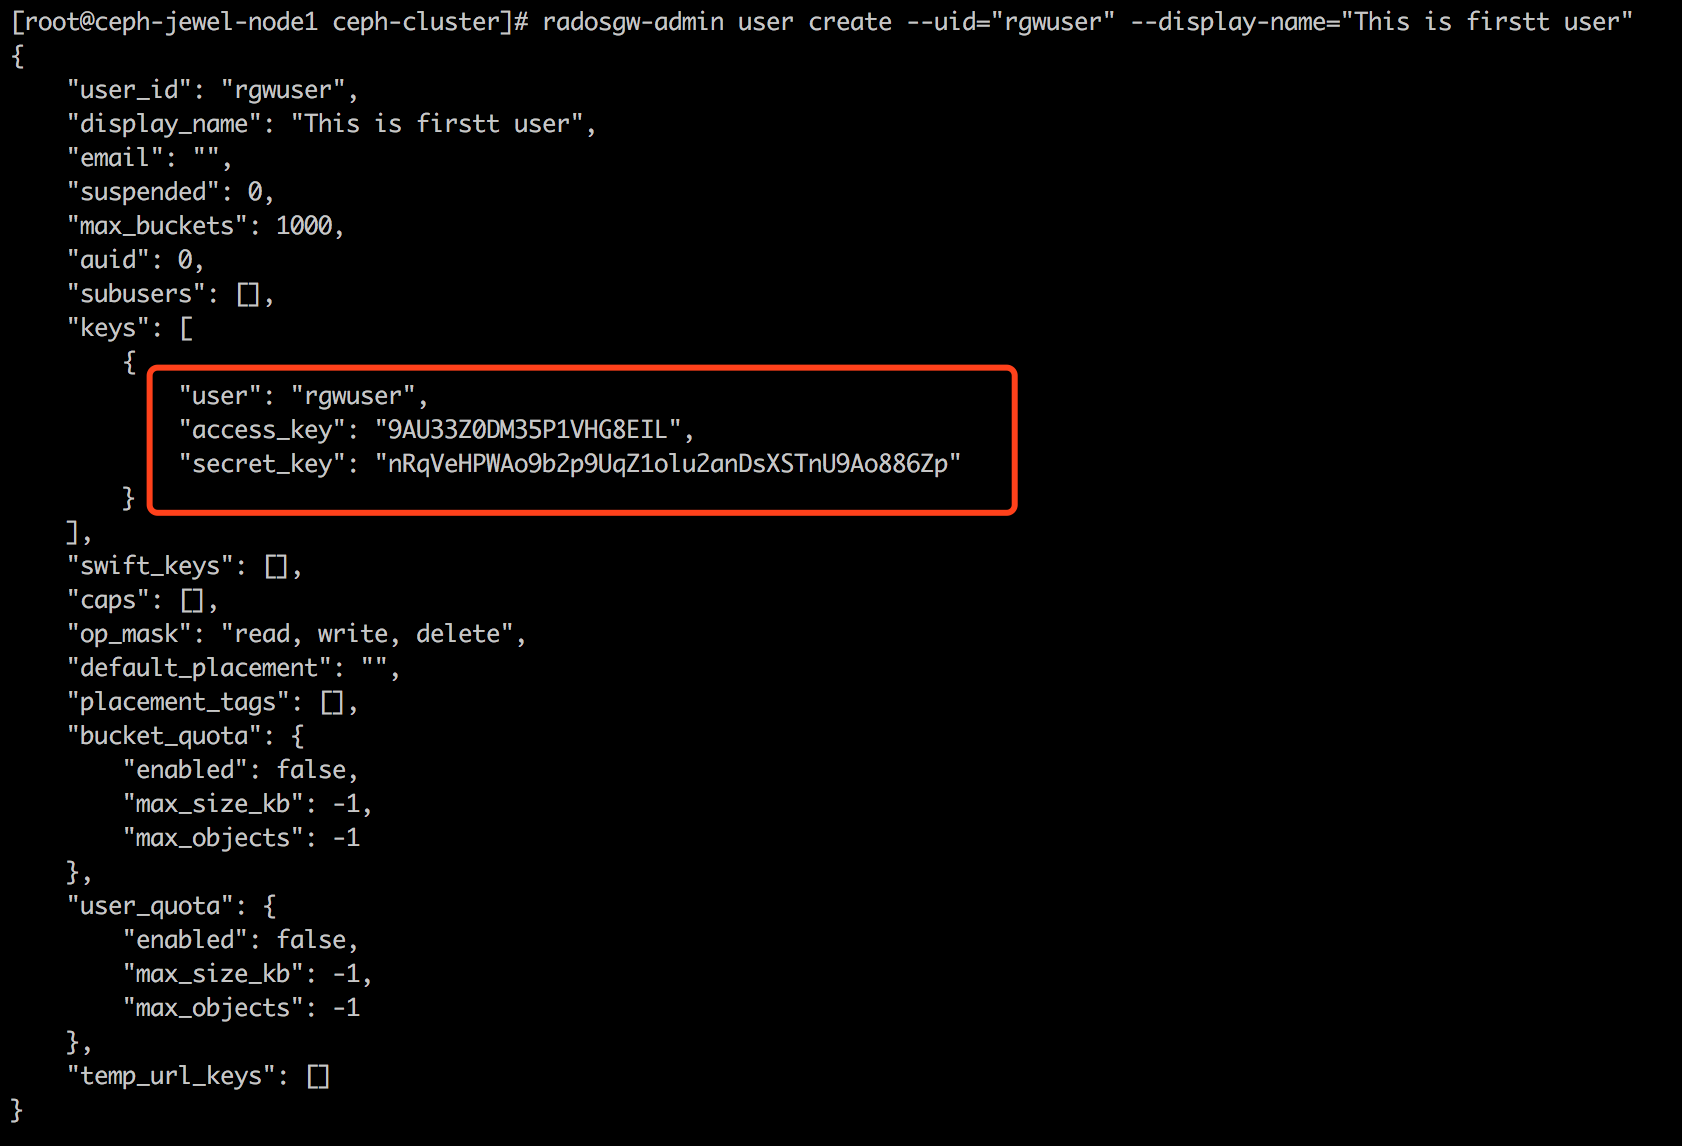
2.2.2 创建对象网关用户
[root@ceph-jewel-node1 ceph-cluster]# radosgw-admin user create --uid="rgwuser" --display-name="This is firstt user"
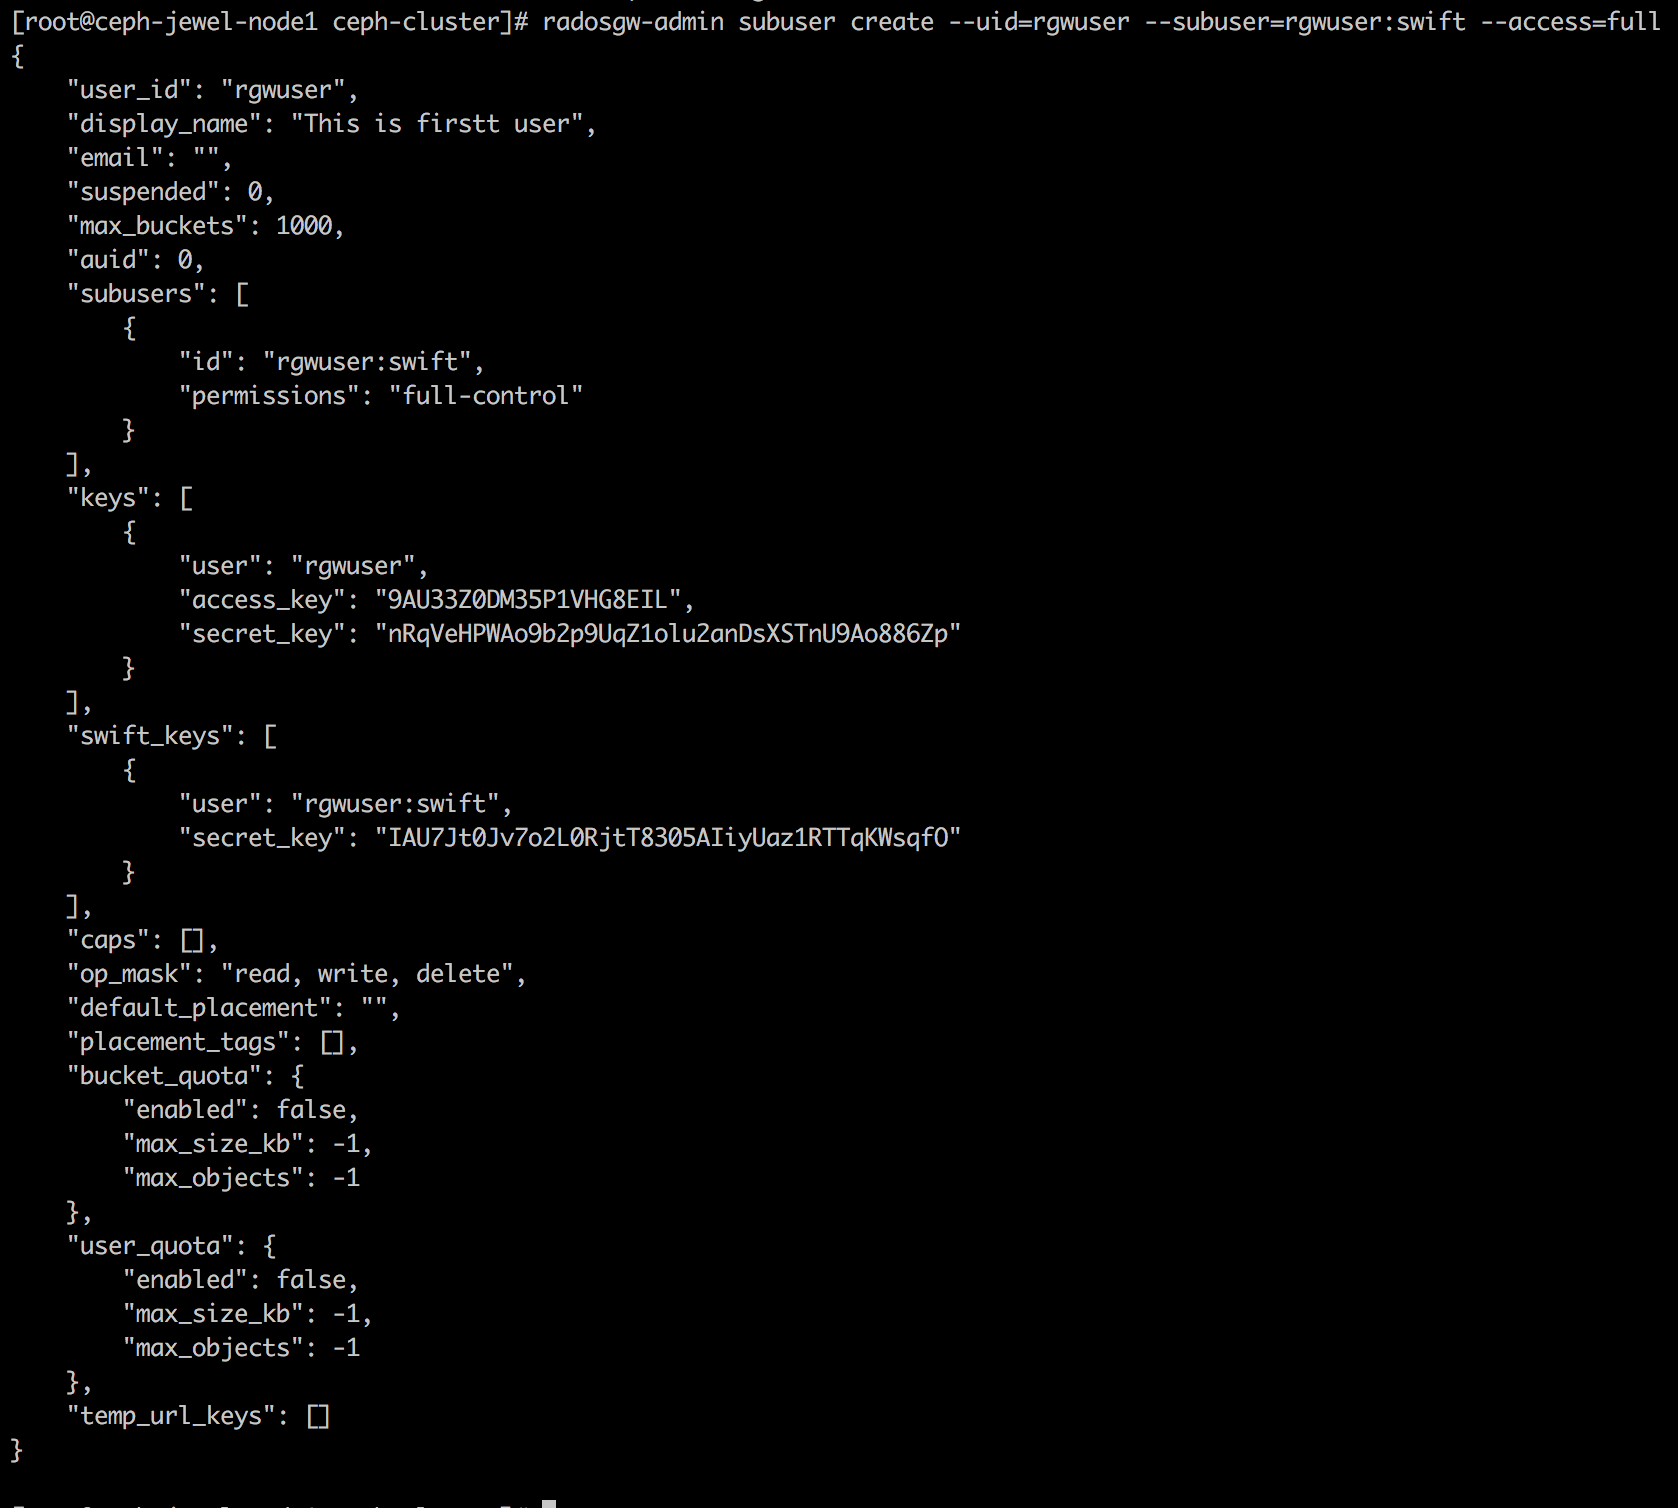
[root@ceph-jewel-node1 ceph-cluster]# radosgw-admin subuser create --uid=rgwuser --subuser=rgwuser:swift --access=full
2.3 测试S3访问
[root@ceph-jewel-node1 ceph-cluster]# yum -y install python-boto
|
1
2
3
4
5
6
7
8
9
10
11
12
13
14
15
16
17
18
|
[root@ceph-jewel-node1 ceph-cluster]# cat s3.pyimport botoimport boto.s3.connectionaccess_key = '9AU33Z0DM35P1VHG8EIL'secret_key = 'nRqVeHPWAo9b2p9UqZ1olu2anDsXSTnU9Ao886Zp'conn = boto.connect_s3( aws_access_key_id = access_key, aws_secret_access_key = secret_key, host = 'admin', port=7480, is_secure=False, calling_format = boto.s3.connection.OrdinaryCallingFormat(),)bucket = conn.create_bucket('my-first-s3-bucket')for bucket in conn.get_all_buckets(): print "{name} {created}".format( name = bucket.name, created = bucket.creation_date,) |
[root@ceph-jewel-node1 ceph-cluster]# python s3.py

2.4 s3cmd方法测试s3
[root@ceph-jewel-node1 ceph-cluster]# yum -y install s3cmd
[root@ceph-jewel-node1 ceph-cluster]# s3cmd --configure
[root@ceph-jewel-node1 ~]# cat /root/.s3cfg
[default]
access_key = 9AU33Z0DM35P1VHG8EIL
secret_key = nRqVeHPWAo9b2p9UqZ1olu2anDsXSTnU9Ao886Zp
host_base = http://192.168.101.205:7480
host_bucket = 192.168.101.205/my-first-s3-bucket
use_https = False
2、列举所有 Buckets。(bucket 相当于根文件夹)
1 |
s3cmd ls
|
3、创建 bucket,且 bucket 名称是唯一的,不能重复。
1 |
s3cmd mb s3://my-bucket-name
|
4、删除空 bucket
1 |
s3cmd rb s3://my-bucket-name
|
5、列举 Bucket 中的内容
1 |
s3cmd ls s3://my-bucket-name
|
6、上传 file.txt 到某个 bucket,
1 |
s3cmd put file.txt s3://my-bucket-name/file.txt
|
7、上传并将权限设置为所有人可读
1 |
s3cmd put --acl-public file.txt s3://my-bucket-name/file.txt
|
8、批量上传文件
1 |
s3cmd put ./* s3://my-bucket-name/
|
9、下载文件
1 |
s3cmd get s3://my-bucket-name/file.txt file.txt
|
10、批量下载
1 |
s3cmd get s3://my-bucket-name/* ./
|
11、删除文件
1 |
s3cmd del s3://my-bucket-name/file.txt
|
12、来获得对应的bucket所占用的空间大小
1 |
s3cmd du -H s3://my-bucket-name
|
以下命令都能将dir1 中的文件上传至my-bucket-name,但效果只截然不同的。
1)dir1 不带"/"斜杠,那么dir1会作为文件路径的一部分,相当于上传整个dir1目录,即类似 "cp -r dir1/"
1 2 |
~/demo$ s3cmd put -r dir1 s3://my-bucket-name/
dir1/file1-1.txt -> s3://my-bucket-name/dir1/file1-1.txt  [1 of 1]
|
2)带"/"斜杠的 dir1,相当于上传dir1目录下的所有文件,即类似 "cp ./* "
1 2 |
~/demo$ s3cmd put -r dir1/ s3://my-bucket-name/
dir1/file1-1.txt -> s3://my-bucket-name/file1-1.txt  [1 of 1]
|
这是s3cmd 使用难点,但却是最实用的功能。官方使用说明见《s3cmd sync HowTo》
首先明确,同步操作是要进行MD5校验的,只有当文件不同时,才会被传输。
1、同步当前目录下所有文件
1 |
s3cmd sync ./ s3://my-bucket-name/
|
2、加 "--dry-run"参数后,仅列出需要同步的项目,不实际进行同步。
1 |
s3cmd sync --dry-run ./ s3://my-bucket-name/
|
3、加 " --delete-removed"参数后,会删除本地不存在的文件。
1 |
s3cmd sync --delete-removed ./ s3://my-bucket-name/
|
4、加 " --skip-existing"参数后,不进行MD5校验,直接跳过本地已存在的文件。
1 |
s3cmd sync --skip-existing ./ s3://my-bucket-name/
|
4.2.1、排除、包含规则(--exclude 、--include)
file1-1.txt被排除,file2-2.txt同样是txt格式却能被包含。
1 2 3 |
~/demo$ s3cmd sync --dry-run --exclude '*.txt' --include 'dir2/*' ./  s3://my-bucket-name/
exclude: dir1/file1-1.txt
upload: ./dir2/file2-2.txt -> s3://my-bucket-name/dir2/file2-2.txt
|
4.2.2、从文件中载入排除或包含规则。(--exclude-from、--include-from)
1 |
s3cmd sync --exclude-from pictures.exclude ./ s3://my-bucket-name/
|
pictures.exclude 文件内容
1 2 3 |
# Hey, comments are allowed here ;-)
*.jpg
*.gif
|
4.2.3、排除或包含规则支持正则表达式
1 |
--rexclude 、--rinclude、--rexclude-from、--rinclude-from
|
2.5 swift API访问ceph对象存储
[root@ceph-jewel-node1 ~]# yum install python-setuptools
[root@ceph-jewel-node1 ~]# easy_install pip
[root@ceph-jewel-node1 ~]# pip install --upgrade setuptools
[root@ceph-jewel-node1 ~]# pip install --upgrade python-swiftclient
[root@ceph-jewel-node1 ~]# radosgw-admin user info --uid rgwuser #获取子用户和秘钥
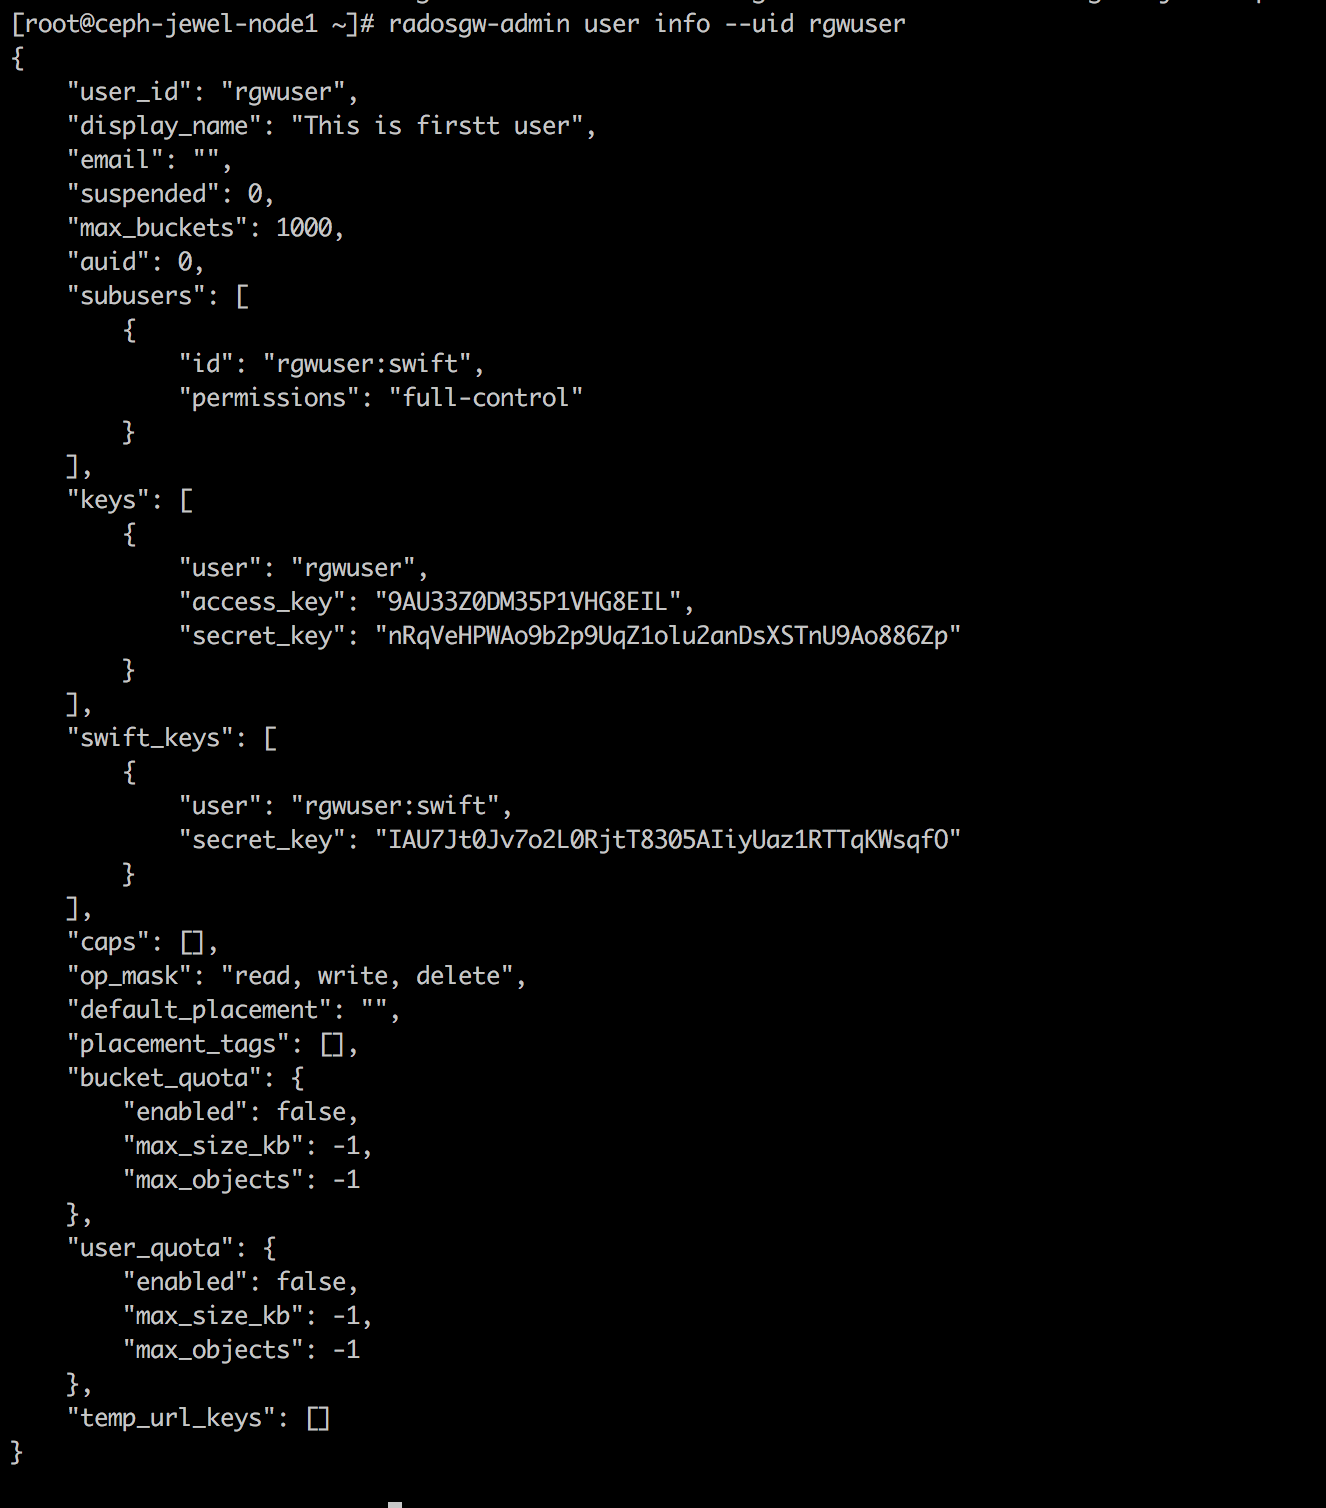
[root@ceph-jewel-node1 ~]# swift -A http://192.168.101.205:7480/auth/1.0 -U rgwuser:swift -K IAU7Jt0Jv7o2L0RjtT8305AIiyUaz1RTTqKWsqfO list
my-first-s3-bucket
my-second-s3-bucket
[root@ceph-jewel-node1 ~]# swift -A
http://192.168.101.205:7480/auth/1.0 -U rgwuser:swift -K
IAU7Jt0Jv7o2L0RjtT8305AIiyUaz1RTTqKWsqfO post my-third-s3-bucket
[root@ceph-jewel-node1
~]# swift -A http://192.168.101.205:7480/auth/1.0 -U rgwuser:swift -K
IAU7Jt0Jv7o2L0RjtT8305AIiyUaz1RTTqKWsqfO list
my-first-s3-bucket
my-second-s3-bucket
my-third-s3-bucket
source:https://www.cnblogs.com/qiyedetonghua/articles/11060460.html