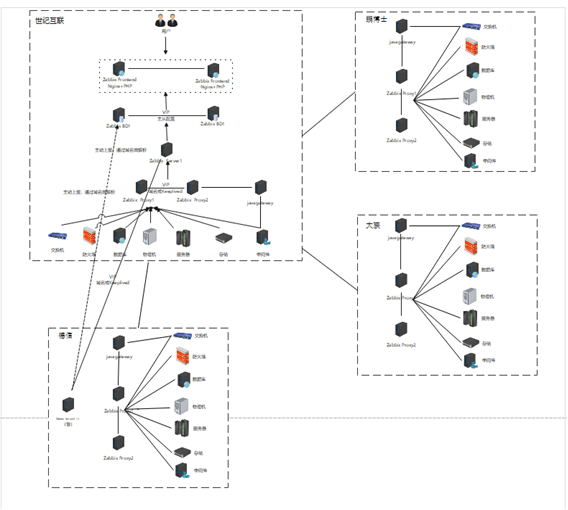
架构讲解
ü 前端展示安装步骤
前端主要使用nginx+php,用来展示zabbix前端及配置:
Nginx安装:
# yum install yum-utils -y
创建repo nginx镜像源/etc/yum.repos.d/nginx.repo,配置内容如下
[nginx-stable]
name=nginx stable repo
baseurl=http://nginx.org/packages/centos/$releasever/$basearch/
gpgcheck=1
enabled=1
gpgkey=https://nginx.org/keys/nginx_signing.key
module_hotfixes=true

[nginx-mainline]
name=nginx mainline repo
baseurl=http://nginx.org/packages/mainline/centos/$releasever/$basearch/
gpgcheck=1
enabled=0
gpgkey=https://nginx.org/keys/nginx_signing.key
module_hotfixes=true
采用nginx主线版本
# yum-config-manager --enable nginx-mainline
安装nginx
# yum install nginx -y
配置文件讲解

/etc/nginx  # nginx配置文件
/usr/sbin/nginx   # nginx二进制文件
/var/log/nginx    #nginx日志
将nginx加入到开机自启
# systemctl enable nginx

PHP安装:
下载php-fpm镜像源
# wget https://mirror.webtatic.com/yum/el7/webtatic-release.rpm
# wget https://mirror.webtatic.com/yum/el7/epel-release.rpm
# rpm -Uvh epel-release.rpm
# rpm -Uvh webtatic-release.rpm

安装命令如下:
#yum -y install php72w-gd php72w-bcmath php72w-xml php72w-cli php72w-common php72w-dba php72w-devel php72w-embedded php72w-enchant php72w-fpm php72w-imap php72w-interbase php72w-intl php72w-ldap php72w-mbstring php72w-mysqlnd php72w-opcache php72w-odbc php72w-pdo php72w-pear php72w-pecl* php72w-snmp php72w-xml php72w-xmlrpc php72w-tidy php72w-phpdbg php72w-process php72w-pspell php72w-recode php72w-soap php72w-sodium
将php-fpm加入开机自启
# systemctl enable php-fpm

测试php-fpm是否与nginx结合成功:
# vim /etc/nginx/conf.d/default.conf
    location ~ \.php$ {
        root           /usr/share/nginx/html;
        fastcgi_pass   127.0.0.1:9000;
        fastcgi_index  index.php;
        fastcgi_param SCRIPT_FILENAME $document_root$fastcgi_script_name;
        include        fastcgi_params;
    }

将zabbix 前端用到的php包,放置ningx html中
# cp -ar zabbix-5.4.11/ui/* /usr/share/nginx/html/zabbix/
# vim /etc/php.ini 修改如下配置参数
ost_max_size = 32M
max_execution_time = 300
max_input_time = 300

首先下载源码包
#wget https://cdn.zabbix.com/zabbix/sources/stable/5.4/zabbix-5.4.11.tar.gz
对源码包进行解压
# tar -zxf zabbix-5.4.11.tar.gz
编译安装前环境准备
yum -y install gcc gcc-c++ net-snmp-devel libevent-devel mariadb-devel postgresql-devel libxml2-devel unixODBC-devel libssh2-devel OpenIPMI-devel gnutls-devel openssl-devel openssl11-devel golang openldap-devel libcurl-devel
创建zabbix用户
groupadd --system zabbix
useradd --system -g zabbix -d /home/work/zabbix_webservice -s /sbin/nologin -c "Zabbix Monitoring System" zabbix

mkdir -m u=rwx,g=rwx,o= -p /home/work/zabbix_webservice
chown -R zabbix:zabbix /home/work/zabbix_webservice
编译安装
./configure --prefix=/home/work/zabbix_webservice --enable-webservice --enable-ipv6 --with-mysql --with-libxml2 --with-unixodbc --with-net-snmp --with-ssh2 --with-openipmi --with-zlib --with-libpthread --with-libevent --with-openssl --with-libmodbus --with-ldap --with-libcurl --with-libpcre --with-iconv
之后进行
# make && make install
设置zabbix webservice开机自启
略
Zabbix server安装步骤
安装zabbix server,因为centos7.6版本官方没有提供rpm包镜像源,所以只能采用源码安装。
首先下载源码包
#wget https://cdn.zabbix.com/zabbix/sources/stable/5.4/zabbix-5.4.11.tar.gz
对源码包进行解压
# tar -zxf zabbix-5.4.11.tar.gz
编译安装前环境准备
yum -y install gcc gcc-c++ net-snmp-devel libevent-devel mariadb-devel postgresql-devel libxml2-devel unixODBC-devel libssh2-devel OpenIPMI-devel gnutls-devel openssl-devel openssl11-devel golang openldap-devel libcurl-devel
创建zabbix用户
groupadd --system zabbix
useradd --system -g zabbix -d /home/work/zabbix_server -s /sbin/nologin -c "Zabbix Monitoring System" zabbix

mkdir -m u=rwx,g=rwx,o= -p /home/work/zabbix_server
chown -R zabbix:zabbix /home/work/zabbix_server
编译安装
./configure --prefix=/home/work/zabbix_server --enable-server --enable-webservice --enable-ipv6 --with-mysql --with-libxml2 --with-unixodbc --with-net-snmp --with-ssh2 --with-openipmi --with-zlib --with-libpthread --with-libevent --with-openssl --with-libmodbus --with-ldap --with-libcurl --with-libpcre --with-iconv
之后进行
# make && make install
注意:
出现如下问题需要执行如下步骤:
go env -w GO111MODULE=on
go env -w GOPROXY=https://goproxy.cn,direct

设置zabbix server开启自启
# vi /lib/systemd/system/zabbix-server.service
[Unit]
Description=Zabbix Server
After=network.target
[Service]
User=root
Environment="CONFFILE=/home/work/zabbix_server/etc/zabbix_server.conf"
Type=forking
Restart=on-failure
PIDFile=/home/work/zabbix_server/tmp/zabbix_server.pid
KillMode=control-group
ExecStart=/home/work/zabbix_server/sbin/zabbix_server -c $CONFFILE
ExecStop=/bin/kill -SIGTERM $MAINPID
RestartSec=10s
TimeoutSec=0

[Install]
WantedBy=multi-user.target