在上一次【https://www.cnblogs.com/webor2006/p/9096412.html】对okhttp的拦截器有了一个初步的认识,接下来则对具体的拦截器一个个进行了解。
RetryAndFollowUpInterceptor:
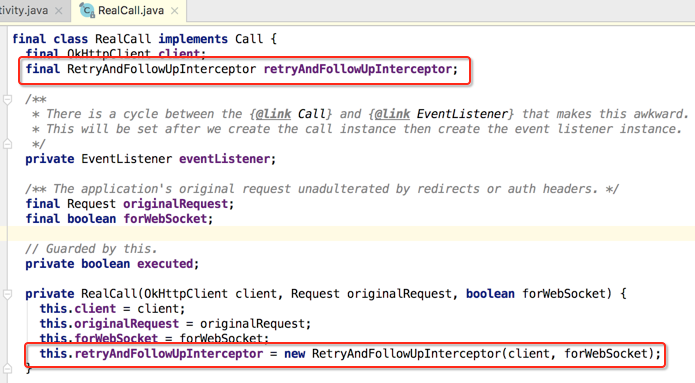
按照添加拦截器的顺序来分析,首当其冲的就是这个重试拦截器啦,如下:

而它是在RealCall构造时所创建的:

从这个类的名字来看应该它就是用来网络异常重连用的,那具体实现细节还得从源码上来进行观察,我们知道对于拦截器中最核心的方法是intercept()方法,所以直接将焦点定位到该方法:

那它是干嘛的呢?从名字来看貌似是分配流的,下面还是看一下官方对它的说明:

虽说它是定义在RetryAndFollowUpInterceptor中,但是并没在为之所用,而真正用到的是在之后要分析的ConnectInterceptor中,如下:


主要是用于连接服务端的connection和用于服务器进行数据传输的输入输出流,这个在未来ConnectionInterceptor中进行进一步分析。
那对于okHttp的拦截器都是通过RealInterceptorChain这个对象来进行链接起来,直到所有的拦截器都走完才会返回response对象,那假如期间出现了异常那咱们的这个重试拦截器是如何发挥作用的呢?

然后其它的一些重试逻辑这里先不细看,看一个跟重试特别相关的代码,如下:
@Override public Response intercept(Chain chain) throws IOException {
    Request request = chain.request();
    RealInterceptorChain realChain = (RealInterceptorChain) chain;
    Call call = realChain.call();
    EventListener eventListener = realChain.eventListener();

    streamAllocation = new StreamAllocation(client.connectionPool(), createAddress(request.url()),
        call, eventListener, callStackTrace);

    int followUpCount = 0;
    Response priorResponse = null;
    while (true) {
      if (canceled) {
        streamAllocation.release();
        throw new IOException("Canceled");
      }

      Response response;
      boolean releaseConnection = true;
      try {
        response = realChain.proceed(request, streamAllocation, null, null);
        releaseConnection = false;
      } catch (RouteException e) {
        // The attempt to connect via a route failed. The request will not have been sent.
        if (!recover(e.getLastConnectException(), false, request)) {
          throw e.getLastConnectException();
        }
        releaseConnection = false;
        continue;
      } catch (IOException e) {
        // An attempt to communicate with a server failed. The request may have been sent.
        boolean requestSendStarted = !(e instanceof ConnectionShutdownException);
        if (!recover(e, requestSendStarted, request)) throw e;
        releaseConnection = false;
        continue;
      } finally {
        // We're throwing an unchecked exception. Release any resources.
        if (releaseConnection) {
          streamAllocation.streamFailed(null);
          streamAllocation.release();
        }
      }

      // Attach the prior response if it exists. Such responses never have a body.
      if (priorResponse != null) {
        response = response.newBuilder()
            .priorResponse(priorResponse.newBuilder()
                    .body(null)
                    .build())
            .build();
      }

      Request followUp = followUpRequest(response);

      if (followUp == null) {
        if (!forWebSocket) {
          streamAllocation.release();
        }
        return response;
      }

      closeQuietly(response.body());

      if (++followUpCount > MAX_FOLLOW_UPS) {
        streamAllocation.release();
        throw new ProtocolException("Too many follow-up requests: " + followUpCount);
      }

      if (followUp.body() instanceof UnrepeatableRequestBody) {
        streamAllocation.release();
        throw new HttpRetryException("Cannot retry streamed HTTP body", response.code());
      }

      if (!sameConnection(response, followUp.url())) {
        streamAllocation.release();
        streamAllocation = new StreamAllocation(client.connectionPool(),
            createAddress(followUp.url()), call, eventListener, callStackTrace);
      } else if (streamAllocation.codec() != null) {
        throw new IllegalStateException("Closing the body of " + response
            + " didn't close its backing stream. Bad interceptor?");
      }

      request = followUp;
      priorResponse = response;
    }
  }
也就是有一个最大重试次数,可以看一下定义的是多少次:

所以可以总结一下该拦截的一个核心流程:
1、创建StreamAllocation对象。
2、调用RealInterceptChain.proceed(...)进行网络请求。
3、根据异常结果或者响应结果判断是否要进行重新请求。
4、调用下一个拦截器,对response进行处理,返回给上一个拦截器。
BridgeInterceptor:
接着按着顺序来分析第二个拦截器:

那它主要是用来干嘛的呢?先看一下官方的注释说明:

有了一个大概认识之后下面来看一下它的源码,当然焦点还是定位到intercept()方法啦:
@Override public Response intercept(Chain chain) throws IOException {
    Request userRequest = chain.request();
    Request.Builder requestBuilder = userRequest.newBuilder();

    RequestBody body = userRequest.body();
    if (body != null) {
      MediaType contentType = body.contentType();
      if (contentType != null) {
        requestBuilder.header("Content-Type", contentType.toString());
      }

      long contentLength = body.contentLength();
      if (contentLength != -1) {
        requestBuilder.header("Content-Length", Long.toString(contentLength));
        requestBuilder.removeHeader("Transfer-Encoding");
      } else {
        requestBuilder.header("Transfer-Encoding", "chunked");
        requestBuilder.removeHeader("Content-Length");
      }
    }

    if (userRequest.header("Host") == null) {
      requestBuilder.header("Host", hostHeader(userRequest.url(), false));
    }

    if (userRequest.header("Connection") == null) {
      requestBuilder.header("Connection", "Keep-Alive");
    }

    // If we add an "Accept-Encoding: gzip" header field we're responsible for also decompressing
    // the transfer stream.
    boolean transparentGzip = false;
    if (userRequest.header("Accept-Encoding") == null && userRequest.header("Range") == null) {
      transparentGzip = true;
      requestBuilder.header("Accept-Encoding", "gzip");
    }

    List<Cookie> cookies = cookieJar.loadForRequest(userRequest.url());
    if (!cookies.isEmpty()) {
      requestBuilder.header("Cookie", cookieHeader(cookies));
    }

    if (userRequest.header("User-Agent") == null) {
      requestBuilder.header("User-Agent", Version.userAgent());
    }

    Response networkResponse = chain.proceed(requestBuilder.build());

    HttpHeaders.receiveHeaders(cookieJar, userRequest.url(), networkResponse.headers());

    Response.Builder responseBuilder = networkResponse.newBuilder()
        .request(userRequest);

    if (transparentGzip
        && "gzip".equalsIgnoreCase(networkResponse.header("Content-Encoding"))
        && HttpHeaders.hasBody(networkResponse)) {
      GzipSource responseBody = new GzipSource(networkResponse.body().source());
      Headers strippedHeaders = networkResponse.headers().newBuilder()
          .removeAll("Content-Encoding")
          .removeAll("Content-Length")
          .build();
      responseBuilder.headers(strippedHeaders);
      String contentType = networkResponse.header("Content-Type");
      responseBuilder.body(new RealResponseBody(contentType, -1L, Okio.buffer(responseBody)));
    }

    return responseBuilder.build();
  }
首先是给咱们的request添加各种请求头用于接下来的http请求,其中可以看到一个很熟悉的头:

接下来则请求获取response对象:


所以这里再将其进行总结一下:
1、是负责将用户构建的一个Request请求转化为能够进行网络访问的请求。
2、将这个符合网络请求的Request进行网络请求。
3、将网络请求回来的响应Response转化为用户可用的Response。