什么是服务呢?
用俗话话应该是长期于后台运行的程序,如果是官方一点,首先它是一个组件,用于执行长期运行的任务,并且与用户没有交互。
每一个服务都需要在配置文件AndroidManifest.xml文件里进行生命,怎么生命呢?
使用标签,其实跟前面的activity,广播接收者receiver一样生命。
通过Context.startService()来开启服务,通过Context.stop()来停止服务。当然啦,还有一种启动形式就是通过Context.bindService()的方法。
为什么要使用服务呢?
从上面的文字说,我们知道这个服务是用于执行长期后台运行的操作。有些时候,我们没有界面,但是程序仍然需要工作。比如说,我们播放音乐,在后台播放音乐。比如说,我们下载任务,在后台下载文件。这些都是没有界面 的后台运行程序,这些都是用服务做的。
所以,服务就有它的用处了。
第二个原因是什么呢?先给大家讲几个概念:
1、前台进程:可以理解为是最顶部的,直接跟用户交互的。比如说我们操作的Activity界面.
2、可见进程:可以见的,但是不操作的,比如说我们在一个Activity的顶部弹出一个Dialog,这个Dialog就是前台进程,但是这个Activity则是可见进程。
3、服务进程:服务可以理解为是忙碌的后台进程,虽然是在后台,但是它很忙碌。
4、后台进程:后台进程就是退隐到后台,不做事的进程。
5、空进程:空进程是不做事的,没有任何东西在上面跑着,仅作缓存作用。
假设,内存不够用了,会先杀谁呢?
首先杀的是空进程,要是还不够就杀后台进程,要是还不够,那么就杀服务,但是服务被杀死以后,等内存够用了,服务又会跑起来了。
所以:如果我们需要长期后台操作的任务,使用Service就对了!其实Framework里多数是服务。如果我们进行音乐播放,即使退到了后台,也可以播放,我们使用服务完成吧!如果我们下载东西,退到后台也能下载,那么我们就使用服务吧!如果我们在不停地记录日志,那我们就用服务吧!
如果面试问到:服务用于执行耗时操作,这是对的吗?
如时服务直接执行耗时操作,也会出现anr.
在这里给大家补充一下anr的时长知识。首先ANR的意思是android no response,也就是无相应或者理解为操作超时。
在android系统中广播的ANR时长为:
 // How long we allow a receiver to run before giving up on it.
    static final int BROADCAST_FG_TIMEOUT = 10*1000;
    static final int BROADCAST_BG_TIMEOUT = 60*1000;
前台广播为10秒,后台广播为60秒。
按键操作的anr时长为:
// How long we wait until we timeout on key dispatching.
static final int KEY_DISPATCHING_TIMEOUT = 5*1000;
按钮事件的时长为5秒,常指的是Activity的操作。
   // How long we wait for a service to finish executing.
    static final int SERVICE_TIMEOUT = 20*1000;

    // How long we wait for a service to finish executing.
    static final int SERVICE_BACKGROUND_TIMEOUT = SERVICE_TIMEOUT * 10;
服务的话,前台服务为20秒超时,后台服务为200秒超时。
以上。
如果在服务中直接做耗时操作,也是会出现ANR异常的。服务可以长期在后台运行,所以你可以这么做:如果要做耗时操作,比如说网络的访问,数据库的读写之类的,可以开线程去做。
服务的生命周期
前面我们知道了为什么要使用服务,接下来我们就使用一下服务,并且学习一下它的生命周期。
我们要写代码了:
首先,创建一个类,继承Service,就像我们之前写Activity要继承自Activity,而广播则继承自BroadcastReceiver。代码如下:
package com.sunofbeaches.servicedemo;

import android.app.Service;
import android.content.Intent;
import android.os.IBinder;
import android.support.annotation.Nullable;
import android.util.Log;

/**
 * Created by TrillGates on 18/4/5.
 * God bless my code!
 */
public class FirstService extends Service{

    private static final String TAG = "FirstService";

    @Nullable
    @Override
    public IBinder onBind(Intent intent) {
        return null;
    }

    @Override
    public void onCreate() {
        Log.d(TAG, "onCreate...");
        super.onCreate();
    }

    @Override
    public int onStartCommand(Intent intent, int flags, int startId) {
        Log.d(TAG, "onStartCommand...");
        return super.onStartCommand(intent, flags, startId);
    }

    @Override
    public void onDestroy() {
        Log.d(TAG, "onDestroy...");
        super.onDestroy();
    }


}
接着,我们写一个Activity去控制服务:
package com.sunofbeaches.servicedemo;

import android.content.Intent;
import android.os.Bundle;
import android.support.v7.app.AppCompatActivity;
import android.util.Log;
import android.view.View;

public class MainActivity extends AppCompatActivity {

    private static final String TAG = "MainActivity";;

    @Override
    protected void onCreate(Bundle savedInstanceState) {
        super.onCreate(savedInstanceState);
        setContentView(R.layout.activity_main);
    }

    public void startService(View view) {
        Log.d(TAG, "start service ... ");
        startService(new Intent(this, FirstService.class));
    }

    public void stopService(View view) {
        Log.d(TAG, "stop service....");
        stopService(new Intent(this, FirstService.class));
    }
}
注册服务,四大组件都需要注册。在配置文件里配置如下:
<service android:name=".FirstService"></service>
以前我们在学习Activity的时候,就知道显示意图和隐式意图了。其实服务也是一样的,启动方式也有显式和隐式的。
上面的Activity中我们直接使用显式意图来启动服务。如果需要使用隐式意图的方式去启动,则需要配置一个意图过滤。
执行结果:
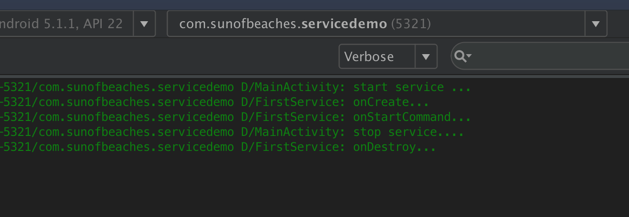
可以看出,我们在startService之后,就执行了onCreate方法,接着是onStartCommand方法。当我们执行stopService的时候,就会走onDestroy方法了。
这就是服务最基本的生命周期了。其实onStart也是服务的生命周期,只是这个方法已经过时了。
当然啦,服务的生命周期并没有这么简单,我们后面再详细去探讨吧!
绑定启动服务
前面的开启服务方式,有一个弊端。就是没法进行通讯。所以我们接直来呢会学习另外一种启动服务的方式–通过绑定服务的形式来启动服务。
绑定服务,对应的停止服务则是解绑服务了!
好,我们看代码吧:
这是我们的第二个服务:
package com.sunofbeaches.servicedemo;

import android.app.Service;
import android.content.Intent;
import android.os.IBinder;
import android.util.Log;

/**
 * Created by TrillGates on 18/4/18.
 * God bless my code!
 */
public class SecondService extends Service {

    private static final String TAG = "SecondService";

    @Override
    public IBinder onBind(Intent intent) {
        Log.d(TAG, "onBind");
        return null;
    }

    @Override
    public boolean onUnbind(Intent intent) {
        Log.d(TAG, "onUnbind");
        return super.onUnbind(intent);
    }

    @Override
    public void onCreate() {
        Log.d(TAG, "onCreate");
        super.onCreate();

    }

    @Override
    public int onStartCommand(Intent intent, int flags, int startId) {
        Log.d(TAG, "onStartCommand");
        return super.onStartCommand(intent, flags, startId);
    }

    @Override
    public void onDestroy() {
        Log.d(TAG, "onDestroy");
        super.onDestroy();
    }
}
然后,在清单文件里注册一下:
<service android:name=".SecondService"></service>
注册完以后,我们编写一个主界面,我们叫做:BindServiceActivity
package com.sunofbeaches.servicedemo;

import android.app.Activity;
import android.content.ComponentName;
import android.content.Intent;
import android.content.ServiceConnection;
import android.os.Bundle;
import android.os.IBinder;
import android.view.View;

/**
 * Created by TrillGates on 18/4/18.
 * God bless my code!
 */
public class BindServiceActivity extends Activity {
    @Override
    protected void onCreate(Bundle savedInstanceState) {
        super.onCreate(savedInstanceState);
        setContentView(R.layout.activity_bind_service);
    }

    public void bindServiceClick(View view) {
        //创建意图对象
        Intent intent = new Intent(this, SecondService.class);
        //第一个是参数是意图对象,第二个参数是回调,第三个参数是标记,这个是自动创建的意,如果服务没有start,那么会自己创建。
        //automatically create the service as long as the binding exists
        bindService(intent, mServiceConnection, BIND_AUTO_CREATE);
    }

    private ServiceConnection mServiceConnection = new ServiceConnection() {
        @Override
        public void onServiceConnected(ComponentName name, IBinder service) {

        }

        @Override
        public void onServiceDisconnected(ComponentName name) {

        }
    };

    public void unBindServiceClick(View view) {
        //解绑服务
        if (mServiceConnection != null) {
            unbindService(mServiceConnection);
        }
    }
}
界面是这样子的:
<?xml version="1.0" encoding="utf-8"?>
<LinearLayout
    xmlns:android="https://schemas.android.com/apk/res/android"
    android:layout_width="match_parent"
    android:layout_height="match_parent"
    android:orientation="vertical">

    <Button
        android:onClick="bindServiceClick"
        android:layout_width="match_parent"
        android:layout_height="wrap_content"
        android:text="绑定服务"/>


    <Button
        android:onClick="unBindServiceClick"
        android:layout_width="match_parent"
        android:layout_height="wrap_content"
        android:text="解绑服务"/>

</LinearLayout>
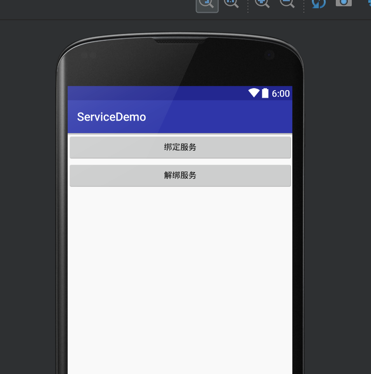
这两个按钮的功能就是绑定服务和解绑服务,可以看上面的代码,其实非常简单的!
我们第一个步骤就是先把服务绑定,启动起来。第二步我们才去研究怎么样进行通讯。
把这个程序跑起来,是怎么样子的呢?
好的,到这里,我们已经实现了通过绑定服务和启动服务来启动服务。并且通过解绑服务来停止服务。
接下来,我们看一下,Activity跟服务之间是怎么通讯的。我们可以看到服务的生命周期有点不一样了!它会执行onBind方法:
    @Override
    public IBinder onBind(Intent intent) {
        Log.d(TAG, "onBind");
        return null;
    }
这个方法里头呢,我们需要返回一个东西,也就是IBinder,假设我们现在这样子,需要调用服务里的一个方法,我们可以在里面声明 一个方法叫服务的内部方法!
我们把服务写成这样子:
package com.sunofbeaches.servicedemo;

import android.app.Service;
import android.content.Intent;
import android.os.Binder;
import android.os.IBinder;
import android.util.Log;

/**
 * Created by TrillGates on 18/4/18.
 * God bless my code!
 */
public class SecondService extends Service {

    public class CommunicateBinder extends Binder{
        void callInnerMethod(){
            innerMethod();
        }
    }

    private static final String TAG = "SecondService";

    private void innerMethod() {
        Log.d(TAG, "innerMethod was called...");
    }

    @Override
    public IBinder onBind(Intent intent) {
        Log.d(TAG, "onBind");
        return new CommunicateBinder();
    }

    @Override
    public boolean onUnbind(Intent intent) {
        Log.d(TAG, "onUnbind");
        return super.onUnbind(intent);
    }

    @Override
    public void onCreate() {
        Log.d(TAG, "onCreate");
        super.onCreate();

    }

    @Override
    public int onStartCommand(Intent intent, int flags, int startId) {
        Log.d(TAG, "onStartCommand");
        return super.onStartCommand(intent, flags, startId);
    }

    @Override
    public void onDestroy() {
        Log.d(TAG, "onDestroy");
        super.onDestroy();
    }
}
有一个服务内部的类,继承了binder类,其实binder类的话是实现了IBinder接口的:
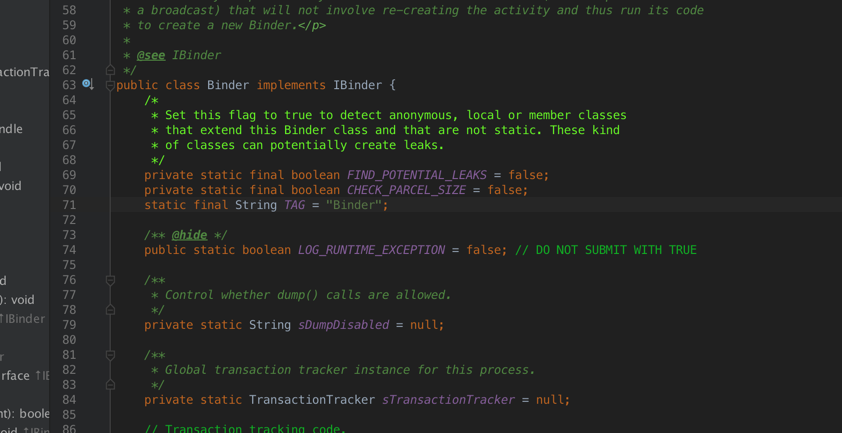
所以我们在绑上的时候,就返回这个类给绑定服务的地方,我们看看绑定服务的地方是怎么获取到这个类的:
package com.sunofbeaches.servicedemo;
import android.app.Activity;
import android.content.ComponentName;
import android.content.Intent;
import android.content.ServiceConnection;
import android.os.Bundle;
import android.os.IBinder;
import android.view.View;
/**
* Created by TrillGates on 18/4/18.
* God bless my code!
*/
public class BindServiceActivity extends Activity {
@Override
protected void onCreate(Bundle savedInstanceState) {
super.onCreate(savedInstanceState);
setContentView(R.layout.activity_bind_service);
}
public void bindServiceClick(View view) {
//创建意图对象
Intent intent = new Intent(this, SecondService.class);
//第一个是参数是意图对象,第二个参数是回调,第三个参数是标记,这个是自动创建的意,如果服务没有start,那么会自己创建。
//automatically create the service as long as the binding exists
bindService(intent, mServiceConnection, BIND_AUTO_CREATE);
}
private SecondService.CommunicateBinder mCommunicateBinder;
private ServiceConnection mServiceConnection = new ServiceConnection() {
@Override
public void onServiceConnected(ComponentName name, IBinder service) {
if (service instanceof SecondService.CommunicateBinder) {
mCommunicateBinder = (SecondService.CommunicateBinder) service;
}
}
@Override
public void onServiceDisconnected(ComponentName name) {
}
};
public void unBindServiceClick(View view) {
//解绑服务
if (mServiceConnection != null) {
unbindService(mServiceConnection);
}
}
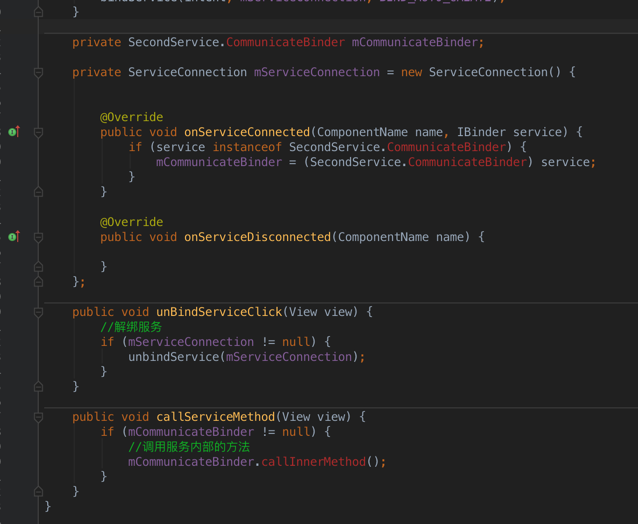
public void callServiceMethod(View view) {
if (mCommunicateBinder != null) {
//调用服务内部的方法
mCommunicateBinder.callInnerMethod();
}
}
}
这里面有一段代码是:
@Override
        public void onServiceConnected(ComponentName name, IBinder service) {
            if (service instanceof SecondService.CommunicateBinder) {
                mCommunicateBinder = (SecondService.CommunicateBinder) service;
            }
        }
我们就是这样子拿到了绑定上以后传回来的那个类,这样子我们就可以调用服务里的方法了:
public void callServiceMethod(View view) {
        if (mCommunicateBinder != null) {
            //调用服务内部的方法
            mCommunicateBinder.callInnerMethod();
        }
    }
在UI上添加了一个按钮,看一下我们测试的结果:

这样子我们就可以控制服务了,假设说我们有一个服务在后台跑着,用它来播放音乐的,因为我们音乐可以后台播放呀,对吧!这个时间 ,我们需要控制音乐的播放和暂停了,就可以通过这种形式去控制音乐了。
这样的代码还不够完美,对于服务内部的方法,应该隐藏起来,而公共的东西进行抽取,所以,我们应该定义一个接口,把服务里的:
   public class CommunicateBinder extends Binder{
        void callInnerMethod(){
            innerMethod();
        }
    }
这个方法隐藏起来,那隐藏起来以后,外部怎么能调用呢?当然是通过接口的形式来实现啦!
我们创建一个接口:
package com.sunofbeaches.servicedemo.interfaces;

/**
 * Created by TrillGates on 18/4/20.
 * God bless my code!
 */
public interface IServiceControl {

    void callServiceInnerMethod();

}
接着,我们私有服务里这个类,并且实现这个接口:
 private class CommunicateBinder extends Binder implements IServiceControl{

        @Override
        public void callServiceInnerMethod() {
            innerMethod();
        }
    }
这样子,我们在服务连接上以后,就可以强转成接口来调用了:
你看,已经没法调用了,因为这个类已经私有了!
把代码改成这样子:
package com.sunofbeaches.servicedemo;

import android.app.Activity;
import android.content.ComponentName;
import android.content.Intent;
import android.content.ServiceConnection;
import android.os.Bundle;
import android.os.IBinder;
import android.view.View;

import com.sunofbeaches.servicedemo.interfaces.IServiceControl;
import com.sunofbeaches.servicedemo.services.SecondService;

/**
 * Created by TrillGates on 18/4/18.
 * God bless my code!
 */
public class BindServiceActivity extends Activity {
    @Override
    protected void onCreate(Bundle savedInstanceState) {
        super.onCreate(savedInstanceState);
        setContentView(R.layout.activity_bind_service);
    }

    public void bindServiceClick(View view) {
        //创建意图对象
        Intent intent = new Intent(this, SecondService.class);
        //第一个是参数是意图对象,第二个参数是回调,第三个参数是标记,这个是自动创建的意,如果服务没有start,那么会自己创建。
        //automatically create the service as long as the binding exists
        bindService(intent, mServiceConnection, BIND_AUTO_CREATE);
    }

    private IServiceControl mCommunicateBinder;

    private ServiceConnection mServiceConnection = new ServiceConnection() {


        @Override
        public void onServiceConnected(ComponentName name, IBinder service) {
            if (service instanceof IServiceControl) {
                mCommunicateBinder = (IServiceControl) service;
            }
        }

        @Override
        public void onServiceDisconnected(ComponentName name) {

        }
    };

    public void unBindServiceClick(View view) {
        //解绑服务
        if (mServiceConnection != null) {
            unbindService(mServiceConnection);
        }
    }

    public void callServiceMethod(View view) {
        if (mCommunicateBinder != null) {
            //调用服务内部的方法
            mCommunicateBinder.callServiceInnerMethod();
        }
    }
}
这样子的效果是一样的,但是代码非常优雅!估计能理解这个的同学就可以体会到了接口有多么有用了!
但是,以绑定的方式启动的服务,在context销毁的时候,必须解绑,否则会泄漏:
报错内容:
[ 04-19 23:02:28.741  1509: 1597 D/         ]
HostConnection::get() New Host Connection established 0xa034adf0, tid 1597
 Activity com.sunofbeaches.servicedemo.BindServiceActivity has leaked ServiceConnection com.sunofbeaches.servicedemo.BindServiceActivity$1@13ae5f6b that was originally bound here
 android.app.ServiceConnectionLeaked: Activity com.sunofbeaches.servicedemo.BindServiceActivity has leaked ServiceConnection com.sunofbeaches.servicedemo.BindServiceActivity$1@13ae5f6b that was originally bound here
     at android.app.LoadedApk$ServiceDispatcher.<init>(LoadedApk.java:1077)
     at android.app.LoadedApk.getServiceDispatcher(LoadedApk.java:971)
     at android.app.ContextImpl.bindServiceCommon(ContextImpl.java:1774)
     at android.app.ContextImpl.bindService(ContextImpl.java:1757)
     at android.content.ContextWrapper.bindService(ContextWrapper.java:539)
     at com.sunofbeaches.servicedemo.BindServiceActivity.bindServiceClick(BindServiceActivity.java:27)
     at java.lang.reflect.Method.invoke(Native Method)
     at java.lang.reflect.Method.invoke(Method.java:372)
     at android.view.View$1.onClick(View.java:4015)
     at android.view.View.performClick(View.java:4780)
     at android.view.View$PerformClick.run(View.java:19866)
     at android.os.Handler.handleCallback(Handler.java:739)
     at android.os.Handler.dispatchMessage(Handler.java:95)
     at android.os.Looper.loop(Looper.java:135)
     at android.app.ActivityThread.main(ActivityThread.java:5254)
     at java.lang.reflect.Method.invoke(Native Method)
     at java.lang.reflect.Method.invoke(Method.java:372)
     at com.android.internal.os.ZygoteInit$MethodAndArgsCaller.run(ZygoteInit.java:903)
     at com.android.internal.os.ZygoteInit.main(ZygoteInit.java:698)
onUnbind
onDestroy
 all threads took: 5.485ms
BindServiceActivity has leaked 这里已经说了泄漏了!
bindService开启的服务,在系统里是看不到服务在运行的:
如果是通过startService的方式启动的服务,则会在应用里看到:
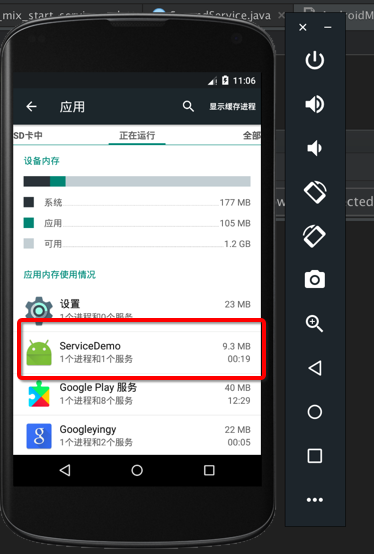
如果是通过bindService的方式来启动,则不会有
总结一下绑定服务的特点(这些内容会在视频里给大家做实验证明):
1、绑定服务在系统设置里是没有显进服务正在跑着的;
2、如果onBind方法返回的是null,那么onServiceConnected方法不会被调用;
3、绑定服务的生命周期跟Activity是不求同时生,但求同时死,Activity没了,服务也要解绑;
4、服务在解除绑定以后会停止运行,执行unBind方法—>onDestroy方法;
5、绑定服务开启的服务,只可以解绑一次,多次解绑会抛异常;
6、绑定的connection要跟解绑的connection要对应着,否则没法解绑。
稍微总结一下,startService和bindService的区别,优点和缺点:
1、startService这个方法来启动服务的话,是长期运行的,只有stopService才会停止服务。而bindService来启动服务,不用的时候,需要调用unBindService,否则会导致context泄漏,所以bindService不是长期运行的。当context销毁的时候,则会停止服务运行。
2、startService来启动服务可以长期运行,但是不可以通讯,而bindService的方式来启动服务则可以通讯,两者都有优缺点,所以我们就有了混合起来使用的方法。
接下来,我们会学习服务的混合开启方式,达到互补的效果。
混合启动服务
在前面的基础上,我们把开启服务,停止服务,绑定服务,解绑服务,调用服务内部的方法结合起来。再看看它的生命周期,以及作用效果。
首先,我们先总结一下服务的生命周期:
》startService–>stopService
这个生命周期我们前面已经看到了:
onCreate—>onStartCommand—->onDestroy
》bindService–>unBindService
这个生命周期,我们也从前面的例子中看到了:
onCreate—->onBind—>onUnbind—->onDestroy
在这一小节之前,我们提到,两种开启服务各有各自的优点和缺点。startService的方法可以长期地在后台运行,而bindService的方法则不可以长期于后台运行;bindService启动服务,可以跟服务进行通讯,但是startService启动服务不可以跟服务进行通讯。
我们混合两种开启方式,比如说,我们先startService,再进行bindService,这样子的话,服务可以长期于后台运行,又可以跟服务进行通讯了。
我们还是以例子的形式来学习一下:
我们在前面的例子稍加修改,添加了开启服务和停止服务,绑定服务和解绑服务不变,其实就是前面例子的结合体来的。
这个是界面:
<?xml version="1.0" encoding="utf-8"?>
<LinearLayout
    xmlns:android="https://schemas.android.com/apk/res/android"
    android:layout_width="match_parent"
    android:layout_height="match_parent"
    android:orientation="vertical">


    <Button
        android:layout_width="match_parent"
        android:layout_height="wrap_content"
        android:onClick="startServiceClick"
        android:text="开启服务"/>

    <Button
        android:layout_width="match_parent"
        android:layout_height="wrap_content"
        android:onClick="stopServiceClick"
        android:text="停止服务"/>


    <Button
        android:layout_width="match_parent"
        android:layout_height="wrap_content"
        android:onClick="bindServiceClick"
        android:text="绑定服务"/>


    <Button
        android:layout_width="match_parent"
        android:layout_height="wrap_content"
        android:onClick="unBindServiceClick"
        android:text="解绑服务"/>

    <Button
        android:layout_width="match_parent"
        android:layout_height="wrap_content"
        android:onClick="callServiceMethod"
        android:text="调用服务内部方法"/>

</LinearLayout>
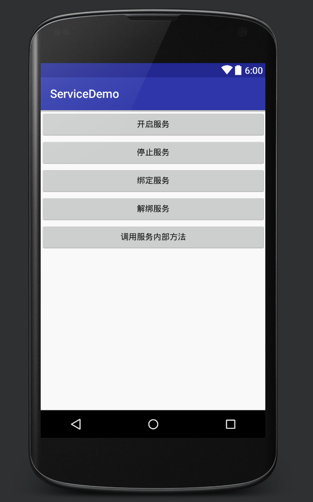
对应的,有点击事件,我们在activity里的代码实现一下:
package com.sunofbeaches.servicedemo;

import android.app.Activity;
import android.content.ComponentName;
import android.content.Intent;
import android.content.ServiceConnection;
import android.os.Bundle;
import android.os.IBinder;
import android.view.View;

import com.sunofbeaches.servicedemo.interfaces.IServiceControl;
import com.sunofbeaches.servicedemo.services.SecondService;

/**
 * Created by TrillGates on 18/4/18.
 * God bless my code!
 */
public class BindServiceActivity extends Activity {
    @Override
    protected void onCreate(Bundle savedInstanceState) {
        super.onCreate(savedInstanceState);
        setContentView(R.layout.activity_bind_service);
    }

    public void bindServiceClick(View view) {
        //创建意图对象
        Intent intent = new Intent(this, SecondService.class);
        //第一个是参数是意图对象,第二个参数是回调,第三个参数是标记,这个是自动创建的意,如果服务没有start,那么会自己创建。
        //automatically create the service as long as the binding exists
        bindService(intent, mServiceConnection, BIND_AUTO_CREATE);
    }


    public void startServiceClick(View view) {
        Intent intent = new Intent(this, SecondService.class);
        startService(intent);
    }

    public void stopServiceClick(View view) {
        Intent intent = new Intent(this, SecondService.class);
        stopService(intent);
    }

    private IServiceControl mCommunicateBinder;

    private ServiceConnection mServiceConnection = new ServiceConnection() {


        @Override
        public void onServiceConnected(ComponentName name, IBinder service) {
            if (service instanceof IServiceControl) {
                mCommunicateBinder = (IServiceControl) service;
            }
        }

        @Override
        public void onServiceDisconnected(ComponentName name) {

        }
    };

    public void unBindServiceClick(View view) {
        //解绑服务
        if (mServiceConnection != null) {
            unbindService(mServiceConnection);
        }
    }

    public void callServiceMethod(View view) {
        if (mCommunicateBinder != null) {
            //调用服务内部的方法
            mCommunicateBinder.callServiceInnerMethod();
        }
    }
}
然后我们就是开始使用啦!
第一个实验
》开启服务—>绑定服务—->调用服务的方法——>解绑服务——>停止服务(不停止服务它会一直跑着)
开启服务:
D/SecondService: onCreate D/SecondService: onStartCommand
绑定服务:
D/SecondService: onBind
调用服务的方法:
D/SecondService: innerMethod was called…
解绑服务:
D/SecondService: onUnbind
停止服务:
D/SecondService: onDestroy
从上面的操作记录来看,我们在解绑服务的时候,它并没有执行onDestroy方法,也就是说,服务还是在运行的。所以我们使用到了startService的好处:1、服务在后台长期运行;
而我们也是能调用服务内部的方法的,所以我们使用到了bindService的好处:2、跟服务进行通讯
也就是说,只要startService的方式开启服务,没有stopService,服务一直在运行者。
第二个实验:
我们去开启服务(startService)—->绑定服务(bindService)—–>停止服务(stopService)
从上面的图中,我们可以得出结论:通过startService,再去bindService,如果没有解绑,那么是停止不了服务的
实际开发中的模板流程:
第一步:startService–>这一步是为了服务可以长期后台运行 第二步:bindService–>这一步的目录是为了拿到服务的控制binder 第三步:调用服务里的方法 第四步:unBindService—>解绑服务,否则无法停止服务的(但是服务,仍然在后台运行) 第五步:在不需要服务的时候停止服务stopService
跨进程通讯AIDL
什么是AIDL呢?可能一般的开发人员使用的场景不多,但是就我现在做开发,天天用到,因为我做的launcher要显示所有第三方应用的附加界面,并且要进行通讯,所以就要用到AIDL了!
AIDL其实是:android interface definition language 安卓接口定义语言(其实这个使用得少,但是面试的时候会问一下吧!)
在例子开始之前,我们要了解一个概念:
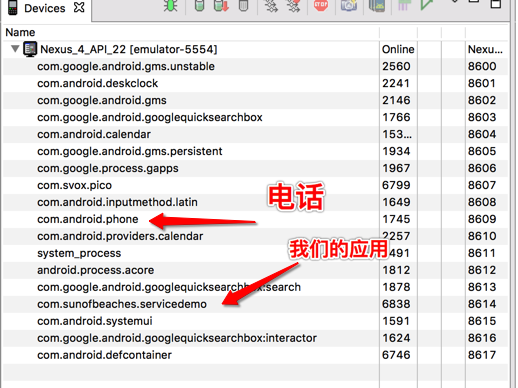
IPC:inter process communication 进程间通讯。要知道什么是进程间通讯,那就要从进程的角度去理解了。在window下的话,我们打开一个应用,它就会给这个应用开一个进程。而在android里也是一样的,你看就知道了,在我们的ddms里头就有这么多的进程:

我们可以看到这些进程:
进程之间是独立的,而每个应用使用的内存也是独立的。为什么要独立呢,如果不独立的话就会存在安全问题呀!比如说,在你的应用里有支付相关的内容,如果其他应用可以访问得到的话,那么就危险了!对吧!
进程之间是独立的,那就有一个问题了!它们是怎么进行通讯的呢?有这样的场景呀,比如说:我们第三方应用要发起充值的业务,通过支付宝进行充值,调用支付宝简单,但是支付宝怎么把支付结果告诉我们的应用呢?对吧!
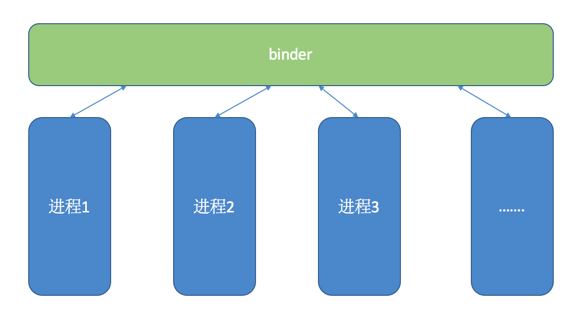
进程间的通讯,基本上在每个操作系统上都有这个概念。其实我们猜也能猜到是怎么实现的!
我们可以划出一个公共的内存空间,把要通讯的数据,通过这个空间来交流即可!而这个空间呢,就是binder了!
接下来的话,我们就会写一个例子,怎么样来跨进程通讯!
这个例子大概是这样子的:一个应用程序去调用另外一个应用里的服务里的方法。
如上所说,我们就是要创建两个应用了!
但是要先理解两个概念,本地服务和远程服务。
本地服务是相对于自己来说的,在自己应用上的服务,其实就是本地服务。相对于自己来说,服务在别人的应用上,那么就是远程服务了。
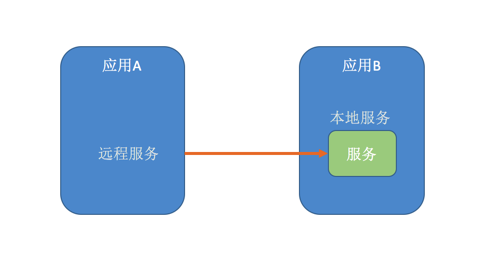
图中的服务相对于A来是远程服务相对于B来说是本地服务。
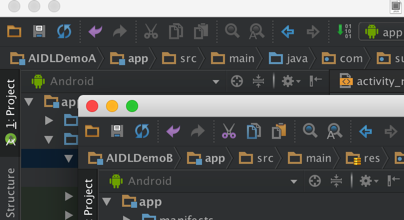
接下来的这个例子,我们就是有两个应用,一个是应用A,一个是应用B。在应用B里头有一个服务。然后呢,我们的应用A绑定应用B的服务,并且调用里面的方法。
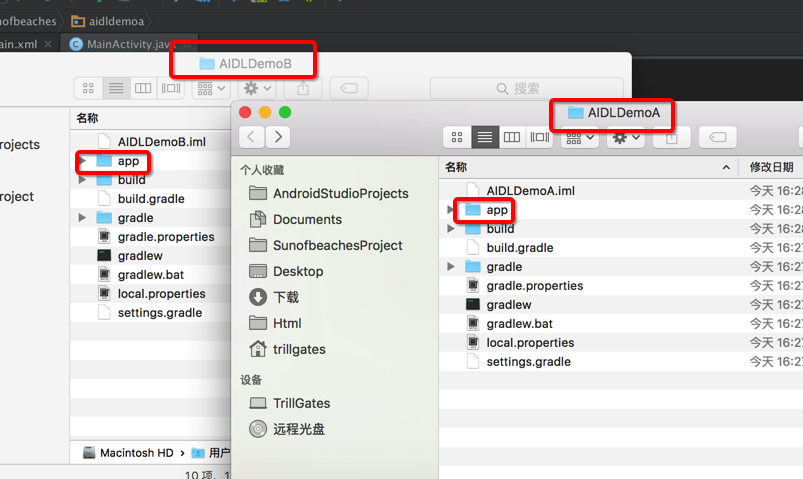
第一步,创建两个应用:AIDLDemoA,和AIDLDemoB
第二步:在 AIDLDemoB的程序里面创建一个服务:AppBService
package com.sunofbeaches.aidldemob;

import android.app.Service;
import android.content.Intent;
import android.os.IBinder;

/**
 * Created by TrillGates on 18/4/23.
 * God bless my code!
 */
public class AppBService extends Service {

    @Override
    public IBinder onBind(Intent intent) {
        return null;
    }
}
第三步,在配置文件里注册这个服务:
        <service android:name=".AppBService"
            android:exported="true">
            <intent-filter>
                <action android:name="com.sunofbeaches.aidldemob.INNER_SERVICE"/>
            </intent-filter>
        </service>
这里这个exported=”true”其实就是允许外部启动这个服务,绑定这个服务。默认就是true的,如果改成false了,外部就没法绑定/启动了。
这个action是给第三方应用(应用A)绑定用的。
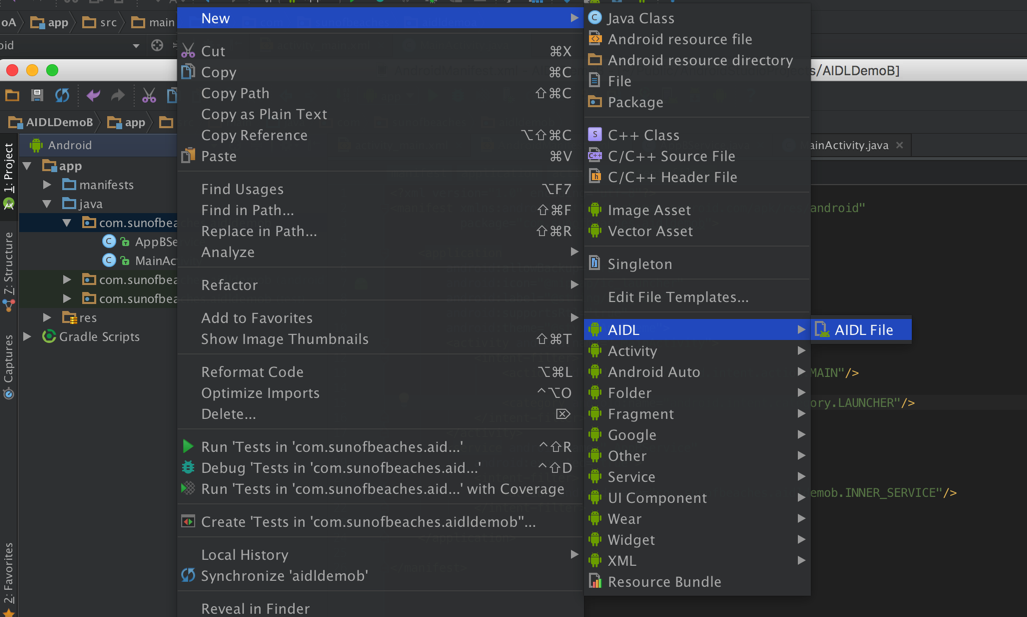
第四步,重点来了:我们要创建AIDL接口:
// IDemoBServiceControl.aidl
package com.sunofbeaches.aidldemob;

// Declare any non-default types here with import statements

interface IDemoBServiceControl {
    /**
     * Demonstrates some basic types that you can use as parameters
     * and return values in AIDL.
     */
    void basicTypes(int anInt, long aLong, boolean aBoolean, float aFloat,
            double aDouble, String aString);
}
然后,就会创建这样一个文件了,对于AIDL的知识点挺多的,大家先学会怎么使用,后面再学习更多的内容,比如说,你要知道怎么要传一个自定义的bean类,怎么要相互控制,都是可以的。
这里面的话,我们就使用A应用,调用B应用里的服务的方法,并且把内容传过去。
// IDemoBServiceControl.aidl
package com.sunofbeaches.aidldemob;

interface IDemoBServiceControl {

     void callInnerService();

     void innserServicePrint(in String printContent);
}
基本数据类型不需要导包,我们自己定义的才要导包,这个以后我们会学到的。
第五步,我们点击build里的make一下,这样子就会自动生成一个类,所以我们才可以new出来:
package com.sunofbeaches.aidldemob;

import android.app.Service;
import android.content.Intent;
import android.os.IBinder;
import android.os.RemoteException;
import android.util.Log;

/**
 * Created by TrillGates on 18/4/23.
 * God bless my code!
 */
public class AppBService extends Service {

    private static final String TAG = "AppBService";

    @Override
    public IBinder onBind(Intent intent) {
        Log.d(TAG, "应用B的服务被绑定...");
        return new IDemoBServiceControl.Stub() {
            @Override
            public void callInnerService() throws RemoteException {
                innerMethod();
            }

            @Override
            public void innerServicePrint(String printContent) throws RemoteException {
                printMethod(printContent);
            }
        };
    }


    @Override
    public boolean onUnbind(Intent intent) {
        Log.d(TAG, "应用B的服务解绑了...");
        return super.onUnbind(intent);
    }

    private void innerMethod() {
        Log.d(TAG, "应用B的服务内部方法被调用了!...");
    }

    private void printMethod(String content) {
        Log.d(TAG, "应用B的输出方法被调用,传过来的内容是 -- > " + content);
    }

}
以上是我们服务修改成这样子,IDemoBServiceControl.Stub()这个类是根据我们的aidl接口生成的,它继承自己IBinder,所以我们可以直接new出来返回,当onBind的时候。
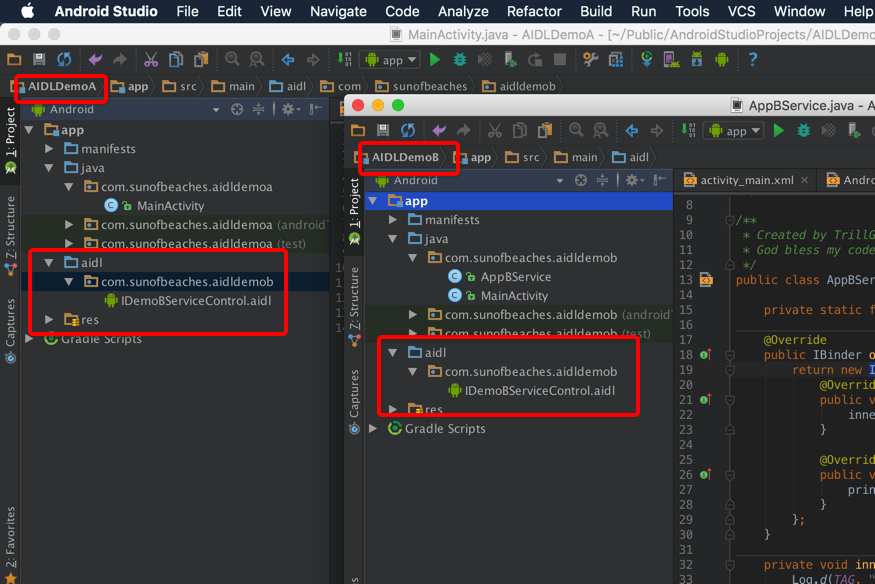
第五步:复制aidl的整个文件夹到应用A,视图如下:
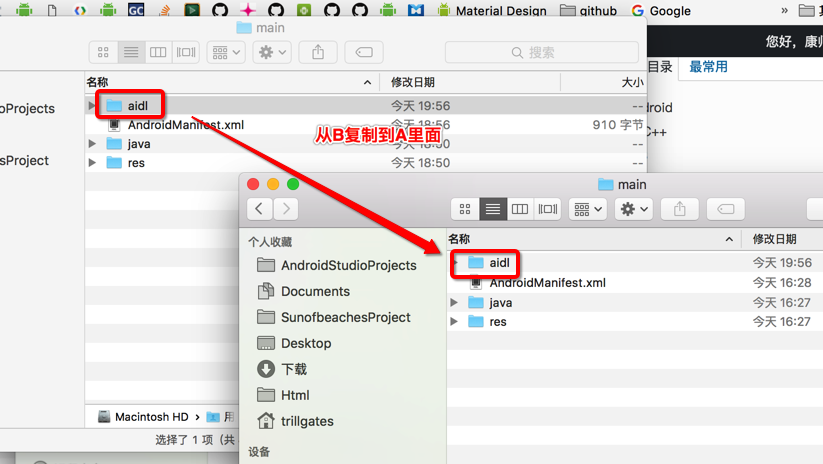
要注意的地方是:确保它们的包名是一样的。如图:
至于AIDL的原理,现在解释可能大家还没法理解。大家先按步骤去做,如果到这里已经很吃力了,那就去看视频好了。
然后,我们在应用A绑定服务的时候,就可以拿到这个接口的实现了,请看吧:
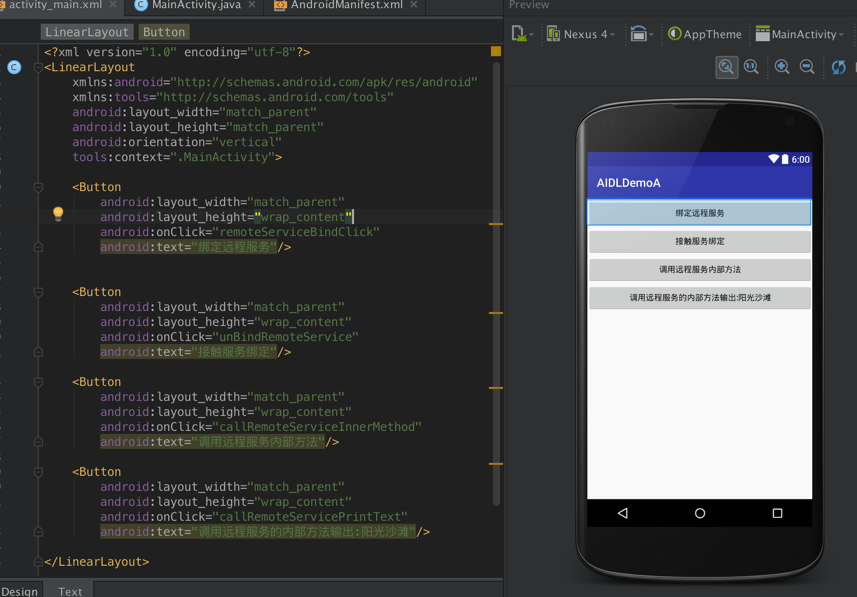
这是应用A的界面代码:
然后是主的Activity:
package com.sunofbeaches.aidldemoa;

import android.content.ComponentName;
import android.content.Intent;
import android.content.ServiceConnection;
import android.os.Bundle;
import android.os.IBinder;
import android.os.RemoteException;
import android.support.v7.app.AppCompatActivity;
import android.util.Log;
import android.view.View;

import com.sunofbeaches.aidldemob.IDemoBServiceControl;

public class MainActivity extends AppCompatActivity {

    private static final String TAG = "MainActivity";
    private IDemoBServiceControl mIDemoBServiceControl = null;

    @Override
    protected void onCreate(Bundle savedInstanceState) {
        super.onCreate(savedInstanceState);
        setContentView(R.layout.activity_main);
    }

    /**
     * 这个方法用于绑定服务
     *
     * @param view
     */
    public void remoteServiceBindClick(View view) {
        Intent intent = new Intent();
        //设置远程服务B的包名
        intent.setPackage("com.sunofbeaches.aidldemob");
        //设置服务的action: com.sunofbeaches.aidldemob.INNER_SERVICE
        intent.setAction("com.sunofbeaches.aidldemob.INNER_SERVICE");
        //绑定服务,服务不能重复绑定
        if (mIDemoBServiceControl == null) {
            bindService(intent, mServiceConnection, BIND_AUTO_CREATE);
        }
    }

    private ServiceConnection mServiceConnection = new ServiceConnection() {
        @Override
        public void onServiceConnected(ComponentName name, IBinder service) {
            //我们可以通过AIDL自动创建的类的一个方法,自动转,不需要强转了
            mIDemoBServiceControl = IDemoBServiceControl.Stub.asInterface(service);
            Log.d(TAG, "远程服务绑定了...");
        }

        @Override
        public void onServiceDisconnected(ComponentName name) {
            mIDemoBServiceControl = null;
            Log.d(TAG, "远程服务断开绑定了...");
        }
    };

    /**
     * 这个方法用于解绑服务
     *
     * @param view
     */
    public void unBindRemoteService(View view) {
        unBindRemoteService();
    }


    /**
     * 这个方法用于调用远程服务里的方法
     *
     * @param view
     */
    public void callRemoteServiceInnerMethod(View view) {
        if (mIDemoBServiceControl != null) {
            try {
                mIDemoBServiceControl.callInnerService();
            } catch (RemoteException e) {
                e.printStackTrace();
            }
        }
    }

    /**
     * 这个方法用于调用远程服务的方法,让期输出内容
     *
     * @param view
     */
    public void callRemoteServicePrintText(View view) {
        if (mIDemoBServiceControl != null) {
            try {
                mIDemoBServiceControl.innerServicePrint("阳光沙滩");
            } catch (RemoteException e) {
                e.printStackTrace();
            }
        }
    }


    @Override
    protected void onDestroy() {
        super.onDestroy();
        unBindRemoteService();
    }

    private void unBindRemoteService() {
        if (mServiceConnection != null && mIDemoBServiceControl != null) {
            unbindService(mServiceConnection);
            mIDemoBServiceControl = null;
        }
    }
}
注释已经写清楚了,可以看注释,如果有问题的话,可以到社区网站里提问交流。
然后我们先跑起应用B,再跑起应用A。然后看应用B的Log,因为我们要看应用B的输出内容:
从上面的结果,我们可以看到,我们应用A控制应用B了,已经做到了跨应用(进程)进行通讯了,后面的话我们以一个实际的使用例子来说一下吧