引言 这个游戏加点很烦人,每次开局都点的手累;小鼹鼠的礼物不在游戏界面就收不到,何不挂机。
测试
图像匹配测试
截取了主界面全屏,

从中截取了里面的小豆豆图像 。
。
使用模板匹配,相似度总是0.55左右,模板匹配(Match Template)中了解到工作原理:
通过在输入图像上滑动图像块对实际的图像块和输入图像进行匹配
大概知道了原因,小豆图片是直接从电脑上截取主界面图中的一小块,但是没有保持原分辨率,所以匹配不到。原图大小再截取了一次 。匹配到相似度
0.9988448023796082。

# imread()函数读取目标图片和模板,目标图片先读原图,后灰度。灰度用来比较,原图用来标记匹配
img_bgr = cv2.imread("home.png")
img_gray = cv2.cvtColor(img_bgr, cv2.COLOR_BGR2GRAY)
template = cv2.imread('pea.png', 0)
w, h = template.shape[::-1]

# 模板匹配
res = cv2.matchTemplate(img_gray, template, cv2.TM_CCOEFF_NORMED)

# 阈值
threshold = 0.9
loc = np.where( res >= threshold)

# 使用灰度图像中的坐标对原始RGB图像进行标记

for pt in zip(*loc[::-1]):
    cv2.rectangle(img_bgr, pt, (pt[0] + w, pt[1] + h), (0,0,255), 2)

# 显示图像

#cv2.namedWindow('blend', 0)
cv2.imshow('blend', img_bgr)
cv2.imwrite('./run_image/blend_home.png', img_bgr)
cv2.waitKey(0)
cv2.destroyAllWindows()
adb截图测试
adb截图命令很方便
- 截图保存到sdcard
adb shell /system/bin/screencap -p /sdcard/screenshot.png - pull拉取到本地
adb pull /sdcard/screenshot.png
封装一下路径等变量:
def execute(self, command):
    """ 执行adb命令 """
    command = "{} {}".format(self.adb_file_path, command)
    logging.info(command)
    os.system(command)

def get_screenshot(self, name):
    """ 获取屏幕截图 """
    self.execute(' shell screencap -p /sdcard/%s' % str(name))
    self.execute(' pull /sdcard/{0} {1}{0}'.format(name, self.run_image_path))
INFO:root:f:pywechat_rainbow/adb/adb   shell screencap -p /sdcard/rainbow_screen.png
INFO:root:f:pywechat_rainbow/adb/adb   pull /sdcard/rainbow_screen.png f:pywechat_rainbow/run_image/rainbow_screen.png
封装公共函数
上一节封装了执行adb命令和获取屏幕截图函数。
要能进行下去还需两个核心函数:判断在某个界面,获取某个特征匹配中心点。
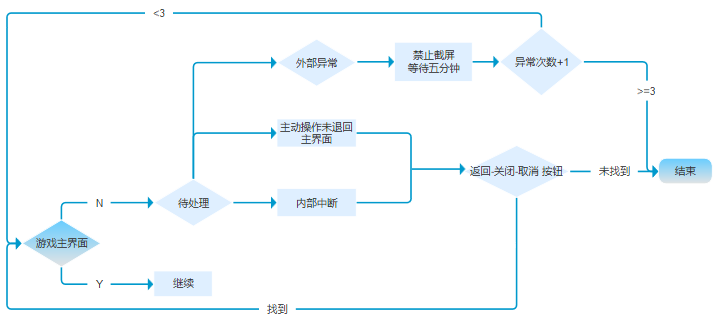
在界面中还需细分:一些异常会导致遮挡屏幕(被外部应用遮挡,比如被电话、视频打断)、(内部遮挡[不合预期的弹出]:送钻石的气球乱飘,误点到或者错误计算的位置误点弹出界面)。

主要功能列表
- [x] 执行adb
- [x] 获取屏幕截图
- [x] 界面匹配
- [x] 特征按钮匹配
- [ ] 金币获取
- [x] 鼹鼠匹配
- [x] 执行动作(基础功能)
实战
小鼹鼠的礼物
获取鼹鼠位置,
鼹鼠模板 有时不能匹配上,发现鼹鼠是动的,比如
 就是异常的。异常匹配0.86不到0.9,故检测鼹鼠时,阈值降低至0.8。
矩阵最值
min_val,max_val,min_indx,max_indx=cv2.minMaxLoc(res)
点击鼹鼠领取礼物之后,弹出「太棒了」按钮,点击之后,有一定几率还是会出现一张地图的「太棒了」,所以太棒了得判断两次。
封装一个checks (action, is_check, num=1)方法,执行某动作多次用,并可选择是否点击。所有动作都可调用此基础方法,鼹鼠匹配的阈值不一样,则多加一个关键字参数。
def checks(self, action, is_click=True, num=1, **kw):
    """ 检测多次动作"""
    for i in range(num):
        self.get_screenshot()

        if 'threshold' in kw:
            threshold = kw['threshold']
        else:
            threshold = self.default_threshold

        good_co = self.match(action, threshold)
        if not good_co:
            logging.info(str(action) + "未找到")
            return
        if is_click:
            self.click(*good_co[0])
        logging.info("{0} ok! ({1}/{2})".format(action, i+1, num))
        time.sleep(1)
这样子挖钻石就很简单清晰了
def mole(self):
    """ 挖钻石 """
    if self.checks('home', is_click=False):
        # 主界面
        if self.checks('mole', threshold=0.8):
            # 鼹鼠界面
            if self.checks('good', num=2, screen=True):
                # 太棒了界面
                logging.info('领取成功')
到这里鼹鼠送的钻石和金币就可以领取成功了。如果要深入自动化玩法,还包括收割金币,加点。
金币可以用金币模板 匹配到
匹配到
 ,看得出多个目标都可匹配(每个金币可能会有>=3个坐标点),匹配多个目标的返回值就得用
np.where返回多坐标。
完整代码
import os
import sys
import cv2
import numpy as np
import time
import logging
logging.basicConfig(level=logging.DEBUG, filename='rain.log')


class Rainbow(object):

    def __init__(self):
        self.screen_base_img_name = 'rainbow_screen.png'  # 基础名称
        self.screen_current_img_name = self.screen_base_img_name  # 当前截图名称
        self.run_path = sys.path[0]
        self.adb_file_path = self.run_path+'/adb/adb '
        self.run_image_path = self.run_path+'/run_image/'
        self.data_image_path = self.run_path+'/data_image/'
        self.default_threshold = 0.9  # 默认阈值
        # 路由对应模板
        self.route_template = {
            'home': 'pea.png',
            'mole': 'mole.png',
            'good': 'good.png',
            'gold': 'gold.png',
            'cancel': 'cancel1.png'
        }
        pass

    def match(self, name, threshold=0):
        """ 匹配界面 """

        if threshold == 0:
            # 默认阈值
            threshold = self.default_threshold

        if name in self.route_template:
            # 判断每次图片路由
            template_img = self.route_template[name]
            return self.check_template(template_img, threshold)

    def check_template(self, t_img, threshold=0.9, debug=True):
        """ 页面匹配

        Returns:
            None/[x,y]
        """
        coordinate = []

        # imread()函数读取目标图片和模板,目标图片先读原图,后灰度。灰度用来比较,原图用来标记匹配
        try:
            img_bgr = cv2.imread("{0}{1}".format(self.run_image_path, self.screen_current_img_name))
            img_gray = cv2.cvtColor(img_bgr, cv2.COLOR_BGR2GRAY)
            template = cv2.imread("{0}{1}".format(self.data_image_path, t_img), 0)
            h, w = template.shape[:2]

            # 模板匹配
            res = cv2.matchTemplate(img_gray, template, cv2.TM_CCOEFF_NORMED)

        except Exception as e:
            logging.exception(e)
            raise

        # 矩阵最值
        min_val, max_val, min_indx, max_index = cv2.minMaxLoc(res)
        logging.info(cv2.minMaxLoc(res))
        if max_val > threshold and max_index:
            coordinate.append(max_index)

        # 阈值
        loc = np.where(res >= threshold)

        # 使用灰度图像中的坐标对原始RGB图像进行标记
        for pt in zip(*loc[::-1]):
            # coordinate.append((pt[0]+int(w/2), pt[1]+int(h/2)))
            if debug:
                cv2.rectangle(img_bgr, pt, (pt[0] + w, pt[1] + h), (0, 0, 255), 2)

        if debug:
            # 显示图像
            # cv2.imshow('blend', img_bgr)
            cv2.imwrite('%s/test.png' % self.run_image_path, img_bgr)
            # cv2.waitKey(0)
            # cv2.destroyAllWindows()

        if coordinate:
            return coordinate

    def execute(self, command):
        """ 执行adb命令 """
        command = "{} {}".format(self.adb_file_path, command)
        logging.info(command)
        os.system(command)
        time.sleep(0.5)

    def get_screenshot(self, name=''):
        """ 获取屏幕截图 """
        logging.info('截屏中,请等待')
        if not name:
            # 名称加时间戳
            self.screen_current_img_name = str(int(time.time())) + self.screen_base_img_name
        else:
            self.screen_current_img_name = str(int(time.time())) + name

        self.execute(' shell screencap -p /sdcard/%s' % str(self.screen_base_img_name))
        self.execute(' pull /sdcard/{0} {1}{2}'.format(
            self.screen_base_img_name,
            self.run_image_path,
            self.screen_current_img_name
        ))

        time.sleep(1)

    def click(self, w, h, press_time=0):
        """ 点击 """
        self.execute("shell input tap  {} {}".format(w, h))

    def checks(self, action, is_click=True, num=1, **kw):
        """ 匹配检测并执行

        Args:
            string action: 匹配模板名称
            boolean is_click: 是否点击
            int num: 执行多次
            dict kw:{
                float 'threshold':0.9 # 阈值
                boolean 'screen':True # 截屏
            }
        Returns:
            boolean
        """

        result = False

        for i in range(num):
            logging.info("[{0}] start! ({1}/{2}) {3}".format(action, i+1, num, kw))
            if 'screen' in kw and kw['screen']:
                self.get_screenshot()

            if 'threshold' in kw:
                threshold = kw['threshold']
            else:
                threshold = self.default_threshold

            good_co = self.match(action, threshold)
            if not good_co:
                logging.info(str(action) + "未找到")
            else:
                result = True
                if is_click:
                    self.click(*good_co[0])
            logging.info("{0} ok! ({1}/{2})".format(action, i+1, num))
            time.sleep(1)

        return result

    def mole(self):
        """ 挖钻石 """
        if self.checks('home', is_click=False):
            # 主界面
            if self.checks('mole', threshold=0.8):
                # 鼹鼠界面
                if self.checks('good', num=2, screen=True):
                    # 太棒了界面
                    logging.info('领取成功')

    def run(self):
        logging.info('run')
        # 首页判断
        # self.test('origin.png', 'home')
        # self.test('origin.png', 'mole')
        # self.test('test_mole_1.png', 'mole')
        # self.test('test_mole_2.png', 'mole')
        # mole_co = self.match('mole', 0.8)
        # self.checks('gold', is_click=False) # 金币匹配多个

        while True:
            logging.info('休眠...')
            time.sleep(30)
            # input('next:')
            logging.info('休眠结束,开始执行:截屏')
            self.get_screenshot(self.screen_base_img_name)
            logging.info('鼹鼠呢?')
            self.mole()


rainbow = Rainbow()
rainbow.run()