本次和大家分享的是RedisMQ队列的用法,前两篇文章队列工厂之(MSMQ)和队列工厂之RabbitMQ分别简单介绍对应队列环境的搭建和常用方法的使用,加上本篇分享的RedisMQ那么就完成了咋们队列工厂"三剑客"的目标了哈哈;Redis的作用不仅仅局限于队列,更多的一般都使用它的key,value的形式来存储session或者hash的方式存储一些常用的数据,当然这不是本章分享的内容(之前有些文章有讲过redis的使用场景和代码分享各位可以看下),这QueueReposity-队列工厂最后一篇结束后,笔者后面分享的可能是netcore方面的一些东西了,vs2017出来了简单创建netcore项目之后发现与之前的版本有些变动,例如:没有project.json,怎么配置生成跨平台程序等问题,需要一个一个学习和尝试,网上搜索的文章还很少,全靠阅读全英文的官网来学习了哈哈;希望大家能够喜欢本篇文章,也希望各位多多"扫码支持"和"推荐"谢谢!
» Redis安装和RedisClient工具的使用
» 封装RedisMQ队列的读和写
» 队列工厂之RedisMQ测试用例
下面一步一个脚印的来分享:
» Redis安装和RedisClient工具的使用
首先要使用redis需要下载安装Redis,这里由于之前的文章有讲解在windows下怎么搭建redis服务,所以不再赘述,各位可以点击搭建Redis服务端,并用客户端连接,因此我这里直接分享怎么使用RedisClient工具,这工具使用起来比较简单和方便,首先去这个地址下载:
http://dlsw.baidu.com/sw-search-sp/soft/a2/29740/RedisClient20140730.1406883096.exe
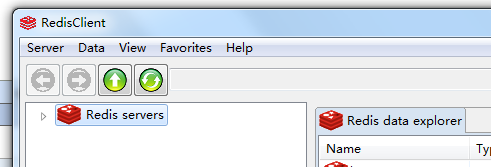
安装-》打开软件,能看到如图的界面:
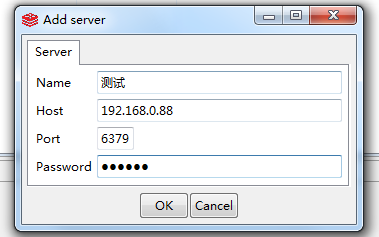
-》点击“Server”-》Add-》输入一个昵称,你redis服务端的ip,端口-》确认即可:
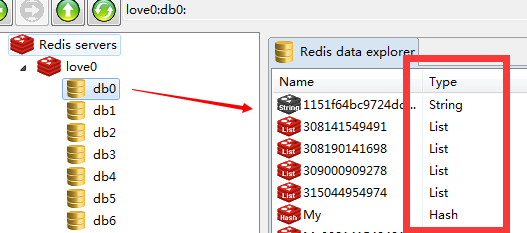
这个时候你redisclient的配置工作就完成了是不是很简单啊,-》再来点击刚才创建昵称-》双击打开redis的第一个数据库db0(这里就是在没有指定数据库位置时候存储数据的地方)-》能看到你存储的数据key:
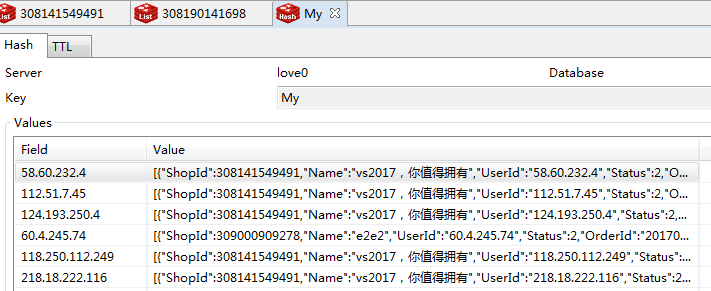
如果想看某个name的数据直接双击对应的name就行了-》这里是我redis服务存储的一个hash数据的截图:
是不是很方便,这个客户端可以直接删除你不想要的数据-》右键选中您想删除的name-》Delete即可删除:
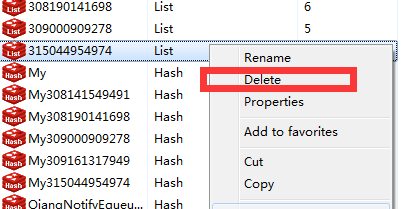
怎么样,这个RedisClient工具学会了么,是不是挺简单的呢;
» 封装RedisMQ队列的读和写
到这里终于来到我们代码分享的时刻了,尽管QueueReposity-队列工厂已经开源了源码,这里还是单独分享一次只有RedisMQ的代码;首先创建一个名称为:QRedisMQ的class-》继承 PublicClass.ConfClass<T>-》再实现接口IQueue,最后就有了我们实现接口方法体代码:
 1     /// <summary>
 2     /// RedisMQ
 3     /// </summary>
 4     public class QRedisMQ : PublicClass.ConfClass<QRedisMQ>, IQueue
 5     {
 6         private IRedisClient redis = null;
 7
 8         public void Create()
 9         {
10             if (string.IsNullOrWhiteSpace(this.ApiUrl) ||
11                 string.IsNullOrWhiteSpace(this.UserPwd)) { throw new Exception("创建QRedisMQ队列需要指定队列:ApiUrl,UserPwd"); }
12
13             this.ApiKey = string.IsNullOrWhiteSpace(this.ApiKey) ? "6379" : this.ApiKey;
14             redis = redis ?? new RedisClient(this.ApiUrl, Convert.ToInt32(this.ApiKey), this.UserPwd);
15         }
16
17         public long Total(string name = "Redis_01")
18         {
19             if (redis == null) { throw new Exception("请先创建队列连接"); }
20             if (string.IsNullOrWhiteSpace(name)) { throw new Exception("name不能为空"); }
21
22             return redis.GetListCount(name);
23         }
24
25         public Message Read(string name = "Redis_01")
26         {
27             if (redis == null) { throw new Exception("请先创建队列连接"); }
28             if (string.IsNullOrWhiteSpace(name)) { throw new Exception("name不能为空"); }
29
30             var message = new Message();
31             try
32             {
33                 message.Label = name;
34                 var result = redis.DequeueItemFromList(name);
35                 if (string.IsNullOrWhiteSpace(result)) { return message; }
36                 message.Body = result;
37             }
38             catch (Exception ex)
39             {
40                 throw new Exception(ex.Message);
41             }
42             return message;
43         }
44
45         public bool Write(string content, string name = "Redis_01")
46         {
47             if (redis == null) { throw new Exception("请先创建队列连接"); }
48             if (string.IsNullOrWhiteSpace(content) || string.IsNullOrWhiteSpace(name)) { throw new Exception("content和name不能为空"); }
49             redis.EnqueueItemOnList(name, content);
50             return true;
51         }
52
53         public void Dispose()
54         {
55             if (redis != null)
56             {
57                 redis.Dispose();
58                 redis = null;
59             }
60         }
61
62
63         //public List<Message> ReadAll()
64         //{
65         //    throw new NotImplementedException();
66         //}
67     }
这里用到的Redis的dll是引用了相关的nuget包:
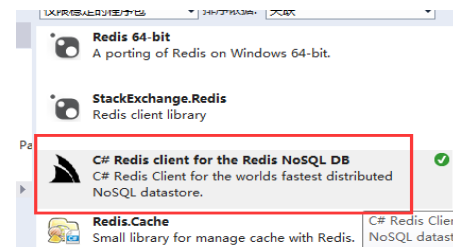
封装的队列Redis工厂流程同样是:创建(Create)-》读(Read)|写(Write)-》释放(Dispose);有了具体的RedisMQ实现类,然后还需利用工厂模式提供的方法来创建这个类的实例:
 1   /// <summary>
 2     /// ==================
 3     /// author:神牛步行3
 4     /// des:该列工厂开源,包括队列有MSMQ,RedisMQ,RabbitMQ
 5     /// blogs:http://www.cnblogs.com/wangrudong003/
 6     /// ==================
 7     /// 队列工厂
 8     /// </summary>
 9     public class QueueReposity<T> where T : class,IQueue, new()
10     {
11         public static IQueue Current
12         {
13             get
14             {
15                 return PublicClass.ConfClass<T>.Current;
16             }
17         }
18     }
到这儿RedisMQ工厂代码就完成了,下面开始分享我们的测试用例;
» 队列工厂之RedisMQ测试用例
通过上面配置环境和封装自己的方法,这里写了一个简单的测试用例,分为Server(加入消息队列)和Client(获取消息队列),首先来看Server端的代码:
 1 /// <summary>
 2     /// 队列服务端测试用例
 3     /// </summary>
 4     class Program
 5     {
 6         static void Main(string[] args)
 7         {
 8             Redis_Server();
 9
10             // RabbitMQ_Server();
11
12             //MSMQ_Server();
13         }
14
15         private static void Redis_Server()
16         {
17             //实例化QRedisMQ对象
18             var mq = QueueReposity<QRedisMQ>.Current;
19
20             try
21             {
22                 Console.WriteLine("Server端创建:RedisMQ实例");
23                 mq.Create();
24
25                 var num = 0;
26                 do
27                 {
28                     Console.WriteLine("输入循环数量(数字,0表示结束):");
29                     var readStr = Console.ReadLine();
30                     num = string.IsNullOrWhiteSpace(readStr) ? 0 : Convert.ToInt32(readStr);
31
32                     Console.WriteLine("插入数据:");
33                     for (int i = 0; i < num; i++)
34                     {
35                         var str = "我的编号是:" + i;
36                         mq.Write(str);
37                         Console.WriteLine(str);
38                     }
39                 } while (num > 0);
40             }
41             catch (Exception ex)
42             {
43             }
44             finally
45             {
46                 Console.WriteLine("释放。");
47                 mq.Dispose();
48             }
49             Console.ReadLine();
50         }
通过:创建(Create)-》读(Read)|写(Write)-》释放(Dispose) 的流程来使用我们的队列工厂,此时我们运行下这个Server端,然后分别录入4次参数:
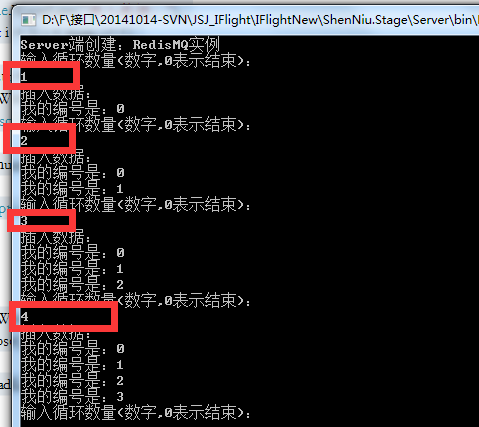
能看到截图的文字描述,这些测试数据插入到了redis的队列中,下面我们通过第一节说的RedisClient工具查看数据,点击队列名称如:
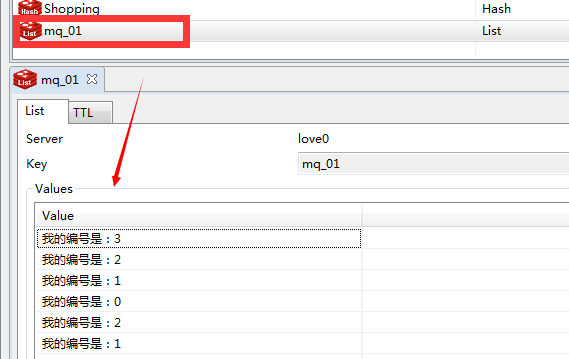
通过工具能看到我们刚才插入的数据,然后我们来通过测试用例的client端读取队列,具体代码:
 1   /// <summary>
 2     /// 队列客户端测试用例
 3     /// </summary>
 4     class Program
 5     {
 6         static void Main(string[] args)
 7         {
 8             RedisMQ_Client();
 9
10           //  RabbitMQ_Client();
11
12             //MSMQ_Client();
13         }
14
15         private static void RedisMQ_Client()
16         {
17             //实例化QRedisMQ对象
18             var mq = QueueReposity<QRedisMQ>.Current;
19             try
20             {
21                 Console.WriteLine("Client端创建:RedisMQ实例");
22                 mq.Create();
23
24                 while (true)
25                 {
26                     try
27                     {
28                         var total = mq.Total();
29                         if (total > 0) { Console.WriteLine("队列条数:" + total); }
30
31                         var result = mq.Read();
32                         if (result.Body == null) { continue; }
33                         Console.WriteLine(string.Format("接受队列{0}:{1}", result.Label, result.Body));
34                     }
35                     catch (Exception ex)
36                     { Console.WriteLine("异常信息:" + ex.Message); }
37                 }
38             }
39             catch (Exception ex)
40             {
41                 throw ex;
42             }
43             finally
44             {
45                 Console.WriteLine("释放。");
46                 mq.Dispose();
47             }
48         }
运行生成的exe,看效果:

通过图形能看出读取队列的数据正如我们想的那样依次读取,测试用例测试RedisMQ的代码没问题;以上对封装RedisMQ的代码分享和环境搭建讲解,到这里队列工厂(MSMQ,RabbitMQ,RedisMQ)就分享完了,希望能给您带来好的帮助,谢谢阅读;