安装
diango官网下载地址
https://www.djangoproject.com/download/
安装最新的LTS版本
pip安装(在windows的crm中或pycharm中的Terminal中输入)
# 安装 三 选 一
pip install django==1.11.18
pip install  django==1.11.18 -i https://pypi.douban.com/simple/
pip install django==1.11.18 -i https://pypi.tuna.tsinghua.edu.cn/simple

删除
pip uninstall django==1.11.18
pycharm安装
File → Settings → Project:pycharm → Project Interpreter
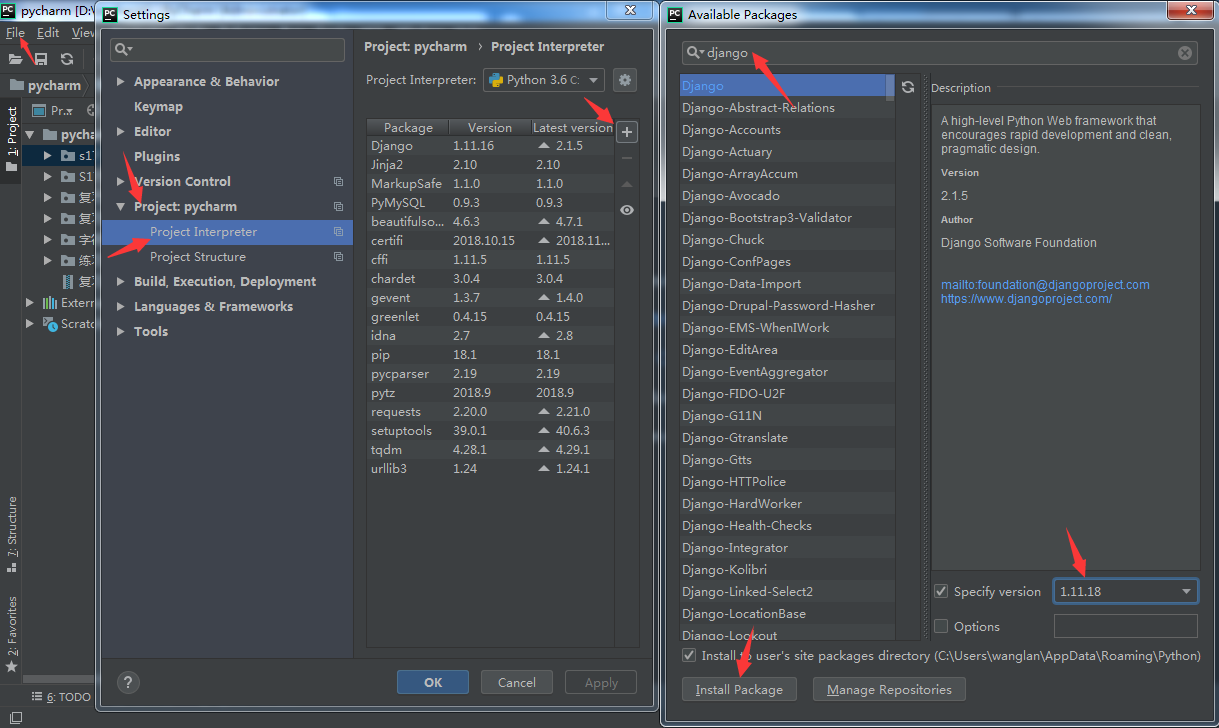
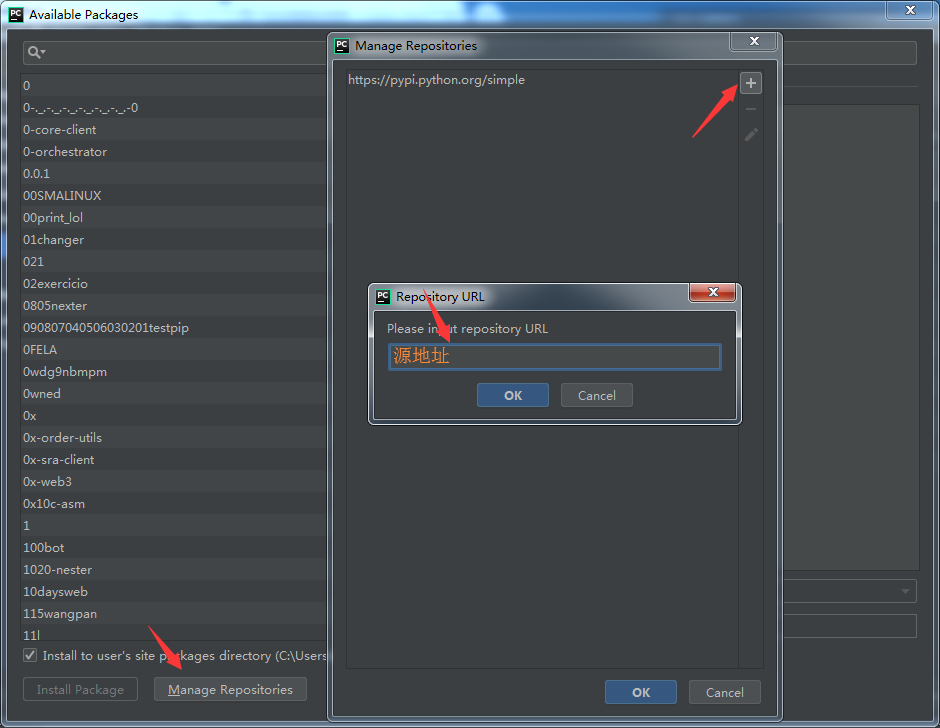
Manage Repositories :配置安装源
创建一个diango项目
下面的命令创建了一个名为"mydiango"的Django 项目(在crm中进到一个文件夹下)
django-admin startproject mydjango
pycharn中创建
file ——> new project ——> 项目名 ——> 选择解释器 ——> create
目录介绍
mysite/
├── manage.py  # 管理文件
└── mysite  # 项目目录
    ├── __init__.py
    ├── settings.py  # 配置
    ├── urls.py  # 路由 --> URL和函数的对应关系
    └── wsgi.py  # runserver命令就使用wsgiref模块做简单的web serve
运行django项目
命令行
python manage.py runserver         # 127.0.0.1:8000
python manage.py runserver  80    # 127.0.0.1:80
python manage.py runserver  0.0.0.0:80     # 0.0.0.0:80
pycharm
点击绿三角(切记勿用右键启动文件)
配置文件


"""
Django settings for mydjango project.

Generated by 'django-admin startproject' using Django 1.11.16.

For more information on this file, see
https://docs.djangoproject.com/en/1.11/topics/settings/

For the full list of settings and their values, see
https://docs.djangoproject.com/en/1.11/ref/settings/
"""

import os

# Build paths inside the project like this: os.path.join(BASE_DIR, ...)
BASE_DIR = os.path.dirname(os.path.dirname(os.path.abspath(__file__)))


# Quick-start development settings - unsuitable for production
# See https://docs.djangoproject.com/en/1.11/howto/deployment/checklist/

# SECURITY WARNING: keep the secret key used in production secret!
SECRET_KEY = '9-=2o#%m*#&kt^%0p=#1v(yvo)q6%(5t7)(_#3z0h!ie4u%vor'

# SECURITY WARNING: don't run with debug turned on in production!
DEBUG = True
# DEBUG = False

ALLOWED_HOSTS = ['*']


# Application definition

INSTALLED_APPS = [
    'django.contrib.admin',
    'django.contrib.auth',
    'django.contrib.contenttypes',
    'django.contrib.sessions',
    'django.contrib.messages',
    'django.contrib.staticfiles',
]

MIDDLEWARE = [
    'django.middleware.security.SecurityMiddleware',
    'django.contrib.sessions.middleware.SessionMiddleware',
    'django.middleware.common.CommonMiddleware',
    'django.middleware.csrf.CsrfViewMiddleware',
    'django.contrib.auth.middleware.AuthenticationMiddleware',
    'django.contrib.messages.middleware.MessageMiddleware',
    'django.middleware.clickjacking.XFrameOptionsMiddleware',
]

ROOT_URLCONF = 'mydjango.urls'

# 模板文件配置
TEMPLATES = [
    {
        'BACKEND': 'django.template.backends.django.DjangoTemplates',
        # templates 文件是pycharm创建的,crm命令行创建没有此文件和文件目录,需要自己创建
        'DIRS': [os.path.join(BASE_DIR, 'templates')]
        ,
        'APP_DIRS': True,
        'OPTIONS': {
            'context_processors': [
                'django.template.context_processors.debug',
                'django.template.context_processors.request',
                'django.contrib.auth.context_processors.auth',
                'django.contrib.messages.context_processors.messages',
            ],
        },
    },
]

WSGI_APPLICATION = 'mydjango.wsgi.application'


# Database
# https://docs.djangoproject.com/en/1.11/ref/settings/#databases

# 配置数据库
DATABASES = {
    'default': {
        'ENGINE': 'django.db.backends.sqlite3',
        'NAME': os.path.join(BASE_DIR, 'db.sqlite3'),
    }
}


# Password validation
# https://docs.djangoproject.com/en/1.11/ref/settings/#auth-password-validators

AUTH_PASSWORD_VALIDATORS = [
    {
        'NAME': 'django.contrib.auth.password_validation.UserAttributeSimilarityValidator',
    },
    {
        'NAME': 'django.contrib.auth.password_validation.MinimumLengthValidator',
    },
    {
        'NAME': 'django.contrib.auth.password_validation.CommonPasswordValidator',
    },
    {
        'NAME': 'django.contrib.auth.password_validation.NumericPasswordValidator',
    },
]


# Internationalization
# https://docs.djangoproject.com/en/1.11/topics/i18n/

LANGUAGE_CODE = 'en-us'

TIME_ZONE = 'UTC'

USE_I18N = True

USE_L10N = True

USE_TZ = True


# Static files (CSS, JavaScript, Images)
# https://docs.djangoproject.com/en/1.11/howto/static-files/

STATIC_URL = '/static/' #静态文件  别名
练习
templates
<!DOCTYPE html>
<html lang="en">
<head>
    <meta charset="UTF-8">
    <title>Title</title>
</head>
<body>
<h1>这是index页面</h1>

</body>
</html>
urls.py
""mydjango URL Configuration

The `urlpatterns` list routes URLs to views. For more information please see:
    https://docs.djangoproject.com/en/1.11/topics/http/urls/
Examples:
Function views
    1. Add an import:  from my_app import views
    2. Add a URL to urlpatterns:  url(r'^$', views.home, name='home')
Class-based views
    1. Add an import:  from other_app.views import Home
    2. Add a URL to urlpatterns:  url(r'^$', Home.as_view(), name='home')
Including another URLconf
    1. Import the include() function: from django.conf.urls import url, include
    2. Add a URL to urlpatterns:  url(r'^blog/', include('blog.urls'))
"""
from django.conf.urls import url
from django.contrib import admin
from django.shortcuts import HttpResponse,render

def index(request):
    # return HttpResponse('这是index页面')
    return render(request,'index.html')
urlpatterns = [
    url(r'^admin/', admin.site.urls),
    url(r'^index',index)
]
可以通过IP+地址访问了
