1.JS实现打印的方式
方式一:window.print()
window.print();会弹出打印对话框,打印的是window.document.body.innerHTML中的内容,下面是从网上摘到的一个局部打印的例子,该例子的不足是打印会修改页面的内容。
<!DOCTYPE html>
<html>
<head>
<meta http-equiv="Content-Type" content="text/html; charset=utf-8" />
<title>局部打印案例</title>
<script type="text/javascript">
function doPrint() {
if (confirm('确定打印吗?')){
try{
print.portrait = false ;//横向打印
}catch(e){
//alert("不支持此方法");
}
bdhtml=window.document.body.innerHTML;
sprnstr="<!--startprint-->";
eprnstr="<!--endprint-->";
prnhtml=bdhtml.substr(bdhtml.indexOf(sprnstr)+17);
prnhtml=prnhtml.substring(0,prnhtml.indexOf(eprnstr));
window.document.body.innerHTML=prnhtml;
window.print();
}
</script>
</head>

<body>
<p>1不需要打印的地方</p>
<p>2这里不要打印啊</p>
<!--startprint--><!--注意要加上html里star和end的这两个标记-->
<h1>打印标题</h1>
<p>打印内容~~</p>
<!--endprint-->
<button type="button" onclick="doPrint()">打印</button>
<p>不打印的地方啊哈哈哈哈</p>
<p>2</p>
</body>
</html>
方式二:使用html 标签<object>引入Webbrowser控件
这种方式是其只兼容IE,其他浏览器不可使用,同时IE10以下的浏览器才可以使用,调用方式如下:
<body>
<object id="WebBrowser" classid=CLSID:8856F961-340A-11D0-A96B-00C04FD705A2 height="0" width="0"> </object>
</body>
<script>
WebBrowser.ExecWB(1,1) //打开
WebBrowser.ExecWB(2,1) //关闭现在所有的IE窗口,并打开一个新窗口
WebBrowser.ExecWB(4,1) //保存网页
//--------------- 常用 ---------------
WebBrowser.ExecWB(6,1) //打印
WebBrowser.ExecWB(7,1) //打印预览
WebBrowser.ExecWB(8,1) //打印页面设置
//-------------------------------------
WebBrowser.ExecWB(10,1) //查看页面属性
WebBrowser.ExecWB(15,1) //撤销
WebBrowser.ExecWB(17,1) //全选
WebBrowser.ExecWB(22,1) //刷新
WebBrowser.ExecWB(45,1) //关闭窗体无提示
</script>
这种方式优势是在IE下可以弹出打印预览,这是打印很人性化的功能,但是遗憾的是高版本的IE浏览器不支持WebBrowser了
方式三:采用document.execCommand(”print”)
该方式也兼容各个版本的浏览器,同window.print()一样,其启动的是打印对话框,chrome的打印对话框自带预览功能,但是IE、火狐仅仅只弹出打印设置对话框,没有预览功能。
方式四:采用JQuery插件
使用JQuery浏览插件可以很方便的进行局部打印,常用的插件有:
1)jquery.print.js 下载地址:https://github.com/DoersGuild/jQuery.print
2)jquery.print-preview.js 下载地址:https://github.com/etimbo/jquery-print-preview-plugin
这两种方式使用都很简单,1)通过$("#id").print(/*options*/);调用;2)通过$('#id').printArea(/*options*/); 其中的option可选项可以在下载地址下载下来后看示例代码,一般options不用传即可,示例代码如下:
<html>
<head>
<meta http-equiv=Content-Type content="text/html; charset=utf-8">
<title>JQuery打印</title>
<script type="text/javascript" src="./js/jquery-3.1.1.min.js"></script>
<script language="javascript" src="./js/jquery.print.js"></script>
</head>

<body style='margin:0 auto;text-align:center;'>
<button id='button_print' name='button_print' onclick="javascript:printit()>打印</button>
<div id='ganburenmianbaio' class="WordSection1" style='750px;margin:0 auto;text-align:center;vertical-align: middle;'>
</div>
</body>
<script language="javascript">
function printit(){
$("#ganburenmianbaio").print({iframe:true,prepend:'<br/>'});
}
</script>
</html>
方式五:采用浏览器打印第三方插件
该方式需要用户浏览器安装相关的第三方插件,用户体验不好,故在此不细述了。
2.打印预览
chrome浏览器、win10自带的IE浏览器 调用打印弹出的打印设置界面中包含打印预览部分,故其通过上面的打印函数的调用即可实现。
IE9以后的版本、火狐不支持webbrowser控件了,JS调用不了浏览器的打印预览的功能,我们只能用iframe模拟打印预览的对话框,将需要打印的内容显示在该对话框中,然后在调用打印的功能实现打印。
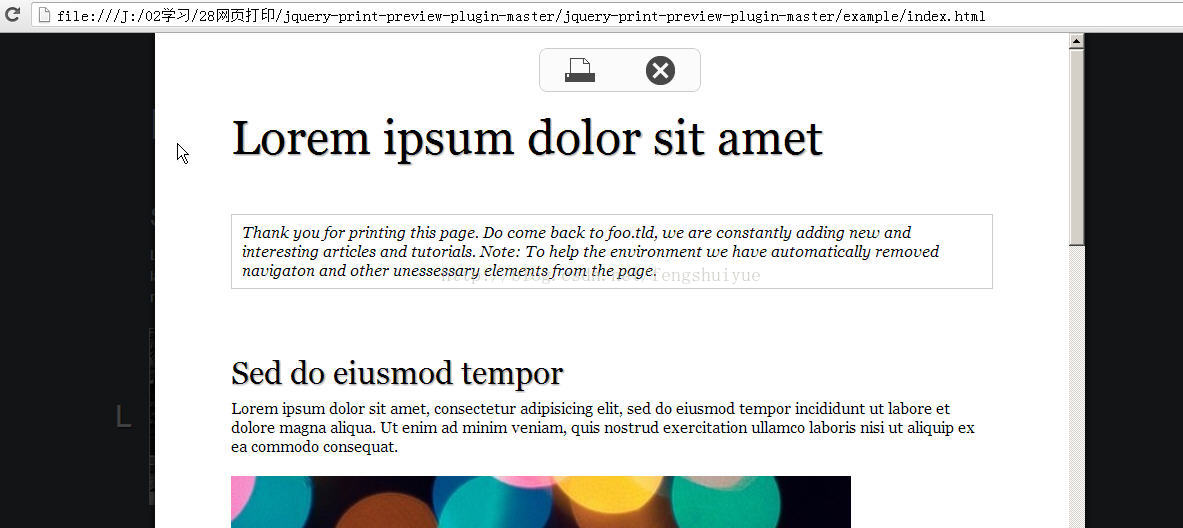
1)jquery打印预览插件
jquery.print-preview.js 下载地址:https://github.com/etimbo/jquery-print-preview-plugin
其实现的效果如下图(其自动的示例代码)
2)webbrowser控件打印预览
IE8及以下版本可以调用WebBrowser.ExecWB(7,1) 函数弹出浏览器的打印预览对话框,采用该函数的好处是 用户可以在打印预览对话框中 调整页边距、页眉、页脚;
下面贴出的是设置页边距、页眉、页脚的JS代码
//取得页面打印设置的原参数数据
function PageSetup_temp(){
try
{
var Wsh=new ActiveXObject("WScript.Shell");
HKEY_Key="header";
//取得页眉默认值
head = Wsh.RegRead(HKEY_Root+HKEY_Path+HKEY_Key);
HKEY_Key="footer";
//取得页脚默认值
foot = Wsh.RegRead(HKEY_Root+HKEY_Path+HKEY_Key);
HKEY_Key="margin_bottom";
//取得下页边距
bottom = Wsh.RegRead(HKEY_Root+HKEY_Path+HKEY_Key);
HKEY_Key="margin_left";
//取得左页边距
left = Wsh.RegRead(HKEY_Root+HKEY_Path+HKEY_Key);
HKEY_Key="margin_right";
//取得右页边距
right = Wsh.RegRead(HKEY_Root+HKEY_Path+HKEY_Key);
HKEY_Key="margin_top";
//取得上页边距
top = Wsh.RegRead(HKEY_Root+HKEY_Path+HKEY_Key);
}
catch(e){
//alert("不允许ActiveX控件");
}
}

//设置网页打印的页眉页脚和页边距,注册表里的单位是英寸,打印设置中是毫米,1英寸=25.4毫米
function PageSetup_Null(){
try
{
var Wsh=new ActiveXObject("WScript.Shell");
HKEY_Key="header";
//设置页眉(为空)
Wsh.RegWrite(HKEY_Root+HKEY_Path+HKEY_Key,"");
HKEY_Key="footer";
//设置页脚(为空)
Wsh.RegWrite(HKEY_Root+HKEY_Path+HKEY_Key,"");
HKEY_Key="margin_bottom";
//设置下页边距(0)
Wsh.RegWrite(HKEY_Root+HKEY_Path+HKEY_Key,"0.6");
HKEY_Key="margin_left";
//设置左页边距(0)
Wsh.RegWrite(HKEY_Root+HKEY_Path+HKEY_Key,"0.3");
HKEY_Key="margin_right";
//设置右页边距(0)
Wsh.RegWrite(HKEY_Root+HKEY_Path+HKEY_Key,"0.3");
HKEY_Key="margin_top";
//设置上页边距(8)
Wsh.RegWrite(HKEY_Root+HKEY_Path+HKEY_Key,"0.6");
}
catch(e){
//alert("不允许ActiveX控件");
}
}

//设置网页打印的页眉页脚和页边距为默认值
function PageSetup_Default(){
try
{
var Wsh=new ActiveXObject("WScript.Shell");
HKEY_Key="header";
HKEY_Key="header";
//还原页眉
Wsh.RegWrite(HKEY_Root+HKEY_Path+HKEY_Key,head);
HKEY_Key="footer";
//还原页脚
Wsh.RegWrite(HKEY_Root+HKEY_Path+HKEY_Key,foot);
HKEY_Key="margin_bottom";
//还原下页边距
Wsh.RegWrite(HKEY_Root+HKEY_Path+HKEY_Key,bottom);
HKEY_Key="margin_left";
//还原左页边距
Wsh.RegWrite(HKEY_Root+HKEY_Path+HKEY_Key,left);
HKEY_Key="margin_right";
//还原右页边距
Wsh.RegWrite(HKEY_Root+HKEY_Path+HKEY_Key,right);
HKEY_Key="margin_top";
//还原上页边距
Wsh.RegWrite(HKEY_Root+HKEY_Path+HKEY_Key,top);
}
catch(e){
//alert("不允许ActiveX控件");
}
}
使用该函数,会弹出
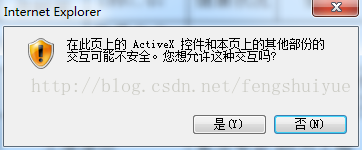
通过网页修改activex安全设置,添加信任站点,禁用该弹出窗口提示,代码如下:
function activeXControl(){
try{
var WshShell=new ActiveXObject("WScript.Shell");

//添加信任站点(http://127.0.0.1)
WshShell.RegWrite("HKEY_CURRENT_USER\Software\Microsoft\Windows\CurrentVersion\Internet Settings\ZoneMap\Ranges\Range100\","");
WshShell.RegWrite("HKEY_CURRENT_USER\Software\Microsoft\Windows\CurrentVersion\Internet Settings\ZoneMap\Ranges\Range100\:Range","127.0.0.1");
WshShell.RegWrite("HKEY_CURRENT_USER\Software\Microsoft\Windows\CurrentVersion\Internet Settings\ZoneMap\Ranges\Range100\http","2","REG_DWORD");

//修改IE ActiveX安全设置: 1本地Intranet区域
WshShell.RegWrite("HKEY_CURRENT_USER\Software\Microsoft\Windows\CurrentVersion\Internet Settings\Zones\1\1001","0","REG_DWORD");
WshShell.RegWrite("HKEY_CURRENT_USER\Software\Microsoft\Windows\CurrentVersion\Internet Settings\Zones\1\1004","0","REG_DWORD");
WshShell.RegWrite("HKEY_CURRENT_USER\Software\Microsoft\Windows\CurrentVersion\Internet Settings\Zones\1\1200","0","REG_DWORD");
WshShell.RegWrite("HKEY_CURRENT_USER\Software\Microsoft\Windows\CurrentVersion\Internet Settings\Zones\1\1201","0","REG_DWORD");
WshShell.RegWrite("HKEY_CURRENT_USER\Software\Microsoft\Windows\CurrentVersion\Internet Settings\Zones\1\1405","0","REG_DWORD");
WshShell.RegWrite("HKEY_CURRENT_USER\Software\Microsoft\Windows\CurrentVersion\Internet Settings\Zones\1\2201","0","REG_DWORD");

//修改IE ActiveX安全设置:2受信任的站点区域
WshShell.RegWrite("HKEY_CURRENT_USER\Software\Microsoft\Windows\CurrentVersion\Internet Settings\Zones\2\1001","0","REG_DWORD");
WshShell.RegWrite("HKEY_CURRENT_USER\Software\Microsoft\Windows\CurrentVersion\Internet Settings\Zones\2\1004","0","REG_DWORD");
WshShell.RegWrite("HKEY_CURRENT_USER\Software\Microsoft\Windows\CurrentVersion\Internet Settings\Zones\2\1200","0","REG_DWORD");
WshShell.RegWrite("HKEY_CURRENT_USER\Software\Microsoft\Windows\CurrentVersion\Internet Settings\Zones\2\1201","0","REG_DWORD");
WshShell.RegWrite("HKEY_CURRENT_USER\Software\Microsoft\Windows\CurrentVersion\Internet Settings\Zones\2\1405","0","REG_DWORD");
WshShell.RegWrite("HKEY_CURRENT_USER\Software\Microsoft\Windows\CurrentVersion\Internet Settings\Zones\2\2201","0","REG_DWORD");

//修改IE ActiveX安全设置:3Internet区域
WshShell.RegWrite("HKEY_CURRENT_USER\Software\Microsoft\Windows\CurrentVersion\Internet Settings\Zones\3\1001","0","REG_DWORD");
WshShell.RegWrite("HKEY_CURRENT_USER\Software\Microsoft\Windows\CurrentVersion\Internet Settings\Zones\3\1004","0","REG_DWORD");
WshShell.RegWrite("HKEY_CURRENT_USER\Software\Microsoft\Windows\CurrentVersion\Internet Settings\Zones\3\1200","0","REG_DWORD");
WshShell.RegWrite("HKEY_CURRENT_USER\Software\Microsoft\Windows\CurrentVersion\Internet Settings\Zones\3\1201","0","REG_DWORD");
WshShell.RegWrite("HKEY_CURRENT_USER\Software\Microsoft\Windows\CurrentVersion\Internet Settings\Zones\3\1405","0","REG_DWORD");
WshShell.RegWrite("HKEY_CURRENT_USER\Software\Microsoft\Windows\CurrentVersion\Internet Settings\Zones\3\2201","0","REG_DWORD");

//禁用Winxp弹出窗口阻止程序
WshShell.RegWrite("HKEY_CURRENT_USER\Software\Microsoft\Internet Explorer\New Windows\PopupMgr","no");
}catch(e){
//alert("不允许ActiveX控件");
}
}
3.问题
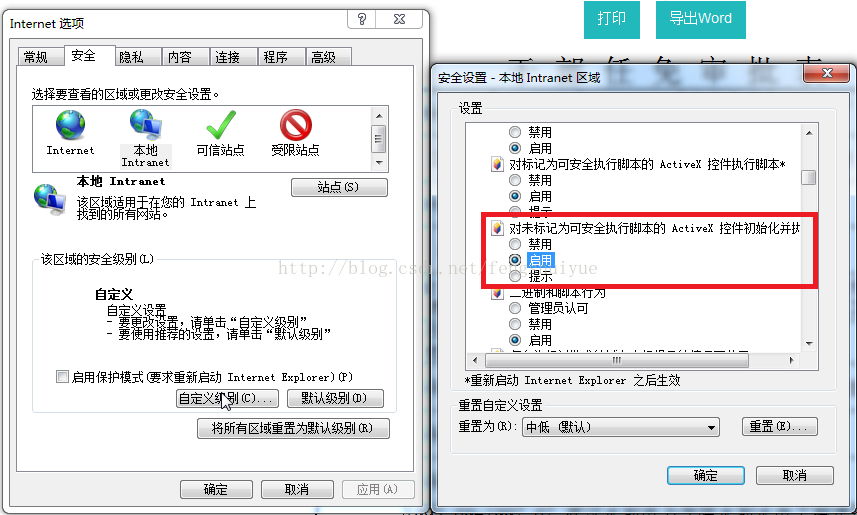
1)网页修改activex安全设置该段代码也是必须在启用ActiveX的条件下调用成功,是需要用户在Internet的配置项中设置的(如下图),如何才能自动启用该插件?
2) chrome、火狐如何通过JS设置页边距、页眉、页脚?
3) IE高版本浏览器、火狐如何通过JS弹出浏览器自己的打印预览?