在平常写WinForm程序时,都是使用Visual Studio 的向导功能,选中项目类型为Windows Form Application,IDE就会为我们生成好代码框架。这无疑使非常方便的,但是却不利于我这样的新手了解程序的运行机理。
下面我试着,抛弃IDE生成的代码框架,从一个空的项目来创建一个Windows From的应用程序。
一 . 创建窗体
创建完Empty Project后,第一步就需要添加一些必要的引用:System , System.Drawing , System.Windows.Forms。然后向项目中添加一个名为HelloWorld的类 。
1: using System.Windows.Forms;
2: 3: namespace test
4: {5: class HelloWord
6: {7: public static void Main()
8: {9: Form frm = new Form();
10: frm.Show(); 11: } 12: } 13: }上面的代码中,在Main()方法中,通过实例化Form类来创建一个窗体,然后调用show()方法让其显示。在运行该程序前,需要先更改项目的输出类型为Windows Application。运行程序,一个窗口闪烁下就消失了。这是由于一个Windows应用程序结束时会销毁其所创建的所有窗口。我们知道,Windows应用程序时事件驱动,在没有触发关闭事件,应用程序是不应该被关闭的。显然的,上面的示例程序并没有进入到一个消息循环中,就已经结束了。
怎样让程序进入到消息循环?这时就需要一个神奇的方法”Run”了,它能让应用程序进入到消息循环中,接受输入事件。
改造上面的代码如下:
using System.Windows.Forms;

namespace test
{
    class HelloWord
    {
        public static void Main()
        {
            Form frm = new Form();
            frm.Show();
            Application.Run();
        }
    }
}
运行程序,得到一个标准的窗口,能移动、最大化、最小化,但是在关闭窗口时却出现了问题,只是窗口消失了但是进程却并没有结束(在调试下运行会很容易的发现这点)。这是因为,关闭了窗口只是销毁了窗口,并不是结束程序。要想关闭窗口同时程序结束,将一个Form的实例作为参数传递给Run是一个很好的选择。
1: using System.Windows.Forms;
2: 3: namespace test
4: {5: class HelloWord
6: {7: public static void Main()
8: {9: Form frm = new Form();
10: Application.Run(frm); 11: } 12: } 13: }上面代码并没有调用show方法,这是因为当一个窗体作为参数时,Run会将该窗体设置为可见,并让该窗体进入到消息循环。当关闭窗体时,Run方法会返回到Main函数中,接着执行完Application.Run()后面的代码后,程序结束。
二.处理事件
Windows 应用程序是事件驱动的,上面已经创建好了窗体,下面来响应窗体的输入事件。
窗体一个比较重要的事件就是Paint事件,它在窗体被创建、窗体的 客户区失效或部分失效时会被触发。对该时间的处理是通过一个委托实现的。
public delegate void PaintEventHandler(object sender, PaintEventArgs e);
对Paint事件的处理,只需要定义一个和上面委托有相同的签名的静态的方法作为事件的处理程序,然后将该方法和Paint事件绑定即可。
1: using System.Windows.Forms;
2: using System.Drawing;
3: 4: namespace test
5: {6: class HelloWord
7: {8: public static void Main()
9: {10: Form frm = new Form();
11: frm.Paint += new PaintEventHandler(frm_Paint); //注册事件处理程序
12: Application.Run(frm); 13: } 14: 15: //事件处理程序
16: static void frm_Paint(object sender, PaintEventArgs e)
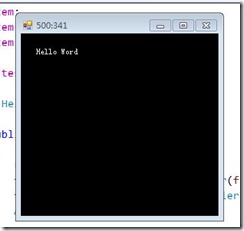
17: { 18: Form frm = (Form)sender; 19: Graphics g = e.Graphics; 20: g.Clear(Color.Black);21: g.DrawString("Hello Word", frm.Font, Brushes.White, new Point(20, 20));
22: } 23: } 24: }和Paint事件类似,也可以处理窗体的鼠标点击事件
1: using System;
2: using System.Windows.Forms;
3: using System.Drawing;
4: 5: namespace test
6: {7: class HelloWord
8: {9: public static void Main()
10: {11: Form frm = new Form();
12: frm.Paint += new PaintEventHandler(frm_Paint); //注册Paint事件处理程序
13: frm.Click += new System.EventHandler(frm_Click);//注册Click事件处理程序
14: Application.Run(frm); 15: } 16: 17: // Click事件处理程序
18: static void frm_Click(object sender, EventArgs e)
19: { 20: Form frm = (Form)sender;21: //在标题栏显示鼠标单击的位置
22: frm.Text = Cursor.Position.X.ToString() + ":" + Cursor.Position.Y.ToString();
23: } 24: 25: //事件处理程序
26: static void frm_Paint(object sender, PaintEventArgs e)
27: { 28: Form frm = (Form)sender; 29: Graphics g = e.Graphics; 30: g.Clear(Color.Black);31: g.DrawString("Hello Word", frm.Font, Brushes.White, new Point(20, 20));
32: } 33: } 34: }三.继承窗体
上面的代码看上去已经实现了一个窗体,能为窗体赋于某些属性,响应一些事件的输入,实际则不然。因为我们只是通过创建Form类的一个实例来实现了一个窗体,这是不够,Form的某些功能是用protected保护的,以此要想实现窗体的全部功能就需要“变成”窗体,继承Form创建一个新的类则是一个很好的选择。
1: using System;
2: using System.Drawing;
3: using System.Windows.Forms;
4: 5: namespace test
6: {7: class InheritClass:Form
8: {9: public static void Main()
10: {11: Application.Run(new InheritClass());
12: } 13: 14: public InheritClass()
15: {16: Text = "通过继承创建窗体";
17: BackColor = Color.Black; 18: } 19: }上面代码InheritClass继承自Form,然后实例化InheritClass来创建窗体。这也是使用Windows Form类库在C#中创建一个窗体的正式的方法。
通过继承来实现的窗体的好处之一就是能够访问Form中受保护的成员,例如可以重写(override)OnPaint方法,这样就不必处理Paint事件了。
1: using System;
2: using System.Drawing;
3: using System.Windows.Forms;
4: 5: namespace test
6: {7: class InheritClass:Form
8: {9: public static void Main()
10: {11: Application.Run(new InheritClass());
12: } 13: 14: public InheritClass()
15: {16: Text = "通过继承创建窗体";
17: BackColor = Color.Black; 18: } 19: 20: protected override void OnPaint(PaintEventArgs e)
21: {22: //base.OnPaint(e);
23: Graphics g = e.Graphics;24: g.DrawString("Hello World", Font, Brushes.Yellow, new Point(0, 0));
25: } 26: } 27: }四.最后
上面的代码虽然也能工作,但是看起来总有些不够整洁,特别是Main方法的位置,总是让人有些别扭。对代码改造下,让其看起来整洁些。
再建立一个program类,将程序的入口Main方法放入到该类中
这是program类
1: using System;
2: using System.Windows.Forms;
3: 4: namespace test
5: {6: class program
7: {8: public static void Main()
9: {10: Application.Run(new InheritClass());
11: } 12: } 13: }InheritClass类
1: using System;
2: using System.Drawing;
3: using System.Windows.Forms;
4: 5: namespace test
6: {7: class InheritClass:Form
8: {9: public InheritClass()
10: {11: Text = "通过继承创建窗体";
12: BackColor = Color.Black; 13: } 14: 15: protected override void OnPaint(PaintEventArgs e)
16: {17: //base.OnPaint(e);
18: Graphics g = e.Graphics;19: g.DrawString("Hello World", Font, Brushes.Yellow, new Point(0, 0));
20: } 21: } 22: }是不是有点像IDE自动生成的代码了呢?
