Sentinel Dashboard集成Nacos目录:
SpringCloud Alibaba 改造Sentinel Dashboard将流控规则持久化到Nacos 本文
SpringCloud Alibaba 改造Sentinel Dashboard将熔断规则持久化到Nacos
Sentinel是阿里开源的项目,提供了流量控制、熔断降级、系统负载保护等多个维度来保障服务之间的稳定性。经历过Alibaba历届双十一的考验,其性能的卓越性肯定是不言而喻的。
Sentinel Dashboard是Sentinel提供的图形化控制台,可以通过Sentinel Dashboard维护流控规则、熔断规则、热点规则等。
然而,开源版本的Sentinel Dashboard是无法直接应用于生产环境中的,这是因为通过开源版本的Sentinel Dashboard维护的各项规则是存储于内存中的,当Sentinel Dashboard重启,则内存中的各项规则也一并丢失,这在生产上是不被允许的。
在Alibaba Sentinel的githup上,有一篇帖子在生产环境中使用Sentinel,介绍了Sentinel的三种规则管理和推送规则,
如下,而开源版本的Sentinel Dashboard使用的就是其中的原始模式,可以看到是不被推荐在生产环境中应用的。
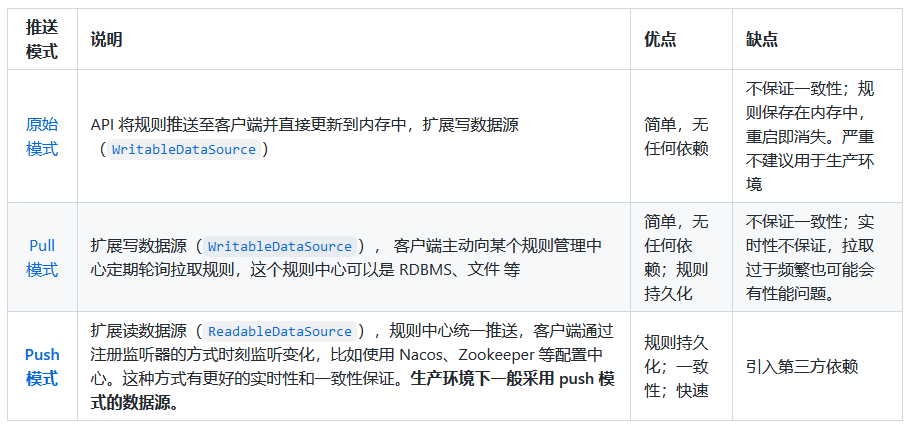
而另外两种方式,pull模式和push模式,前者是使用诸如Nacos,利用Nacos Config的特性将Nacos作为纯粹的数据源来使用。当需要对流控规则做修改时,需要到Nacos上进行修改,然后Sentinel Dashboard拉取(Pull)Nacos Config上存储的规则并展示在Dashboard上。
此种方式下,在Dashboard上维护的规则无法直接存储到Nacos上,修改规则需要到Nacos上进行,但这样的话就无法利用Dashboard提供的图形化界面,在Nacos上维护规则也容易出错,且对人员的要求高,需要非常熟悉规则配置的参数。同时拉取模式无法保证时效性。
所以Sentinel官方推荐的方式是使用Push模式,通过Dashboard配置的规则直接可以存储在如Nacos之类的数据源上,客户端通过订阅Nacos上的配置来拉取规则配置,具体架构如官网上的下图:

这种方式好是好,但是开源的Sentinel Dashboard并未提供实现,来将配置好的规则存储于第三方的数据源中,需要直接下载Sentinel Dashboard的源代码,依据选择的第三方数据源修改代码予以实现。本文下面的内容就是介绍如何实现Sentinel Dashboard将规则推送至Nacos上,以及各个应用如何订阅Nacos上的配置实现流控的。
SpringCloud、SpringCloud Alibaba和SpringBoot三者之间有比较严格的版本依赖,在Sentinel开源版本的使用中可能会遇到各种各样的问题,这其中绝大多数是由于三者版本不匹配导致的,因此建议使用官方推荐的版本。Sentinel官网上并未详细介绍三者版本之间的关系,而是需要到githup上才能得知具体的依赖关系,介绍的网址如下:
本文使用的是如下的版本:

下载Sentinel Dashboard源代码
下载地址如下:
https://github.com/alibaba/Sentinel/,使用IDE打开sentinel-dashboard项目

一. Sentinel Dashboard集成Nacos实现流控规则持久化
Sentinel Dashboard的流控规则下的所有操作,都会调用com.alibaba.csp.sentinel.dashboard.controller.FlowControllerV1这个类,这个类中包含流控规则本地化(内存中)的CRUD操作,因此流控规则是存储在内存中的,所以每当重启Dashboard后,内存中的内容就会丢失。
而com.alibaba.csp.sentinel.dashboard.controller.v2.FlowControllerV2中同样实现了流控规则的CRUD,和V1版本不同的是,它可以实现指定数据源的规则拉取(从指定的数据源中查询已经配置好的流控规则)和发布(将通过Dashboard维护的内容存储到指定的数据源中)。
FlowControllerV2中注入了两个非常重要的类:com.alibaba.csp.sentinel.dashboard.rule.DynamicRuleProvider和com.alibaba.csp.sentinel.dashboard.rule.DynamicRulePublisher分别实现了拉取和发布动作。
这里就需要扩展这两个类,实现集成Nacos来实现Sentinel Dashboard规则的同步。
1. 首先修改Sentinel Dashboard源码中的Pom文件,把sentinel-datasource-nacos依赖的<scope>注释掉
<!-- for Nacos rule publisher sample -->
<dependency>
    <groupId>com.alibaba.csp</groupId>
    <artifactId>sentinel-datasource-nacos</artifactId>
    <!-- 使用Nacos作为数据源,需要将scope=test注释掉 -->
    <!--<scope>test</scope>-->
</dependency>
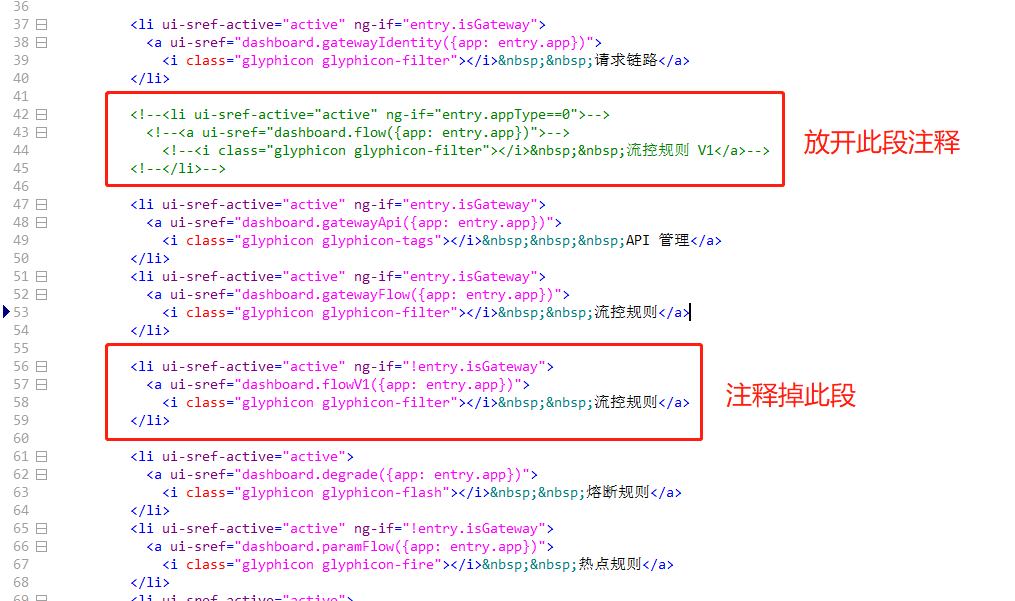
2. 修改html文件,使得前台维护动作可以调用V2接口
打开:/sentinel-dashboard/src/main/webapp/resources/app/scripts/directives/sidebar/sidebar.html,按照截图中的介绍修改此html代码。
打开:/sentinel-dashboard/src/main/webapp/resources/app/views/flow_v2.html,注释掉<回到单机页面>代码。注释掉此段代码的原因是,当我们修改了sidebar.html中的代码注释掉了V1版本的页面,放开了V2版本的页面后,V2版本的页面依然保留了原有的在内存中维护规则的入口,就是这个<回到单机页面>按钮。
通过点击<回到单机页面>按钮进入到的维护页面维护的规则依然是存储在内存中的,为了避免使用者的误解,故注释掉此段代码。

接下来修改簇族链路中的流控规则添加按钮:

打开:\src\main\webapp\resources\app\scripts\controllers\identity.js
修改下图红框位置的代码,将FlowServiceV1修改为FlowServiceV2。
修改前代码如下:
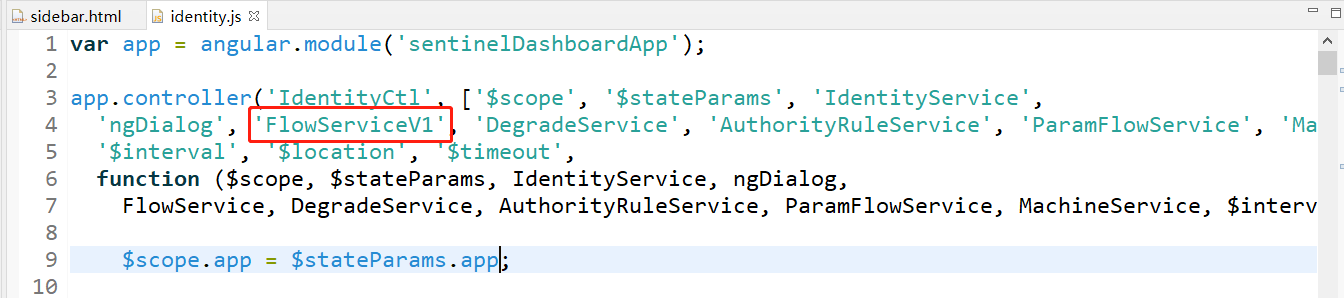
修改后代码如下:

3:创建DynamicRuleProvider和DynamicRulePublisher新的实现类
3.1 创建静态类,定义所需常量
/**
 * Nacos常量类
 * @author gang.wang
 * 2021年11月8日
 */
public class NacosConstants {

    public static final String DATA_ID_POSTFIX = "-sentinel-flow";

    public static final String GROUP_ID = "DEFAULT_GROUP";

}
3.2 创建NacosPropertiesConfiguration类,加载application.properties中的Nacos配置
import org.springframework.boot.context.properties.ConfigurationProperties;

/**
 * 加载Nacos配置
 * @author gang.wang
 * 2021年10月31日
 */
@ConfigurationProperties(prefix="sentinel.nacos")
public class NacosPropertiesConfiguration {

    /**
     * Nacos服务地址
     */
    private String serverAddr;

    private String dataId;

    private String groupId = "DEFAULT_GROUP";

    private String namespace;

    public String getServerAddr() {
        return serverAddr;
    }

    public void setServerAddr(String serverAddr) {
        this.serverAddr = serverAddr;
    }

    public String getDataId() {
        return dataId;
    }

    public void setDataId(String dataId) {
        this.dataId = dataId;
    }

    public String getGroupId() {
        return groupId;
    }

    public void setGroupId(String groupId) {
        this.groupId = groupId;
    }

    public String getNamespace() {
        return namespace;
    }

    public void setNamespace(String namespace) {
        this.namespace = namespace;
    }

}
3.3 创建NacosConfiguration类,初始化Nacos配置
import java.util.List;
import java.util.Properties;

import org.springframework.boot.context.properties.EnableConfigurationProperties;
import org.springframework.context.annotation.Bean;
import org.springframework.context.annotation.Configuration;

import com.alibaba.csp.sentinel.dashboard.datasource.entity.rule.FlowRuleEntity;
import com.alibaba.csp.sentinel.datasource.Converter;
import com.alibaba.fastjson.JSON;
import com.alibaba.nacos.api.PropertyKeyConst;
import com.alibaba.nacos.api.config.ConfigFactory;
import com.alibaba.nacos.api.config.ConfigService;
import com.alibaba.nacos.api.exception.NacosException;

/**
 * Nacos配置类
 * @author gang.wang
 * 2021年10月31日
 */
@EnableConfigurationProperties(NacosPropertiesConfiguration.class)
@Configuration
public class NacosConfiguration {

    @Bean
    public Converter<List<FlowRuleEntity>, String> flowRuleEntityEncoder() {
        return JSON::toJSONString;
    }

    @Bean
    public Converter<String, List<FlowRuleEntity>> flowRuleEntityDecoder() {
        return s -> JSON.parseArray(s, FlowRuleEntity.class);
    }

    @Bean
    public ConfigService nacosConfigService(NacosPropertiesConfiguration nacosPropertiesConfiguration) throws NacosException {
        Properties properties = new Properties();
        properties.put(PropertyKeyConst.SERVER_ADDR, nacosPropertiesConfiguration.getServerAddr());
        properties.put(PropertyKeyConst.NAMESPACE, nacosPropertiesConfiguration.getNamespace());
        return ConfigFactory.createConfigService(properties);
    }
}
3.4 创建DynamicRuleProvider的实现类
import java.util.ArrayList;
import java.util.List;

import org.apache.commons.lang3.StringUtils;
import org.slf4j.Logger;
import org.slf4j.LoggerFactory;
import org.springframework.beans.factory.annotation.Autowired;
import org.springframework.stereotype.Service;

import com.alibaba.csp.sentinel.dashboard.datasource.entity.rule.FlowRuleEntity;
import com.alibaba.csp.sentinel.dashboard.rule.DynamicRuleProvider;
import com.alibaba.csp.sentinel.datasource.Converter;
import com.alibaba.nacos.api.config.ConfigService;

/**
 * 实现从Nacos配置中心获取流控规则
 * @author gang.wang
 * 2021年11月8日
 */
@Service
public class FlowRuleNacosProvider implements DynamicRuleProvider<List<FlowRuleEntity>> {

    private static Logger logger = LoggerFactory.getLogger(FlowRuleNacosProvider.class);

    @Autowired
    private NacosPropertiesConfiguration nacosConfigProperties;

    @Autowired
    private ConfigService configService;

    @Autowired
    private Converter<String, List<FlowRuleEntity>> converter;

    @Override
    public List<FlowRuleEntity> getRules(String appName) throws Exception {

        //定义dataId 应用名+固定后缀
        String dataId = new StringBuilder(appName).append(NacosConstants.DATA_ID_POSTFIX).toString();

        String rules = configService.getConfig(dataId, nacosConfigProperties.getGroupId(), 3000);

        logger.info("Pull FlowRule from Nacos Config : {}", rules);

        if(StringUtils.isEmpty(rules)) {
            return new ArrayList<>();
        }
        return converter.convert(rules);
    }
}
3.5 创建DynamicRulePublisher的实现类
import java.util.List;

import org.apache.commons.lang3.StringUtils;
import org.slf4j.Logger;
import org.slf4j.LoggerFactory;
import org.springframework.beans.factory.annotation.Autowired;
import org.springframework.stereotype.Service;

import com.alibaba.csp.sentinel.dashboard.datasource.entity.rule.FlowRuleEntity;
import com.alibaba.csp.sentinel.dashboard.rule.DynamicRulePublisher;
import com.alibaba.csp.sentinel.datasource.Converter;
import com.alibaba.nacos.api.config.ConfigService;

/**
 * 将通过Sentinel Dashboard上维护的流控规则数据持久化到Nacos中
 * @author gang.wang
 * 2021年11月8日
 */
@Service
public class FlowRuleNacosPublisher implements DynamicRulePublisher<List<FlowRuleEntity>> {

    private static Logger logger = LoggerFactory.getLogger(FlowRuleNacosPublisher.class);

    @Autowired
    private NacosPropertiesConfiguration nacosConfigProperties;

    @Autowired
    private ConfigService configService;

    @Autowired
    private Converter<List<FlowRuleEntity>, String> converter;

    @Override
    public void publish(String appName, List<FlowRuleEntity> rules) throws Exception {

        if(StringUtils.isBlank(appName)) {
            logger.error("传入的AppName为Null");
            return ;
        }

        if(null == rules) {
            logger.error("传入的流控规则数据为null");
            return ;
        }

        String dataId = new StringBuilder(appName).append(NacosConstants.DATA_ID_POSTFIX).toString();

        configService.publishConfig(dataId, nacosConfigProperties.getGroupId(), converter.convert(rules));

    }
}
4:修改FlowControllerV2中DynamicRuleProvider和DynamicRulePublisher的依赖注入
修改com.alibaba.csp.sentinel.dashboard.controller.v2.FlowControllerV2中DynamicRuleProvider和DynamicRulePublisher的依赖注入,引用最新的Nacos Provider和Publisher
修改后如下:
@Autowired
//@Qualifier("flowRuleDefaultProvider") //注释掉原注入
@Qualifier("flowRuleNacosProvider")//Nacos数据源
private DynamicRuleProvider<List<FlowRuleEntity>> ruleProvider;

/**
* 动态规则的发布,将在Sentinel Dashboard中修改的规则同步到指定数据源中。
*/
@Autowired
//@Qualifier("flowRuleDefaultPublisher")
@Qualifier("flowRuleNacosPublisher")//Nacos数据源
private DynamicRulePublisher<List<FlowRuleEntity>> rulePublisher;
5:添加Nacos配置信息
修改application.properties文件的内容添加Nacos服务器配置。
# 定义Nacos服务器信息
sentinel.nacos.serverAddr=127.0.0.1:8848
sentinel.nacos.namespace=37c7c263-bdf1-41db-9f34-bf1094111111
sentinel.nacos.group-id=DEFAULT_GROUP
6:重新打包并运行我们修改好的Sentinel Dashboard
启动Sentinel Dashboard项目,浏览器中访问:http://127.0.0.1:8080/#/login 输入用户名/密码=sentinel/sentinel,就可以顺利登陆Sentinel Dashboard控制台了!

此时进入控制台后,左边菜单中还看不到任何菜单信息。因为此刻还没有任何项目连接到Sentinel Dashboard上。
7:创建SpringBoot应用并连接到Sentinel Dashboard上
7.1 应用的Pom文件中添加sentinel和nacos相关依赖


<?xml version="1.0"?>
<project
    xsi:schemaLocation="http://maven.apache.org/POM/4.0.0 https://maven.apache.org/xsd/maven-4.0.0.xsd"
    xmlns="http://maven.apache.org/POM/4.0.0"
    xmlns:xsi="http://www.w3.org/2001/XMLSchema-instance">
    <modelVersion>4.0.0</modelVersion>
    <groupId>com.alibaba.sentinel</groupId>
    <artifactId>sentinel-dashboard-test</artifactId>
    <version>0.0.1-SNAPSHOT</version>
    <name>sentinel-dashboard-test</name>
    <url>http://maven.apache.org</url>
    <properties>
        <project.build.sourceEncoding>UTF-8</project.build.sourceEncoding>
    </properties>
    <dependencies>

        <!-- Spring Cloud -->

        <dependency>
            <groupId>com.alibaba.cloud</groupId>
            <artifactId>spring-cloud-starter-alibaba-nacos-discovery</artifactId>
        </dependency>

        <dependency>
            <groupId>com.alibaba.cloud</groupId>
            <artifactId>spring-cloud-starter-alibaba-nacos-config</artifactId>
        </dependency>

        <dependency>
            <groupId>com.alibaba.cloud</groupId>
            <artifactId>spring-cloud-starter-alibaba-sentinel</artifactId>
        </dependency>

        <dependency>
            <groupId>com.alibaba.csp</groupId>
            <artifactId>sentinel-datasource-nacos</artifactId>
        </dependency>

        <!-- Spring Boot -->
        <dependency>
            <groupId>org.springframework.boot</groupId>
            <artifactId>spring-boot-starter-actuator</artifactId>
        </dependency>

        <dependency>
            <groupId>org.springframework.boot</groupId>
            <artifactId>spring-boot-starter-aop</artifactId>
        </dependency>

        <dependency>
            <groupId>org.springframework.boot</groupId>
            <artifactId>spring-boot-starter-web</artifactId>
        </dependency>

        <dependency>
            <groupId>org.springframework.cloud</groupId>
            <artifactId>spring-cloud-starter-bootstrap</artifactId>
            <version>3.0.3</version>
        </dependency>

        <dependency>
            <groupId>org.springframework.boot</groupId>
            <artifactId>spring-boot-starter-data-redis</artifactId>
        </dependency>

        <dependency>
            <groupId>org.springframework.boot</groupId>
            <artifactId>spring-boot-configuration-processor</artifactId>
            <optional>true</optional>
        </dependency>

        <!-- Database -->
        <dependency>
            <groupId>mysql</groupId>
            <artifactId>mysql-connector-java</artifactId>
            <scope>runtime</scope>
        </dependency>

        <dependency>
             <groupId>com.oracle</groupId>
             <artifactId>ojdbc7</artifactId>
             <version>12.1.0.1</version>
         </dependency>

        <dependency>
            <groupId>org.mybatis.spring.boot</groupId>
            <artifactId>mybatis-spring-boot-starter</artifactId>
            <version>2.1.0</version>
        </dependency>

        <dependency>
            <groupId>com.zaxxer</groupId>
            <artifactId>HikariCP</artifactId>
        </dependency>

        <!-- Other -->
        <dependency>
            <groupId>org.apache.commons</groupId>
            <artifactId>commons-lang3</artifactId>
        </dependency>

        <dependency>
            <groupId>junit</groupId>
            <artifactId>junit</artifactId>
            <scope>test</scope>
        </dependency>

        <dependency>
            <groupId>org.apache.commons</groupId>
            <artifactId>commons-lang3</artifactId>
        </dependency>

    </dependencies>

    <build>
        <plugins>
            <plugin>
                <groupId>org.springframework.boot</groupId>
                <artifactId>spring-boot-maven-plugin</artifactId>
            </plugin>
        </plugins>
    </build>
</project>
7.2 修改应用的yml文件,添加Nacos和Sentinel Dashboard配置
spring:
  application:
    name: sentinel-dashboard-test
  jackson:
    time-zone: GMT+8
    date-format: yyyy-MM-dd HH:mm:ss
  cloud:
    nacos:
      discovery:
        namespace: 37c7c263-bdf1-41db-9f34-bf10948be752
        server-addr: 127.0.0.1:8848
        weight: 1
      config:
        namespace: 37c7c263-bdf1-41db-9f34-bf10948be752
        file-extension: yml
        max-retry: 5
        name: sentinel-dashboard-test
        refresh-enabled: true
        prefix:
    sentinel:
      transport:
        dashboard: 127.0.0.1:8080
      datasource:
        flow:
          nacos:
            server-addr: 127.0.0.1:8848
            namespace: 37c7c263-bdf1-41db-9f34-bf10948be752
            data-id: ${spring.application.name}-sentinel-flow
            group-id: DEFAULT_GROUP
            data-type: json
            rule-type: flow
7.3 创建一个接口
import org.slf4j.Logger;
import org.slf4j.LoggerFactory;
import org.springframework.web.bind.annotation.GetMapping;
import org.springframework.web.bind.annotation.RestController;

import com.alibaba.csp.sentinel.annotation.SentinelResource;
import com.alibaba.csp.sentinel.slots.block.BlockException;

/**
 * @author gang.wang
 * 2021年9月15日
 */
@RestController
public class SentinelDemoOneController {

    private Logger logger = LoggerFactory.getLogger(SentinelDemoOneController.class);

    @SentinelResource(value = "hello", blockHandler = "blockHandlerHello")
    @GetMapping("/say")
    public String hello() {
        return "hello, Gary!";
    }
public String blockHandlerHello(BlockException ex) {
        logger.error("当前请求已被限流", ex);
        return "当前请求已被限流";
    }

}
7.4 启动应用并访问定义的接口
启动应用,并使用如Postman访问定义好的/say接口。因为Sentinel Dashboard是使用懒加载的模式检测需要拦截的接口(http://127.0.0.1:8083/say),因此启动应用后如果不调用几次接口,则在Sentinel Dashboard中还是看不到我们定义好的接口信息。
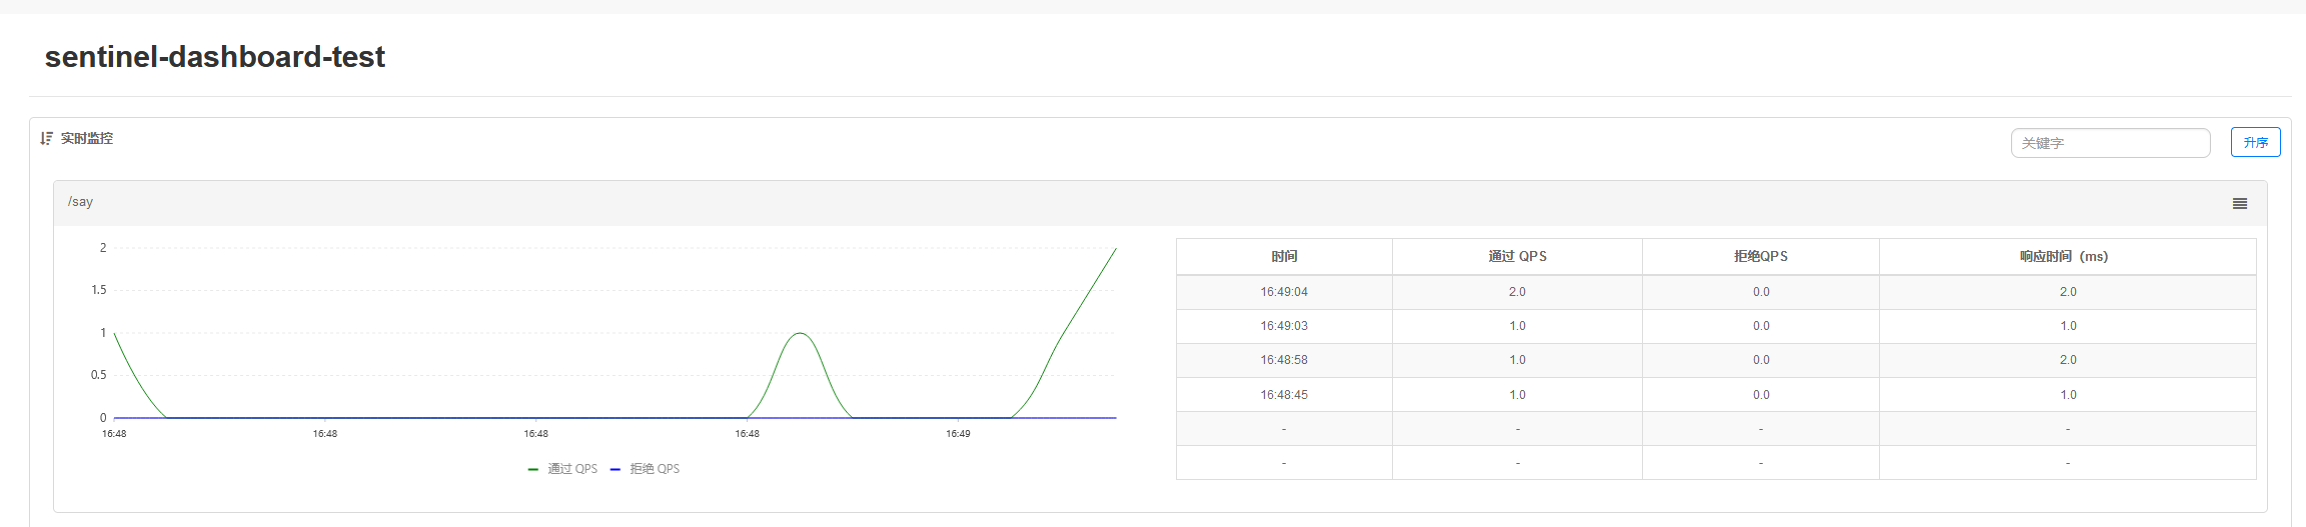
刷新Sentinel Dashboard页面,可以看到应用了

点击实时监控菜单,可以看到刚才我们访问的接口的监控数据
点击流控规则菜单,新建一条流控规则:
这里我们为了验证方便,将qps的阈值设置为1,即每秒允许一个请求通过。

8:验证流控规则是否生效
再次使用Postman快速访问这个接口,可以看到有时候会成功,有时候会失败,失败时的返回结果如下:

9:验证通过Sentinel Dashboard配置好的流控规则是否正确存储在Nacos上
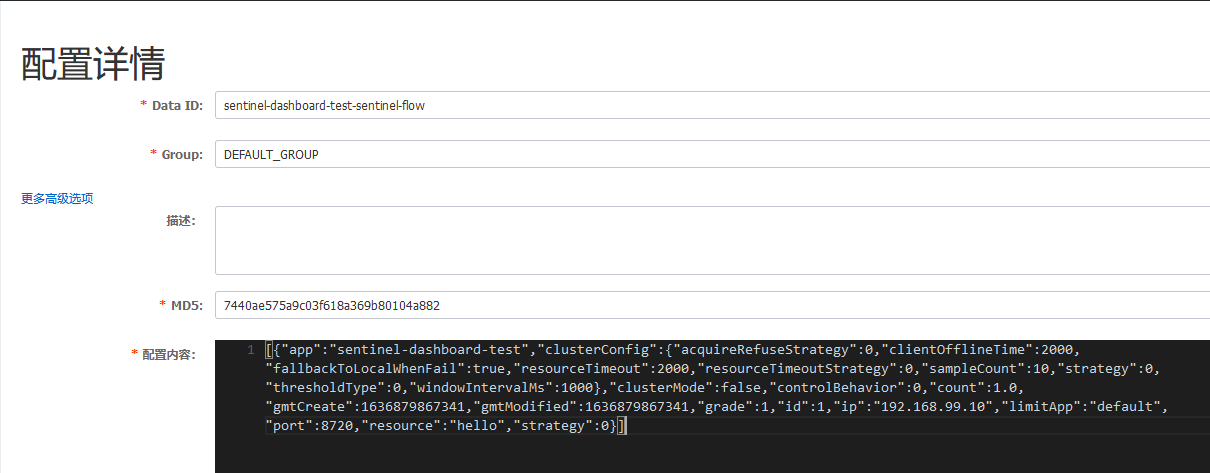
访问Nacos控制台,查看对应的Namespace下是否有dataId = sentinel-dashboard-test-sentinel-flow的配置。

可见,通过Sentinel Dashboard配置的流控规则已经自动存储在Nacos中了!
至此,Sentinel Dashboard与Nacos之间对于流控规则的同步已经完成了。