1、安装Skywalking环境
这里我使用的是docker-compose一键安装的方式,docker-compose有三种方式可安装:
(我选择的是第二种方式安装)
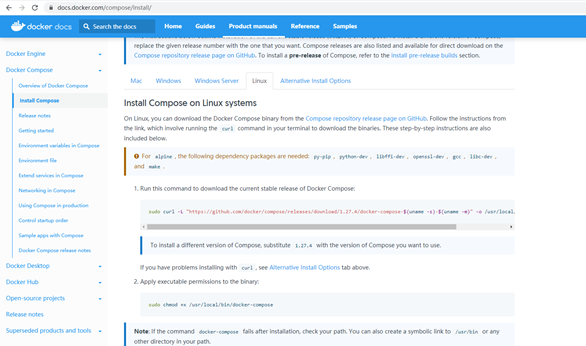
1.1>参见官网:https://docs.docker.com/compose/install/
1.1.1>下载docker compose
sudo curl -L "https://github.com/docker/compose/releases/download/1.27.4/docker-compose-$(uname -s)-$(uname -m)" -o /usr/local/bin/docker-compose
1.1.2>添加可执行权限
sudo chmod +x /usr/local/bin/docker-compose
1.1.3>将文件copy到 /usr/bin/目录下
sudo ln -s /usr/local/bin/docker-compose /usr/bin/docker-compose
1.1.4>查看版本
docker-compose –version
1.2>通过pip进行安装
1.2.1>安装pip
yum -y install epel-release
yum -y install python-pip
查看版本
pip –version
1.2.2>更新pip
pip install --upgrade pip
1.2.3>安装docker-compose
pip install docker-compose
1.2.4>查看docker compose的版本
docker-compose version
1.3>离线安装
访问https://github.com/docker/compose/releases,下载 docker-compose-Linux-x86_64,将docker-compose-Linux-x86_64重命名为docker-compose
通过ssh工具MobaXterm,将刚才下载的docker-compose文件上传到centos7的/usr/local/bin/目录下
输入以下命令 添加可执行权限和查看docker compose版本:
# 添加可执行权限
sudo chmod +x /usr/local/bin/docker-compose
# 查看docker-compose版本
docker-compose -v
2、一键部署skywalking
2.1>创建文件夹skywalking,并切换到该目录下:
mkdir skywalking
cd skywalking
2.2>创建文件docker-compose.yml,写入内容:
内容参见:https://github.com/apache/skywalking-docker/blob/master/8/8.1.0/compose-es7/docker-compose.yml,直接用即可,可视具体情况修改参数
vi docker-compose.yml


# Licensed to the Apache Software Foundation (ASF) under one
# or more contributor license agreements.  See the NOTICE file
# distributed with this work for additional information
# regarding copyright ownership.  The ASF licenses this file
# to you under the Apache License, Version 2.0 (the
# "License"); you may not use this file except in compliance
# with the License.  You may obtain a copy of the License at
#
#     http://www.apache.org/licenses/LICENSE-2.0
#
# Unless required by applicable law or agreed to in writing, software
# distributed under the License is distributed on an "AS IS" BASIS,
# WITHOUT WARRANTIES OR CONDITIONS OF ANY KIND, either express or implied.
# See the License for the specific language governing permissions and
# limitations under the License.

version: '3.8'
services:
  elasticsearch:
    image: docker.elastic.co/elasticsearch/elasticsearch:7.5.0
    container_name: elasticsearch
    restart: always
    ports:
      - 9200:9200
    healthcheck:
      test: ["CMD-SHELL", "curl --silent --fail localhost:9200/_cluster/health || exit 1"]
      interval: 30s
      timeout: 10s
      retries: 3
      start_period: 40s
    environment:
      - discovery.type=single-node
      - bootstrap.memory_lock=true
      - "ES_JAVA_OPTS=-Xms512m -Xmx512m"
    ulimits:
      memlock:
        soft: -1
        hard: -1
  oap:
    image: apache/skywalking-oap-server:8.1.0-es7
    container_name: oap
    depends_on:
      - elasticsearch
    links:
      - elasticsearch
    restart: always
    ports:
      - 11800:11800
      - 12800:12800
    healthcheck:
      test: ["CMD-SHELL", "/skywalking/bin/swctl"]
      interval: 30s
      timeout: 10s
      retries: 3
      start_period: 40s
    environment:
      SW_STORAGE: elasticsearch7
      SW_STORAGE_ES_CLUSTER_NODES: elasticsearch:9200
  ui:
    image: apache/skywalking-ui:8.1.0
    container_name: ui
    depends_on:
      - oap
    links:
      - oap
    restart: always
    ports:
      - 8080:8080
    environment:
      SW_OAP_ADDRESS: oap:12800
Insert切换插入模式;按Esc,输入:wq,保存并退出vi编辑
2.3>执行docker-compose.yml
docker-compose up -d
(偶尔可能会因为网络原因失败,重新执行命令即可)
2.4>skywalking部署完成之后,可正常访问:es和ui(IP地址根据实际情况输入)
正常打开无报错信息即可
3、.NetCore使用SkyWalking(已创建好WebAPI工程)
3.1>引用包SkyAPM.Agent.AspNetCore,记得为1.0.0版本;
在根目录创建skyapm.json文件,并设置复制到输出目录:如果较新则复制
写入内容:
{
  "SkyWalking": {
    "ServiceInstanceName": "OpenServiceInstance",
    "ServiceName": "OpenService",
    "Logging": {
      "Level": "Information",
      "FilePath": "logs\skyapm-{Date}.log"
    },
    "Transport": {
      "Interval": 3000,
      "QueueSize": 30000,
      "BatchSize": 3000,
      "gRPC": {
        "Servers": "192.168.56.10:11800",
        "Timeout": 10000,
        "ConnectTimeout": 10000,
        "ReportTimeout": 600000
      }
    }
  }
}
ServiceName为服务名称,ServiceInstanceName为实例名称,Servers为skywalking收集器地址,只需要改动该三项即可
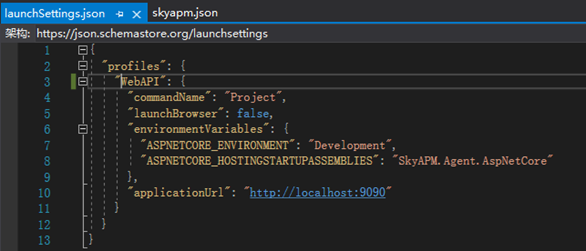
3.2> 配置启动环境变量
在launchSettings.json中增加环境变量配置:
"ASPNETCORE_HOSTINGSTARTUPASSEMBLIES": "SkyAPM.Agent.AspNetCore"
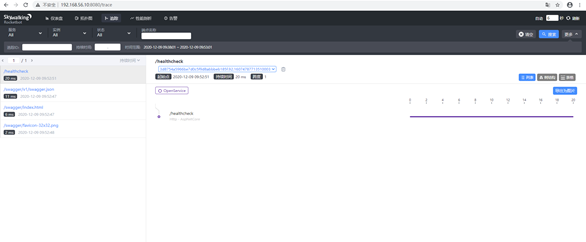
运行起来并任意访问一个api地址,然后在skywalking-ui中可追溯api访问记录:
(时间范围记得根据实际情况选择)
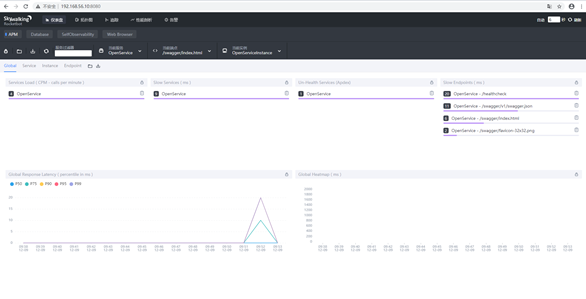
大功告成
部分参考:
https://www.cnblogs.com/xwgli/p/13827042.html