一、多表查询

#建表
create table dep(
id int,
name varchar(20)
);

create table emp(
id int primary key auto_increment,
name varchar(20),
sex enum('male','female') not null default 'male',
age int,
dep_id int
);

#插入数据
insert into dep values
(200,'技术'),
(201,'人力资源'),
(202,'销售'),
(203,'运营');

insert into emp(name,sex,age,dep_id) values
('jason','male',18,200),
('egon','female',48,201),
('kevin','male',38,201),
('nick','female',28,202),
('owen','male',18,200),
('jerry','female',18,204)
;
当初为什么要分表,就是为了方便管理,在硬盘上确实是多张表,但是到了内存中我们应该把他们再拼成一张表进行查询才合理。
select * from emp,dep; #左表一条记录与右表所有记录都对应一遍>>>笛卡尔积
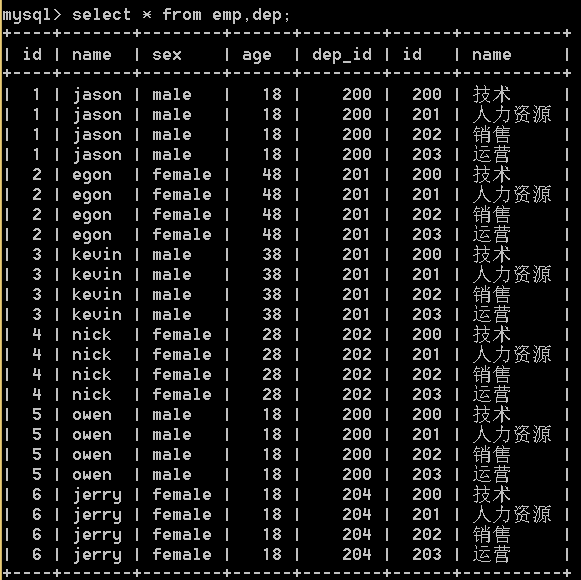
将所有的数据都对应了一遍,虽然不合理但是其中有合理的数据,现在我们需要的就是找出合理的数据,所以有了多表查询。
多表查询操作 (有四种)
1.内连接 inner join 只连接两张表相同的数据
select * from emp inner join dep on emp.dep_id = dep.id; #on后面跟的是条件

2.左连接 left join 在内连接的基础上,保留左边表(emp)没有对应的数据
select * from emp left join dep on emp.dep_id = dep.id;
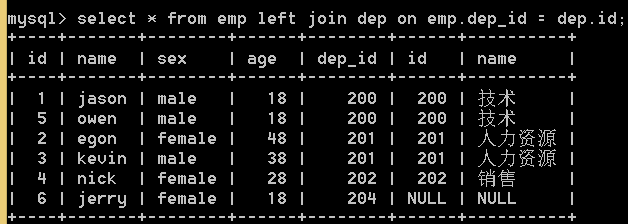
3.右连接 right join 在内连接的基础上,保留右边表(dep)没有对应的数据
select * from emp right join dep on emp.dep_id=dep.id;
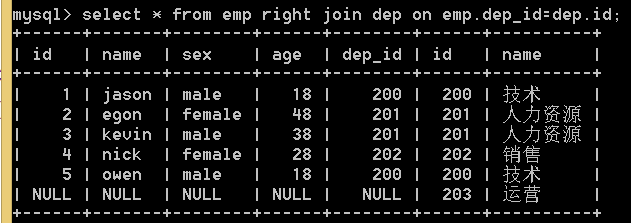
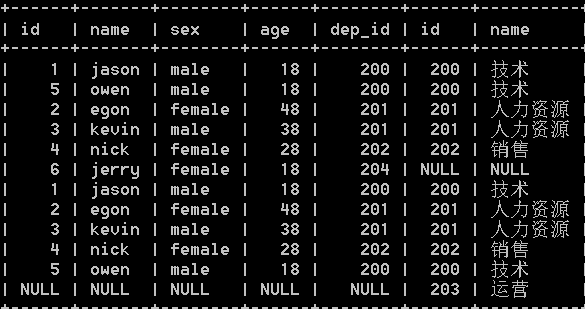
4.全连接 union 就是左连接和右连接用union连起来,不包括重复行
select * from emp left join dep on emp.dep_id = dep.id
union
select * from emp right join dep on emp.dep_id = dep.id;
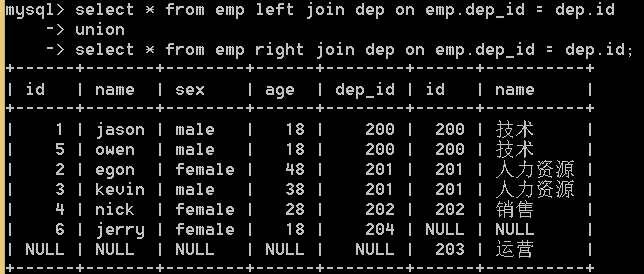
5. union all 也是将左连接和右连接结果合并起来,包括重复行,即显示所有结果
select * from emp left join dep on emp.dep_id = dep.id
union all
select * from emp right join dep on emp.dep_id = dep.id;
二、子查询
将一张表查询结果作为另一条sql语句的查询条件
查询部门是技术或者是人力资源的员工信息
select * from emp where dep_id in(select id from dep where name = '技术' or name='人力资源');

记住一个规律,表的查询结果可以作为其他表的查询条件,也可以通过取别名的方式把它作为一张虚拟表去跟其他表做关联查询。
三、exists
EXISTS关键字表示存在,在使用EXISTS关键字时,内层查询语句不返回查询的记录,而是返回一个真假值,True或False。当返回True时,外层查询语句将进行查询,当返回值为False时,外层查询语句不进行查询。
select * from emp where exists (select id from dep where id > 203);
四、Navicat使用
掌握:
1.测试+连接数据库
2.新建库
3.新建表,新增字段+类型+约束
4.设计表:外键
5.新建查询
6.建立表模型
注意:批量加注释 ctrl+?键
五、pymysql模块
1.安装:pip install pymysql
2.代码连接
import pymysql
#连接
conn=pymysql.connect(
  host='localhost',
 port=3306,
  user='root',
  password='root',
  database='day38',
  charset='utf8'
)
#游标
# cursor = conn.cursor()  #执行完毕返回的结果默认以元组显示
cursor = conn.cursor(pymysql.cursors.DictCursor)  # 产生一个游标对象以字典的形式返回查询出来的数据,键是表的字段,值是表的字段对应的信息
sql = 'select * from teacher'
cursor.execute(sql)  #执行传入的sql语句
print(cursor.fetchone())  #只获取一条数据
print(cursor.fetchone())  #只获取一条数据
# cursor.scroll(1,'relative')  #relative相当于当前位置  光标往后移动几位
cursor.scroll(1,'absolute')  #absolute相当于起始位置  光标往后移动几位
print(cursor.fetchall())  #获取所有数据,结果返回的是一个列表,元素是一个个的字典
# print(cursor.fetchmany(4))  #写入需要查询的数据条数,结果返回的是一个列表

六、sql注入问题
就是利用一些特殊符号巧妙的修改sql语句(比如mysql中的注释是 --,会把--后面的sql全部注释)
后续写sql语句不要手动拼接关键性数据,要让execute帮你去做拼接
username = input(">>>:").strip()
password = input(">>>:").strip()
sql = "select * from user where username='%s' and password='%s'"%(username,password)
正确写法
username = input('username>>>:')
password = input('password>>>:')
sql = "select * from user where name =%s and password = %s"
res = cursor.execute(sql,(username,password))  # 能够帮你自动过滤特殊符号 避免sql注入的问题
# execute 能够自动识别sql语句中的%s 帮你做替换
if res:
    print(cursor.fetchall())   #查询所有
else:
    print('用户名或密码错误')

#一次插入多行记录    res = cursor.executemany(sql,[(),(),()])

增删改问题
做数据库增删改的操作 都必须在设置连接的地方写autocommit = True。
# 增
sql = "insert into user(username,password) values(%s,%s)"
rows = cursor.excute(sql,('jason','123'))
# 修改
sql = "update user set username='jasonDSB' where id=1"
rows = cursor.excute(sql)

增删改 单单执行excute并不会真正影响到数据
conn = pymysql.connect(
    host = 'localhost',
    port = 3306,
    user = 'root',
    password = 'root',
    database = 'day38',
    charset = 'utf8',  # 编码千万不要加- 如果写成了utf-8会直接报错
    autocommit = True  # 这个参数配置完成后  增删改操作都不需要在手动加conn.commit了
)
