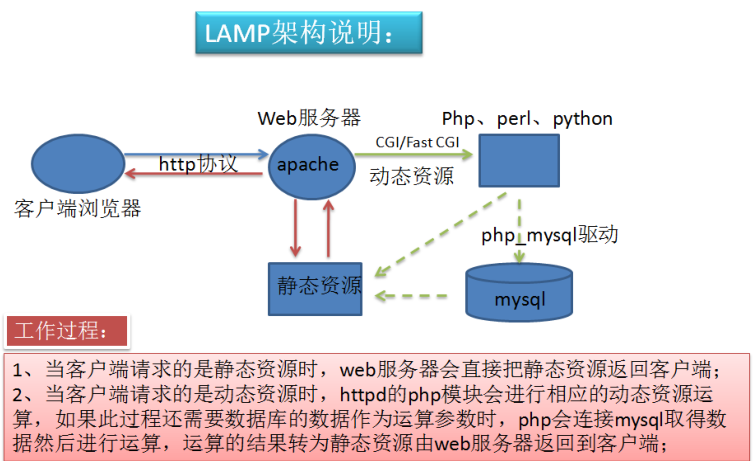
一、工作原理

1.1 LAMP简介
lamp/lnmp 其实就是由Linux+Apache/Nginx+Mysql/MariaDB+Php/Perl/Python的一组动态网站或者服务器的开源软件,除Linux外其它各部件本身都是各自独立的程序,但是因为经常被放在一起使用,拥有了越来越高的兼容度,共同组成了一个强大的Web应用程序平台。
web服务器的资源分为两种,静态资源和动态资源
静态资源就是指静态内容,客户端从服务器获得的资源的表现形式与原文件相同。可以简单的理解为就是直接存储于文件系统中的资源
动态资源则通常是程序文件,需要在服务器执行之后,将执行的结果返回给客户端
CGI:
程序=指令+数据
指令:代码文件
数据:数据存储系统、文件
CGI:Common Gateway Interface
可以让一个客户端,从网页浏览器通过http服务器向执行在网络服务器上的程序传输数据;CGI描述了客户端和服务器程序之间传输的一种标准
请求流程:
Client -- (httpd) --> httpd -- (cgi) -->application server (program file) -- (mysql) --> mysql
php: 脚本编程语言、嵌入到html中的嵌入式web程序语言
基于zend编译成opcode(二进制格式的字节码,重复运行,可省略编译环境)
LAMP :
httpd :接受用户的web请求;静态资源则直接响应;动态资源为php脚本,对此类资源的请求将交由php来运行
php:运行php程序
mysql:数据管理系统
1.2 http与php结合的方式
CGI
FastCGI
modules (将php编译成为httpd的模块,默认方式)
MPM:
prefork: libphp5.so
event, worker: libphp5-zts.so
1.3 简单快速部署LAMP
···
CentOS 7:
Modules:httpd, php, php-mysql, mariadb-server
FastCGI:httpd, php-fpm, php-mysql, mariadb-server
CentOS 6:
Modules:httpd, php, php-mysql, mysql-server
FastCGI:默认不支持
···
1.31 yum安装
···
CentOS 6:
yum install httpd, php, mysql-server, php-mysql
service httpd start
service mysqld start
CentOS 7:
yum install httpd, php, php-mysql, mariadb-server
systemctl start httpd.service
systemctl start mariadb.service
注意:要使用prefork模型
···
1.32 编译安装
编译安装http PHP mysql/mariadb
二、常见LAMP应用
PhpMyAdmin是一个以PHP为基础,以Web-Base方式架构在网站主机上的MySQL的数据库管理工具,让管理者可用Web接口管理MySQL数据库
WordPress是一种使用PHP语言开发的博客平台,用户可以在支持PHP和MySQL数据库的服务器上架设属于自己的网站。也可把WordPress当作一个内容管理系统(CMS)来使用
2.1 部署phpmyadmin
yum -y install httpd mariadb-server php php-mysql
systemctl start httpd
systemctl start mariadb
mysql_secure_installation
下载:https://www.phpmyadmin.net/downloads/
tar xvf phpMyAdmin-4.0.10.20-all-languages.tar.xz
cd /var/www/html
cd phpadmin/
cp config.sample.inc.php config.inc.php
 yum -y install php-mbstring
systemctl reload httpd
2.2 部署wordpress
下载地址:官网:https://cn.wordpress.org/
解压缩WordPress博客程序到网页站点目录下
unzip wordpress-4.3.1-zh_CN.zip
新建wpdb库和wpuser用户
mysql> create database wpdb;
mysql> grant all privileges on wpdb.* to wpuser@'%' identified by "wppass";
打开http://webserver/wordpress进行页面安装

注意wordpress目录权限
Setfacl –R –m u:apache:rwx wordpress
2.3 编译php-xcache加速访问
CentOS7编译Php-xcache加速访问
官网:http://xcache.lighttpd.net/wiki/ReleaseArchive
安装方法
rpm包:来自epel源
编译安装
编译安装
yum -y install php-devel
下载并解压缩xcache-3.2.0.tar.bz2
phpize 生成编译环境
cd xcache-3.2.0
./configure --enable-xcache --with-php-
config=/usr/bin/php-config
make && make install
cp xcache-3.2.0/xcache.ini  /etc/php.d/
systemctl restart httpd.service
三、Centos7编译安装LAMP
在centos7上编译安装LAMP:
···
mairadb:通用二进制格式,mariadb-5.5.56
httpd:编译安装,httpd-2.4.25
php5:编译安装,php-5.6.30
phpMyAdmin:安装phpMyAdmin-4.4.15.10-all-languages
Xcache:编译安装xcache-3.2.0
php5.4依赖于mariadb-devel包
顺序:mariadb-->httpd-->php
···
3.1二进制安装mariadb
ftp://172.16.0.1/pub/Source/7.x86_64/mariadb/mariadb-5.5-46-linux-x86_64.tar.gz
tar  -xvf mariadb-5.5-46-linux-x86_64.tar.gz -C /usr/local
cd /usr/local
ls -sv mariadb-5.5.46-linux-x86_64 mysql
cd mysql
chown -R root.mysql /usr/local/mysql
mkdir /opt/data -p
chown -R mysql.mysql /opt/data
mkdir /etc/mysql
vim /etc/profile.d/mysql.sh
export PATH=/usr/local/mysql/bin/:$PATH
cp support-files/my-large.cnf /etc/mysql/my.cnf
vim /etc/mysql/my.cnf
[mysqld]加三行
datadir =/opt/data
innodb_file_per_table = ON
skip_name_resolve = ON
scripts/mysql_install_db --user=mysql --datadir=/opt/data
cp support-files/mysql.server /etc/rc.d/init.d/mysqld
chkconfig --add mysqld
service mysqld start
/usr/local/mysql/bin/mysql 测试是否成功
3.2 编译安装httpd-2.4
groupadd  -r apache
useradd -r -s /sbin/nologin -g apache apache
yum install pcre-devel apr-devel apr-util-devel openssl-devel
tar -xvf  httpd-2.4* -C /usr/src/
cd /usr/src/httpd-2.4*/
./configure --prefix=/usr/local/apache --
sysconfdir=/etc/httpd --enable-so --enable-ssl --
enable-rewrite --with-zlib --with-pcre --with-
apr=/usr --with-apr-util=/usr --enable-modules=most
--enable-mpms-shared=all --with-mpm=prefork
make -j 2 && make install
echo 'export PATH=/usr/local/apache/bin/:$PATH' > /etc/profile.d/http.sh
source /etc/profile.d/http.sh
sed 's/#ServerName www.example.com:80/ServerName www.example.com:80/g' /etc/httpd/httpd.conf
注意httpd2.2做lamp,php版本必须为5版本
3.3 编译安装php-5.6
官网下载源包
tar  php-5.6*  -C /usr/src/
yum install libxml2-devel bzip2-devel libmcrypt-devel -y
./configure --prefix=/usr/local/php --with-mysql=/usr/local/mysql --with-openssl --with-mysqli=/usr/local/mysql/bin/mysql_config --enable-mbstring --with-png-dir --with-jpeg-dir --with-freetype-dir --with-zlib --with-libxml-dir=/usr --enable-xml --enable-sockets --with-apxs2=/app/httpd24/bin/apxs --with-mcrypt --with-config-file-path=/etc --with-config-file-scan-dir=/etc/php.d --with-bz2
make -j 2 && make install
3.4 编译安装php-7.1.7
官网下载源包
tar  php-7.1.7*  -C /usr/src/
cd /usr/src/php-7.1.7/
./configure --prefix=/app/php --enable-mysqlnd --with-mysqli=mysqlnd --with-openssl --with-pdo-mysql=mysqlnd --enable-mbstring --with-freetype-dir --with-jpeg-dir --with-png-dir --with-zlib --with-
libxml-dir=/usr --enable-xml --enable-sockets --with-apxs2=/app/httpd24/bin/apxs --with-mcrypt --
with-config-file-path=/etc --with-config-file-scan-dir=/etc/php.d --enable-maintainer-zts --disable-fileinfo
注意:php-7.0以上版本使用--enable-mysqlnd --with-mysqli=mysqlnd ,原--with-mysql不再支持