1.1Git简介
linus 用C语言编写 2005年诞生 分布式版本管理系统 速度快,适合大规模,跨地区多人协同开发
Git不仅是一款开源的分布式版本控制系统,而且有其独特的功能特性,例如大多数的分布式版本控制系统只会记录每次文件的变化,说白了就是只会关心文件的内容变化差异,而Git则是关注于文件数据整体的变化,直接会将文件提交时的数据保存成快照,而非仅记录差异内容,并且使用SHA-1加密算法保证数据的完整性。
Git为了提高效率,对于没有被修改的文件,则不会重复存储,而是创建一个链接指向之前存储过的文件。
在正式使用前,我们还需要弄清楚Git的三种重要模式,分别是已提交、已修改、已暂存
已提交(committed):表示数据文件已经顺利提交到Git数据库中。
已修改(modified):表示数据文件已经被修改,但未被保存到Git数据库中。
已暂存(staged):表示数据文件已经被修改,并会在下次提交时提交到Git数据库中。
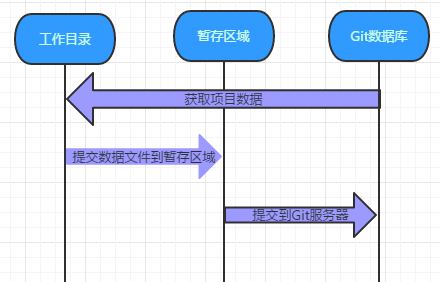
提交前的数据文件可能会被随意修改或丢失,但只要把文件快照顺利提交到Git数据库中,那就可以完全放心了,流程为:
1.在工作目录中修改数据文件。
2.将文件的快照放入暂存区域。
3.将暂存区域的文件快照提交到Git仓库中。
1.2Git 生态
Git 分布式版本管理系统
Gitlab git私库解决方案
Github git公有库解决方案
1.3Git安装
1.3.1编译安装
Centos
yum install git
Ubuntu
apt-get install git

Windows安装git bash

Liunx编译安装
注意不要使用git1.8以下版本,推荐使用2.7版本
一、安装依赖
yum update -y
yum install curl-devel expat-devel gettext-devel openssl-devel zlib-devel gcc perl-ExtUtils-MakeMaker
cd /usr/local/src
wget https://github.com/git/git/archive/v2.7.4.zip
unzip v2.7.4.zip
cd git-2.7.4
make prefix=/usr/local/git all
make prefix=/usr/local/git install
rm -rf /usr/bin/git
ln -s /usr/local/git/bin/git /usr/bin/git
git --version
#初始化
[root@linux-node1]# mkdir test
[root@linux-node1]# git init
Initialized empty Git repository in /root/.git/
[root@linux-node1]# git config --global user.name "zsq"
[root@linux-node1]# git config --global user.email zsq@126.com
[root@linux-node1]# git config --list
user.name=zsq
user.email=zsq@126.com
core.repositoryformatversion=0
core.filemode=true
core.bare=false
core.logallrefupdates=true
1.32yum安装
[root@linux-node1-example /]# yum -y install git
[root@linux-node1-example /]# git config --global user.name "zsq"
[root@linux-node1-example /]# git config --global user.email "zsq@mail.com"
[root@linux-node1-example /]# git config --global color.ui true
[root@linux-node1-example /]# git config --list
user.name=zsq
user.email=zsq@mail.com
color.ui=true
常用命令
git add            加入暂存(索引区)
git status         查看状态
git status -s      状态概览
git diff           尚未暂存的文件
git diff --staged  暂存区文件
git commit         提交更新
git reset          回滚
git rm             从版本库中移除
git rm --cached README 从暂存区中移除
git mv                 相当于mv git、 rm 、git add三个命令
1.4Git基本操作
1.4.1Git提交数据
我们可以简单的把工作目录理解成是一个被Git服务程序管理的目录,Git会时刻的追踪目录内文件的改动,另外在安装好了Git服务程序后,默认就会创建好了一个叫做master的分支,我们直接可以提交数据到master分支
[root@linux-node1-example /]# mkdir zsq #创建本地工作目录
[root@linux-node1-example /]# cd zsq #进入本地工作目录
[root@linux-node1-example zsq]# git init  #初始为git工作目录
Initialized empty Git repository in /zsq/.git/
[root@linux-node1-example zsq]# touch readme.txt  #创建文件
[root@linux-node1-example zsq]# git status #查看git状态
# On branch master
#
# Initial commit
#
# Untracked files:
#   (use "git add <file>..." to include in what will be committed)
#
#    readme.txt   #发现新建的readme.txt文件
nothing added to commit but untracked files present (use "git add" to track)
[root@linux-node1-example zsq]# git add readme.txt #git添加文件至暂存区
[root@linux-node1-example zsq]# git status #再次查看状态
# On branch master
#
# Initial commit
#
# Changes to be committed:
#   (use "git rm --cached <file>..." to unstage)
#
#    new file:   readme.txt
#
[root@linux-node1-example zsq]# git commit -m "the first commit" #git cmmit提交暂存取文件至git版本仓库
[master (root-commit) 2498564] the first commit
 1 file changed, 0 insertions(+), 0 deletions(-)
 create mode 100644 readme.txt
1.4.2Git移除数据
有些时候会向把已经添加到暂存区的文件移除,但仍然希望文件在工作目录中不丢失,换句话说,就是把文件从追踪清单中删除。
[root@linux-node1-example zsq]# touch database #建立文件
[root@linux-node1-example zsq]# git add database #添加文件至暂存区
[root@linux-node1-example zsq]# git status #查看当前git状态
# On branch master
# Changes to be committed:
#   (use "git reset HEAD <file>..." to unstage)
#
#    new file:   database
#
[root@linux-node1-example zsq]# git rm --cached database #将文件从git暂存区域的追踪列表移除(并不会删除当前工作目录内的数据文件)
rm 'database'
[root@linux-node1-example zsq]# git status #此时文件已经是未追踪状态了
# On branch master
# Untracked files:
#   (use "git add <file>..." to include in what will be committed)
#
#    database
nothing added to commit but untracked files present (use "git add" to track)
#如果想将文件数据从git暂存区和工作目录一起删除,可以做如下操作。
[root@linux-node1-example zsq]# git add database  #再将database文件提交到git暂存区
[root@linux-node1-example zsq]# git rm -f database  #但如果在删除之前数据文件已经被放入到暂存区域的话,git会担心你误删未提交的文件而报错信息,此时可追加强制删除-f参数。
rm 'database'
[root@linux-node1-example zsq]# ls  #查看工作区也没database文件
readme.txt
[root@linux-node1-example zsq]# git status #查看当前状态
# On branch master
nothing to commit, working directory clean
1.4.3Git移动数据
[root@linux-node1-example zsq]# git mv readme.txt test.txt  #git如果要修改文件名称,则使用git mv命令
[root@linux-node1-example zsq]# git status #查看状态发现下次提交会有一个改名操作
# On branch master
# Changes to be committed:
#   (use "git reset HEAD <file>..." to unstage)
#
#    renamed:    readme.txt -> test.txt
#
[root@linux-node1-example zsq]# git commit -m "changed name" #提交到git版本仓库
[master 9d78632] changed name
 1 file changed, 0 insertions(+), 0 deletions(-)
 rename readme.txt => test.txt (100%)

#其实可以如下方法改名
[root@linux-node1-example zsq]# mv test.txt readme.txt
[root@linux-node1-example zsq]# git rm test.txt
rm 'test.txt'
[root@linux-node1-example zsq]# git add readme.txt
[root@linux-node1-example zsq]# git commit -m "changed the file name"
[master a112ba4] changed the file name
 1 file changed, 0 insertions(+), 0 deletions(-)
 rename test.txt => readme.txt (100%)
1.4.4Git历史记录
[root@linux-node1-example zsq]# git log #查看提交历史记录
commit a112ba41550938bee20095af35d6daaf012b6ef7
Author: zsq <zsq@mail.com>
Date:   Sun Jan 15 01:45:13 2017 +0800

    changed the file name

commit 9d78632ae6206461ef41af4e621de6890644c383
Author: zsq <zsq@mail.com>
Date:   Sun Jan 15 01:41:35 2017 +0800

changed name
commit 2498564e69024e4f015af9086aba9a7968bdef9d
Author: zsq <zsq@mail.com>
Date:   Sun Jan 15 01:27:25 2017 +0800

    the first commit
[root@linux-node1-example zsq]# git log -2 #查看最近几条记录
commit a112ba41550938bee20095af35d6daaf012b6ef7
Author: zsq <zsq@mail.com>
Date:   Sun Jan 15 01:45:13 2017 +0800

    changed the file name

commit 9d78632ae6206461ef41af4e621de6890644c383
Author: zsq <zsq@mail.com>
Date:   Sun Jan 15 01:41:35 2017 +0800

changed name

[root@linux-node1-example zsq]# git log -p -1 #-p显示每次提交的内容差异,例如仅查看最近一次差异
commit a112ba41550938bee20095af35d6daaf012b6ef7
Author: zsq <zsq@mail.com>
Date:   Sun Jan 15 01:45:13 2017 +0800

    changed the file name

diff --git a/readme.txt b/readme.txt
new file mode 100644
index 0000000..e69de29
diff --git a/test.txt b/test.txt
deleted file mode 100644
index e69de29..0000000

[root@linux-node1-example zsq]# git log --stat -2 # --stat简要显示数据增改行数,这样能够看到提交中修改过的内容,对文件添加或移动的行数,并在最后列出所有增减行的概要信息
commit a112ba41550938bee20095af35d6daaf012b6ef7
Author: zsq <zsq@mail.com>
Date:   Sun Jan 15 01:45:13 2017 +0800

    changed the file name

 readme.txt | 0
 test.txt   | 0
 2 files changed, 0 insertions(+), 0 deletions(-)

commit 9d78632ae6206461ef41af4e621de6890644c383
Author: zsq <zsq@mail.com>
Date:   Sun Jan 15 01:41:35 2017 +0800

    changed name

 readme.txt | 0
 test.txt   | 0
 2 files changed, 0 insertions(+), 0 deletions(-)

[root@linux-node1-example zsq]# git log --pretty=oneline #--pretty根据不同的格式展示提交的历史信息
a112ba41550938bee20095af35d6daaf012b6ef7 changed the file name
9d78632ae6206461ef41af4e621de6890644c383 changed name
2498564e69024e4f015af9086aba9a7968bdef9d the first commit
[root@linux-node1-example zsq]# git log --pretty=fuller -2 #以更详细的模式输出提交的历史记录
commit a112ba41550938bee20095af35d6daaf012b6ef7
Author:     zsq <zsq@mail.com>
AuthorDate: Sun Jan 15 01:45:13 2017 +0800
Commit:     zsq <zsq@mail.com>
CommitDate: Sun Jan 15 01:45:13 2017 +0800

    changed the file name

commit 9d78632ae6206461ef41af4e621de6890644c383
Author:     zsq <zsq@mail.com>
AuthorDate: Sun Jan 15 01:41:35 2017 +0800
Commit:     zsq <zsq@mail.com>
CommitDate: Sun Jan 15 01:41:35 2017 +0800

changed name

还可以使用format参数来指定具体的输出格式,这样非常便于后期编程的提取分析哦,常用的格式有:
%s  提交说明。
%cd 提交日期。
%an 作者的名字。
%cn 提交者的姓名。
%ce 提交者的电子邮件。
%H  提交对象的完整SHA-1哈希字串。
%h  提交对象的简短SHA-1哈希字串。
%T  树对象的完整SHA-1哈希字串。
%t  树对象的简短SHA-1哈希字串。
%P  父对象的完整SHA-1哈希字串。
%p  父对象的简短SHA-1哈希字串。
%ad 作者的修订时间。

[root@linux-node1-example zsq]# git log --pretty=fomat:"%h %cn" #查看当前所有提交记录的简短SHA-1哈希字串与提交着的姓名
fomat:a112ba4 zsq
fomat:9d78632 zsq
fomat:2498564 zsq
1.4.4Git还原数据
[root@linux-node1-example zsq]#  echo "Git is a version control system" >> readme.txt #追加一段话
[root@linux-node1-example zsq]# git add readme.txt #添加至暂存区
[root@linux-node1-example zsq]# git commit -m "inyroduction software" #提交至git版本仓库
[master ffb6b3b] inyroduction software
 1 file changed, 1 insertion(+)

此时觉得写得不妥,想还原某一次提交的文件快照
[root@linux-node1-example zsq]# git log --pretty=oneline #提交的历史信息
ffb6b3bec6d2d3317568444f730db5bae594be23 inyroduction software
a112ba41550938bee20095af35d6daaf012b6ef7 changed the file name
9d78632ae6206461ef41af4e621de6890644c383 changed name
2498564e69024e4f015af9086aba9a7968bdef9d the first commit
Git服务程序中有一个叫做HEAD的版本指针,当用户申请还原数据时,其实就是将HEAD指针指向到某个特定的提交版本,但是因为Git是分布式版本控制系统,为了避免历史记录冲突,故使用了SHA-1计算出十六进制的哈希字串来区分每个提交版本,另外默认的HEAD版本指针会指向到最近的一次提交版本记录,而上一个提交版本会叫HEAD^,上上一个版本则会叫做HEAD^^,当然一般会用HEAD~5来表示往上数第五个提交版本。
[root@linux-node1-example zsq]# git reset --hard HEAD^ #还原历史提交版本上一次
HEAD is now at a112ba4 changed the file name
[root@linux-node1-example zsq]# cat readme.txt  #查看文件内容(已经还原,上一版本没有追加内容)

刚刚的操作实际上就是改变了一下HEAD版本指针的位置,就是你将HEAD指针放在那里,那么你的当前工作版本就会定位在那里,要想把内容再还原到最新提交的版本,先查看下提交版本号
a112ba41550938bee20095af35d6daaf012b6ef7 changed the file name
9d78632ae6206461ef41af4e621de6890644c383 changed name
2498564e69024e4f015af9086aba9a7968bdef9d the first commit

怎么搞得?竟然没有了Introduction software这个提交版本记录?
原因很简单,因为我们当前的工作版本是历史的一个提交点,这个历史提交点还没有发生过Introduction software更新记录,所以当然就看不到了,要是想“还原到未来”的历史更新点,可以用git reflog命令来查看所有的历史记录:

[root@linux-node1-example zsq]# git reflog #查看未来历史更新点
a112ba4 HEAD@{0}: reset: moving to HEAD^
ffb6b3b HEAD@{1}: commit: inyroduction software
a112ba4 HEAD@{2}: commit: changed the file name
9d78632 HEAD@{3}: commit: changed name
2498564 HEAD@{4}: commit (initial): the first commit

[root@linux-node1-example zsq]# git reset --hard ffb6b3b #找到历史还原点的SHA-1值后,就可以还原(值不写全,系统会自动匹配)
HEAD is now at ffb6b3b inyroduction software
[root@linux-node1-example zsq]# cat readme.txt  #查看内容
Git is a version control system

我们突然发现不应该写一句话的,可以手工删除(当内容比较多的时候会很麻烦),还可以将文件内容从暂存区中恢复
[root@linux-node1-example zsq]# git checkout -- readme.txt
[root@linux-node1-example zsq]# cat readme.txt
Git is a version control system
这其中是有一套规则,如果暂存区中有该文件,则直接从暂存区恢复,如果暂存区没有该文件,则将还原成最近一次文件提交时的快照。
1.6Git管理分支结构
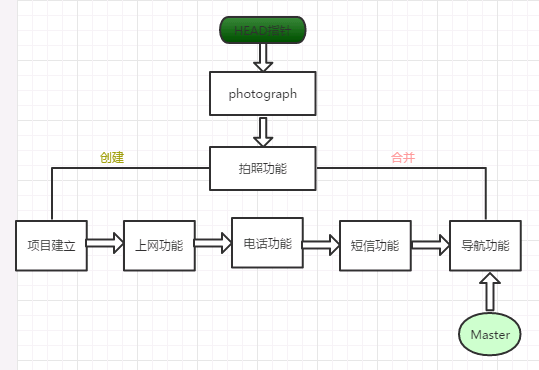
分支即是平行空间,假设你在为某个手机系统研发拍照功能,代码已经完成了80%,但如果将这不完整的代码直接提交到git仓库中,又有可能影响到其他人的工作,此时我们便可以在该软件的项目之上创建一个名叫“拍照功能”的分支,这种分支只会属于你自己,而其他人看不到,等代码编写完成后再与原来的项目主分支合并下即可,这样即能保证代码不丢失,又不影响其他人的工作。
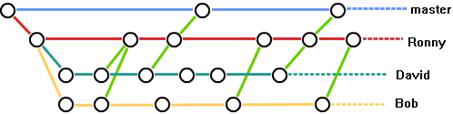
一般在实际的项目开发中,我们要尽量保证master分支是非常稳定的,仅用于发布新版本,平时不要随便直接修改里面的数据文件,而工作的时候则可以新建不同的工作分支,等到工作完成后在合并到master分支上面,所以团队的合作分支看起来会像上面图那样。
生产代码提交方式
1.6.1Git创建分支
[root@linux-node1-example zsq]# git branch linux  #创建分支
[root@linux-node1-example zsq]# git checkout linux #切换分支
Switched to branch 'linux'
[root@linux-node1-example zsq]# git branch  #查看当前分支情况,当前分支前有*号
* linux
  master
[root@linux-node1-example zsq]#  echo "Create new branch is linux" >> readme.txt #我们对文件追加一行字符串
[root@linux-node1-example zsq]# git add readme.txt  #提交到暂存区
[root@linux-node1-example zsq]# git commit -m "new branch" #提交到git版本仓库
[linux ab40fec] new branch
 1 file changed, 1 insertion(+)
[root@linux-node1-example zsq]# git checkout master #我们在提交文件后再切回master分支
Switched to branch 'master'
[root@linux-node1-example zsq]# cat readme.txt #查看文件内容,发现并没有新追加的字符串
Git is a version control system
1.6.2Git合并分支
现在,我们想把linux的工作成果合并到master分支上了,则可以使用”git merge”命令来将指定的的分支与当前分支合
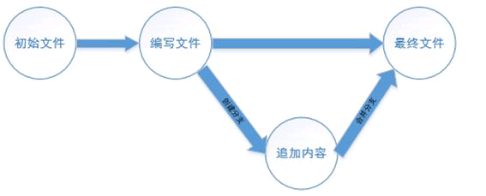
git合并分之示意图
[root@linux-node1-example zsq]# git branch  #查看是否在master分支
  linux
* master
[root@linux-node1-example zsq]# git merge linux #合并Linux分支至master
Updating ffb6b3b..ab40fec
Fast-forward
 readme.txt | 1 +
 1 file changed, 1 insertion(+)
[root@linux-node1-example zsq]# cat readme.txt #查看合并后的readme文件
Git is a version control system
Create new branch is linux
[root@linux-node1-example zsq]# git branch -d linux #确认合并完成后,可以放心地删除Linux分支
Deleted branch linux (was ab40fec).
[root@linux-node1-example zsq]# git branch #删除后,查看branch,只剩下master分支了
* master
1.6.3Git分支冲突
但是Git并不能每次都为我们自动的合并分支,当遇到了内容冲突比较复杂的情况,则必须手工将差异内容处理点,比如这样的情况:
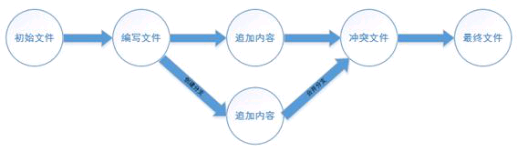
git分支冲突示意图
root@linux-node1-example zsq]# git checkout -b linux  #创建分支并切换到该分支
[root@linux-node1-example zsq]# git branch  #查看分支
* linux
  master
[root@linux-node1-example zsq]# vim readme.txt  #编辑readme文件,修改一行内容
[root@linux-node1-example zsq]# git add readme.txt  #在Linux分支添加readme至暂存区
[root@linux-node1-example zsq]# git commit -m "create two"  #在Linux分支提交readme
[linux 13a42ad] create two
1 file changed, 1 insertion(+), 2 deletions(-)
[root@linux-node1-example zsq]# git checkout master  #切换到master分支
Switched to branch 'master'
[root@linux-node1-example zsq]# git branch  #查看是否切换至master分支
  linux
* master
[root@linux-node1-example zsq]# vim readme.txt  #编在master分支上修改readme文件同一行的内容
[root@linux-node1-example zsq]# git add readme.txt  #添加至暂存区
[root@linux-node1-example zsq]# git commit -m 'create to master'  #提交至Git版本仓库
[master 75bd55c] create to master
 1 file changed, 1 insertion(+)
[root@linux-node1-example zsq]# git merge linux  #合并Linux分支(冲突)
Auto-merging readme.txt
CONFLICT (content): Merge conflict in readme.txt
Automatic merge failed; fix conflicts and then commit the result.

#那么此时,我们在master与linux分支上都分别对readme文件进行了修改并提交了,那这种情况下Git就没法再为我们自动的快速合并了,它只能告诉我们readme文件的内容有冲突,需要手工处理冲突的内容后才能继续合并
[root@linux-node1-example zsq]# cat readme.txt  #冲突内容如下
#Git用< <<<<<<,=======,>>>>>>>分割开了各个分支冲突的内容,我们需要手工的删除这些符号,并将内容修改
Git is a version control system
<<<<<<< HEAD
Create new branch is shishi
=======
Create new branch is sisi
>>>>>>> linux

[root@linux-node1-example zsq]# git add readme.txt #再次添加至暂存区
[root@linux-node1-example zsq]# git commit -m 'config' #提交至git版本仓库
[master e433833] config
[root@linux-node1-example zsq]# git branch -d linux #最后删除Linux分支结束
Deleted branch linux (was 4288aea).
[root@linux-node1-example zsq]# git branch #检查是否删除完毕
* master
1.7Git管理标签
#当版本仓库内的数据有个大的改善或者功能更新,我们经常会打一个类似于软件版本号的标签,这样通过标签就可以将版本库中的某个历史版本给记录下来,方便我们随时将特定历史时期的数据取出来用,另外打标签其实只是像某个历史版本做了一个指针,所以一般都是瞬间完成的。

[root@linux-node1-example ~]# cd /zsq/ #进入git版本控制系统
[root@linux-node1-example zsq]# git tag v1.0 #当前提交内容打一个标签(方便快速回滚)
[root@linux-node1-example zsq]# git tag  #查看当前所有的标签
v1.0
[root@linux-node1-example zsq]# git show v1.0 #查看当前1.0版本的详细信息
commit e433833da413a21ab7573168a3fd6a624262527d
Merge: 6b508de 4288aea
Author: zsq <zsq@mail.com>
Date:   Mon Jan 16 07:42:26 2017 +0800

    config

diff --cc readme.txt
index 3a26336,582e884..cb56f37
--- a/readme.txt
+++ b/readme.txt
@@@ -1,2 -1,2 +1,3 @@@
  Git is a version control system
 +Create new branch is shishi
+ Create new branch is sisi

[root@linux-node1-example zsq]# git tag v1.2 -m "version 1.2 release is test" #创建带有说明的标签,-a指定标签名字,-m指定说明文字
[root@linux-node1-example zsq]# git tag -d v1.0 #我们为同一个提交版本设置了两次标签,删除之前的v1.0
Deleted tag 'v1.0' (was e433833)
[root@linux-node1-example zsq]# git tag #再次查看,v1.0已经被删除
v1.2