-
kubernetes的本质上就是一个集群系统,用户可以在集群中部署各种服务,所谓的部署服务,其实就是在kubernetes集群中运行一个个的容器,并将指定的程序跑在容器中。
-
kubernetes的最小管理单元是pod而不是容器,所以只能将容器放在Pod中,而kubernetes一般也不会直接管理Pod,而是通过
Pod控制器来管理Pod的。 -
Pod可以提供服务之后,就要考虑如何访问Pod中服务,kubernetes提供了
Service资源实现这个功能。 -
如果Pod中程序的数据需要持久化,kubernetes还提供了各种
存储系统。 - 学习kubernetes的核心,就是学习如何对集群上的Pod、Pod控制器、Service、存储等各种资源进行操作。
-
资源类型
kubernetes中所有的内容都抽象为资源,可以通过下面的命令进行查看kubectl api-resources
-
kubectl api-resources
-
资源分类 资源名称 缩写 资源作用 集群级别资源 nodes no 集群组成部分 namespaces ns 隔离Pod pod资源 pods po 装载容器 pod资源控制器 replicationcontrollers rc 控制pod资源 replicasets rs 控制pod资源 deployments deploy 控制pod资源 daemonsets ds 控制pod资源 jobs 控制pod资源 cronjobs cj 控制pod资源 horizontalpodautoscalers hpa 控制pod资源 statefulsets sts 控制pod资源 服务发现资源 services svc 统一pod对外接口 ingress ing 统一pod对外接口 存储资源 volumeattachments 存储 persistentvolumes pv 存储 persistentvolumeclaims pvc 存储 配置资源 configmaps cm 配置 secrets 配置 -
练习指令式命令 创建/删除 namespace和pod
-
[root@node2 ~]# kubectl create namespace test
namespace/test created
[root@node2 ~]# kubectl get ns
NAME STATUS AGE
default Active 39h
kube-node-lease Active 39h
kube-public Active 39h
kube-system Active 39h
kuboard Active 38h
nginx-ingress Active 38h
test Active 6s - 运行一个pod
-
[root@node1 ~]# kubectl run pod --image=nginx -n test
pod/pod created - 查看pod日志
-
[root@node1 ~]# kubectl logs -f pod -n test
/docker-entrypoint.sh: /docker-entrypoint.d/ is not empty, will attempt to perform configuration
/docker-entrypoint.sh: Looking for shell scripts in /docker-entrypoint.d/
/docker-entrypoint.sh: Launching /docker-entrypoint.d/10-listen-on-ipv6-by-default.sh
10-listen-on-ipv6-by-default.sh: info: Getting the checksum of /etc/nginx/conf.d/default.conf
10-listen-on-ipv6-by-default.sh: info: Enabled listen on IPv6 in /etc/nginx/conf.d/default.conf
/docker-entrypoint.sh: Launching /docker-entrypoint.d/20-envsubst-on-templates.sh
/docker-entrypoint.sh: Launching /docker-entrypoint.d/30-tune-worker-processes.sh
/docker-entrypoint.sh: Configuration complete; ready for start up
2022/10/07 06:53:50 [notice] 1#1: using the "epoll" event method
2022/10/07 06:53:50 [notice] 1#1: nginx/1.23.1
2022/10/07 06:53:50 [notice] 1#1: built by gcc 10.2.1 20210110 (Debian 10.2.1-6)
2022/10/07 06:53:50 [notice] 1#1: OS: Linux 3.10.0-1160.53.1.el7.x86_64
2022/10/07 06:53:50 [notice] 1#1: getrlimit(RLIMIT_NOFILE): 1048576:1048576
2022/10/07 06:53:50 [notice] 1#1: start worker processes
2022/10/07 06:53:50 [notice] 1#1: start worker process 30
2022/10/07 06:53:50 [notice] 1#1: start worker process 31 - 查看新建的pod
-
[root@node1 ~]# kubectl get pods -n test
NAME READY STATUS RESTARTS AGE
pod 1/1 Running 0 4m43s - 删除pod
-
[root@node1 ~]# kubectl delete pod -n test
error: resource(s) were provided, but no name, label selector, or --all flag specified
[root@node1 ~]# kubectl delete pods pod -n test
pod "pod" deleted
[root@node1 ~]# kubectl get pods -n test
No resources found in test namespace. -
Namespace是kubernetes系统中的一种非常重要资源,它的主要作用是用来实现多套环境的资源隔离或者多租户的资源隔离。
默认情况下,kubernetes集群中的所有的Pod都是可以相互访问的。但是在实际中,可能不想让两个Pod之间进行互相的访问,那此时就可以将两个Pod划分到不同的namespace下。kubernetes通过将集群内部的资源分配到不同的Namespace中,可以形成逻辑上的"组",以方便不同的组的资源进行隔离使用和管理。
- 访问pod
-
[root@node1 ~]# kubectl get pod -n test -o wide
NAME READY STATUS RESTARTS AGE IP NODE NOMINATED NODE READINESS GATES
nginx 0/1 ImagePullBackOff 0 6m16s 10.100.166.131 node1 <none> <none>
pod 1/1 Running 0 94s 10.100.104.2 node2 <none> <none>
[root@node1 ~]# curl http://10.100.104.2
<!DOCTYPE html>
<html>
<head>
<title>Welcome to nginx!</title>
<style>
body {
35em;
margin: 0 auto;
font-family: Tahoma, Verdana, Arial, sans-serif;
}
</style>
</head>
<body>
<h1>Welcome to nginx!</h1>
<p>If you see this page, the nginx web server is successfully installed and
working. Further configuration is required.</p><p>For online documentation and support please refer to
<a href="http://nginx.org/">nginx.org</a>.<br/>
Commercial support is available at
<a href="http://nginx.com/">nginx.com</a>.</p><p><em>Thank you for using nginx.</em></p>
</body>
</html> -
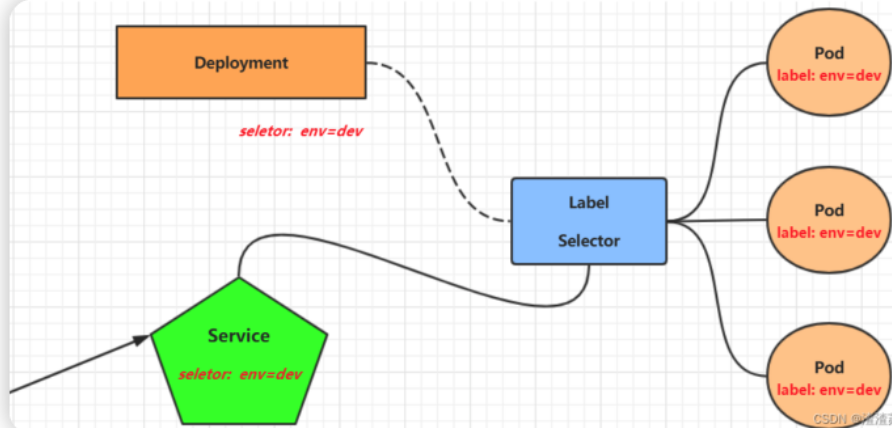
虽然每个Pod都会分配一个单独的Pod IP,然而却存在如下两问题:
Pod IP 会随着Pod的重建产生变化
Pod IP 仅仅是集群内可见的虚拟IP,外部无法访问
这样对于访问这个服务带来了难度。因此,kubernetes设计了Service来解决这个问题。 - Service可以看作是一组同类Pod对外的访问接口。借助Service,应用可以方便地实现服务发现和负载均衡。
创建deployment ,通过yaml文件创建控制器
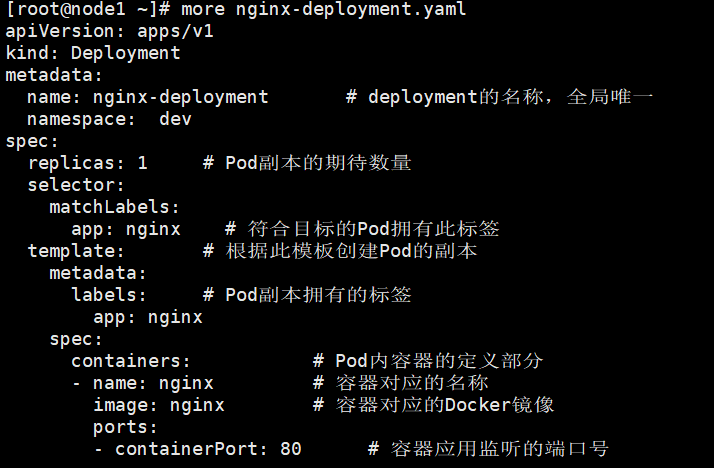
[root@node1 ~]# kubectl apply -f nginx-deployment.yaml
deployment.apps/nginx-deployment created-
[root@node1 ~]# kubectl get deployment -n dev
NAME READY UP-TO-DATE AVAILABLE AGE
nginx-deployment 1/1 1 1 85s - 创建 service
-
[root@node1 ~]# kubectl get deployment -n dev
NAME READY UP-TO-DATE AVAILABLE AGE
nginx-deployment 1/1 1 1 4m43s
[root@node1 ~]# kubectl expose deployment nginx-deployment -n dev --type=ClusterIP --port=80 --target-port=80
service/nginx-deployment exposed -
[root@node1 ~]# kubectl get svc -n dev
NAME TYPE CLUSTER-IP EXTERNAL-IP PORT(S) AGE
nginx-deployment ClusterIP 10.96.234.210 <none> 80/TCP 91s
[root@node1 ~]# curl http://10.96.234.210
<!DOCTYPE html>
<html>
<head>
<title>Welcome to nginx!</title>
<style>
body {
35em;
margin: 0 auto;
font-family: Tahoma, Verdana, Arial, sans-serif;
}
</style>
</head>
<body>
<h1>Welcome to nginx!</h1>
<p>If you see this page, the nginx web server is successfully installed and
working. Further configuration is required.</p><p>For online documentation and support please refer to
<a href="http://nginx.org/">nginx.org</a>.<br/>
Commercial support is available at
<a href="http://nginx.com/">nginx.com</a>.</p><p><em>Thank you for using nginx.</em></p>
</body>
</html>
[root@node1 ~]# -
[root@node2 ~]# kubectl expose deploy nginx-deployment --name=svc-nginx2 --type=NodePort --port=80 --target-port=80 -n dev
service/svc-nginx2 exposed -
[root@node2 ~]# kubectl get svc -n dev
