写在前面的话
高级语言有Java golang C等,通过系统调用访问系统的资源,那底层的汇编代码是如何运行的,此文通过汇编语言简单的说明系统调用。
环境准备安装nasm
osx系统通过brew安装
brew install nasm
CentOS7环境下源码安装
下载汇编编译器nasm:https://www.nasm.us/
wget https://www.nasm.us/pub/nasm/releasebuilds/2.15.05/nasm-2.15.05.tar.gz
tar -xvf nasm-2.15.05.tar.gz && cd nasm-2.15.05.tar.gz && ./configure && make && make install
Unbuntu环境下安装
sudo apt-get install nasm
汇编说明
一个汇编的简单例子 hello.asm
section .data
msg: db "hello world", 0x0a
len: equ $-msg
    SYS_WRITE equ 1
    STD_OUT equ 1
    SYS_EXIT equ 60

section .text
    global _start
_start:
    mov rax, SYS_WRITE
    mov rdi,STD_OUT
    mov rsi,msg
    mov rdx,len
    syscall
    jmp exit

exit:
    mov rax,SYS_EXIT
    mov rdi,0
    syscall
编译如下汇编文件
hello:
    nasm -f elf64 -o hello.o hello.asm
    ld -o hello -e _start hello.o

clean:
    rm hello hello.o
nasm支持的输出文件格式包括 linux的elf64 elf32以及macox的macho32 mach64等
使用C代码解析
#include <stdio.h>

const char *msg= "hello world
";
const int len = 12;
int main() {
    write(1, msg, len);
    exit(0);
    return 0;
}
将如下C代码编译成汇编
gcc -S hello.c产生hello.s汇编文件内容如下
    .file    "hello.c"
    .globl    msg
    .section    .rodata
.LC0:
    .string    "hello world
"
    .data
    .align 8
    .type    msg, @object
    .size    msg, 8
msg:
    .quad    .LC0
    .globl    len
    .section    .rodata
    .align 4
    .type    len, @object
    .size    len, 4
len:
    .long    12
    .text
    .globl    main
    .type    main, @function
main:
.LFB0:
    .cfi_startproc
    pushq    %rbp
    .cfi_def_cfa_offset 16
    .cfi_offset 6, -16
    movq    %rsp, %rbp
    .cfi_def_cfa_register 6
    movl    $12, %edx
    movq    msg(%rip), %rax
    movq    %rax, %rsi
    movl    $1, %edi
    movl    $0, %eax
    call    write
    movl    $0, %edi
    call    exit
    .cfi_endproc
对比如上两个汇编,基本一致。
数据段 .data
数据段用于定义常量,在运行时不可改变,定义语法如下
section .data
msg: db "hello world", 0x0a
len: equ $-msg
解析:
定义数据段: section .data
声明一个字符串,以换行结尾:msg: db "hello world", 0x0a
对应的C代码的
const char *msg= "hello world
";
db的含义是定义字节 byte,每个字符是一个字节。
另外还有两个字节的dw,以及其他的
dx := DB | DW | DD | DQ | DT | DO | DY | DZ
type := BYTE | WORD | DWORD | QWORD | TWORD | OWORD | YWORD | ZWORD
声明一个长度常量,取值字符串的长度:len: equ $-msg
equ的含义是定义一个常量的符号,取值是一个常量。
对应的C代码
const int len = 12;
代码段 .text
代码段用于代码,代码段需要以global _start开头,告诉系统这是代码的入口,定义语法如下:
section .text
    global _start
_start:
解析:
定义代码段:section .text
定义代码的全局入口标签:global _start
代码标签开始:_start:
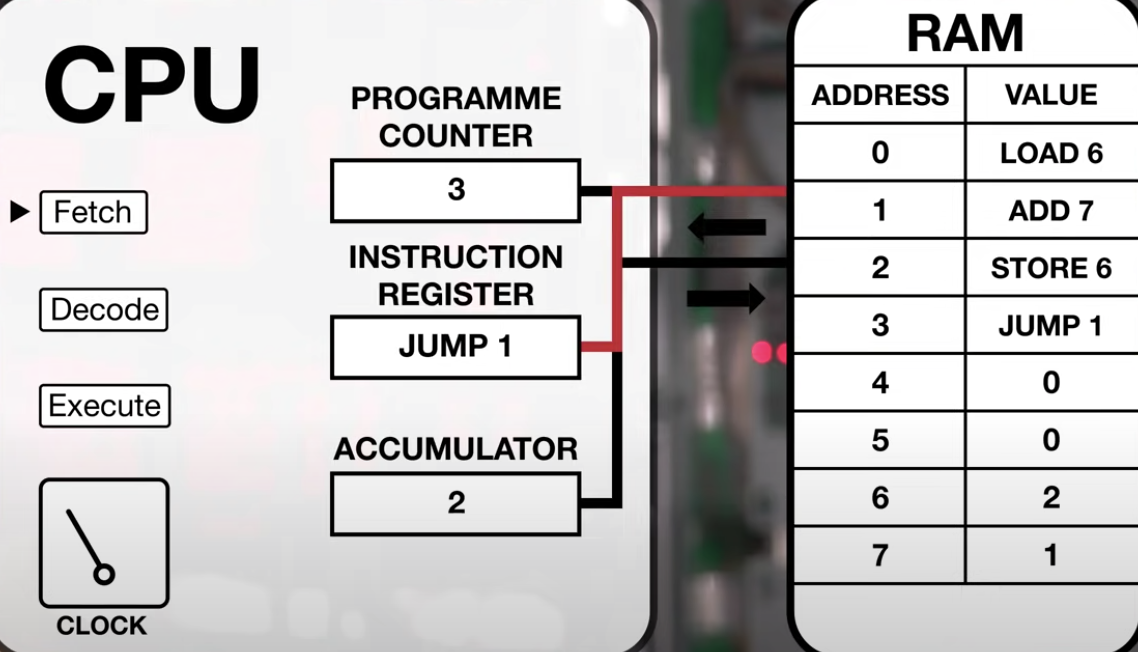
从CPU运行的角度分析代码段
CPU简洁执行步骤是 加载指令,解码指令,运行指令

CPU在时钟驱动下,从内存加载,解码和运行指令顺序如下所示:
控制台标准输出字符串的汇编解析
mov rax,1
mov rdi,1
mov rsi,msg
mov rdx,len
syscall
对应C代码
write(1, hello, 12);
解析:
mov rax,1 表示将__NR_write的系统调用号赋值给寄存器RAX,对应write系统调用函数,#define __NR_write 1
mov rdi,1 表示给系统调用write传递第一个参数,参数值等于1,表示控制台标准输出stdout
mov rsi, msg 表示给系统调用write传递第二个参数,参数值等于msg字符串指针,即"hello world
"
mov rdx, len 表示给系统调用write传递第三个参数,参数值等于msg字符串的长度,即12
syscall 表示执行系统调用write
本文使用osx和Centos7系统实验。
退出程序的汇编
    mov rax,60
    mov rdi,0
    syscall
对应C代码
exit(0);
解析:
mov rax,60 表示将__NR_exit的系统调用号赋值给寄存器RAX,对应exit系统调用函数,#define __NR_exit 60
mov rdi,0 表示给系统调用exit传递第一个参数,参数值等于0
syscall 表示执行系统调用exit
在linux系统上可以查看/usr/include/asm/unistd_64.h获取常用的系统调用函数的系统调用号
#define __NR_read 0
#define __NR_write 1
#define __NR_open 2
#define __NR_close 3

// ...
#define __NR_exit 60
// ...
#define __NR_pkey_free 331
如上就将简单的helloworld的汇编解析完毕,那么为什么要使用到rax rdi rsi rdx这些寄存器呢,
原因是CPU规定64位系统函数调用的参数传递使用的寄存器如下
对应的macos的代码如下,区别是不同系统的系统调用号不同
hello.asm
section .data
msg: db "hello world", 0x0a
len: equ $-msg
    SYS_WRITE equ 0x2000004
    STD_OUT equ 1
    SYS_EXIT equ 0x2000001

section .text
    global _start
_start:
    mov rax, SYS_WRITE
    mov rdi,STD_OUT
    mov rsi,msg
    mov rdx,len
    syscall
    jmp exit

exit:
    mov rax,SYS_EXIT
    mov rdi,0
    syscall
编译的Makefile
hello:
    nasm -f macho64 -o hello.o hello.asm
    ld -o hello -e _start hello.o -L /Library/Developer/CommandLineTools/SDKs/MacOSX.sdk/usr/lib -lSystem

clean:
    rm hello hello.o
在macos系统上生成二进制文件需要链接 -lSystem库才可以执行。
更多的汇编代码可以学习nasm的汇编文档说明:
https://www.nasm.us/pub/nasm/releasebuilds/2.15.05
参考材料:
https://0xax.blogspot.com/2014/08/say-hello-to-x64-assembly-part-1.html
https://github.com/0xAX/asm
祝玩的开心~
done.