原文地址:Silverlight 4 - MVVM with Commanding and WCF RIA Services
在我的前一篇文章 “WCF RIA Services and a guide to use DTO/”Presentation Model””,我提到要写一篇文章来讲述ViewModel。在这篇文章中,我将向你展示如何利用Silverlight 4 Commanding 和ViewModel来实现MVVM模式。在文章中我将使用Unity作为依赖注入框架将我的Repository注入DomainService,为了达到目的,我们需要创建自己的DomainServiceFactory,在我的“WCF RIA Services Unity DomainServiceFactory” 中你将会学到如何使用Unity和依赖注入,在本文章中就不再多说。
架构和设计
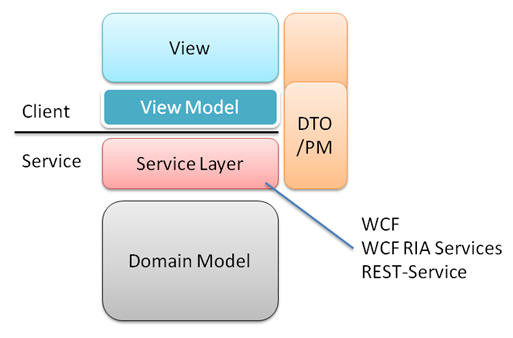
下图显示的是我经常在建立RIA应用的时候使用的架构和设计。

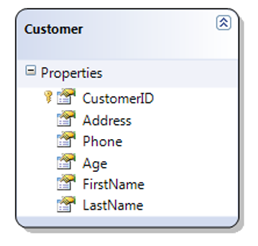
本文的服务层使用WCF RIA Service的DomainService,Domain Model将会非常简单,只是一个Customer实体和一个CustomerRepository。下图是Customer的类图

下面是CustomerRepository的接口代码
{
Customer GetCustomerByID(int customerID);
void Update(Customer customer);
}
注意:本文的重点不是如何实现ICustomerRepository接口,这里假设使用Entity Framework,Linq to SQL或者NHibernate、ADO.NET都可以。这些不是本文的重点。
下面的代码是使用了WCF RIA Services的DomainService,ICustomerRepository应该被注入。
 代码
代码
public class CustomerService : DomainService
{
private ICustomerRepository _customerRepository;
public CustomerService(ICustomerRepository customerRepository)
{
_customerRepository = customerRepository;
}
public CustomerDto GetCustomerByID(int customerID)
{
var customer = _customerRepository.GetCustomerByID(customerID);
return MapCustomerToCustomerDto(customer);
}
public void UpdateCustomer(CustomerDto customer)
{
if (customerDto == null)
throw new ArgumentNullException("customer");
_customerRepository.Update(MapCustomerDtoToCustomer(customerDto));
}
}
你可能已经发现了,在domain 实体Customer和CustomerDto(Data Transfer Object)之间有一个映射。如果我们使用过WCF,我们就会将对象实体映射为数据契约。在这里使用了类似AutoMapper 的框架来帮助我们代替手工映射。在内网应用中,网速良好,没有太复杂的业务逻辑的情况下,我们可以在不进行映射的情况下直接使用Customer实体。但是这些都依赖于我们构建的应用,在我们作出正确决定之前,已经有很多因素被包含进来。因此,本文也不是银弹。下面是CustomerDto的代码,在里面使用了一些验证规则,如果使用ViewModel,这些代码应该放入ViewModel中。
 代码
代码
{
[Key]
public int CustomerID { get; set; }
[Required]
[StringLength(32, MinimumLength=2)]
public string FirstName { get; set; }
[Required]
[StringLength(32, MinimumLength = 2)]
public string LastName { get; set; }
public int Age { get; set; }
}
注意:我将会使用自己的DomainServiceFactory在创建CustomerService的时候注入ICustomerRepository,可以通过阅读here. 来指导更多相关知识。
现在服务层已经完成,继续来实现client端,将会使用ViewModel和Silverlight4的Commanding。
ViewModel
一个ViewModel就是View的一个代理类。想像一下电影《矩阵》,我们只看见屏幕上面的一些字符,通过这些字符我们看见了世界。可以将ViewModel想象成字符,通过他们我们可以看见View。使用ViewModel的原因是分离关注,我们不想在View中看见逻辑代码。使用这种分离,即使UI还没有摆放好的时候,我们也可以通过自动化测试来测试View。
下面是一段ViewModel代码,使用了Commanding
 代码
代码
{
public CustomerViewModel()
{
}
public string FirstName
{
get;
set;
}
public string LastName
{
get;
set;
}
public bool IsAdult
{
get;
}
{
get;
}
}
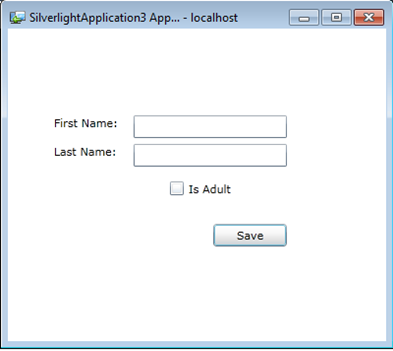
ViewModel代表了一个应该显示两个输入框的View,一个是firstname,一个是lastname,和一个代表Customer是否audit的只读checkbox。View还应该由一个Save按钮。IsLoading用来显示或者隐藏进度条。这里View将会使用ViewModel

下面是View的xaml代码,不需要后台代码,只需要将ViewModel作为资源加入,将数据绑定到ViewModel。
 代码
代码
xmlns:my="clr-namespace:System.Windows.Controls;assembly=System.Windows.Controls.Toolkit" x:Class="SilverlightApplication1.MainPage"
xmlns="http://schemas.microsoft.com/winfx/2006/xaml/presentation"
xmlns:x="http://schemas.microsoft.com/winfx/2006/xaml"
xmlns:d="http://schemas.microsoft.com/expression/blend/2008"
xmlns:mc="http://schemas.openxmlformats.org/markup-compatibility/2006"
xmlns:vm="clr-namespace:SilverlightApplication1.ViewModels"
mc:Ignorable="d"
d:DesignHeight="300" d:DesignWidth="400">
<UserControl.Resources>
<vm:CustomerViewModel x:Name="customerViewModel"/>
</UserControl.Resources>
<Grid x:Name="LayoutRoot" DataContext="{StaticResource customerViewModel}">
<my:BusyIndicator IsBusy="{Binding IsLoading}"></my:BusyIndicator>
<TextBox Text="{Binding FirstName, Mode=TwoWay, NotifyOnValidationError=True}" ... />
<TextBox Text="{Binding LastNaem, Mode=TwoWay, NotifyOnValidationError=True}" ... />
<TextBlock Text="First Name:" .../>
<TextBlock Text="Last Name:" .../>
<CheckBox IsChecked="{Binding IsAdult}" Content="Is Adult" .../>
<Button Command="{Binding Save}" Content="Save" ... />
</Grid>
</UserControl>
ViewModel的实现代码
你会发现CustomerViewModel继承自ViewModel,ViewModel实现乐INotifyPropertyChanged和INotifyDataErrorInfo接口。你可以在ViewModel on my other post about INotifyDataErrorInfo class. 中找到具体的实现。在CustomerViewModel的构造函数中调用WCF RIA Services来获取一个Customer,因为操作是异步的,我们不知道多长时间可以有结果,因此将IsLoading属性设置为true显示正在加载,下面是实现的代码。
 代码
代码
{
CustomerContext _customerContext = new CustomerContext();
CustomerDto _customerDto = new CustomerDto();
bool _isLoading = false;
public CustomerViewModel()
{
this.IsLoading = true;
_customerContext.Load<CustomerDto>( _customerContext.GetCustomerByIDQuery(10),
loadOperation =>
{
_customerDto = loadOperation.Entities.SingleOrDefault();
LoadingCompleted();
}, null);
}
public string FirstName
{
get { return _customerDto.FirstName; }
set
{
if (_customerDto.FirstName != value)
{
_customerDto.FirstName = value;
NotifyPropertyChanged("FirstName");
}
}
}
public string LastName
{
get { return _customerDto.LastName; }
set
{
if (_customerDto.LastName != value)
{
_customerDto.LastName = value;
NotifyPropertyChanged("LastName");
}
}
}
public bool IsLoading
{
get { return _isLoading; }
internal set { _isLoading = value; NotifyPropertyChanged("IsLoading"); }
}
public bool IsAdult
{
get { return _customerDto.Age >= 18; }
}
public ICommand Save
{
get { return new SaveCommand(this); }
}
internal void SaveCustomer()
{
_customerContext.SubmitChanges();
} private void LoadingCompleted() { NotifyPropertyChanged("FirstName"); NotifyPropertyChanged("LastName"); NotifyPropertyChanged("IsAdult"); this.IsLoading = false; }
}
看起来可能有点奇怪,一个空的CustomerDto被分配给_CustoemrDto字段。CustoemrViewModel的其他属性将会访问这个字段和他的属性,为了避免在get和set中添加一大丢检查是否null的代码,使用了一个默认的CustomerDto。因此,虽然有点丑陋,但是在每个属性中避免了一大丢代码。在构造函数中将会加载一个Customer。
 代码
代码
{
this.IsLoading = true;
_customerContext.Load<CustomerDto>(
_customerContext.GetCustomerByIDQuery(10),
loadOperation =>
{
_customerDto = loadOperation.Entities.SingleOrDefault();
LoadingCompleted();
}, null);
}
IsLoading属性设置为true,可以保证加载数据的时候显示进度条。当Customer对象加载完毕,_CustomerDto会设置为加载的customer对象,将会调用LoadingCompleted方法。方法将会保证隐藏进度条,通知View变化,因此控件绑定将会调用绑定属性的get方法显示customer的内容。
Commanding
你可以从“Silverlight 4 Commanding enables ViewModels”. 中阅读一些关于Commanding的知识。在ViewModel中有一个方法SaveRule,是CustomerViewModel实现了ISaveableViewModel 接口。CustomerViewModel中的Save属性可以返回一个SaveCommand。
public ICommand Save
{
get { return new SaveCommand(this); }
}
internal void SaveRule()
{
_customerContext.SubmitChanges();
}
Save属性绑定了View的Save按钮的command属性,下面就是Save属性返回的SaveCommand实现代码
 代码
代码
{
private ISaveableViewModel _view;
public SaveCommand(ISaveableViewModel view)
{
_view = view;
}
public bool CanExecute(object parameter)
{
return true;
}
public event EventHandler CanExecuteChanged;
public void Execute(object parameter)
{
_view.SaveRule();
}
}
在SaveCommand中使用了一个ISaveableViewModel接口。保证加入ViewModel的Command会被执行,Command可以被其他View重用。
总结:
本文向你展示了如何使用WCF RIA Services,Model View View Model模式以及Commanding。代码可能不是最好的,没有加入更多的错误验证。
