一、RabbitMQ消息队列介绍
RabbitMQ也是消息队列,那RabbitMQ和之前的Python的Queue有什么区别呢:
py消息队列
1. 线程queue(同一进程下线程之间进行交互) 2. 进程Queue(父子进程进行交互或者同属于同一进程下的多个子进程进行交互)类似于这种公共的中间有:
- RabbitMQ
- ZeroMQ
- ActiveMQ
二、RabbitMQ基本示例
1、Rabbitmq安装 ubuntu系统
sudo apt-get install rabbitmq-server
2、简单的基本示例
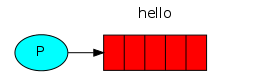
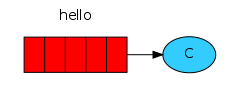
简单的总图:P为生产者,C为消费者,红色的为队列

分图:sending(生产者):
3、示例代码
生产者(发送端):
#send端
import pika
connection = pika.BlockingConnection(pika.ConnectionParameters(
    'localhost'))#默认端口5672,可不写

#创建通道,声明一个管道,在管道里发送消息
channel = connection.channel()
#在管道里声明queue
channel.queue_declare(queue='hello')
#一条消息永远不能直接发送到队列,它总需要经过一个交换exchange
channel.basic_publish(exchange='',
                      routing_key='hello',
                      body='Hello World')#设置routing_key(消息队列的名称)和body(发送的内容)
print("[x] Sent 'Hello World!'")
connection.close()#关闭连接,队列关闭
#结果:
[x] Sent 'Hello World!'
消费者(接收者)
#receiving(消费者接收者)
import pika
#创建一个连接
connection = pika.BlockingConnection(
    pika.ConnectionParameters('localhost'))#默认端口5672,可不写
#创建通道,声明一个管道,在管道里发送消息
channel = connection.channel()

#把消息队列的名字为hello,把消费者和queue绑定起来,生产者和queue的也是hello
#为什么又声明了一个hello队列
#如果确定已经声明了,可以不声明。但是你不知道那个机器先运行,所以要声明两次
#The next step, just like before, is to make sure that the queue exists. Creating a queue using queue_declare is idempotent ‒ we can run the command as many times as we like, and only one will be created.
channel.queue_declare(queue='hello')

#回调函数get消息体
def callback(ch,method,properties,body):#四个参数为标准格式
    #管道内存对象,内容相关信息
    print("打印看下是什么:",ch,method,properties) #打印看下是什么
    print(" [x] Received %r" % body)
#消费消息
channel.basic_consume(
    queue='hello',#你要从那个队列里收消息
    on_message_callback=callback,#如果收到消息,就调用callback函数来处理消息
    auto_ack=True #写的话,如果接收消息,机器宕机消息就丢了
    #一般不写,宕机则生产者检测到发给其他消费者
)
print(' [*] Waiting for messages. To exit press CTRL+C')
channel.start_consuming() #创建死循环,监听消息队列,可使用CTRL+C结束监听

#结果:
 [*] Waiting for messages. To exit press CTRL+C
打印看下是什么: <BlockingChannel impl=<Channel number=1 OPEN conn=<SelectConnection OPEN transport=<pika.adapters.utils.io_services_utils._AsyncxtTransport object at 0x7faf21dc2e48> params=<ConnectionParameters host=localhost port=5672 virtual_host=/ ssl=False>>>> <Basic.Deliver(['consumer_tag=ctag1.f9cc6a09079c43cfad16a4b991158c27', 'delivery_tag=1', 'exchange=', 'redelivered=False', 'routing_key=hello'])> <BasicProperties>
 [x] Received b'Hello World'
4、查看队列名和所的消息
sudo rabbitmqctl list_queues
On Windows, omit the sudo:
rabbitmqctl.bat list_queues
Rabbitmq官方文档
https://www.rabbitmq.com/getstarted.html