上篇粗略的分析android添加账号的流程,本篇深入的解析下执行步骤。先来看图片,取自深入理解android卷2:

上图详细的分析了addAccount的流程,下面我们结合源码来理解它
1、addAccount:其实这里省略了一步,应该是客户端addAccount——>AddAccountSettings.addAccount——>AccountManager.addAccount。我们看下setting是如何到AccountManager:
private void addAccount(String accountType) {
    ......
        AccountManager.get(this).addAccount(
                accountType,
                null, /* authTokenType */
                null, /* requiredFeatures */
                addAccountOptions,
                null,
                mCallback,
                null /* handler */);
        mAddAccountCalled  = true;
    }
}
代码直白的告诉我们就是去调用AccountManager.addAccount(好像是废话哎),但我们深入看get函数发现另有玄机
public static AccountManager get(Context context) {
        if (context == null) throw new IllegalArgumentException("context is null");
        return (AccountManager) context.getSystemService(Context.ACCOUNT_SERVICE);
    }
而对于getSystemService(xxx)来说就是ContextImpl对应的注册函数
registerService(ACCOUNT_SERVICE, new ServiceFetcher() {
                public Object createService(ContextImpl ctx) {
                    IBinder b = ServiceManager.getService(ACCOUNT_SERVICE);
                    IAccountManager service = IAccountManager.Stub.asInterface(b);
                    return new AccountManager(ctx, service);
                }})
public AccountManager(Context context, IAccountManager service, Handler handler) {
        mContext = context;
        mService = service;
        mMainHandler = handler;
    }
ok,也就是说AccountManager.get(this)去创建了一个包含IAccountManager.Stub.asInterface(实质为AccountManagerService)的AccountManager.Proxy;这很重要下面会用到。
2—5、这几步都是在AccountManager.addAccount里,代码脉络也很清晰就一起解释吧。
public AccountManagerFuture<Bundle> addAccount(final String accountType,
    ......
        return new AmsTask(activity, handler, callback) {
            public void doWork() throws RemoteException {
                mService.addAccount(mResponse, accountType, authTokenType,
                        requiredFeatures, activity != null, optionsIn);
            }
        }.start();
    }
创建AmsTask并start,而start函数实质是去执行doWork函数,故这里是去执行mService.addAccount。这里需要注意的是mResponse,它是在new AmsTask时被创建
mResponse = new Response();
Response是AmsTask的内部类且继承自IAccountManagerResponse.Stub(重要)。
6—12、按流程是去执行mService.addAccount,上面分析到mService 为AccountManagerService即AccountManagerService.addAccount
  public void addAccount(final IAccountManagerResponse response, final String accountType,
    ......
        new Session(accounts, response, accountType, expectActivityLaunch,
                    true /* stripAuthTokenFromResult */) {
                @Override
                public void run() throws RemoteException {
                    mAuthenticator.addAccount(this, mAccountType, authTokenType, requiredFeatures,
                            options);
                }
        ......
                }
            }.bind();
    ......
可以看到此函数中包含很多操作,我们慢慢来剖析。
 private abstract class Session extends IAccountAuthenticatorResponse.Stub
           implements IBinder.DeathRecipient, ServiceConnection {
    ......
Session的构造函数中初始化mResponse,看参数可知mResponse =AmsTask.mResponse
public Session(UserAccounts accounts, IAccountManagerResponse response, String accountType,
    ......
    mResponse = response;
    ......
     IAccountManagerResponse response = mResponse;
    ......
Session是AccountManagerService内部抽象类,继承IAccountAuthenticatorResponse.Stub且实现ServiceConnection接口,这样才能调用下面的bind(第8步)函数。
void bind() {
    ......
            if (!bindToAuthenticator(mAccountType)) {
                Log.d(TAG, "bind attempt failed for " + toDebugString());
                onError(AccountManager.ERROR_CODE_REMOTE_EXCEPTION, "bind failure");
            }
        }
private boolean bindToAuthenticator(StringauthenticatorType) {
    //从mAuthenticatorCache中查询满足指定类型的服务信息
   AccountAuthenticatorCache.ServiceInfo<AuthenticatorDescription>
            authenticatorInfo =
             mAuthenticatorCache.getServiceInfo(
                           AuthenticatorDescription.newKey(authenticatorType));
   ......
    Intentintent = new Intent();
   intent.setAction(AccountManager.ACTION_AUTHENTICATOR_INTENT);
    //设置目标服务的ComponentName
   intent.setComponent(authenticatorInfo.componentName);
     //通过bindService启动指定的服务,成功与否将通过第二个参数传递的
    //ServiceConnection接口返回
      if (!mContext.bindServiceAsUser(intent, this, Context.BIND_AUTO_CREATE,
          ......
 }
这里分2步走:查询系统得到我们要添加账户类型(微信、微博、淘宝,这里用retme pocApp里的代码来解释,不熟悉概念的看资料2)的authenticatorInfo;bindServiceAsUser去bind微信账号的service(此service就是pocApp里的AuthenticationService)。而此时pocApp的AuthenticationService执行onBind(第9步)
package com.example.android.samplesync.authenticator;

public IBinder onBind(Intent intent) {
        if (Log.isLoggable(TAG, Log.VERBOSE)) {
            Log.v(TAG, "getBinder()...  returning the AccountAuthenticator binder for intent "
                    + intent);
        }
        return mAuthenticator.getIBinder();
    }
注意这里返回的binder是mAuthenticator,而mAuthenticator是pocApp中的Authenticator(如果你不懂这些是什么玩意,建议结合pocApp看资料2)。
class Authenticator extends AbstractAccountAuthenticator {
AbstractAccountAuthenticator类中有内部类继承
private class Transport extends IAccountAuthenticator.Stub {
而在执行bindServiceAsUser后回去回调onServiceConnection函数(第10步),不清楚为什么要回调自行查资料。上面提到Session实现ServiceConnection接口,这里直接调用Session.onServiceConnection。这里的service就是onbind返回的Authenticator,故mAuthenticator = Authenticator
public void onServiceConnected(ComponentName name,IBinder service) {
   //得到远端AAS返回的IAccountAuthenticator接口,这个接口用于
  //AccountManagerService和该远端AAS交互
   mAuthenticator = IAccountAuthenticator.Stub.asInterface(service);
    try {
           run();//调用匿名Session类实现的run函数,看第6步中的匿名类函数
     } ......
 }
执行第11步 run
 public void run() throws RemoteException {
                    mAuthenticator.addAccount(this, mAccountType, authTokenType, requiredFeatures,
                            options);
                }
第12步mAuthenticator.addAccount就是pocApp中Authenticator.addAccount
13、Authenticator.addAccount返回bundle。由于pocApp没有实现账户登陆,所以后面的流程走步下去了。但我们看
[-->AbstractAccountAuthenticator.java::Transport:addAccount]发现其内部会调用
response.onResult(bundle);
根据mAuthenticator.addAccount参数可知,response是IAccountAuthenticatorResponse类型就是上面的匿名Session类 。所以这里执行的是Session.onResult
  public void onResult(Bundle result) {
            if (response != null) {
                try {
                ......
                        response.onError(AccountManager.ERROR_CODE_INVALID_RESPONSE,
                                "null bundle returned");
                    } else {
                        ......
                        response.onResult(result);
                    }
             ......
        }
14、由第6步的Session构造函数可知 response就是AmsTask.mResponse,而AmsTask.mResponse = new Response()这里调用AmsTask内部类Response.onResult
 private class Response extends IAccountManagerResponse.Stub {
            public void onResult(Bundle bundle) {
                Intent intent = bundle.getParcelable(KEY_INTENT);
                if (intent != null && mActivity != null) {
                    // since the user provided an Activity we will silently start intents
                    // that we see
                    mActivity.startActivity(intent);
                    // leave the Future running to wait for the real response to this request
                } else if (bundle.getBoolean("retry")) {
                    try {
                        doWork();
                    } catch (RemoteException e) {
                        // this will only happen if the system process is dead, which means
                        // we will be dying ourselves
                    }
                } else {
                    set(bundle);
                }
            }
这里调用startActivity去启动账号登陆activity(launchAnyWhere bug)。源码分析到此为止嘞,但是期间涉及到的很多类我们需要整理下,便于记忆和消化addAccount流程
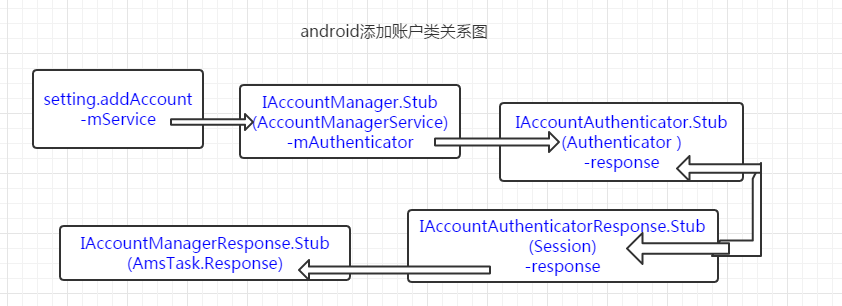
看到罗,addAccount就是上面这几个类之间的操作。其实addAccount总结起来也很简单,accountManager—>accountAuthenticator—>accountAuthenticatorRespone—>accountManagerRespone
参考资料:
1、[深入理解Android卷二 全文-第八章]深入理解ContentService和AccountManagerService
2、一步一步教你在 Android 里创建自己的账号系统(一)
3、https://github.com/retme7/launchAnyWhere_poc_by_retme_bug_7699048