命令模式是行为型设计模式之一。命令模式没那么多条条框框,所以很灵活。命令模式简单的说就是给他下一个命令,然后他就会执行和这个命令的一系列操作。例如点击电脑的关机命令,系统会执行暂停,保存,关闭等一系列的命令,最后完成关机。
命令模式也跟关机一样,将一系列方法封装为一个方法,用户只要执行这个方法就会执行封装的一系列方法。不过真正用起来并不是这么直白简单。
定义
将一个请求封装成一个对象,从而让用户使用不同的请求把客户端参数化;对请求队列或者记录请求日志,以及支持可撤销的操作。
使用场景
- 需要对行为进行记录,撤销,重做,事务处理时。
- 需要抽象出待执行的动作,然后以参数的形式提供出来。
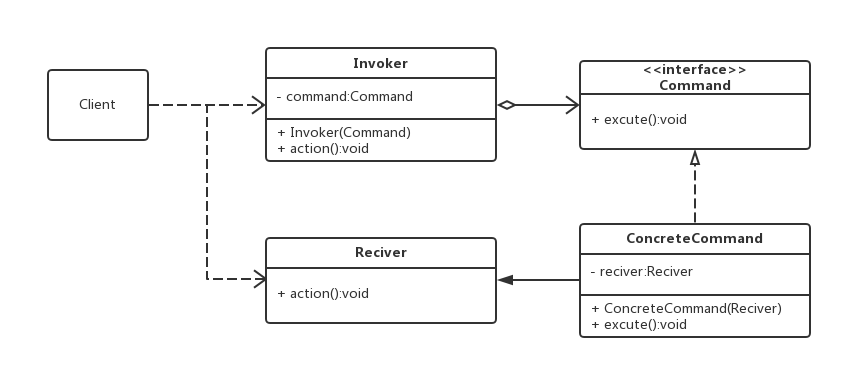
UML

- Receiver : 命令接收者,负责具体执行一个请求。在接收者中封装的具体操作逻辑的方法叫行动方法。
- Command:命令角色,定义具体命令类的接口。
- ConcreteCommand : 具体的命令角色。,实现了Command接口,在excute()方法中调用接收者Receiver的相关方法,弱化了命令接收者和具体行为之间的耦合。
- Invoker:请求者角色,调用命令对象执行具体的请求。
模板代码:
接收者,执行具体命令
public class Receiver {
    public void action(){
        System.out.println("具体执行");
    }
}- 1
- 2
- 3
- 4
- 5
- 1
- 2
- 3
- 4
- 5
抽象的命令
public interface Command {
    void excute();
}- 1
- 2
- 3
- 1
- 2
- 3
具体的命令
public class ConcreteCommand implements Command {
    private Receiver receiver;

    public ConcreteCommand(Receiver receiver) {
        this.receiver = receiver;
    }

    @Override
    public void excute() {
        receiver.action();
    }
}- 1
- 2
- 3
- 4
- 5
- 6
- 7
- 8
- 9
- 10
- 11
- 12
- 1
- 2
- 3
- 4
- 5
- 6
- 7
- 8
- 9
- 10
- 11
- 12
发起请求者
public class Invoker {
    private Command command;

    public Invoker(Command command) {
        this.command = command;
    }
    public void action(){
        command.excute();
    }
}- 1
- 2
- 3
- 4
- 5
- 6
- 7
- 8
- 9
- 10
- 1
- 2
- 3
- 4
- 5
- 6
- 7
- 8
- 9
- 10
客户端调用
public class Client {
    public static void main(String[] args) {
        Receiver receiver = new Receiver();
        Command command = new ConcreteCommand(receiver);
        Invoker invoker = new Invoker(command);
        invoker.action();
    }
}- 1
- 2
- 3
- 4
- 5
- 6
- 7
- 8
- 1
- 2
- 3
- 4
- 5
- 6
- 7
- 8
输出

简单实现
接下来就以俄罗斯方块举个例子。将俄罗斯方块这个游戏看做是命令接收者,我们的手柄按键作为命令请求者。
先创建一个游戏,执行具体命令
public class Game {
    public void toLeft(){
        System.out.println("向左移动");
    }
    public  void toRight(){
        System.out.println("向右移动");
    }
    public void transform(){
        System.out.println("变形");
    }

}- 1
- 2
- 3
- 4
- 5
- 6
- 7
- 8
- 9
- 10
- 11
- 12
- 1
- 2
- 3
- 4
- 5
- 6
- 7
- 8
- 9
- 10
- 11
- 12
创建抽象命令接口
public interface Command {
    void excute();
}- 1
- 2
- 3
- 1
- 2
- 3
创建三个具体命令
public class LeftCommand implements Command {
    private Game receiver;

    public LeftCommand(Game receiver) {
        this.receiver = receiver;
    }

    @Override
    public void excute() {
        receiver.toLeft();
    }
}- 1
- 2
- 3
- 4
- 5
- 6
- 7
- 8
- 9
- 10
- 11
- 12
- 1
- 2
- 3
- 4
- 5
- 6
- 7
- 8
- 9
- 10
- 11
- 12
public class RightCommand implements Command {
    private Game receiver;

    public RightCommand(Game receiver) {
        this.receiver = receiver;
    }

    @Override
    public void excute() {
        receiver.toRight();
    }
}- 1
- 2
- 3
- 4
- 5
- 6
- 7
- 8
- 9
- 10
- 11
- 12
- 1
- 2
- 3
- 4
- 5
- 6
- 7
- 8
- 9
- 10
- 11
- 12
public class TransformCommand implements Command {
    private Game receiver;

    public TransformCommand(Game receiver) {
        this.receiver = receiver;
    }

    @Override
    public void excute() {
        receiver.transform();
    }
}- 1
- 2
- 3
- 4
- 5
- 6
- 7
- 8
- 9
- 10
- 11
- 12
- 1
- 2
- 3
- 4
- 5
- 6
- 7
- 8
- 9
- 10
- 11
- 12
创建一个按钮,这个按钮发起命令
public class Buttons {
    private LeftCommand leftCommand;
    private RightCommand rightCommand;
    private TransformCommand transformCommand;

    public void setLeftCommand(LeftCommand leftCommand) {
        this.leftCommand = leftCommand;
    }

    public void setRightCommand(RightCommand rightCommand) {
        this.rightCommand = rightCommand;
    }

    public void setTransformCommand(TransformCommand transformCommand) {
        this.transformCommand = transformCommand;
    }

    public void toLeft(){
        leftCommand.excute();
    }

    public void toRight(){
        rightCommand.excute();
    }
    public void transform(){
        transformCommand.excute();
    }

}- 1
- 2
- 3
- 4
- 5
- 6
- 7
- 8
- 9
- 10
- 11
- 12
- 13
- 14
- 15
- 16
- 17
- 18
- 19
- 20
- 21
- 22
- 23
- 24
- 25
- 26
- 27
- 28
- 29
- 1
- 2
- 3
- 4
- 5
- 6
- 7
- 8
- 9
- 10
- 11
- 12
- 13
- 14
- 15
- 16
- 17
- 18
- 19
- 20
- 21
- 22
- 23
- 24
- 25
- 26
- 27
- 28
- 29
客户端调用
public class Client {
    public static void main(String[] args) {
        Game game = new Game();
        LeftCommand leftCommand = new LeftCommand(game);
        RightCommand rightCommand = new RightCommand(game);
        TransformCommand transformCommand = new TransformCommand(game);
        Buttons buttons = new Buttons();
        buttons.setLeftCommand(leftCommand);
        buttons.setRightCommand(rightCommand);
        buttons.setTransformCommand(transformCommand);

        buttons.toRight();
        buttons.toLeft();
        buttons.transform();

    }
}- 1
- 2
- 3
- 4
- 5
- 6
- 7
- 8
- 9
- 10
- 11
- 12
- 13
- 14
- 15
- 16
- 17
- 1
- 2
- 3
- 4
- 5
- 6
- 7
- 8
- 9
- 10
- 11
- 12
- 13
- 14
- 15
- 16
- 17
最后输出

说明
可能看到上面写那么一大堆东西,最后就实现那么点功能,是不是觉得太麻烦了?确实太麻烦了,上面的功能其实几行代码就搞定了:
public class Client {
    public static void main(String[] args) {
        Game game = new Game();
        game.toLeft();
        game.toRight();
        game.transform();
    }
}- 1
- 2
- 3
- 4
- 5
- 6
- 7
- 8
- 1
- 2
- 3
- 4
- 5
- 6
- 7
- 8
输出同样是:

这其实也体现出来了命令模式的优点和缺点,命令模式提供了更低的耦合度,更好的扩展性,但也生成了大量的命令类。膨胀极其迅速。
总结
命令模式本质就是将命令进行封装,将命令的发起者和真正的执行者隔离,降低耦合度。
命令请求者只需要发起请求,命令的具体执行时什么用,由谁执行都不需要知道。
优点
- 降低了请求者和发起者的耦合,降低了系统的耦合度
- 对命令更容易控制,可以自由组合不同的命令组。
- 对命令的拓展极其容易,新命令很容易加到系统中
缺点
- 类的数量膨胀太严重。