键盘数据监控:
同样的,键盘的检测和鼠标的情形很类似,都是以QWidget为基类的工程
Step1:在UI设计中添加该模块需要使用的相关组件,如下所示:


 <width>141</width>
     <height>31</height>
    </rect>
   </property>
   <property name="text">
    <string>Direction Contol:</string>
   </property>
  </widget>
  <widget class="QGraphicsView" name="graphicsView">
   <property name="geometry">
    <rect>
     <x>200</x>
     <y>50</y>
     <width>181</width>
     <height>151</height>
    </rect>
   </property>
  </widget>
  <widget class="QLabel" name="label_7">
   <property name="geometry">
    <rect>
     <x>250</x>
     <y>200</y>
     <width>91</width>
     <height>17</height>
    </rect>
   </property>
   <property name="text">
    <string>Move Regon</string>
   </property>
  </widget>
  <widget class="QPushButton" name="pushButton_3">
   <property name="geometry">
    <rect>
     <x>240</x>
     <y>100</y>
     <width>16</width>
     <height>16</height>
    </rect>
   </property>
   <property name="font">
    <font>
     <pointsize>8</pointsize>
     <italic>false</italic>
    </font>
   </property>
   <property name="text">
    <string>O</string>
   </property>
  </widget>
 </widget>
 <layoutdefault spacing="6" margin="11"/>
 <resources/>
 <connections/>
</ui>
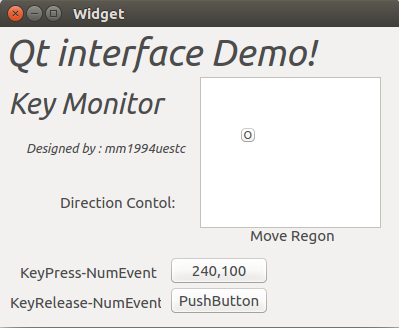 从ui设计当中,我们能明确的额看到有两个按键,若干个Lable,一个Frame等等。
Step2:我们在widget.cpp文件中添加我们对应事件的执行函数:
func1:keyPressEvent func2:keyPressEvent
void Widget::keyPressEvent(QKeyEvent *e)
{
    int x, y, dis;
    x = ui->pushButton_3->x();
    y = ui->pushButton_3->y();
    switch(e->key())
    {
    case Qt::Key_W : dis = y>40  ? 10:0; ui->pushButton_3->move(x,y-dis); break;
    case Qt::Key_S : dis = y<190 ? 10:0; ui->pushButton_3->move(x,y+dis); break;
    case Qt::Key_A : dis = x>190 ? 10:0; ui->pushButton_3->move(x-dis,y); break;
    case Qt::Key_D : dis = x<370 ? 10:0; ui->pushButton_3->move(x+dis,y); break;
    default : break;
    }
    ui->pushButton->setText(tr("%1,%2").arg(x).arg(y));
}

void Widget::keyReleaseEvent(QKeyEvent *e)
{
    ui->pushButton_2->setText(tr("%1").arg(e->key()));
}
同样的在widget.h头文件中对这两个函数进行声明:
protected:
    void keyPressEvent(QKeyEvent *);
    void keyReleaseEvent(QKeyEvent *);
以上的两个基本步骤就完成了整个工程的建立,接下来就是编译并运行了!(Demo的使用方法就是键盘上的WSAD对应了前后左右的方向,Frame上的那个圆圈会随着键盘的前后左右而运动)