阅读目录
- 1.vue组件注册步骤
- 2.理解组件的创建和注册。
- 3.理解Vue全局注册和局部注册
- 4.理解父组件和子组件
- 5.理解组件的语法糖。
- 6.学会使用 script或 template 标签
- 7.理解使用props
1.vue组件注册步骤
Vue.js 的组件有三个步骤: 创建组件构造器(Vue.extend()方法 ),注册组件(Vue.component())和实例化组件。
如下demo:
<!DOCTYPE html>
<html>
  <body>
    <head>
      <title>演示Vue</title>
    </head>
    <div id="container">
      <component1></component1>
    </div>
  </body>
  <script src="./vue.js"></script>
  <script type="text/javascript">
    // 1. 创建一个组件构造器
    var component1 = Vue.extend({
      template: '<div>hello world</div>'
    });
    // 2. 注册组件,并指定组件的标签为<component1>
    Vue.component('component1', component1);

    // 3. 实例化组件
    new Vue({
      el: '#container'
    });
  </script>
</html>
浏览器编译后html结构会变为
<div id="container">
  <div>hello world</div>
</div>
页面运行显示为
hello world
2.理解组件的创建和注册。
2-1 Vue.extend() 是Vue构造器的扩展,调用Vue.extend()创建的是一个组件构造器,该构造器有一个选项对象,选项对象的template属性用于定义组件要渲染的html。
2-2 Vue.component() 是注册组件,需要2个参数,第一个参数是自定义组件的标签,第二个参数是组件的构造器。
2-3 组件需要挂载到某个Vue的实例下,否则不生效。
如下实例:
<!DOCTYPE html>
<html>
  <body>
    <head>
      <title>演示Vue</title>
    </head>
    <div id="container1">
      <component1></component1>
    </div>
    <div id="container2">
      <component1></component1>
    </div>

    <div id="container3">
      <component1></component1>
    </div>
  </body>
  <script src="./vue.js"></script>
  <script type="text/javascript">
    // 1. 创建一个组件构造器
    var component1 = Vue.extend({
      template: '<div>hello world</div>'
    });
    // 2. 注册组件,并指定组件的标签为<component1>
    Vue.component('component1', component1);

    // 3. 实例化组件 container1
    new Vue({
      el: '#container1'
    });
    // 3. 实例化组件 container2
    new Vue({
      el: '#container2'
    });
    // 不实例化 container3 因此第三个自定义标签是不会生效的
  </script>
</html>
最终代码被渲染成为如下:
<div id="container1"><div>hello world</div></div>
<div id="container2"><div>hello world</div></div>
3.理解Vue全局注册和局部注册
调用Vue.component()注册组件时,组件的注册是全局的,如果想要使用组件的局部注册的话,可以用选项对象的components属性实现局部注册。
如下代码:中间就把第二步注册组件哪项移到实例化组件里面来了;如下代码:
<!DOCTYPE html>
<html>
  <body>
    <head>
      <title>演示Vue</title>
    </head>
    <div id="container1">
      <component1></component1>
    </div>
    <!-- 不能使用component1组件,因为它是container1里面局部注册的 -->
    <div id="container2">
      <component1></component1>
    </div>
  </body>
  <script src="./vue.js"></script>
  <script type="text/javascript">
    // 1. 创建一个组件构造器
    var component1 = Vue.extend({
      template: '<div>hello world</div>'
    });

    // 3. 实例化组件 container1
    new Vue({
      el: '#container1',
      components: {
        'component1': component1
      }
    });
    // 实例化container2 是不生效的
    new Vue({
      el: '#container2'
    })
  </script>
</html>
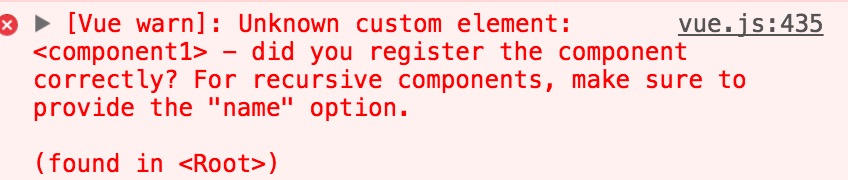
实例化container2 是不生效的,并且在浏览器控制台会报如下错误:
4.理解父组件和子组件。
在一个组件中包含另一个组件,那么另一个组件就是该组件的子组件。
如下代码:
<!DOCTYPE html>
<html>
  <body>
    <head>
      <title>演示Vue</title>
    </head>
    <div id="container1">
      <parent-component></parent-component>
    </div>
  </body>
  <script src="./vue.js"></script>
  <script type="text/javascript">
    // 1. 创建一个组件构造器
    var Child = Vue.extend({
      template: '<div>hello world</div>'
    });

    var Parent = Vue.extend({
      // 在组件内部使用<child-component>组件
      template: '<div>hello world <child-component></child-component></div>',
      components: {
        // 局部注册Child组件
        'child-component': Child
      }
    });
    // 全局注册Parent组件
    Vue.component('parent-component', Parent);

    // 实例化组件
    new Vue({
      el: '#container1'
    })
  </script>
</html>
简单理解代码如下:
1. var Child = Vue.extend(...) 定义一个Child组件构造器。
2. var Parent = Vue.extend(...) 定义一个Parent组件构造器。
3. components: {'child-component': Child}, 将Child组件注册到Parent组件,并将Child组件的标签设置为 child-component;
4. template: 渲染html模板,找到template选项,然后使用 child-component组件。
5. 注册Parent组件 Vue.component('parent-component', Parent);
6. 最后实例化组件,需要到html元素为id='container1'里面去。
Child组件是在Parent组件中注册的,只能在Parent组件中注册的。如下几种情况都不行的。
4-1 以子标签的形式在父组件中使用;如下代码:
<!DOCTYPE html>
<html>
  <body>
    <head>
      <title>演示Vue</title>
    </head>
    <div id="container1">
      <parent-component>
        <child-component></child-component>
      </parent-component>
    </div>
  </body>
  <script src="./vue.js"></script>
  <script type="text/javascript">
    // 1. 创建一个组件构造器
    var Child = Vue.extend({
      template: '<div>hello world</div>'
    });

    var Parent = Vue.extend({
      // 在组件内部使用<child-component>组件
      template: '<div>hello world</div>',
      components: {
        // 局部注册Child组件
        'child-component': Child
      }
    });
    // 全局注册Parent组件
    Vue.component('parent-component', Parent);

    // 实例化组件
    new Vue({
      el: '#container1'
    })
  </script>
</html>
上面调用子组件的方式是无效的,因为在js里面当父组件要需要的html模板template的内容的时候已经决定了需要渲染什么,所以当parent-component运行的时候,在父组件使用自定义的子标签。
运行时会当做html的普通标签来渲染,但是它又不是普通的html标签,因此会被忽略掉。
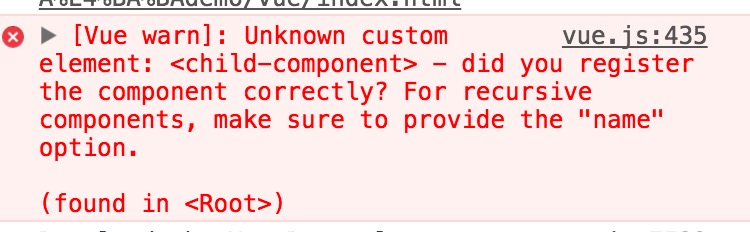
4-2. 在父组件标签外使用子组件。
<div id="container1">
  <parent-component></parent-component>
  <child-component></child-component>
</div>
js代码还是上面的一样,运行完成后,在浏览器下会报错如下:
5.理解组件的语法糖。
我们可以使用更简单的方式来注册组件。
5-1 使用Vue.component()直接创建和注册组件。如下代码:
<!DOCTYPE html>
<html>
  <body>
    <head>
      <title>演示Vue</title>
    </head>
    <div id="container1">
      <component1></component1>
    </div>
  </body>
  <script src="./vue.js"></script>
  <script type="text/javascript">
    // 全局注册
    Vue.component('component1', {
      template: '<div>hello world222</div>'
    });
    // 实例化
    var vm1 = new Vue({
      el: '#container1'
    });
  </script>
</html>
Vue.component()的第一个参数是标签名称,第二个参数是一个选项对象,使用选项对象的template属性定义,使用该方式,在Vue源码中会调用Vue.extend()方法。
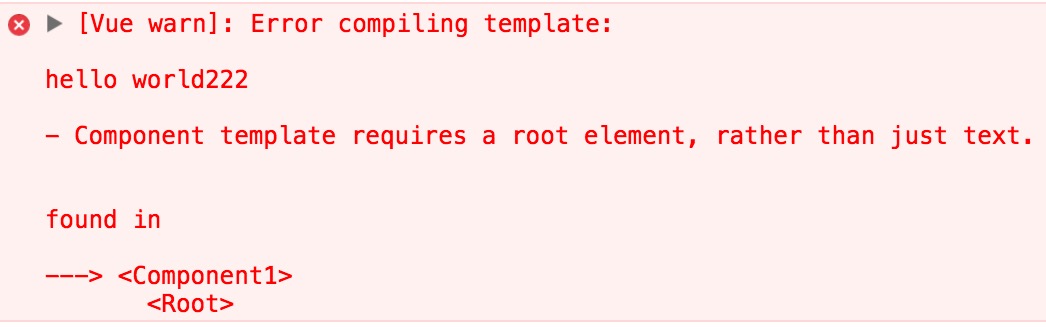
注意: 在template元素中需要使用一个标签容器包围,比如我们可以把div元素去掉的话,只放内容的话,会报错如下:
5-2 在选项对象的components属性中实现局部注册。
<!DOCTYPE html>
<html>
  <body>
    <head>
      <title>演示Vue</title>
    </head>
    <div id="container1">
      <component1></component1>
    </div>

    <div id="container2">
      <component2></component2>
      <component3></component3>
    </div>
  </body>
  <script src="./vue.js"></script>
  <script type="text/javascript">
    // 全局注册,my-component1是标签名称
    Vue.component('component1',{
      template: '<div>This is the first component!</div>'
    })
    var vm1 = new Vue({
      el: '#container1'
    })

    // 实例化 局部注册
    var vm1 = new Vue({
      el: '#container2',
      components: {
        // 局部注册, component2 是标签名称
        'component2': {
          template: '<div>component2</div>'
        },
        // 局部注册,component3 是标签名称
        'component3': {
          template: '<div>component3</div>'
        }
      }
    });
  </script>
</html>
6.学会使用 script或 template 标签。
虽然语法糖简化了组件注册,但是在template选项中拼接了html元素,这导致View和C层的高耦合性。幸运的是Vue.js 提供了2种方式将javascript中的html模板分离出来。
6-1 使用script标签, 如下代码:
<!DOCTYPE html>
<html>
  <body>
    <head>
      <title>演示Vue</title>
    </head>
    <div id="container1">
      <component1></component1>
    </div>
    <script type='text/x-template' id="myComponent">
      <div>hello world!!!!!</div>
    </script>
  </body>
  <script src="./vue.js"></script>
  <script type="text/javascript">
    new Vue({
      el: '#container1',
      components: {
        'component1': {
          template: '#myComponent'
        }
      }
    })
  </script>
</html>
注意: 使用<script>标签时,type指定为 text/x-template,是告诉浏览器这不是一段js脚本,浏览器在解析html文档时会忽略script标签内定义的内容。
6-2 使用<template>标签。不需要指定type属性。
如下代码:
<!DOCTYPE html>
<html>
  <body>
    <head>
      <title>演示Vue</title>
    </head>
    <div id="container1">
      <component1></component1>
    </div>
    <template id="myComponent">
      <div>hello world2222!!!!!</div>
    </template>
  </body>
  <script src="./vue.js"></script>
  <script type="text/javascript">
    new Vue({
      el: '#container1',
      components: {
        'component1': {
          template: '#myComponent'
        }
      }
    })
  </script>
</html>
7.理解使用props。
父组件的数据如何传给子组件呢?可以使用props把数据传给子组件。
代码如下:
<!DOCTYPE html>
<html>
  <body>
    <head>
      <title>演示Vue</title>
    </head>
    <div id="container1">
      <component1 v-bind:my-name="name" v-bind:my-age="age"></component1>
    </div>
    <template id="myComponent">
      <table>
        <tr>
          <th colspan="2">
            子组件数据
          </th>
        </tr>
        <tr>
          <td>myName</td>
          <td>{{ myName }}</td>
        </tr>
        <tr>
          <td>myAge</td>
          <td>{{ myAge }}</td>
        </tr>
      </table>
    </template>
  </body>
  <script src="./vue.js"></script>
  <script type="text/javascript">
    new Vue({
      el: '#container1',
      data: {
        name: 'longen',
        age: 30
      },
      components: {
        'component1': {
          template: '#myComponent',
          props: ['myName', 'myAge']
        }
      }
    })
  </script>
</html>
注意: 在子组件中定义prop时,使用了camelCase命名法。由于HTML特性不区分大小写,camelCase的prop用于特性时,会转为短横线隔开的,比如上面的代码:
在props中定义的myName,在用作特性时需要转换为 my-name
理解prop的单向绑定
既然父组件使用props把数据传给了子组件,那么如果子组件修改了数据,对父组件是否有影响呢?
看下面的代码如下:
<!DOCTYPE html>
<html>
  <body>
    <head>
      <title>演示Vue</title>
      <style>
        * {
          margin: 0;
          padding: 0;
          box-sizing: border-box
        }
        html {
          font-size: 12px;
          font-family: Ubuntu, simHei, sans-serif;
          font-weight: 400
        }
        body {
          font-size: 1rem
        }

        table,
        td,
        th {
          border-collapse: collapse;
          border-spacing: 0
        }

        table {
           100%;
          margin: 20px;
        }

        td,
        th {
          border: 1px solid #bcbcbc;
          padding: 5px 10px
        }

        th {
          background: #42b983;
          font-size: 1.2rem;
          font-weight: 400;
          color: #fff;
          cursor: pointer
        }

        tr:nth-of-type(odd) {
          background: #fff
        }

        tr:nth-of-type(even) {
          background: #eee
        }

        fieldset {
          border: 1px solid #BCBCBC;
          padding: 15px;
        }

        input {
          outline: none
        }

        input[type=text] {
          border: 1px solid #ccc;
          padding: .5rem .3rem;
        }

        input[type=text]:focus {
          border-color: #42b983;
        }

        button {
          outline: none;
          padding: 5px 8px;
          color: #fff;
          border: 1px solid #BCBCBC;
          border-radius: 3px;
          background-color: #009A61;
          cursor: pointer;
        }
        button:hover{
          opacity: 0.8;
        }

        #container1 {
          margin: 0 auto;
          max- 480px;
        }
      </style>
    </head>
    <div id="container1">
      <table>
        <tr>
          <th colspan="3">
            父组件数据
          </th>
        </tr>
        <tr>
          <td>name</td>
          <td>{{ name }}</td>
          <td><input type='text' v-model = "name" /></td>
        </tr>
        <tr>
          <td>age</td>
          <td>{{ age }}</td>
          <td><input type="text" v-model="age" /></td>
        </tr>
      </table>
      <component1 v-bind:my-name="name" v-bind:my-age="age"></component1>
    </div>
    <template id="myComponent">
      <table>
        <tr>
          <th colspan="3">
            子组件数据
          </th>
        </tr>
        <tr>
          <td>myName</td>
          <td>{{ myName }}</td>
          <td><input type="text" v-model="myName" /></td>
        </tr>
        <tr>
          <td>myAge</td>
          <td>{{ myAge }}</td>
          <td><input type="text" v-model="myAge" /></td>
        </tr>
      </table>
    </template>
  </body>
  <script src="./vue.js"></script>
  <script type="text/javascript">
    new Vue({
      el: '#container1',
      data: {
        name: 'longen',
        age: 30
      },
      components: {
        'component1': {
          template: '#myComponent',
          props: ['myName', 'myAge']
        }
      }
    })
  </script>
</html>