一、 什么是服务注册中心
服务注册中心是服务实现服务化管理的核心组件,类似于目录服务的作用,主要用来存储服务信息,譬如提供者url串、路由信息等。服务注册中心是SOA架构中最基础的设施之一。
1 服务注册中心的作用
1,服务的注册
2,服务的发现
2. 常见的注册中心有哪些
1,Dubbo 的注册中心Zookeeper
2,Sringcloud的注册中心Eureka
3. 服务注册中心解决了什么问题
- 服务管理;
- 服务的依赖关系管理;
4. 什么是Eureka注册中心
Eureka是Netflix开发的服务发现组件,本身是一个基于REST的服务。Spring Cloud将它集成在其子项目spring-cloud-netflix中,以实现Spring Cloud的服务注册与发现,同时还提供了负载均衡、故障转移等能力。
5. Eureka注册中心三种角色
5.1 Eureka Server
通过Register、Get、Renew等接口提供服务的注册和发现。
5.2 Application Service (Service Provider)
服务提供方
把自身的服务实例注册到Eureka Server中
5.3 Application Client (Service Consumer)
服务调用方
通过Eureka Server 获取服务列表,消费服务。
二、 Eureka入门案例
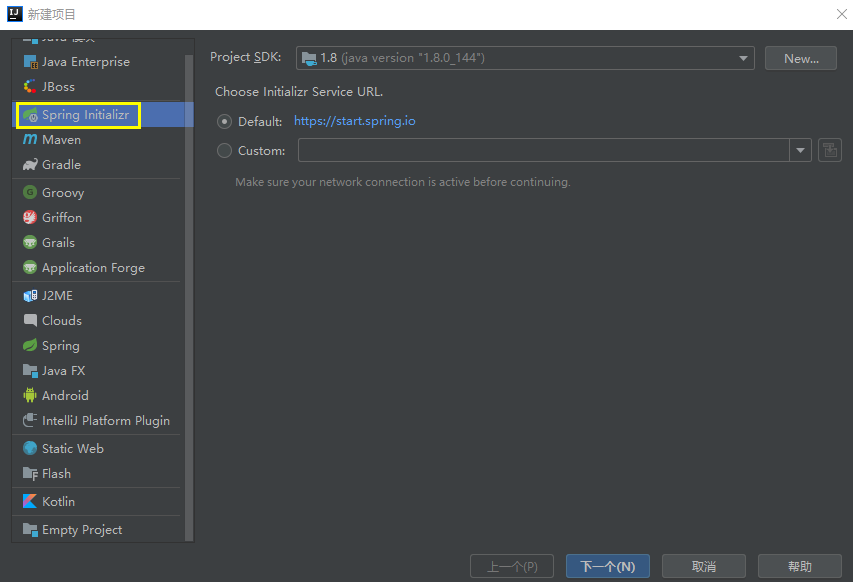
1、创建项目
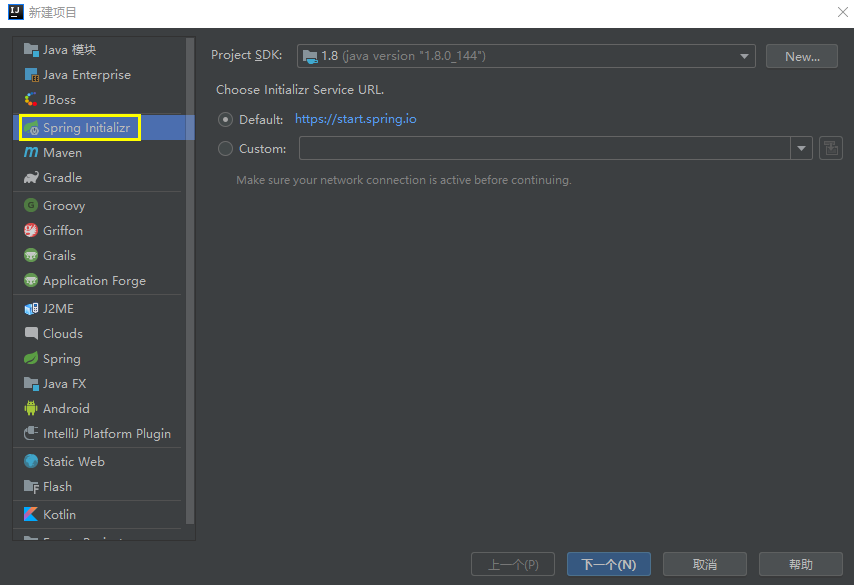
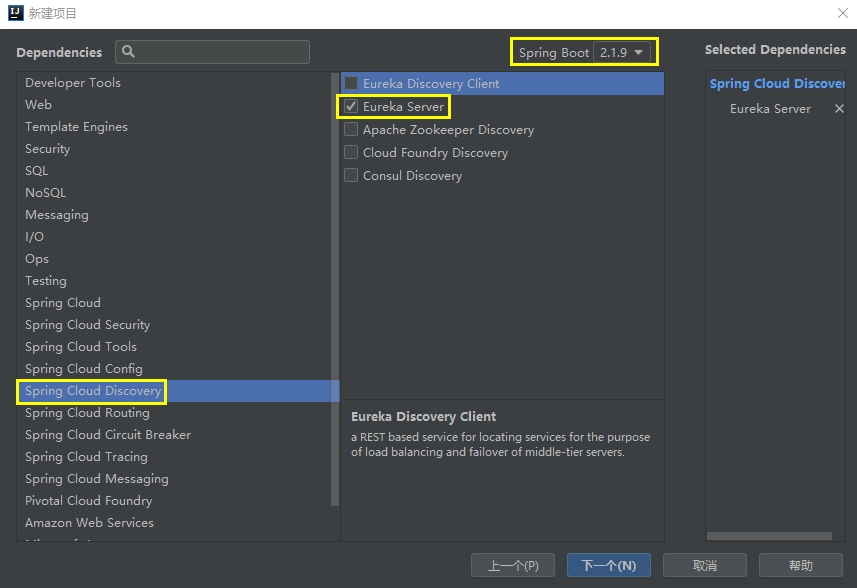
2、pom.xml文件如下
 1 <?xml version="1.0" encoding="UTF-8"?>
 2 <project xmlns="http://maven.apache.org/POM/4.0.0" xmlns:xsi="http://www.w3.org/2001/XMLSchema-instance"
 3          xsi:schemaLocation="http://maven.apache.org/POM/4.0.0 https://maven.apache.org/xsd/maven-4.0.0.xsd">
 4     <modelVersion>4.0.0</modelVersion>
 5     <parent>
 6         <groupId>org.springframework.boot</groupId>
 7         <artifactId>spring-boot-starter-parent</artifactId>
 8         <version>2.1.9.RELEASE</version>
 9         <relativePath/> <!-- lookup parent from repository -->
10     </parent>
11     <groupId>com.angei</groupId>
12     <artifactId>eurekaserver</artifactId>
13     <version>0.0.1-SNAPSHOT</version>
14     <name>eurekaserver</name>
15     <description>Demo project for Spring Boot</description>
16
17     <properties>
18         <java.version>1.8</java.version>
19         <spring-cloud.version>Greenwich.SR3</spring-cloud.version>
20     </properties>
21
22     <dependencies>
23         <dependency>
24             <groupId>org.springframework.cloud</groupId>
25             <artifactId>spring-cloud-starter-netflix-eureka-server</artifactId>
26         </dependency>
27
28         <dependency>
29             <groupId>org.springframework.boot</groupId>
30             <artifactId>spring-boot-starter-test</artifactId>
31             <scope>test</scope>
32         </dependency>
33     </dependencies>
34
35     <dependencyManagement>
36         <dependencies>
37             <dependency>
38                 <groupId>org.springframework.cloud</groupId>
39                 <artifactId>spring-cloud-dependencies</artifactId>
40                 <version>${spring-cloud.version}</version>
41                 <type>pom</type>
42                 <scope>import</scope>
43             </dependency>
44         </dependencies>
45     </dependencyManagement>
46
47     <build>
48         <plugins>
49             <plugin>
50                 <groupId>org.springframework.boot</groupId>
51                 <artifactId>spring-boot-maven-plugin</artifactId>
52             </plugin>
53         </plugins>
54     </build>
55
56 </project>
提示:如果IDEA加载pom.xml时一直下载失败,可以在pom.xml中添加如下配置,使其从国内阿里云镜像中下载相关内容,下载速率将会大幅提升。
<repositories>
    <repository>
        <id>aliyun</id>
        <name>aliyun</name>
        <url>https://maven.aliyun.com/repository/public</url>
    </repository>
</repositories>
3、添加application.yml全局配置文件
 1 server:
 2   port: 8761
 3 eureka:
 4   instance:
 5     appname: provider-service
 6     hostname: localhost
 7   client:
 8     service-url:
 9       defaultZone:
10         http://localhost:8761/eureka/
11     register-with-eureka: false
12     fetch-registry: false
说明:
 1 server:
 2   port: 8761
 3 eureka:
 4   instance:
 5     #服务名,默认取 spring.application.name 配置值,如果没有则为 unknown
 6     appname: provider-service
 7     #设置当前实例的主机名称
 8     hostname: localhost
 9   client:
10     service-url:
11       #指定服务注册中心地址,类型为 HashMap,并设置有一组默认值,
12       #默认的Key为 defaultZone;默认的Value为 http://localhost:8761/eureka ,
13       #如果服务注册中心为高可用集群时,多个注册中心地址以逗号分隔。
14       defaultZone:
15         http://localhost:8761/eureka/
16
17     #是否将自己注册到Eureka-Server中,默认的为true
18     register-with-eureka: false
19
20     #是否从Eureka-Server中获取服务注册信息,默认为true
21     fetch-registry: false
细节注意:

4、修改启动类
 1 import org.springframework.boot.SpringApplication;
 2 import org.springframework.boot.autoconfigure.SpringBootApplication;
 3 import org.springframework.cloud.netflix.eureka.server.EnableEurekaServer;
 4
 5 @SpringBootApplication
 6 @EnableEurekaServer
 7 public class EurekaserverApplication {
 8
 9     public static void main(String[] args) {
10         SpringApplication.run(EurekaserverApplication.class, args);
11     }
12
13 }
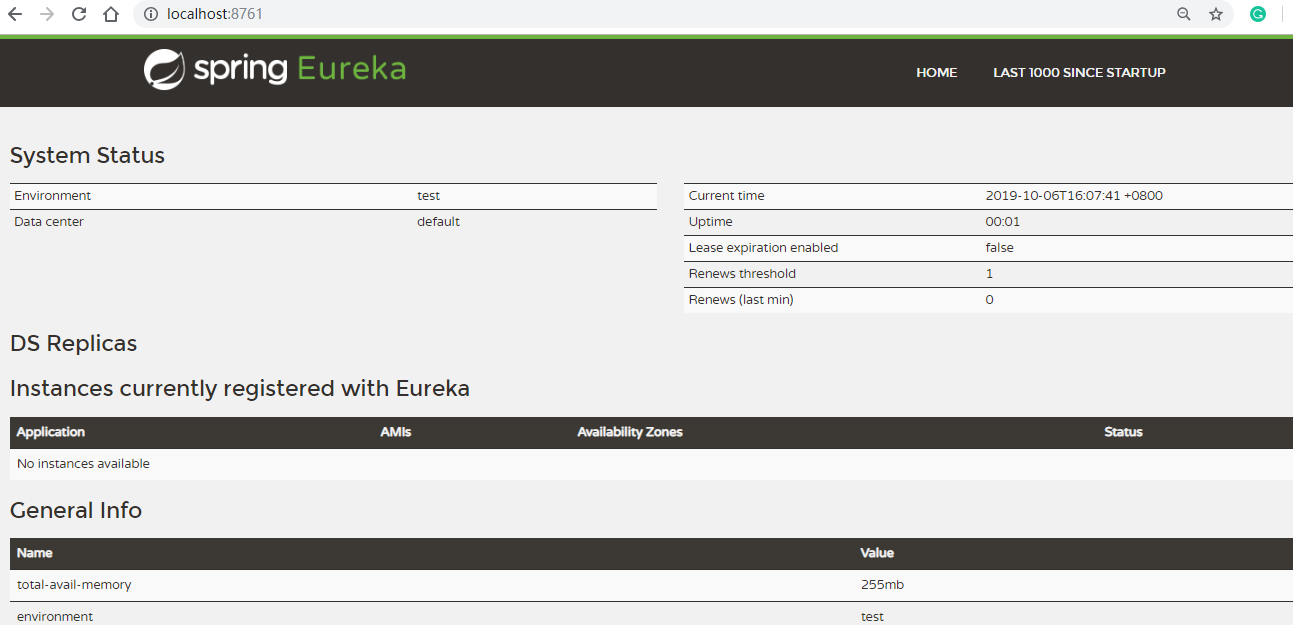
5、通过浏览器访问Eureka-Server服务管理平台
三、 搭建高可用Eureka注册中心(Eureka集群)
在微服务架构中,注册中心是一个必不可少的组件,前面我们搭建的注册中心只适合本地开发使用,在生产环境必须搭建一个集群来保证高可用。
Eureka的集群搭建很简单,每一台Eureka都需要在配置中指定另外N个Eureka的地址就可以。
在Eureka服务端的配置项eureka.client.serviceUrl.defaultZone中地址那一行要使用ip或域名,由于这里是在本地一台机子上模拟集群环境,ip地址都一样,所以通过更改本地host文件的方式创建三个可用的域名。
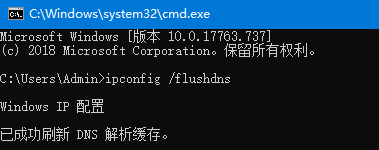
1.修改C:WindowsSystem32driversetchosts文件:
127.0.0.1 server1
127.0.0.1 server2
127.0.0.1 server3
2.本地刷新dns:
指令: ipconfig /flushdns

3.创建3个application.yml
注意:在集群环境下,每一个Eureka都需要将自己注册到Eureka-Server中(register-with-eureka默认就是true故可不配置)、也要从Eureka-Server中获取服务注册信息(fetch-registry默认就是true故可不配置)。
application-p8761.yml
server:
  port: 8761
eureka:
  instance:
    #服务名,默认取 spring.application.name 配置值,如果没有则为 unknown
    appname: provider-service
    #设置当前实例的主机名称
    hostname: server1
  client:
    service-url:
      #指定服务注册中心地址,类型为 HashMap,并设置有一组默认值,
      #默认的Key为 defaultZone;默认的Value为 http://localhost:8761/eureka ,
      #如果服务注册中心为高可用集群时,多个注册中心地址以逗号分隔,地址形式是ip或域名:端口号
      defaultZone:
        http://server2:8762/eureka/,http://server3:8763/eureka/
application-p8762.yml
server:
  port: 8762
eureka:
  instance:
    appname: provider-service
    hostname: server2
  client:
    service-url:
      defaultZone:
        http://server1:8761/eureka/,http://server3:8763/eureka/
application-p8763.yml
server:
  port: 8763
eureka:
  instance:
    appname: provider-service
    hostname: server3
  client:
    service-url:
      defaultZone:
        http://server1:8761/eureka/,http://server2:8762/eureka/
4.然后需要注意,application-xxxx.yml不是默认的配置形式,是无法被自动识别的,可以通过配置spring.profiles.active的方式指定运行时加载。
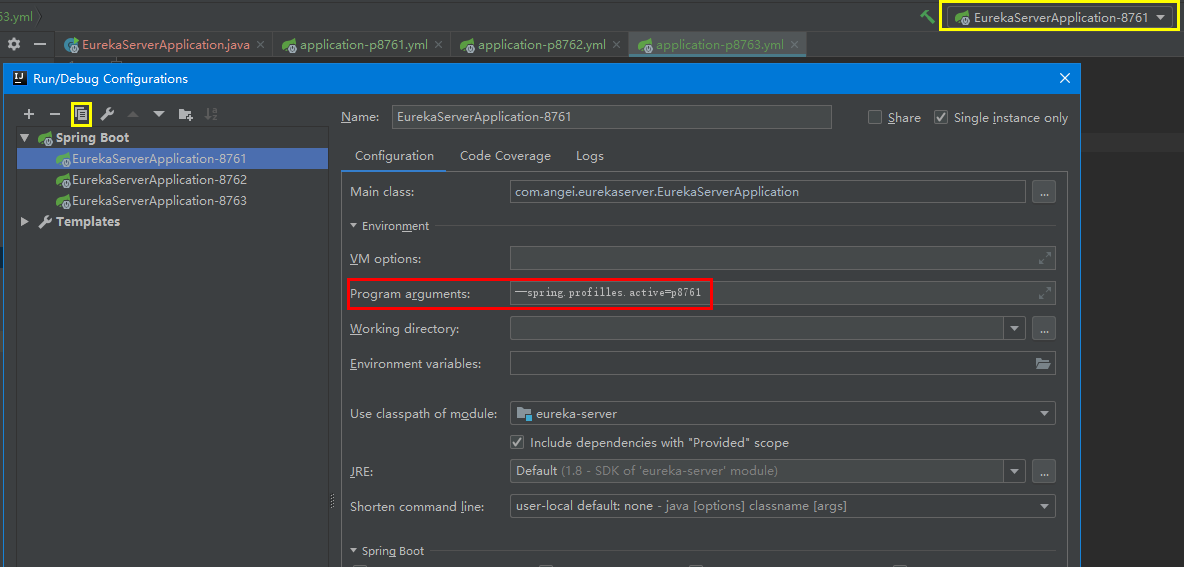
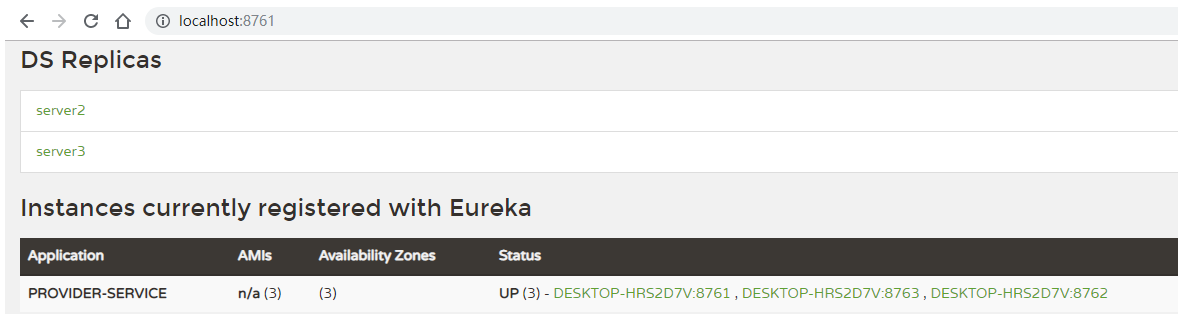
5.分别启动pEurekaServerApplication-8761, EurekaServerApplication-8762, EurekaServerApplication-8763

显示如下:
6.同时,在客户端的配置项中设置服务注册中心地址时,设置为哪一个都可以,最好都写上(用逗号隔开),这样当其中一个节点挂了,客户端还会自动尝试连接其他节点。
server:
  port: 80
spring:
  application:
    name: order-service
eureka:
  client:
    service-url:
      #设置服务注册中心地址
      defaultZone:
        http://localhost:8761/eureka/,http://localhost:8762/eureka/,http://localhost:8763/eureka/
四、 在Eureka注册中心中构建客户端服务
Eureka客户端开发要点:
①、maven 依赖 spring-cloud-starter-netflix-eureka-client;
②、application.yml 配置 eureka.client.service-url.defaultZone;
③、入口类増加 @EnableEurekaClient;
1、创建项目
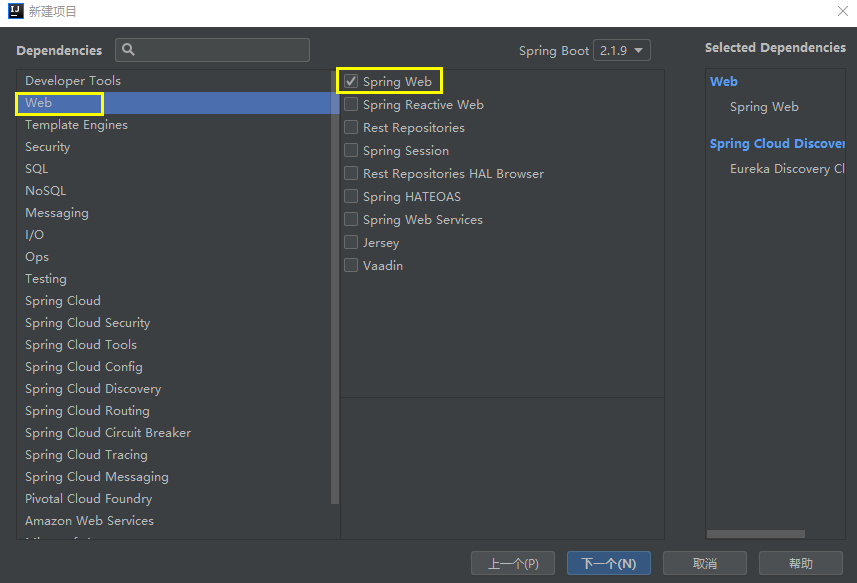

2、pom.xml文件如下
 1 <?xml version="1.0" encoding="UTF-8"?>
 2 <project xmlns="http://maven.apache.org/POM/4.0.0" xmlns:xsi="http://www.w3.org/2001/XMLSchema-instance"
 3          xsi:schemaLocation="http://maven.apache.org/POM/4.0.0 https://maven.apache.org/xsd/maven-4.0.0.xsd">
 4     <modelVersion>4.0.0</modelVersion>
 5     <parent>
 6         <groupId>org.springframework.boot</groupId>
 7         <artifactId>spring-boot-starter-parent</artifactId>
 8         <version>2.1.9.RELEASE</version>
 9         <relativePath/> <!-- lookup parent from repository -->
10     </parent>
11     <groupId>com.angei</groupId>
12     <artifactId>eureka-client</artifactId>
13     <version>0.0.1-SNAPSHOT</version>
14     <name>eureka-client</name>
15     <description>Demo project for Spring Boot</description>
16
17     <properties>
18         <java.version>1.8</java.version>
19         <spring-cloud.version>Greenwich.SR3</spring-cloud.version>
20     </properties>
21
22     <dependencies>
23         <dependency>
24             <groupId>org.springframework.boot</groupId>
25             <artifactId>spring-boot-starter-web</artifactId>
26         </dependency>
27         <dependency>
28             <groupId>org.springframework.cloud</groupId>
29             <artifactId>spring-cloud-starter-netflix-eureka-client</artifactId>
30         </dependency>
31
32         <dependency>
33             <groupId>org.springframework.boot</groupId>
34             <artifactId>spring-boot-starter-test</artifactId>
35             <scope>test</scope>
36         </dependency>
37     </dependencies>
38
39     <dependencyManagement>
40         <dependencies>
41             <dependency>
42                 <groupId>org.springframework.cloud</groupId>
43                 <artifactId>spring-cloud-dependencies</artifactId>
44                 <version>${spring-cloud.version}</version>
45                 <type>pom</type>
46                 <scope>import</scope>
47             </dependency>
48         </dependencies>
49     </dependencyManagement>
50
51     <build>
52         <plugins>
53             <plugin>
54                 <groupId>org.springframework.boot</groupId>
55                 <artifactId>spring-boot-maven-plugin</artifactId>
56             </plugin>
57         </plugins>
58     </build>
59
60 </project>
3、添加application.yml全局配置文件
 1 server:
 2   port: 80
 3 spring:
 4   application:
 5     name: order-service
 6 eureka:
 7   client:
 8     service-url:
 9       #设置服务注册中心地址
10       defaultZone:
11         http://localhost:8761/eureka/
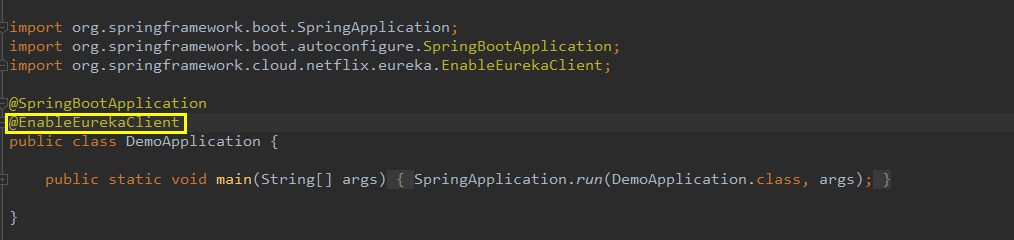
4、修改启动类
 1 import org.springframework.boot.SpringApplication;
 2 import org.springframework.boot.autoconfigure.SpringBootApplication;
 3 import org.springframework.cloud.netflix.eureka.EnableEurekaClient;
 4
 5 @SpringBootApplication
 6 @EnableEurekaClient
 7 public class EurekaClientApplication {
 8     public static void main(String[] args) {
 9         SpringApplication.run(EurekaClientApplication.class, args);
10     }
11 }
5、测试
 1 package com.angei.eurekaclient.Controller;
 2
 3 import org.springframework.stereotype.Controller;
 4 import org.springframework.web.bind.annotation.GetMapping;
 5 import org.springframework.web.bind.annotation.PathVariable;
 6 import org.springframework.web.bind.annotation.ResponseBody;
 7
 8 @Controller
 9 public class orderController {
10
11     @GetMapping("/order/{id}")
12     @ResponseBody
13     public String findById(@PathVariable("id") Integer orderId){
14         if(orderId==2019){
15             return "{"Id":1,"Title":"饿了么订单"}";
16         }else{
17             return null;
18         }
19     }
20 }
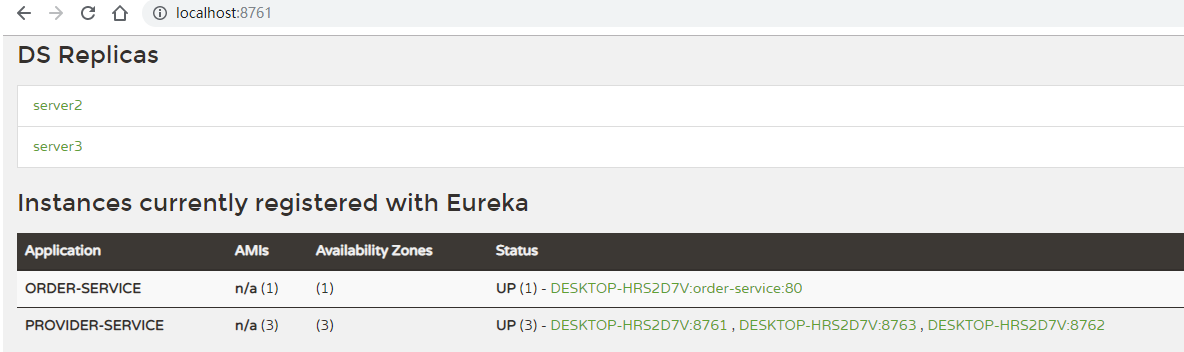
先启动服务器,再启动客户端:

五、 在高可用的Eureka注册中心中模拟构建provider服务和consumer服务
(一)搭建provider提供服务
1.搭载环境


配置application.properties,将服务注册到注册中心。
spring.application.name=eureka-provider
server.port=9090
#设置服务注册中心地址
eureka.client.serviceUrl.defaultZone=http://server1:8761/eureka/,http://server2:8762/eureka/,http://server3:8763/eureka/
2.模拟提供服务
创建User实体类:
 1 import lombok.Getter;
 2 import lombok.Setter;
 3 import java.io.Serializable;
 4
 5 @Getter
 6 @Setter
 7 public class User implements Serializable {
 8
 9     private int id;
10
11     private String name;
12
13     public User() {
14     }
15
16     public User(int id, String name) {
17         this.id = id;
18         this.name = name;
19     }
20
21     @Override
22     public String toString() {
23         return "学号:" + this.id + "	姓名:" + this.name;
24     }
25 }
创建userController:
 1 import com.example.demo.pojo.User;
 2 import org.springframework.stereotype.Controller;
 3 import org.springframework.web.bind.annotation.RequestMapping;
 4 import org.springframework.web.bind.annotation.RestController;
 5
 6 import java.util.ArrayList;
 7
 8 @Controller
 9 @RestController
10 public class userController {
11
12     @RequestMapping("/getAllUser")
13     public ArrayList<User> getAllUser() {
14         ArrayList<User> list = new ArrayList<>();
15         list.add(new User(2018, "Benjieming"));
16         list.add(new User(2019, "Huangsi"));
17         list.add(new User(2020, "Yangyi"));
18         return list;
19
20     }
21 }
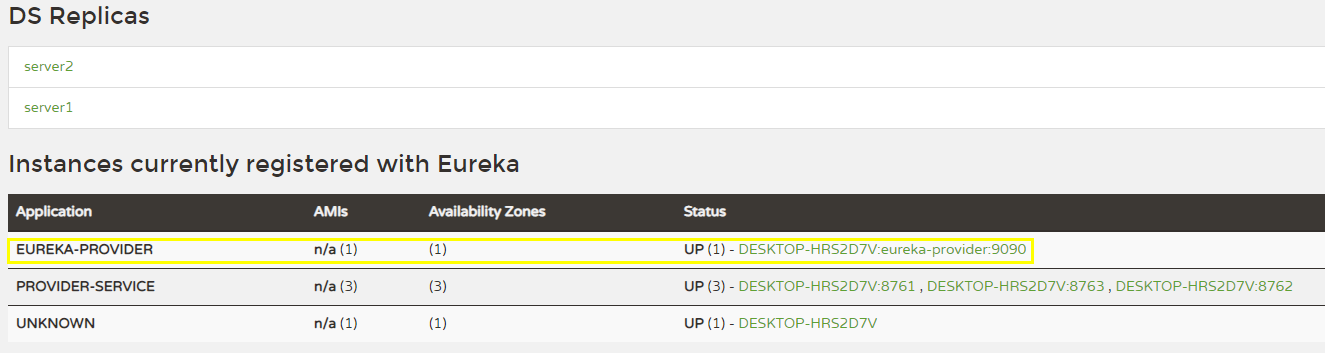
3.启动项目并检测
(二) 搭建consumer调用服务
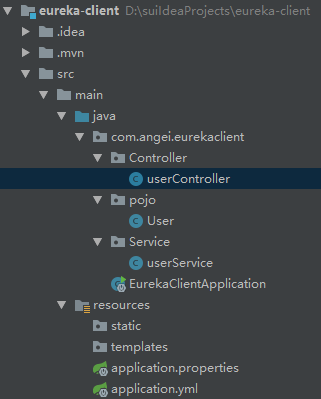
1.创建项目,过程同provider,最终项目结构如下:
application.yml内容如下:
server:
  port: 9091
spring:
  application:
    name: eureka-consumer
eureka:
  client:
    service-url:
      #设置服务注册中心地址
      defaultZone:
        http://server1:8761/eureka/,http://server2:8762/eureka/,http://server3:8763/eureka/
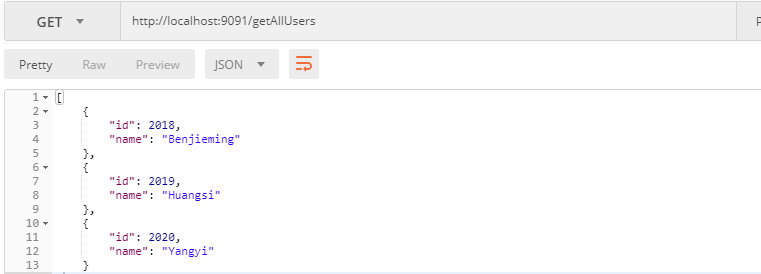
2.创建userService和userController
userService.java
 1 package com.angei.eurekaclient.Service;
 2
 3 import com.angei.eurekaclient.pojo.User;
 4 import org.springframework.beans.factory.annotation.Autowired;
 5 import org.springframework.cloud.client.ServiceInstance;
 6 import org.springframework.cloud.client.loadbalancer.LoadBalancerClient;
 7 import org.springframework.core.ParameterizedTypeReference;
 8 import org.springframework.http.HttpMethod;
 9 import org.springframework.http.ResponseEntity;
10 import org.springframework.stereotype.Service;
11 import org.springframework.web.client.RestTemplate;
12
13 import java.util.List;
14
15 @Service
16 public class userService {
17
18     @Autowired
19     private LoadBalancerClient loadBalancerClient;//ribbon负载均衡器
20
21     public List<User> getUsers() {
22
23         //选择调用的服务的名称
24         //ServiceInstance类封装了服务的基本信息,如 IP,端口等
25         ServiceInstance si = this.loadBalancerClient.choose("eureka-provider");
26         //拼接访问服务的URL
27         StringBuffer sb = new StringBuffer();
28         //http://server1:8761/getAllUser
29         System.out.println("host:" + si.getHost());
30         System.out.println("Port:" + si.getPort());
31         sb.append("http://").append(si.getHost()).append(":").append(si.getPort()).append("/getAllUser");
32
33
34         //springMVC RestTemplate
35         RestTemplate rt = new RestTemplate();
36
37         ParameterizedTypeReference<List<User>> type = new ParameterizedTypeReference<List<User>>() {
38         };
39
40         //ResponseEntity:封装了返回值信息
41         ResponseEntity<List<User>> response = rt.exchange(sb.toString(), HttpMethod.GET, null, type);
42         List<User> list = response.getBody();
43         return list;
44     }
45 }
注意:这里是向注册中心获取服务并拉取信息。
userController.java
 1 package com.angei.eurekaclient.Controller;
 2
 3 import com.angei.eurekaclient.Service.userService;
 4 import com.angei.eurekaclient.pojo.User;
 5 import org.springframework.web.bind.annotation.RequestMapping;
 6 import org.springframework.web.bind.annotation.RestController;
 7
 8 import javax.annotation.Resource;
 9 import java.util.List;
10
11 @RestController
12 public class userController {
13
14     @Resource
15     private userService userservice;
16
17     @RequestMapping("/getAllUsers")
18     public List<User> getUsers(){
19         return userservice.getUsers();
20     }
21 }
3.启动项目并测试
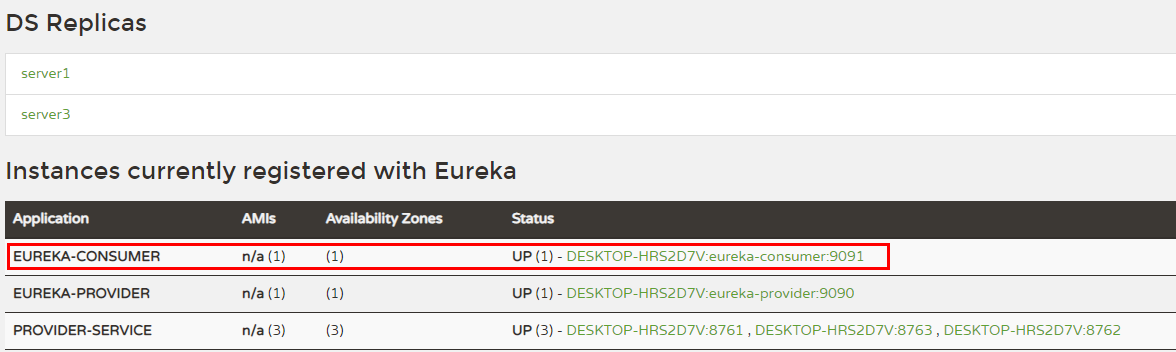
五、 Eureka注册中心架构原理
1、Eureka架构图

说明:
Register(服务注册):把自己的IP和端口注册给Eureka。
Renew(服务续约):发送心跳包,每30秒发送一次。告诉Eureka自己还活着。
Cancel(服务下线):当provider关闭时会向Eureka发送消息,把自己从服务列表中删除。防止consumer调用到不存在的服务。
Get Registry(获取服务注册列表):获取其他服务列表。
Replicate(集群中数据同步):eureka集群中的数据复制与同步。
Make Remote Call(远程调用):完成服务的远程调用。
2、CAP原则
CAP原则又称CAP定理,指的是在一个分布式系统中,Consistency(一致性)、 Availability(可用性)、Partition tolerance(分区容错性),三者不可兼得。
CAP由Eric Brewer在2000年PODC会议上提出。该猜想在提出两年后被证明成立,成为我们熟知的CAP定理。


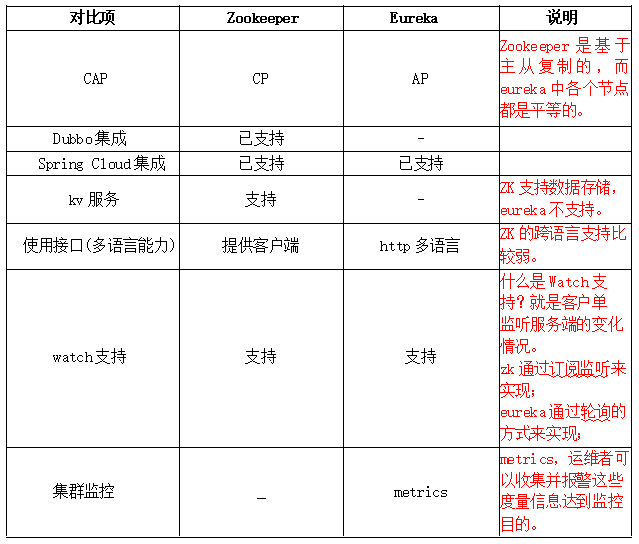
3、基于分布式CAP定理,分析注册中心两大主流框架:分析Eureka与Zookeeper的区别
六、 Eureka优雅停服
1、在什么条件下,Eureka会启动自我保护?
什么是自我保护模式
1,自我保护的条件
一般情况下,微服务在Eureka上注册后,会每30秒发送心跳包,Eureka通过心跳来判断服务是否健康,同时会定期删除超过90秒没有发送心跳服务。
2,有两种情况会导致Eureka Server收不到微服务的心跳
a.是微服务自身的原因;
b.是微服务与Eureka之间的网络故障;
通常微服务的自身的故障关闭只会导致个别服务出现故障,一般不会出现大面积故障,而网络故障通常会导致Eureka Server在短时间内无法收到大批心跳。
考虑到这个区别,Eureka设置了一个阀值,当判断挂掉的服务的数量超过阀值时,Eureka Server认为很大程度上出现了网络故障,将不再删除心跳过期的服务。
3,那么这个阀值是多少呢?
15分钟之内故障率是否低于85%;
Eureka Server在运行期间,会统计心跳失败的比例在15分钟内是否低于85%,
这种算法叫做Eureka Server的自我保护模式。
2、为什么要启动自我保护?
为什么要自我保护
1,因为同时保留"好数据"与"坏数据"总比丢掉任何数据要更好,当网络故障恢复后,这个Eureka节点会退出"自我保护模式"。
2,Eureka还有客户端缓存功能(也就是微服务的缓存功能)。即便Eureka集群中所有节点都宕机失效,微服务的Provider和Consumer都能正常通信。
3,微服务的负载均衡策略会自动剔除死亡的微服务节点。
3、如何关闭自我保护?
修改Eureka Server配置文件
#关闭自我保护:true为开启自我保护,false为关闭自我保护
eureka.server.enableSelfPreservation=false
#清理间隔(单位:毫秒,默认是60*1000)
eureka.server.eviction.interval-timer-in-ms=60000
4、☆如何优雅停服?(springboot - version: 2.1.0.RELEASE及以上)
第1步:不需要在Eureka Server中再配置关闭自我保护的相关配置。
#如果在刚刚的演示中添加了如下配置,则全部删去。
#关闭自我保护:true为开启自我保护,false为关闭自我保护
eureka.server.enableSelfPreservation=false
#清理间隔(单位:毫秒,默认是60*1000)
eureka.server.eviction.interval-timer-in-ms=60000
第2步:在服务中添加actuator.jar依赖包。
<!-- springboot监控 -->
<dependency>
    <groupId>org.springframework.boot</groupId>
    <artifactId>spring-boot-starter-actuator</artifactId>
</dependency>
第3步:修改配置文件,添加如下内容:
1 management:
2   endpoint:
3     shutdown:
4       enabled: true
5   endpoints:
6     web:
7       exposure:
8         include: "*"
management.endpoint.shutdown.enabled 这是说是否启动/shutdown端点,默认是false,management.endpoints.web.exposure.include 这是说公开所有端点。
第4步:发送一个关闭服务的URL请求。注意:请求方式必须是post请求。
请求格式:http://待关闭微服务ip:端口号/actuator/shutdown
如:http://127.0.0.1:9090/actuator/shutdown
(1)方式一:以下是通过一个HttpClientUtil工具类来发送一个post请求。
  1 public class HttpClientUtil {
  2
  3     public static String doGet(String url, Map<String, String> param) {
  4
  5         // 创建Httpclient对象
  6         CloseableHttpClient httpclient = HttpClients.createDefault();
  7
  8         String resultString = "";
  9         CloseableHttpResponse response = null;
 10         try {
 11             // 创建uri
 12             URIBuilder builder = new URIBuilder(url);
 13             if (param != null) {
 14                 for (String key : param.keySet()) {
 15                     builder.addParameter(key, param.get(key));
 16                 }
 17             }
 18             URI uri = builder.build();
 19
 20             // 创建http GET请求
 21             HttpGet httpGet = new HttpGet(uri);
 22
 23             // 执行请求
 24             response = httpclient.execute(httpGet);
 25             // 判断返回状态是否为200
 26             if (response.getStatusLine().getStatusCode() == 200) {
 27                 resultString = EntityUtils.toString(response.getEntity(), "UTF-8");
 28             }
 29         } catch (Exception e) {
 30             e.printStackTrace();
 31         } finally {
 32             try {
 33                 if (response != null) {
 34                     response.close();
 35                 }
 36                 httpclient.close();
 37             } catch (IOException e) {
 38                 e.printStackTrace();
 39             }
 40         }
 41         return resultString;
 42     }
 43
 44     public static String doGet(String url) {
 45         return doGet(url, null);
 46     }
 47
 48     public static String doPost(String url, Map<String, String> param) {
 49         // 创建Httpclient对象
 50         CloseableHttpClient httpClient = HttpClients.createDefault();
 51         CloseableHttpResponse response = null;
 52         String resultString = "";
 53         try {
 54             // 创建Http Post请求
 55             HttpPost httpPost = new HttpPost(url);
 56             // 创建参数列表
 57             if (param != null) {
 58                 List<NameValuePair> paramList = new ArrayList<>();
 59                 for (String key : param.keySet()) {
 60                     paramList.add(new BasicNameValuePair(key, param.get(key)));
 61                 }
 62                 // 模拟表单
 63                 UrlEncodedFormEntity entity = new UrlEncodedFormEntity(paramList,"utf-8");
 64                 httpPost.setEntity(entity);
 65             }
 66             // 执行http请求
 67             response = httpClient.execute(httpPost);
 68             resultString = EntityUtils.toString(response.getEntity(), "utf-8");
 69         } catch (Exception e) {
 70             e.printStackTrace();
 71         } finally {
 72             try {
 73                 response.close();
 74             } catch (IOException e) {
 75                 // TODO Auto-generated catch block
 76                 e.printStackTrace();
 77             }
 78         }
 79
 80         return resultString;
 81     }
 82
 83     public static String doPost(String url) {
 84         return doPost(url, null);
 85     }
 86
 87     public static String doPostJson(String url, String json) {
 88         // 创建Httpclient对象
 89         CloseableHttpClient httpClient = HttpClients.createDefault();
 90         CloseableHttpResponse response = null;
 91         String resultString = "";
 92         try {
 93             // 创建Http Post请求
 94             HttpPost httpPost = new HttpPost(url);
 95             // 创建请求内容
 96             StringEntity entity = new StringEntity(json, ContentType.APPLICATION_JSON);
 97             httpPost.setEntity(entity);
 98             // 执行http请求
 99             response = httpClient.execute(httpPost);
100             resultString = EntityUtils.toString(response.getEntity(), "utf-8");
101         } catch (Exception e) {
102             e.printStackTrace();
103         } finally {
104             try {
105                 response.close();
106             } catch (IOException e) {
108                 e.printStackTrace();
109             }
110         }
111
112         return resultString;
113     }
114
115     public static void main(String[] args) {
116         String url ="http://127.0.0.1:9090/actuator/shutdown";
117         //该url必须要使用doPost方式来发送
118         HttpClientUtil.doPost(url);
119     }
120 }
(2)方式二:通过postman软件发送shutdown命令。

七、 如何加强Eureka注册的安全认证
1、在Eureka Server中添加security的依赖包
<dependencies>
    <dependency>
        <groupId>org.springframework.cloud</groupId>
        <artifactId>spring-cloud-starter-netflix-eureka-server</artifactId>
    </dependency>

    <!--设置登录密码需要用到Spring Security,导入security的依赖包-->
    <dependency>
        <groupId>org.springframework.boot</groupId>
        <artifactId>spring-boot-starter-security</artifactId>
    </dependency>

    <dependency>
        <groupId>org.springframework.boot</groupId>
        <artifactId>spring-boot-starter-test</artifactId>
        <scope>test</scope>
    </dependency>
</dependencies>
2、修改Eureka的Server配置文件 application.yml
#设置eurekaServer的登录密码
spring:
  security:
    user:
      name: admin  # 用户名
      password: admin   # 用户密码
注意:如果是在集群环境下,例如上面示例中的集群环境,则需要分别在applicaion-p8761.properties、applicaion-p8762.properties、applicaion-p8763.properties都进行eurekaServer的登录密码设置。
3、修改Eureka集群节点之间互相访问的url值
eureka.client.serviceUrl.defaultZone=http://admin:admin@server2:8762/eureka/, http://admin:admin@server3:8763/eureka/
4、关闭注册中心Spring Security的CSRF验证
如果不关闭,那么客户端就连接不上。
 1 import org.springframework.context.annotation.Configuration;
 2 import org.springframework.security.config.annotation.web.builders.HttpSecurity;
 3 import org.springframework.security.config.annotation.web.configuration.EnableWebSecurity;
 4 import org.springframework.security.config.annotation.web.configuration.WebSecurityConfigurerAdapter;
 5
 6 /**
 7  如果eurekaServer设置了登录密码,就必须关闭Spring Security的CSRF验证
 8  */
 9 @EnableWebSecurity
10 @Configuration //@Configuration标注在类上,相当于把该类作为spring的xml配置文件中的<beans>,作用为:配置spring容器(应用上下文)。
11 public class WebSecurityConfig extends WebSecurityConfigurerAdapter {
12
13     @Override
14     protected void configure(HttpSecurity http) throws Exception {
15         http.csrf().disable(); //关闭csrf
16         super.configure(http);
17     }
18 }
5、修改微服务的配置文件添加访问注册中心的用户名与密码
配置Client的application.properties:
spring.application.name=eureka-provider
server.port=9090

#设置服务注册中心地址,指向另一个注册中心
eureka.client.serviceUrl.defaultZone=http://admin:admin@server1:8761/eureka/, http://admin:admin@server2:8762/eureka/, http://admin:admin@server3:8763/eureka/

#启用shutdown
endpoints.shutdown.enabled=true
#禁用密码验证
endpoints.shutdown.sensitive=false
演示效果:

