1. 环境准备
说明:本次集群搭建使用系统版本Centos 7.5 ,软件版本 V3.1.1。
1.1 配置说明
本次集群搭建共三台机器,具体说明下:
|
主机名
|
IP
|
说明
|
|
hadoop01
|
10.0.0.10
|
DataNode、NodeManager、NameNode
|
|
hadoop02
|
10.0.0.11
|
DataNode、NodeManager、ResourceManager、SecondaryNameNode
|
|
hadoop03
|
10.0.0.12
|
DataNode、NodeManager
|
1.2 机器配置说明
[clsn@hadoop01 /home/clsn]
$cat  /etc/redhat-release
CentOS Linux release 7.5.1804 (Core)

[clsn@hadoop01 /home/clsn]
$uname  -r
3.10.0-862.el7.x86_64

[clsn@hadoop01 /home/clsn]
$sestatus
SELinux status:                 disabled

[clsn@hadoop01 /home/clsn]
$systemctl  status  firewalld.service
● firewalld.service - firewalld - dynamic firewall daemon
   Loaded: loaded (/usr/lib/systemd/system/firewalld.service; disabled; vendor preset: enabled)
   Active: inactive (dead)
     Docs: man:firewalld(1)

[clsn@hadoop01 /home/clsn]
$id clsn
uid=1000(clsn) gid=1000(clsn) 组=1000(clsn)

[clsn@hadoop01 /home/clsn]
$cat  /etc/hosts
127.0.0.1   localhost localhost.localdomain localhost4 localhost4.localdomain4
::1         localhost localhost.localdomain localhost6 localhost6.localdomain6
10.0.0.10   hadoop01
10.0.0.11   hadoop02
10.0.0.12   hadoop03
注:本集群内所有进程均由clsn用户启动
1.3 ssh互信配置
ssh-keygen
ssh-copy-id -i ~/.ssh/id_rsa.pub  127.0.0.1
scp -rp ~/.ssh hadoop02:/home/clsn
scp -rp ~/.ssh hadoop03:/home/clsn
1.4 配置jdk
在三台机器上都需要操作
tar xf jdk-8u191-linux-x64.tar.gz -C  /usr/local/
ln -s /usr/local/jdk1.8.0_191 /usr/local/jdk
sed -i.ori '$a export JAVA_HOME=/usr/local/jdk
export PATH=$JAVA_HOME/bin:$JAVA_HOME/jre/bin:$PATH
export CLASSPATH=.:$JAVA_HOME/lib:$JAVA_HOME/jre/lib:$JAVA_HOME/lib/tools.jar' /etc/profile
. /etc/profile
2. 安装hadoop
2.1 安装包下载(Binary)
wget http://mirrors.tuna.tsinghua.edu.cn/apache/hadoop/common/hadoop-3.1.1/hadoop-3.1.1.tar.gz
2.2 安装
tar xf hadoop-3.1.1.tar.gz -C /usr/local/
ln -s /usr/local/hadoop-3.1.1  /usr/local/hadoop
sudo  chown  -R clsn.clsn /usr/local/hadoop-3.1.1/
3.修改hadoop配置
配置文件全部位于 /usr/local/hadoop/etc/hadoop 文件夹下
3.1 hadoop-env.sh
[clsn@hadoop01 /usr/local/hadoop/etc/hadoop]
$ head hadoop-env.sh
.  /etc/profile
#
# Licensed to the Apache Software Foundation (ASF) under one
# or more contributor license agreements.  See the NOTICE file
# distributed with this work for additional information
# regarding copyright ownership.  The ASF licenses this file
# to you under the Apache License, Version 2.0 (the
# "License"); you may not use this file except in compliance
# with the License.  You may obtain a copy of the License at
3.2 core-site.xml
[clsn@hadoop01 /usr/local/hadoop/etc/hadoop]
$ cat core-site.xml
<?xml version="1.0" encoding="UTF-8"?>
<?xml-stylesheet type="text/xsl" href="configuration.xsl"?>

<!-- Put site-specific property overrides in this file. -->

<configuration>
    <!-- 指定HDFS老大(namenode)的通信地址 -->
    <property>
        <name>fs.defaultFS</name>
        <value>hdfs://hadoop01:9000</value>
    </property>
    <!-- 指定hadoop运行时产生文件的存储路径 -->
    <property>
        <name>hadoop.tmp.dir</name>
        <value>/data/tmp</value>
    </property>
</configuration>
3.3 hdfs-site.xml
[clsn@hadoop01 /usr/local/hadoop/etc/hadoop]
$ cat hdfs-site.xml
<?xml version="1.0" encoding="UTF-8"?>
<?xml-stylesheet type="text/xsl" href="configuration.xsl"?>

<!-- Put site-specific property overrides in this file. -->

<configuration>
    <!-- 设置namenode的http通讯地址 -->
    <property>
        <name>dfs.namenode.http-address</name>
        <value>hadoop01:50070</value>
    </property>

    <!-- 设置secondarynamenode的http通讯地址 -->
    <property>
        <name>dfs.namenode.secondary.http-address</name>
        <value>hadoop02:50090</value>
    </property>

    <!-- 设置namenode存放的路径 -->
    <property>
        <name>dfs.namenode.name.dir</name>
        <value>/data/name</value>
    </property>

    <!-- 设置hdfs副本数量 -->
    <property>
        <name>dfs.replication</name>
        <value>2</value>
    </property>
    <!-- 设置datanode存放的路径 -->
    <property>
        <name>dfs.datanode.data.dir</name>
        <value>/data/datanode</value>
    </property>

    <property>
        <name>dfs.permissions</name>
        <value>false</value>
    </property>

</configuration>
3.4 mapred-site.xml
[clsn@hadoop01 /usr/local/hadoop/etc/hadoop]
$ cat mapred-site.xml
<?xml version="1.0"?>
<?xml-stylesheet type="text/xsl" href="configuration.xsl"?>
<!-- Put site-specific property overrides in this file. -->

<configuration>
    <!-- 通知框架MR使用YARN -->
    <property>
        <name>mapreduce.framework.name</name>
        <value>yarn</value>
    </property>
    <property>
        <name>mapreduce.application.classpath</name>
        <value>
        /usr/local/hadoop/etc/hadoop,
        /usr/local/hadoop/share/hadoop/common/*,
        /usr/local/hadoop/share/hadoop/common/lib/*,
        /usr/local/hadoop/share/hadoop/hdfs/*,
        /usr/local/hadoop/share/hadoop/hdfs/lib/*,
        /usr/local/hadoop/share/hadoop/mapreduce/*,
        /usr/local/hadoop/share/hadoop/mapreduce/lib/*,
        /usr/local/hadoop/share/hadoop/yarn/*,
        /usr/local/hadoop/share/hadoop/yarn/lib/*
        </value>
    </property>

</configuration>
3.5 yarn-site.xml
[clsn@hadoop01 /usr/local/hadoop/etc/hadoop]
$ cat yarn-site.xml
<?xml version="1.0"?>

<configuration>
    <property>
        <name>yarn.resourcemanager.hostname</name>
        <value>hadoop02</value>
    </property>

    <property>
        <description>The http address of the RM web application.</description>
        <name>yarn.resourcemanager.webapp.address</name>
        <value>${yarn.resourcemanager.hostname}:8088</value>
    </property>

    <property>
        <description>The address of the applications manager interface in the RM.</description>
        <name>yarn.resourcemanager.address</name>
        <value>${yarn.resourcemanager.hostname}:8032</value>
    </property>

    <property>
        <description>The address of the scheduler interface.</description>
        <name>yarn.resourcemanager.scheduler.address</name>
        <value>${yarn.resourcemanager.hostname}:8030</value>
    </property>

    <property>
        <name>yarn.resourcemanager.resource-tracker.address</name>
        <value>${yarn.resourcemanager.hostname}:8031</value>
    </property>

    <property>
        <description>The address of the RM admin interface.</description>
        <name>yarn.resourcemanager.admin.address</name>
        <value>${yarn.resourcemanager.hostname}:8033</value>
    </property>

</configuration>
3.6 masters & slaves
echo 'hadoop02' >> /usr/local/hadoop/etc/hadoop/masters
echo 'hadoop03
hadoop01'  >> /usr/local/hadoop/etc/hadoop/slaves
3.7 启动脚本修改
启动脚本文件全部位于 /usr/local/hadoop/sbin 文件夹下:
(1)修改 start-dfs.sh stop-dfs.sh 文件添加:
HDFS_DATANODE_USER=clsn
HADOOP_SECURE_DN_USER=hdfs
HDFS_NAMENODE_USER=clsn
HDFS_SECONDARYNAMENODE_USER=clsn
(2)修改start-yarn.sh 和 stop-yarn.sh文件添加:
YARN_RESOURCEMANAGER_USER=clsn
HADOOP_SECURE_DN_USER=yarn
YARN_NODEMANAGER_USER=clsn
4. 启动前准备
4.1 创建文件目录
mkdir -p /data/tmp
mkdir -p /data/name
mkdir -p /data/datanode
chown -R clsn.clsn /data
在集群内所有机器上都进行创建,也可以复制文件夹
for i in hadoop02 hadoop03
    do
        sudo scp -rp /data $i:/
done
4.2 复制hadoop配置到其他机器
for i in hadoop02 hadoop03
    do
        sudo scp -rp  /usr/local/hadoop-3.1.1 $i:/usr/local/
done
4.3 启动hadoop集群
(1)第一次启动前需要格式化
/usr/local/hadoop/bin/hdfs namenode -format
(2)启动集群
cd /usr/local/hadoop/sbin
./start-all.sh
5.集群启动成功
(1)使用jps查看集群中各个角色,是否与预期相一致
[clsn@hadoop01 /home/clsn]
$ pssh  -ih  cluster  "`which jps`"
[1] 11:30:31 [SUCCESS] hadoop03
7947 DataNode
8875 Jps
8383 NodeManager
[2] 11:30:31 [SUCCESS] hadoop01
20193 DataNode
20665 NodeManager
21017 NameNode
22206 Jps
[3] 11:30:31 [SUCCESS] hadoop02
8896 DataNode
9427 NodeManager
10883 Jps
9304 ResourceManager
10367 SecondaryNameNode
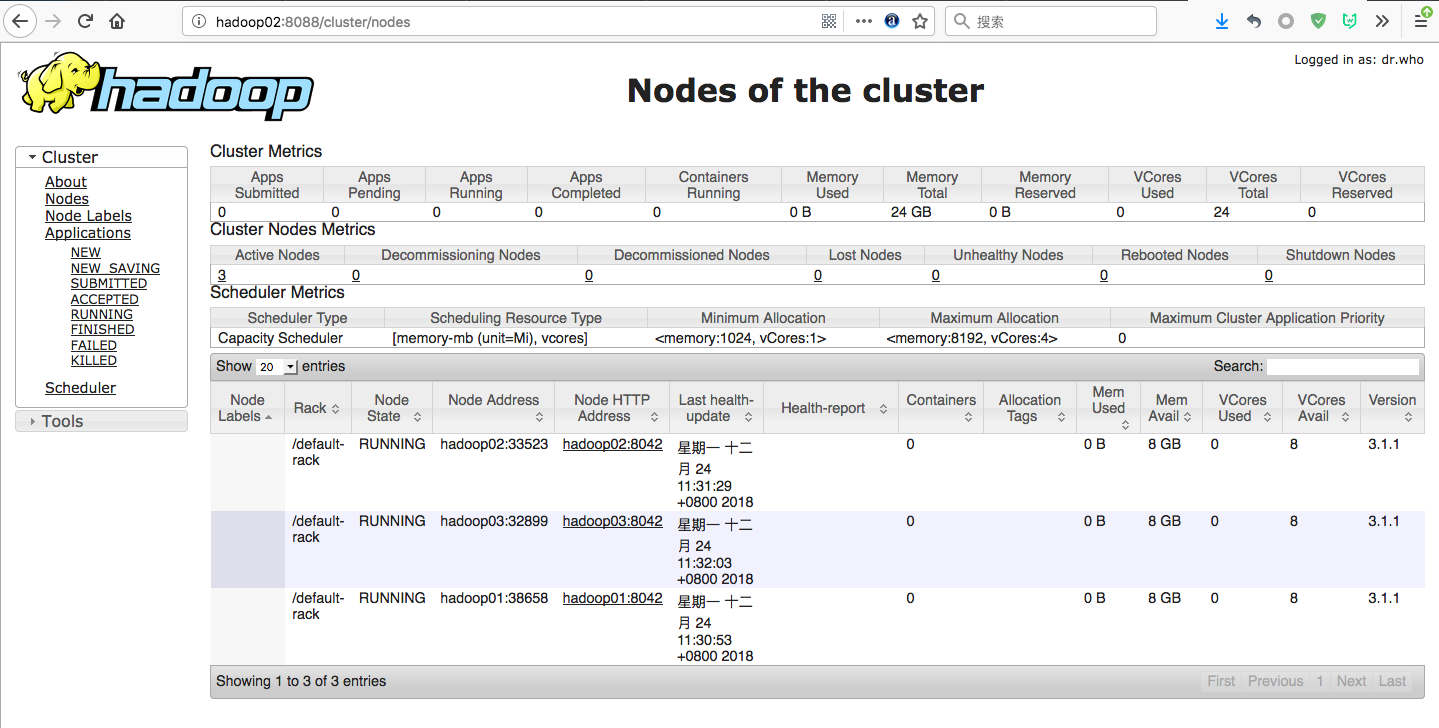
(2)浏览器访问http://hadoop02:8088/cluster/nodes
该页面为ResourceManager 管理界面,在上面可以看到集群中的三台Active Nodes。

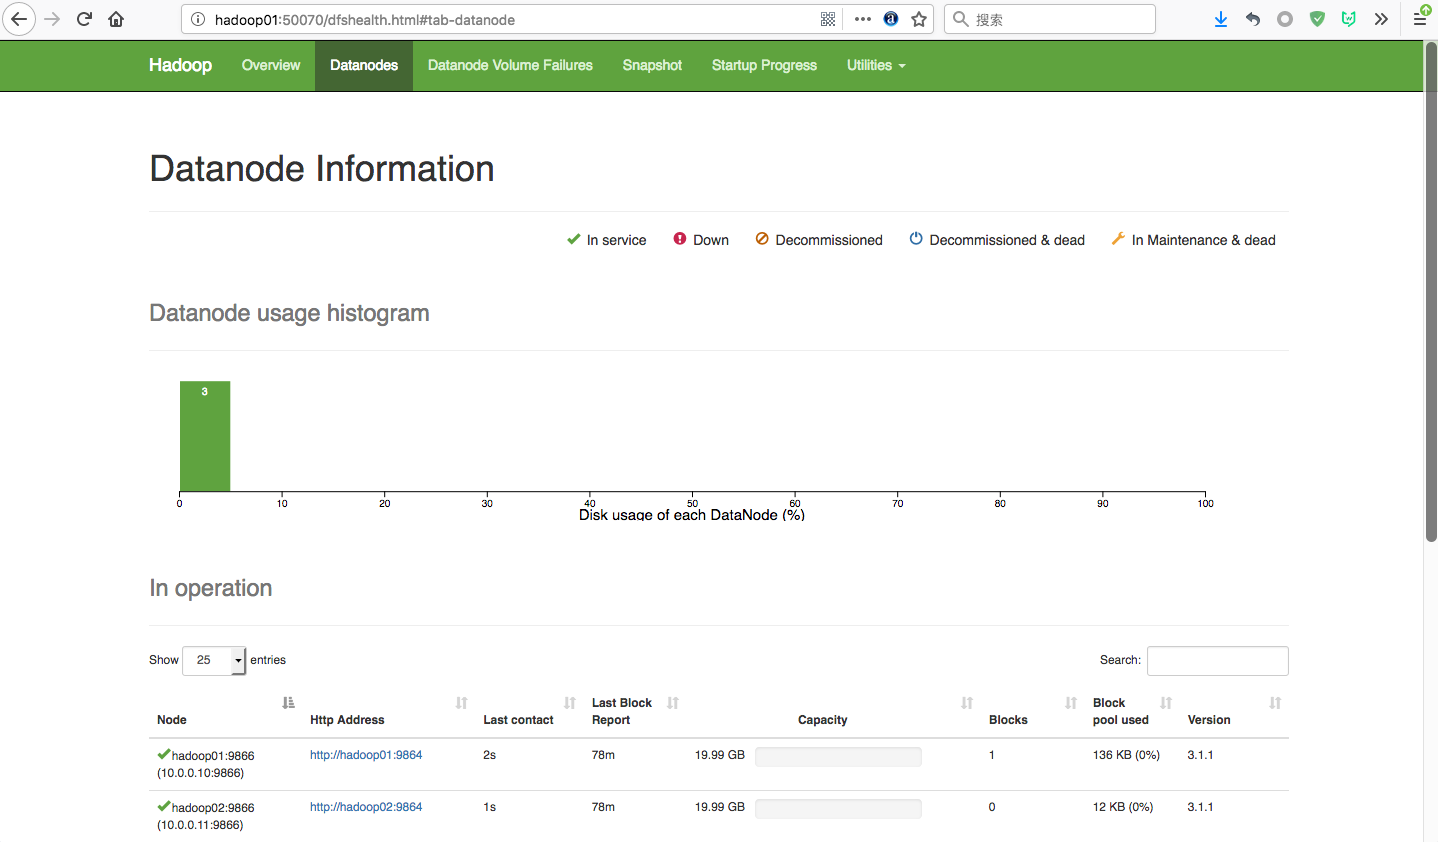
(3) 浏览器访问http://hadoop01:50070/dfshealth.html#tab-datanode
该页面为NameNode管理页面

6.Hbase配置

6.1 部署Hbase包
cd /opt/
wget  http://mirrors.tuna.tsinghua.edu.cn/apache/hbase/1.4.9/hbase-1.4.9-bin.tar.gz
tar xf  hbase-1.4.9-bin.tar.gz -C  /usr/local/
ln -s /usr/local/hbase-1.4.9 /usr/local/hbase
6.2 修改配置文件
6.2.1 hbase-env.sh
# 添加一行
. /etc/profile
6.2.2 hbase-site.xml
[clsn@hadoop01 /usr/local/hbase/conf]
$ cat  hbase-site.xml
<?xml version="1.0"?>
<?xml-stylesheet type="text/xsl" href="configuration.xsl"?>

<configuration>
<property>
	<name>hbase.rootdir</name>
    <!-- hbase存放数据目录 -->
	<value>hdfs://hadoop01:9000/hbase/hbase_db</value>
	<!-- 端口要和Hadoop的fs.defaultFS端口一致-->
</property>
<property>
	<name>hbase.cluster.distributed</name>
    <!-- 是否分布式部署 -->
	<value>true</value>
</property>
<property>
	<name>hbase.zookeeper.quorum</name>
	<!-- zookooper 服务启动的节点,只能为奇数个 -->
	<value>hadoop01,hadoop02,hadoop03</value>
</property>
<property>
	<!--zookooper配置、日志等的存储位置,必须为以存在 -->
	<name>hbase.zookeeper.property.dataDir</name>
	<value>/data/hbase/zookeeper</value>
</property>
<property>
	<!--hbase web 端口 -->
	<name>hbase.master.info.port</name>
	<value>16610</value>
</property>
</configuration>
注意:
zookeeper有这样一个特性:
集群中只要有过半的机器是正常工作的,那么整个集群对外就是可用的。
也就是说如果有2个zookeeper,那么只要有1个死了zookeeper就不能用了,因为1没有过半,所以2个zookeeper的死亡容忍度为0;
同理,要是有3个zookeeper,一个死了,还剩下2个正常的,过半了,所以3个zookeeper的容忍度为1;
再多列举几个:2->0 ; 3->1 ; 4->1 ; 5->2 ; 6->2 会发现一个规律,2n和2n-1的容忍度是一样的,都是n-1,所以为了更加高效,何必增加那一个不必要的zookeeper
6.2.3 regionservers
[clsn@hadoop01 /usr/local/hbase/conf]
$ cat regionservers
hadoop01
hadoop02
hadoop03
6.2.4 分发配置到其他节点
for i in hadoop02 hadoop03
    do
        sudo scp -rp  /usr/local/hbase-1.4.9 $i:/usr/local/
done
6.3 启动hbase集群
6.3.1 启动hbase
[clsn@hadoop01 /usr/local/hbase/bin]
$ sudo  ./start-hbase.sh
hadoop03: running zookeeper, logging to /usr/local/hbase-1.4.9/bin/../logs/hbase-root-zookeeper-hadoop03.out
hadoop02: running zookeeper, logging to /usr/local/hbase-1.4.9/bin/../logs/hbase-root-zookeeper-hadoop02.out
hadoop01: running zookeeper, logging to /usr/local/hbase-1.4.9/bin/../logs/hbase-root-zookeeper-hadoop01.out
running master, logging to /usr/local/hbase-1.4.9/bin/../logs/hbase-root-master-hadoop01.out
hadoop02: running regionserver, logging to /usr/local/hbase-1.4.9/bin/../logs/hbase-root-regionserver-hadoop02.out
hadoop03: running regionserver, logging to /usr/local/hbase-1.4.9/bin/../logs/hbase-root-regionserver-hadoop03.out
hadoop01: running regionserver, logging to /usr/local/hbase-1.4.9/bin/../logs/hbase-root-regionserver-hadoop01.out
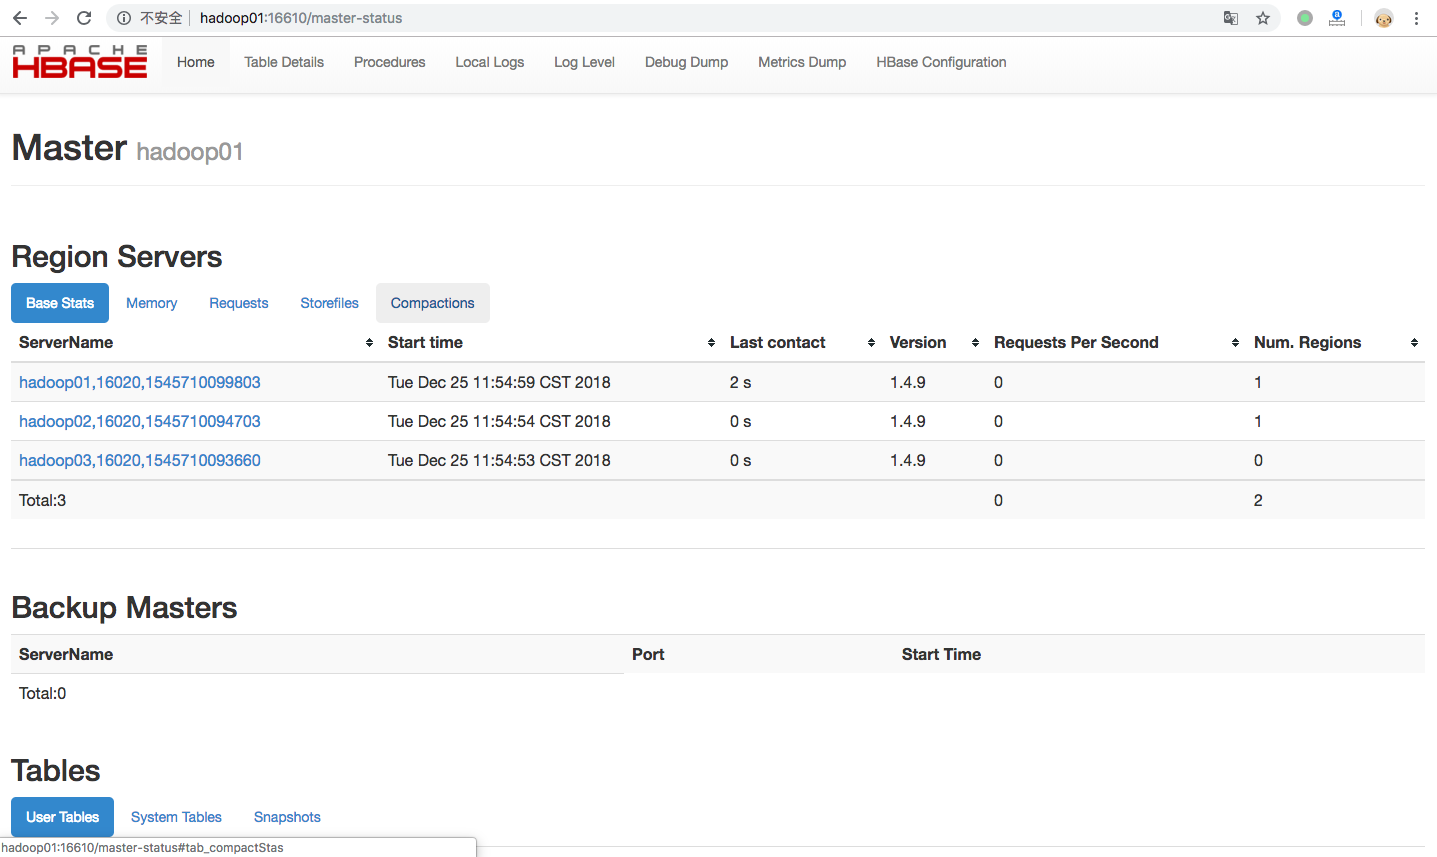
访问 http://hadoop01:16610/master-status 查看hbase状态

6.3.2 启动hbase 客户端
[clsn@hadoop01 /usr/local/hbase/bin]
$ ./hbase shell  #启动hbase客户端
SLF4J: Class path contains multiple SLF4J bindings.
SLF4J: Found binding in [jar:file:/usr/local/hbase-1.4.9/lib/slf4j-log4j12-1.7.10.jar!/org/slf4j/impl/StaticLoggerBinder.class]
SLF4J: Found binding in [jar:file:/usr/local/hadoop-3.1.1/share/hadoop/common/lib/slf4j-log4j12-1.7.25.jar!/org/slf4j/impl/StaticLoggerBinder.class]
SLF4J: See http://www.slf4j.org/codes.html#multiple_bindings for an explanation.
SLF4J: Actual binding is of type [org.slf4j.impl.Log4jLoggerFactory]
HBase Shell
Use "help" to get list of supported commands.
Use "exit" to quit this interactive shell.
Version 1.4.9, rd625b212e46d01cb17db9ac2e9e927fdb201afa1, Wed Dec  5 11:54:10 PST 2018

hbase(main):001:0> create 'clsn','cf'   #创建一个clsn表,一个cf 列簇
0 row(s) in 7.8790 seconds

=> Hbase::Table - clsn

hbase(main):003:0> list    #查看hbase 所有表
TABLE
clsn
1 row(s) in 0.0860 seconds

=> ["clsn"]
hbase(main):004:0> put 'clsn','1000000000','cf:name','clsn'    #put一条记录到表clsn,rowkey 为 1000000000,放到 name列上
0 row(s) in 0.3390 seconds

hbase(main):005:0> put 'clsn','1000000000','cf:sex','male'    #put一条记录到表clsn,rowkey 为 1000000000,放到sex列上
0 row(s) in 0.0300 seconds

hbase(main):006:0> put 'clsn','1000000000','cf:age','24'     #put一条记录到表clsn,rowkey 为 1000000000,放到age列上
0 row(s) in 0.0290 seconds

hbase(main):007:0> count  'clsn'
1 row(s) in 0.2100 seconds

=> 1
hbase(main):008:0>  get 'clsn','cf'
COLUMN                        CELL
0 row(s) in 0.1050 seconds

hbase(main):009:0> get 'clsn','1000000000'      #获取数据
COLUMN                        CELL
 cf:age                       timestamp=1545710530665, value=24
 cf:name                      timestamp=1545710495871, value=clsn
 cf:sex                       timestamp=1545710509333, value=male
1 row(s) in 0.0830 seconds

hbase(main):010:0> list
TABLE
clsn
1 row(s) in 0.0240 seconds

=> ["clsn"]
hbase(main):011:0> drop  clsn
NameError: undefined local variable or method `clsn' for #<Object:0x6f731759>

hbase(main):012:0> drop  'clsn'

ERROR: Table clsn is enabled. Disable it first.

Here is some help for this command:
Drop the named table. Table must first be disabled:
  hbase> drop 't1'
  hbase> drop 'ns1:t1'


hbase(main):013:0> list
TABLE
clsn
1 row(s) in 0.0330 seconds

=> ["clsn"]

hbase(main):015:0> disable 'clsn'
0 row(s) in 2.4710 seconds

hbase(main):016:0> list
TABLE
clsn
1 row(s) in 0.0210 seconds

=> ["clsn"]
7. 参考文献
https://hadoop.apache.org/releases.html
https://my.oschina.net/orrin/blog/1816023
https://www.yiibai.com/hadoop/
http://blog.fens.me/hadoop-family-roadmap/
http://www.cnblogs.com/Springmoon-venn/p/9054006.html
https://github.com/googlehosts/hosts
http://abloz.com/hbase/book.html
