@Value

使用@Value注解读取配置文件内容示例代码如下:
@Value("${test.msg}")
//test.msg为配置文件application.properties中的key
private String msg;
//通过@Value注解将配置文件中key对应的value赋值给变量msg
@ConfigurationProperties

使用@ConfigurationProperties首先建立配置文件与对象的映射关系,然后在控制器方法中使用@Autowired注解将对象注入。
@PropertySource

我们可以使用@PropertySource注解找到项目的其他配置文件
日志配置

默认情况下,Spring Boot项目使用LogBack实现日志,使用apache Commons Logging作为日志接口。

日志级别有ERROR、WARN、INFO、DEBUG和TRACE。Spring Boot默认的日志级别为INFO,日志信息可以打印到控制台。
但开发者可以自己设定Spring Boot项目的日志输出级别,例如在application.properties配置文件中加入以下配置:
#设定日志的默认级别为info
logging.level.root=info
#设定org包下的日志级别为warn
logging.level.org=warn
#设定com.ch.ch4_1包下的日志级别为debug
logging.level.com.ch.ch4_1=debug
Spring Boot项目默认并没有输出日志到文件,但开发者可以在application.properties配置文件中指定日志输出到文件,配置示例如下:
logging.file=my.log
日志输出到my.log文件,该日志文件位于Spring Boot项目运行的当前目录(项目工程目录下)。也可以指定日志文件目录,配置示例如下:
logging.file=c:/log/my.log
这样将在c:/log目录下生成一个名为my.log的日志文件。不管日志文件位于何处,当日志文件大小到达10MB时,将自动生成一个新日志文件。
Spring Boot使用内置的LogBack支持对控制台日志输出和文件输出进行格式控制
%level:指定输出日志级别。
%date:指定日志发生的时间。ISO8601表示标准日期,相当于yyyy-MM-dd HH:mm:ss:SSS。
%logger:指定输出Looger的名字,包名+类名,{n}限定了输出长度。
%M:指定日志发生时的方法名。
%L:指定日志调用时所在代码行,适用于开发调试,线上运行时不建议使用此参数,因为获取代码行对性能有消耗。
%m:表示日志消息。
%n:表示日志换行。
Spring Boot的自动配置原理

    Spring Boot使用核心注解@SpringBootApplication将一个带有main方法的类标注为应用的启动类。@SpringBootApplication注解最主要的功能之一是为Spring Boot开启了一个@EnableAutoConfiguration注解的自动配置功能。

    @EnableAutoConfiguration注解主要利用了一个类名为AutoConfigurationImportSelector的选择器向Spring容器自动配置一些组件。@EnableAutoConfiguration注解的源代码可以从spring-boot-autoconfigure-2.1.4.RELEASE.jar(org.springframework.boot.autoconfigure)依赖包中查看。

    AutoConfigurationImportSelector(源代码位于org.springframework.boot.autoconfigure包)类中有一个名为selectImports的方法,该方法规定了向Spring容器自动配置的组件。

    在方法selectImports中,调用getAutoConfigurationEntry方法获得自动配置。在方法getAutoConfigurationEntry中,调用getCandidateConfigurations方法获取 META-INF/spring.factoies 的配置数据。在方法getCandidateConfigurations中,调用了loadFactoryNames方法。在方法loadFactoryNames中,调用了loadSpringFactories方法。在方法loadSpringFactories中,可以看到加载一个常量:FACTORIES_RESOURCE_LOCATION。
最终Spring Boot是通过加载所有(in multiple JAR files)META-INF/spring.factories配置文件进行自动配置的。所以,@SpringBootApplication注解通过使用@EnableAutoConfiguration注解自动配置的原理是:从classpath中搜索所有META-INF/spring.factories配置文件,并将其中org.springframework.boot.autoconfigure.EnableAutoConfiguration对应的配置项通过Java反射机制进行实例化,然后汇总并加载到Spring的IoC容器。
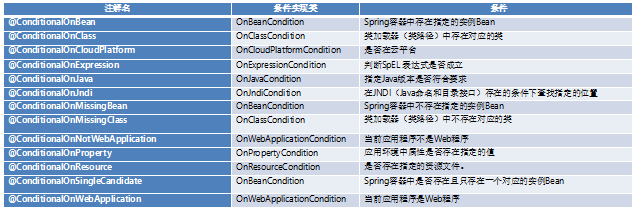
条件注解

所谓Spring的条件注解,就是应用程序的配置类在满足某些特定条件才会被自动启用此配置类的配置项。Spring Boot的条件注解位于spring-boot-autoconfigure-2.1.4.RELEASE.jar的org.springframework.boot.autoconfigure.condition包下

分析HTTP编码配置

Spring Boot自动配置HTTP编码需要满足以下两个条件:
配置encoding和forceEncoding这两个参数;
配置CharacterEncodingFilter的Bean。
1.配置HTTP编码参数
通过查看源代码可知org.springframework.boot.autoconfigure.http.HttpProperties类配置了HTTP编码参数。
通过分析HTTP属性类HttpProperties的源码可知:
①在application.properties中配置前缀是spring.http(@ConfigurationProperties(prefix = "spring.http"));
②默认编码方式为UTF-8(private Charset charset = DEFAULT_CHARSET;),若修改可使用spring.http.encoding.charset=编码;
③设置forceEncoding,默认为true(private Boolean force;),若修改可使用spring.http.encoding.force=false。
2.配置CharacterEncodingFilter的Bean
通过查看源代码可知
org.springframework.boot.autoconfigure.web.servlet. HttpEncodingAutoConfiguration类,根据条件注解配置了CharacterEncodingFilter的Bean。
自定义条件

在Spring框架中,可以通过实现Condition接口,并重写matches方法来构造条件。
<project xmlns="http://maven.apache.org/POM/4.0.0"
    xmlns:xsi="http://www.w3.org/2001/XMLSchema-instance"
    xsi:schemaLocation="http://maven.apache.org/POM/4.0.0 http://maven.apache.org/maven-v4_0_0.xsd">
    <modelVersion>4.0.0</modelVersion>

    <parent>
        <groupId>org.springframework.boot</groupId>
        <artifactId>spring-boot-starter-parent</artifactId>
        <version>2.1.4.RELEASE</version>
        <relativePath /> <!-- lookup parent from repository -->
    </parent>

    <groupId>com.bb</groupId>
    <artifactId>SpringBootConfg</artifactId>
    <packaging>war</packaging>
    <version>0.0.1-SNAPSHOT</version>
    <name>SpringBootConfg Maven Webapp</name>

    <properties>
        <java.version>11</java.version>
    </properties>

    <url>http://maven.apache.org</url>

    <dependencies>

        <dependency>
            <groupId>org.springframework.boot</groupId>
            <artifactId>spring-boot-starter-web</artifactId>
        </dependency>

        <dependency>
            <groupId>org.springframework.boot</groupId>
            <artifactId>spring-boot-starter-test</artifactId>
            <scope>test</scope>
        </dependency>

        <dependency>
            <groupId>org.springframework.boot</groupId>
            <artifactId>spring-boot-configuration-processor</artifactId>
            <optional>true</optional>
        </dependency>

    </dependencies>
    <build>
        <finalName>SpringBootConfg</finalName>

        <plugins>
            <plugin>
                <groupId>org.springframework.boot</groupId>
                <artifactId>spring-boot-maven-plugin</artifactId>
            </plugin>
        </plugins>

    </build>
</project>
package com.ch.ch4_1.conditional;

public interface MessagePrint {
    public String showMessage();
}
package com.ch.ch4_1.conditional;

public class MyMessagePrint implements MessagePrint{
    public String showMessage() {
        return "test.properties文件存在。";
    }
}
package com.ch.ch4_1.conditional;

public class YourMessagePrint implements MessagePrint {

    public String showMessage() {
        return "test.properties文件不存在!";
    }

}
package com.ch.ch4_1.conditional;

import org.springframework.context.annotation.Condition;
import org.springframework.context.annotation.ConditionContext;
import org.springframework.core.type.AnnotatedTypeMetadata;

public class MyCondition implements Condition{
    public boolean matches(ConditionContext context, AnnotatedTypeMetadata metadata) {
        return context.getResourceLoader().getResource("classpath:test.properties").exists();
    }
}
package com.ch.ch4_1.conditional;

import org.springframework.context.annotation.Condition;
import org.springframework.context.annotation.ConditionContext;
import org.springframework.core.type.AnnotatedTypeMetadata;

public class YourCondition implements Condition{
    public boolean matches(ConditionContext context, AnnotatedTypeMetadata metadata) {
        return !context.getResourceLoader().getResource("classpath:test.properties").exists();
    }
}
package com.ch.ch4_1.conditional;

import org.springframework.context.annotation.Bean;
import org.springframework.context.annotation.Conditional;
import org.springframework.context.annotation.Configuration;

@Configuration
public class ConditionConfig {
    @Bean
    @Conditional(MyCondition.class)
    public MessagePrint myMessage() {
        return new MyMessagePrint();
    }

    @Bean
    @Conditional(YourCondition.class)
    public MessagePrint yourMessage() {
        return new YourMessagePrint();
    }
}
package com.ch.ch4_1.conditional;

import org.springframework.context.annotation.AnnotationConfigApplicationContext;

public class TestMain {
    private static AnnotationConfigApplicationContext context;

    public static void main(String[] args) {
        context = new AnnotationConfigApplicationContext(ConditionConfig.class);
        MessagePrint mp = context.getBean(MessagePrint.class);
        System.out.println(mp.showMessage());
    }
}
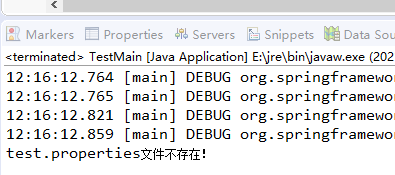
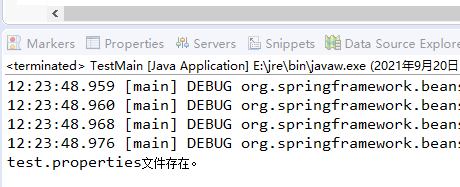
src/main/resources目录下存在test.properties文件时,运行测试类,结果;当Spring Boot应用ch4_1的src/main/resources目录下不存在test.properties文件时,运行测试类,结果。

