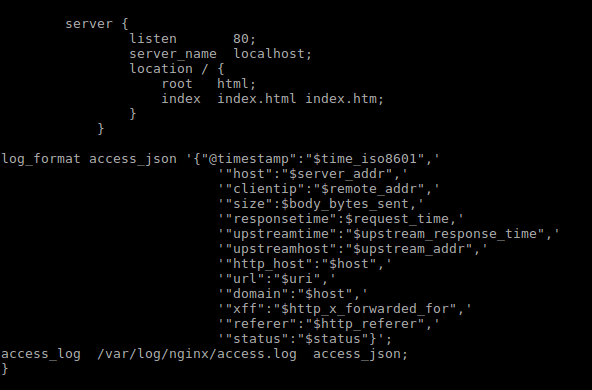
1.修改配置,在http{}中添加
log_format access_json '{"@timestamp":"$time_iso8601",'
                           '"host":"$server_addr",'
                           '"clientip":"$remote_addr",'
                           '"size":$body_bytes_sent,'
                           '"responsetime":$request_time,'
                           '"upstreamtime":"$upstream_response_time",'
                           '"upstreamhost":"$upstream_addr",'
                           '"http_host":"$host",'
                           '"url":"$uri",'
                           '"domain":"$host",'
                           '"xff":"$http_x_forwarded_for",'
                           '"referer":"$http_referer",'
                           '"status":"$status"}';
access_log  /var/log/nginx/access.log  access_json;
2.重启
systemctl restart nginx
或者
nginx -s reload
3.访问,输出日志
{"@timestamp":"2019-10-12T18:41:48+08:00","host":"127.0.0.1","clientip":"127.0.0.1","size":0,"responsetime":0.000,"upstreamtime":"-","upstreamhost":"-","http_host":"localhost","url":"/index.html","domain":"localhost","xff":"-","referer":"-","status":"304"}
日志中变量的含义
log_format access_json '{"ts":"$fmt_localtime",'
                           '"server_addr":"$server_addr",'
                           '"request":"$request",'
                           '"http_accept_language":"$http_accept_language",'
                           '"http_user_agent":"$http_user_agent",'
                           '"remote_addr":"$remote_addr",'
                           '"body_bytes_sent,":$body_bytes_sent,'
                           '"request_time,":$request_time,'
                           '"request_length":$request_length,'
                           '"http_host":"$http_host",'
                           '"url":"$uri",'
                           '"host":"$host",'
                           '"http_x_forwarded_for":"$http_x_forwarded_for",'
                           '"http_referer":"$http_referer",'
                           '"status":"$status"}';
比如
{
"ts":"2019-10-14 16:02:19",
"server_addr":"127.0.0.1",
"request":"GET /index.html HTTP/1.1",
"http_accept_language":"zh-CN,en-US;q=0.7,en;q=0.3",
"http_user_agent":"Mozilla/5.0 (X11; Ubuntu; Linux x86_64; rv:69.0) Gecko/20100101 Firefox/69.0",
"remote_addr":"127.0.0.1",
"body_bytes_sent,":0,
"request_time,":0.000,
"request_length":448,
"http_host":"localhost",
"url":"/index.html",
"host":"localhost",
"http_x_forwarded_for":"-",
"http_referer":"-",
"status":"304"
}
参考
https://www.iteye.com/blog/bit1129-2205848
参数含义
1.访问时间 ts
2.访问端口 server_addr
3.请求方式(GET或者POST等)request
4.用户浏览器语言。如:上例中的 "es-ES,es;q=0.8" http_accept_language
5.用户浏览器其他信息,浏览器版本、浏览器类型等 http_user_agent
6.客户端(用户)IP地址 remote_addr
7.发送给客户端的文件主体内容的大小 body_bytes_sent
8.整个请求的总时间 request_time
9.请求的长度(包括请求行,请求头和请求正文)request_length
10.请求的url地址(目标url地址)的host http_host
11.请求url地址(去除host部分) uri
12.host 与 http_host的区别在于当使用非80/443端口的时候,http_host = host:port host
13.客户端的真实ip,通常web服务器放在反向代理的后面,这样就不能获取到客户的IP地址了,通 过$remote_add拿到的IP地址是反向代理服务器的iP地址。反向代理服务器在转发请求的http头信息中,可以增加 x_forwarded_for信息,用以记录原有客户端的IP地址和原来客户端的请求的服务器地址 http_x_forwarded_for
14.记录从哪个页面链接访问过来的(请求头Referer的内容)http_referer
15.请求状态(状态码,200表示成功) status