gitlab与jenkins的自动化部署(通过webhook与ansilble)
1、部署介绍
gitlab服务器:192.168.1.49:80
jenkins服务器:192.168.1.49:8180
ps:由于两个服务运行在同一台服务器上面,因此,为了保证jenkins服务器能拉取到 gitlab的代码,把root的用户的公钥分别上传到gitlab admin用户跟jenkins admin用户当中去。jenkins我没有使用默认的端口8080,主要是我公司的gerrit架构会用到这个8080端口,所以为了防止冲突,改为8180端口
2、gitlab安装
a) 第一步:安装相应的在依赖包(postfix或者sendmail),其中选择internet site这种网络smtp邮件服务器这种方式来发送邮件,其他一些依赖包:curl openssh-server ca-certificates postfix
If you install Postfix to send email please select 'Internet Site' during setup. Instead of using Postfix you can also use Sendmail or configure a custom SMTP server . If you wish to use Exim, please configure it as an SMTP server.
On Centos 6 and 7, the commands below will also open HTTP and SSH access in the system firewall.
操作命令:
sudo apt-get install curl openssh-server ca-certificates postfix
b) 第二步:Add the GitLab package server and install the package. 下载gitlab安装包,并且安装
方法1、增加yum源链接,使用sduo apt-get install gitlab-ee
Apt-get安装Curl https://packages.gitlab.com/install/repositories/gitlab/gitlab-ee/script.deb.sh|sudo bash
操作命令:
sudo apt-get install gitlab-ce
If you are not comfortable installing the repository through a piped script, you can find the entire script here .
Alternatively you can select and download the package manually and install using
方法2、deb包安装下载deb包,然后安装
下载: sudo wget https://packages.gitlab.com/gitlab/gitlab-ee
安装: sudo dpkg -i gitlab-ce_8.1.2-ee.0_amd64.deb
建议一般下载后再装
c)第三步,启用配置,并且启动 GitLab
操作命令:
sudo gitlab-ctl reconfigure
d) 第四步:打开网页,进行注册,使用默认密码
http://192.168.0.177:80
Username: rootPassword: 5iveL!fe
e) 第五步:2.1.6. Upload your license(EE版本需要认证,CE) 这步我操作的时候是没有的
Go toAdmin > Licenseand upload your.gitlab-licensefile.
Don't have a license yet? Get a subscription.
其实只要下载到gitlab ce包(ce是社区版,不用验证的),直接安装就行了,启动命令为gitlab-ctl reconfigure
3、jenkins安装
a) Install Jenkins
wget -q -O - https://jenkins-ci.org/debian/jenkins-ci.org.key | sudo apt-key add -
sudo sh -c 'echo deb http://pkg.jenkins-ci.org/debian binary/ > /etc/apt/sources.list.d/jenkins.list'
sudo apt-get update
sudo apt-get install jenkins
b) Starting Jenkins
nohup java -Dorg.jenkinsci.plugins.gitclient.Git.timeOut=60 -Dfile.encoding=UTF-8 -Dhudson.DNSMultiCast.disabled=true -jar /usr/share/jenkins/jenkins.war --httpPort=8180 > /var/log/jenkins_log 2>&1 &
(注意--httpPort=8180放在后面)
c) 开启 jenkins页面为:192.168.0.179:8180
http://xxxxx:8180/
d) 插件安装
Git Plugin
SSH Plugin
URL Trigger Plugin
Gerrit Trigger Plugin
Gitlab Hook
Gitlab Merge Request Builder
GitLab Plugin
e) 注册用户
先开启用户注册按钮,用户注册完毕以后,关闭用户注册
4、配置jenkins拉取gitlab项目的账号的sshkey
由于两个服务运行在同一台服务器上面,因此,为了保证jenkins服务器能拉取到 gitlab的代码,把root的用户的公钥分别上传到gitlab admin用户跟jenkins admin用户当中去。步骤我就不写了!
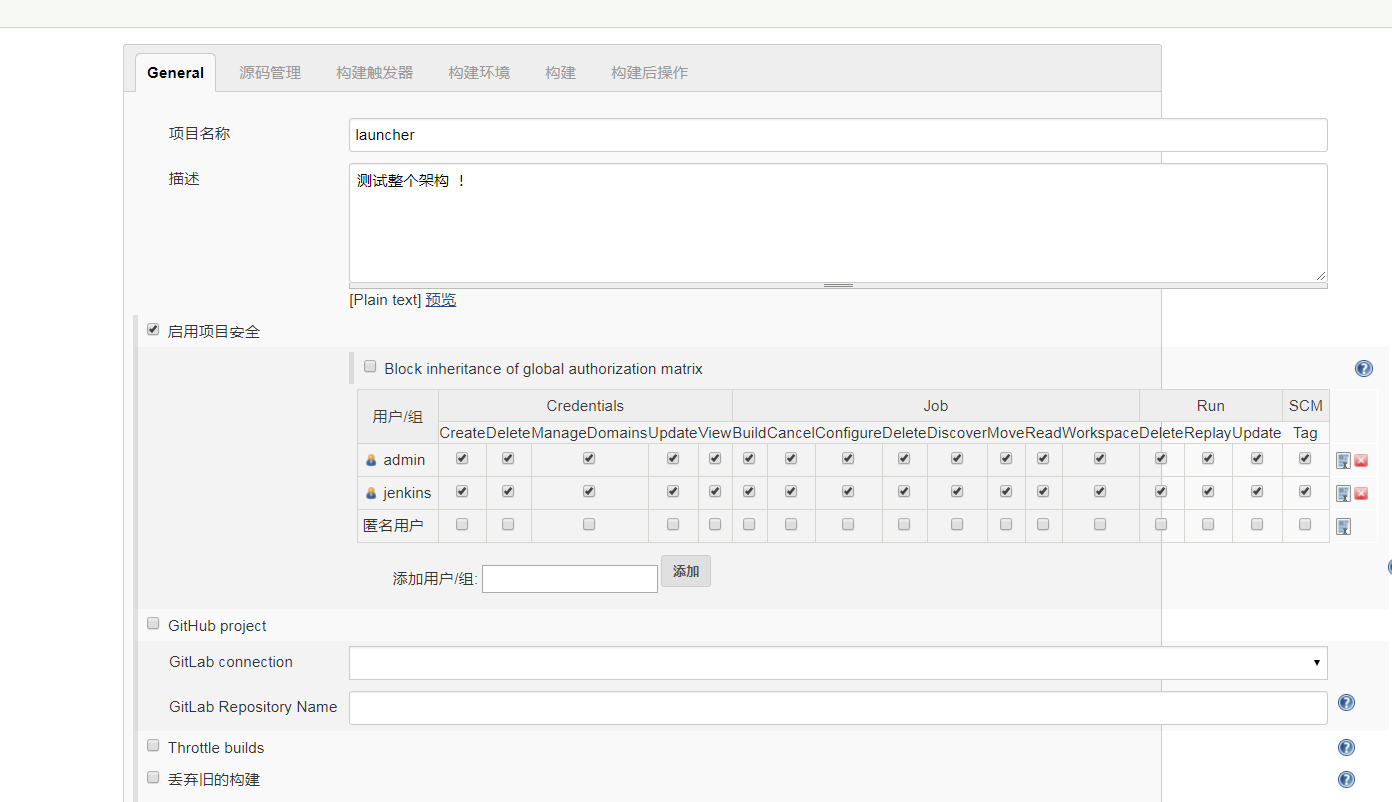
5、配置jenkins项目
1、登录192.168.1.49:8180
点击新建:

依次填写相关信息:(注意,项目安全这块是在日常管理中才会用到,如果简单测试可以忽略)
源码管理: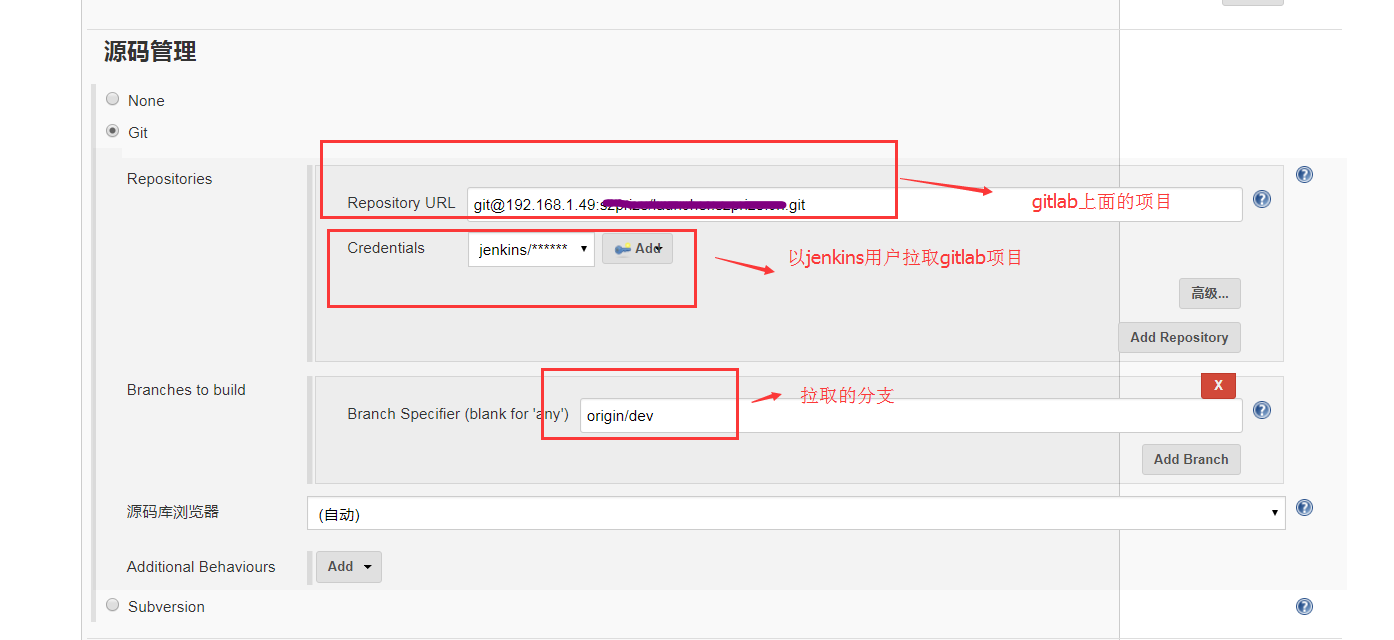
触发器:
我这里选择得比较多,有push触发,也有merge触发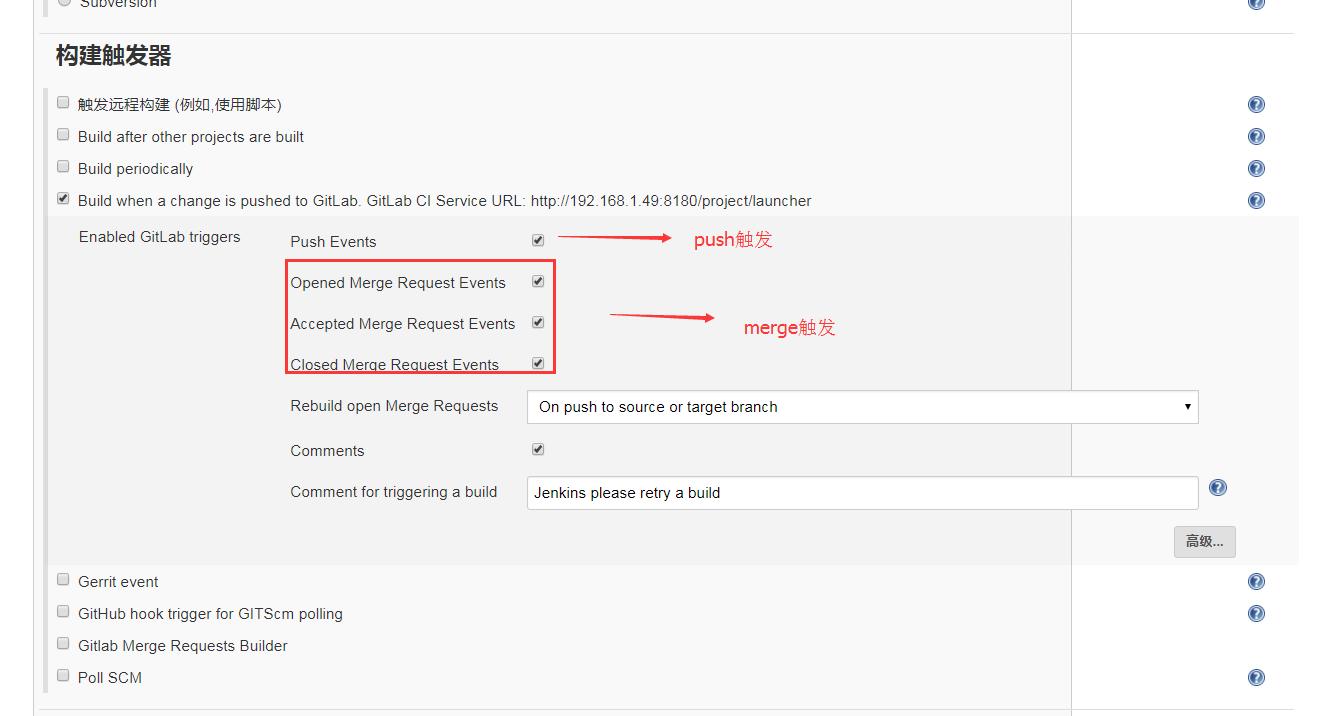
构建:(通过shell来构建)
我这里是通过简单的ansible来控制web服务器的压缩包scp,tar解压,还有指定软联接
#变量WORKSPACE、GIT_URL是jenkins默认内置的变量
#!/bin/bash

#变量WORKSPACE,GIT_URL是jenkins默认提供的变量
cd $WORKSPACE

#截取giturl中的产品
product=`echo $GIT_URL| awk -F"/" '{print $NF}'|sed 's/.git//g'`

#截取代码当前的前七位sha值
sha=`cat .git/HEAD|cut -b 1-7`

#指定日期
d=`date +"%Y%m%d"`

#指定压缩包的路径与包全称,包名(不带后缀)
p_pathname=/tmp/"$product"_"$d"_"$sha".tar.gz
p_name="$product"_"$d"_"$sha".tar.gz
p_productname="$product"_"$d"_"$sha"

#本地压缩
tar -cf $p_pathname  $WORKSPACE/*

#指定web服务器的包的存放位置
p_store=/var/prod/"$product"/"$d"

#指定web服务器的包解压位置
p_target=$p_store/$p_productname

#指定nginx网页代码位置
www=/mnt/www/launcher.szprize.cn

#dev代表web服务器,确保包解压路径存在
ansible dev  -m shell -a "mkdir -p $p_target "
#dev代表web服务器,ansible copy模块远程复制
ansible dev -m copy -a "src=$p_pathname dest=$p_store/"
#ansible 远程解压
ansible dev -m shell -a "tar -xf $p_store/$p_name -C $p_target"
#ansible 软联接
ansible dev -m file -a "src=$p_target dest=$www state=link"#!/bin/bash
jenkins这边就配置完了
但是注意:jenkins跟gitlab怎么通信触发呢?
大家请留意触发器那块有一句话:
Build when a change is pushed to GitLab. GitLab CI Service URL: http://192.168.1.49:8180/project/launcher
它的意思的,gitlab ci接口可以通过http://192.168.1.49:8180/project/launcher来连接两者的有关系。
6、gitlab设置webhook
在对应的gitlab项目设置当中,设置webhooks
当然,这里也可以设置triger事件: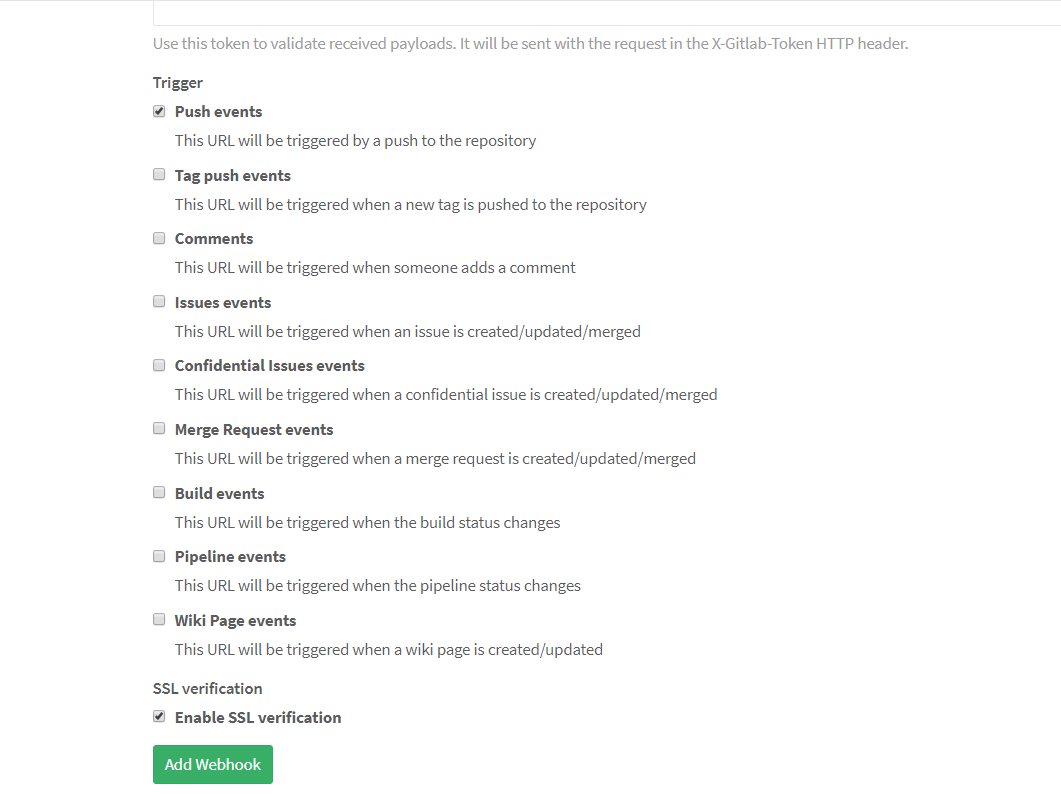
保存后会在底部,生成webhook,点击test,看jenkins界面是否触发了!

登录jenkins界面:192.168.1.49:8180
然后大功告成!